How to Caramelize Onions
This post may contain affiliate links. Please read our disclosure policy.
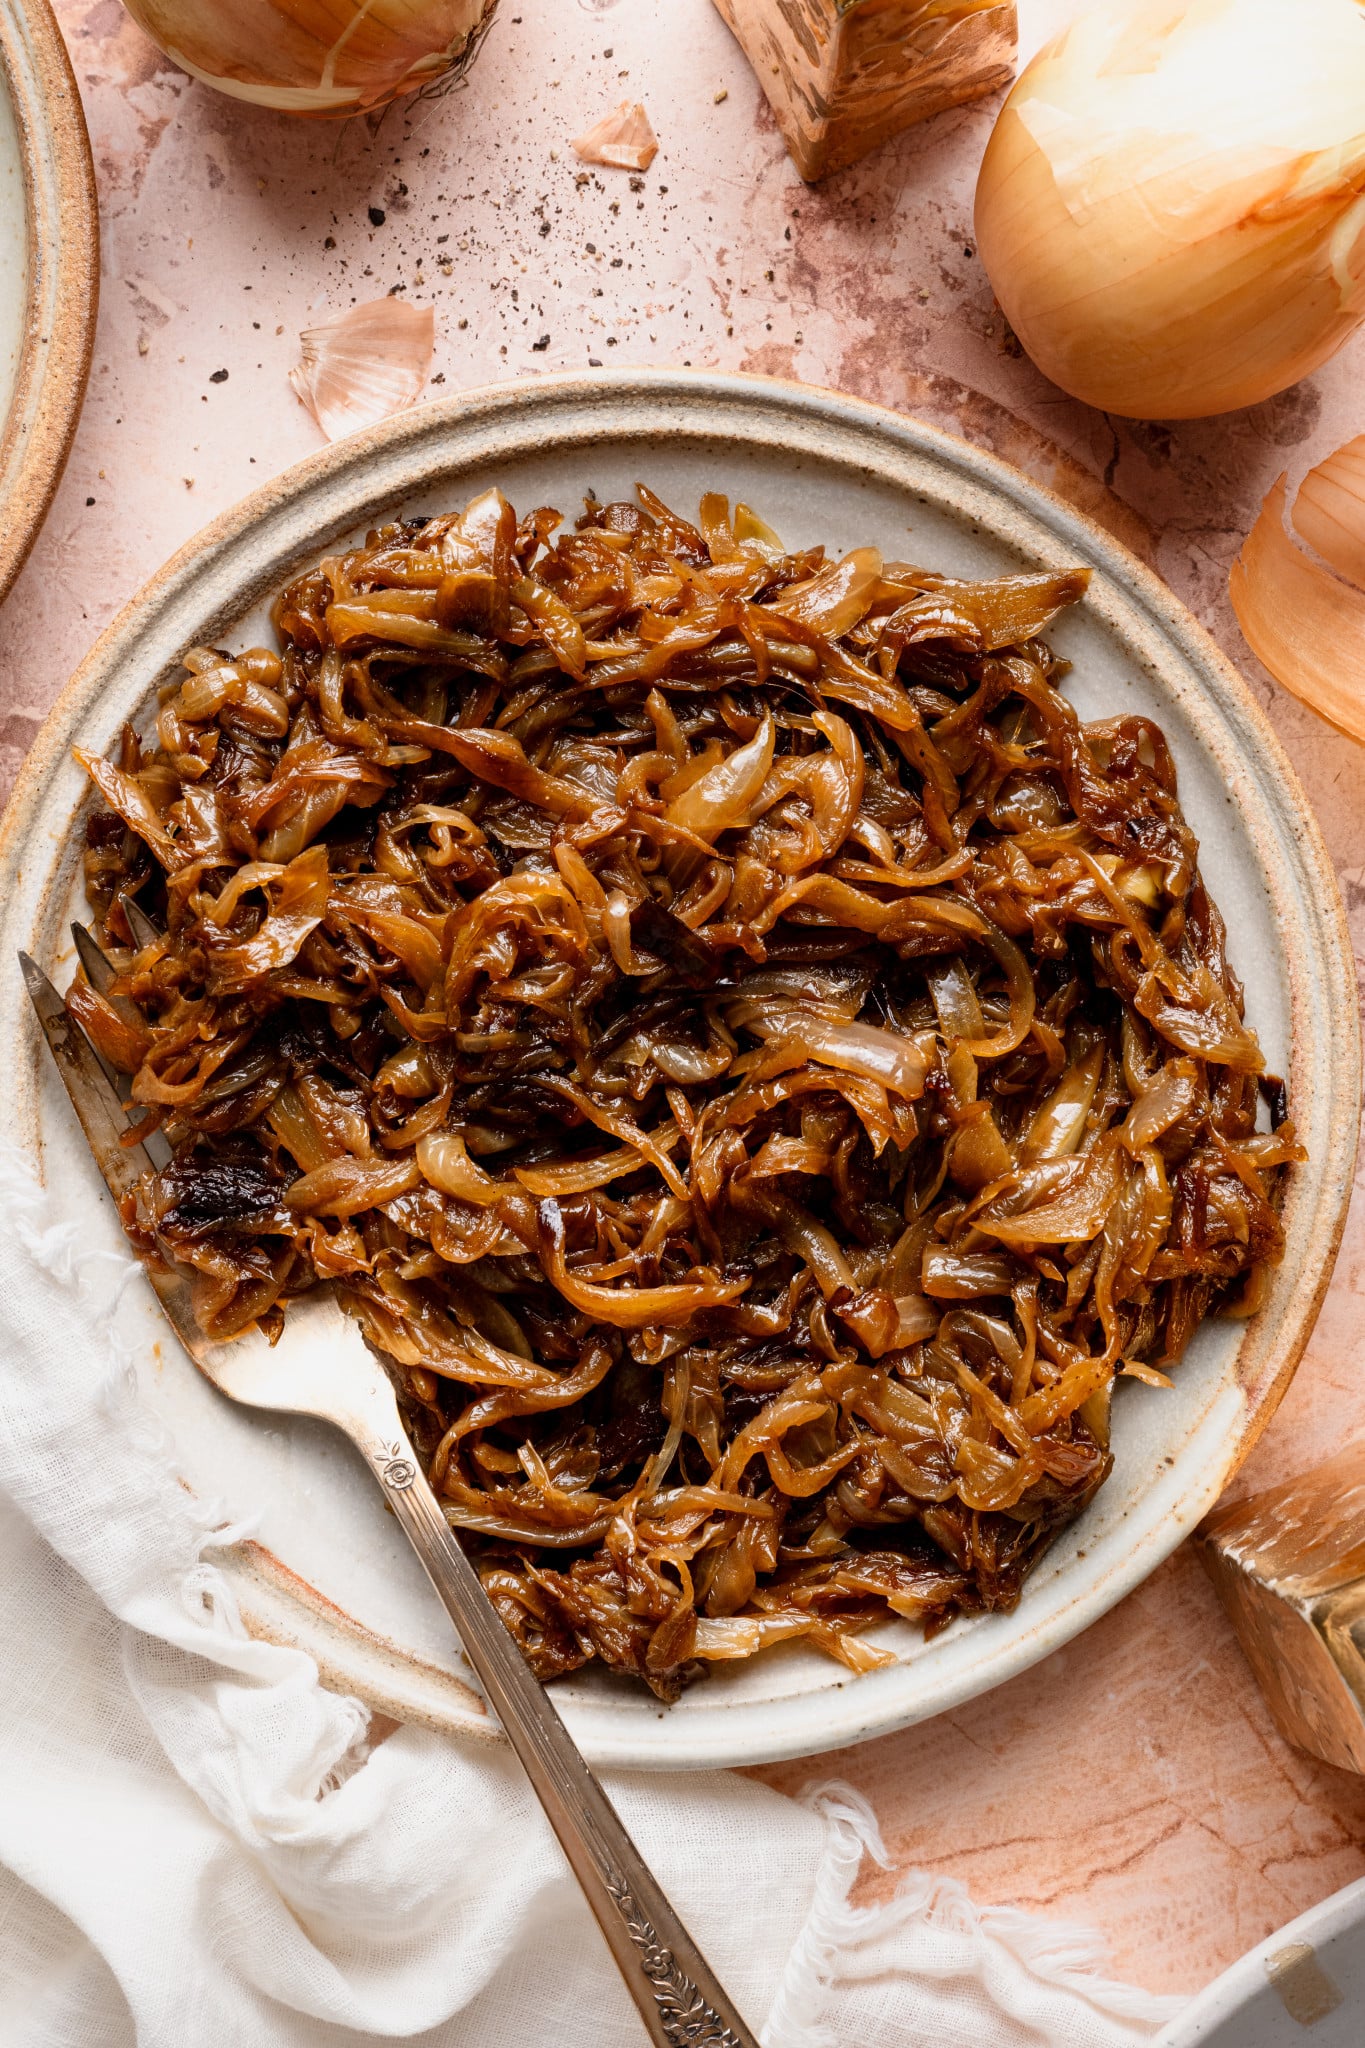
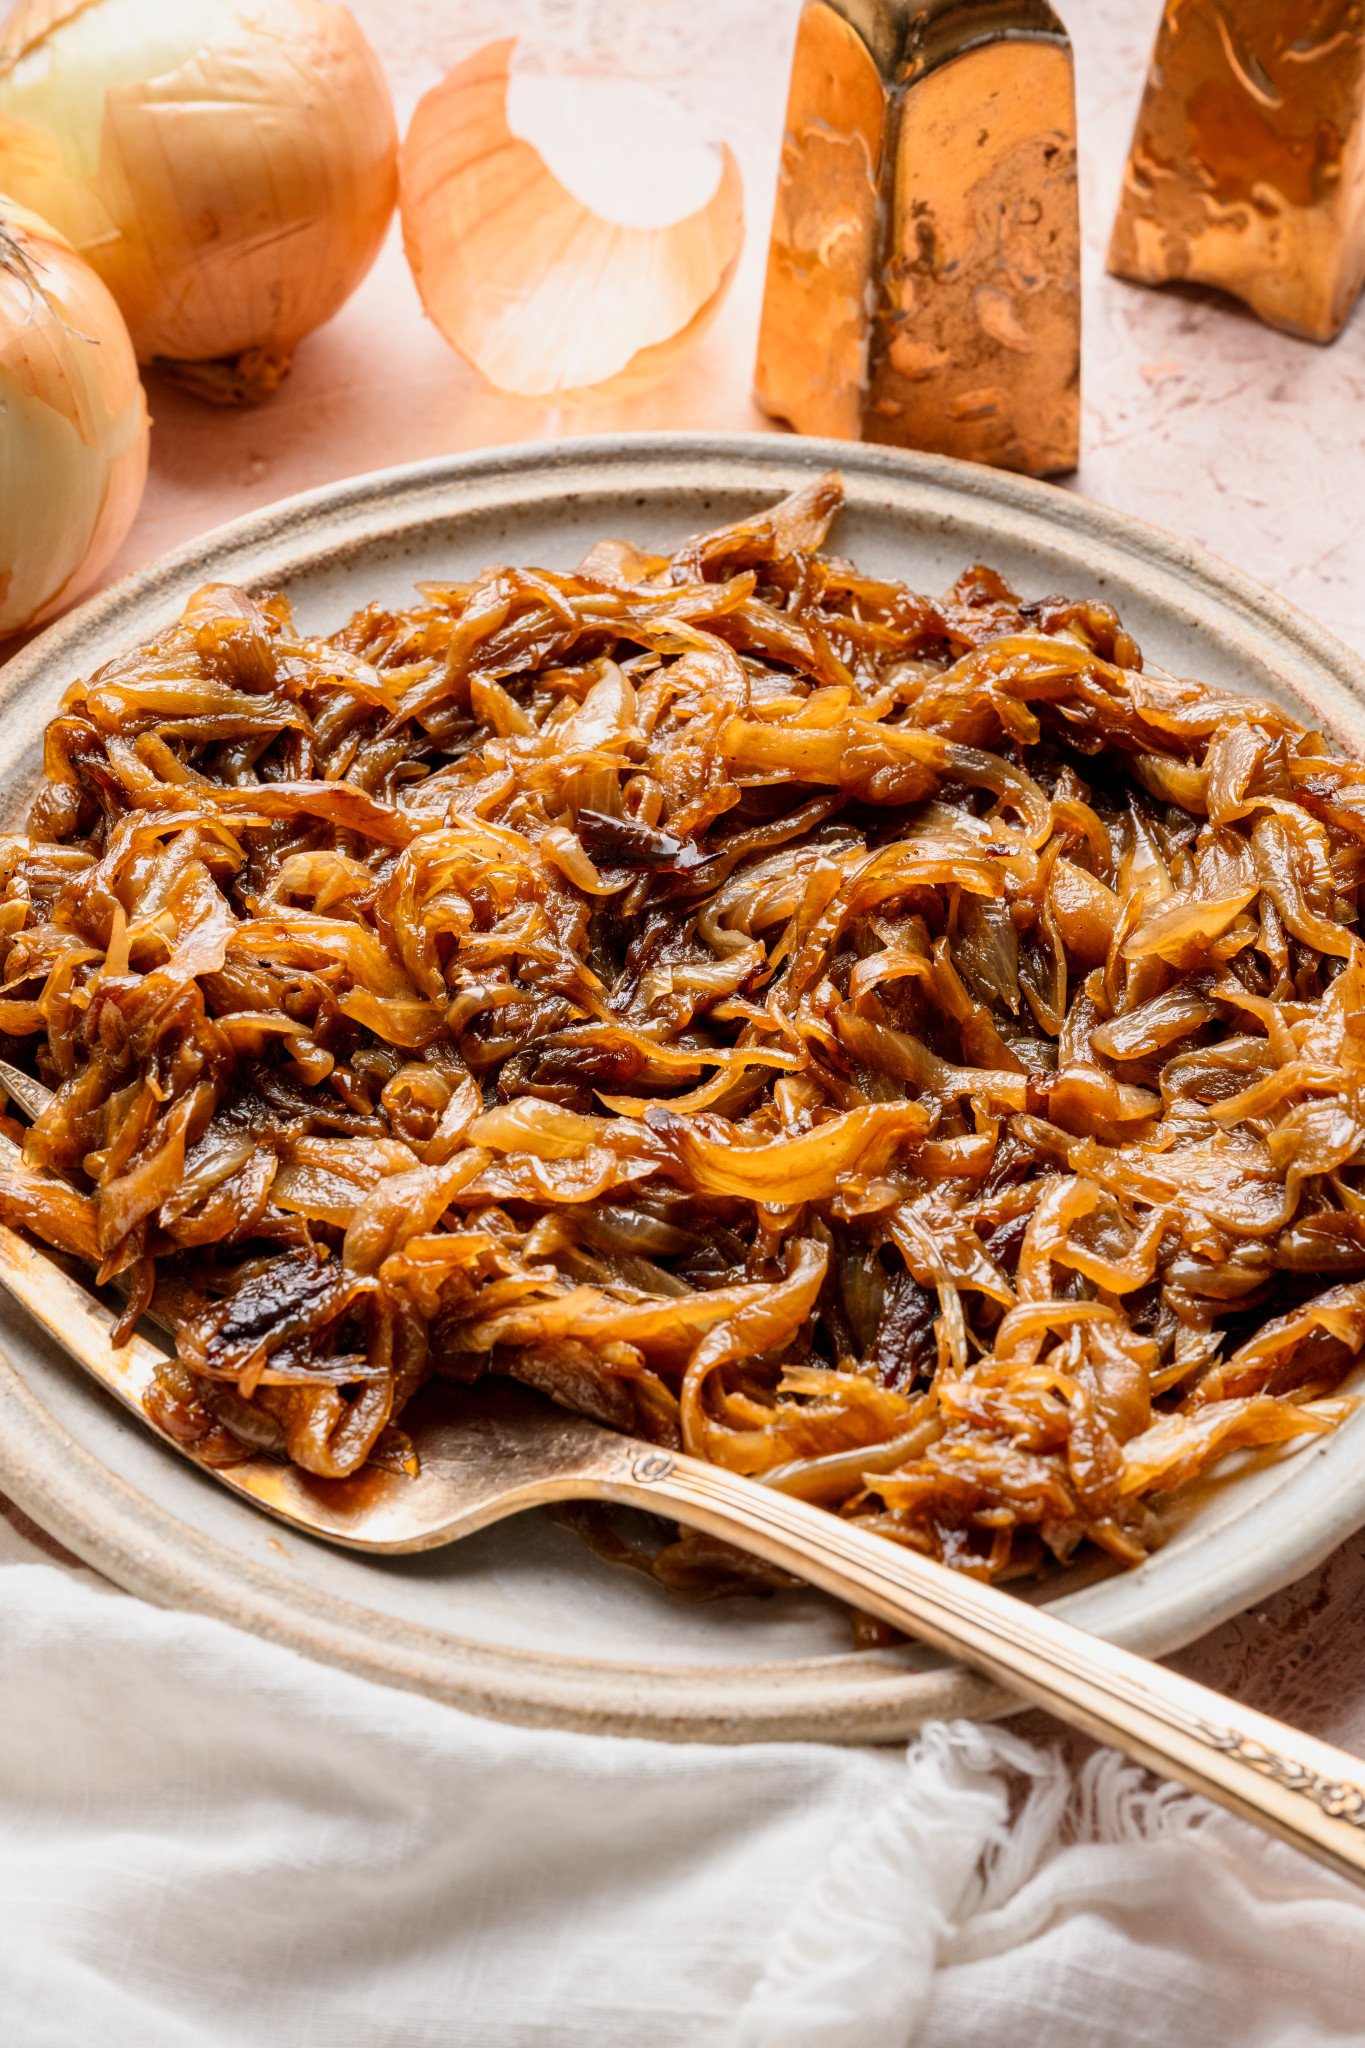
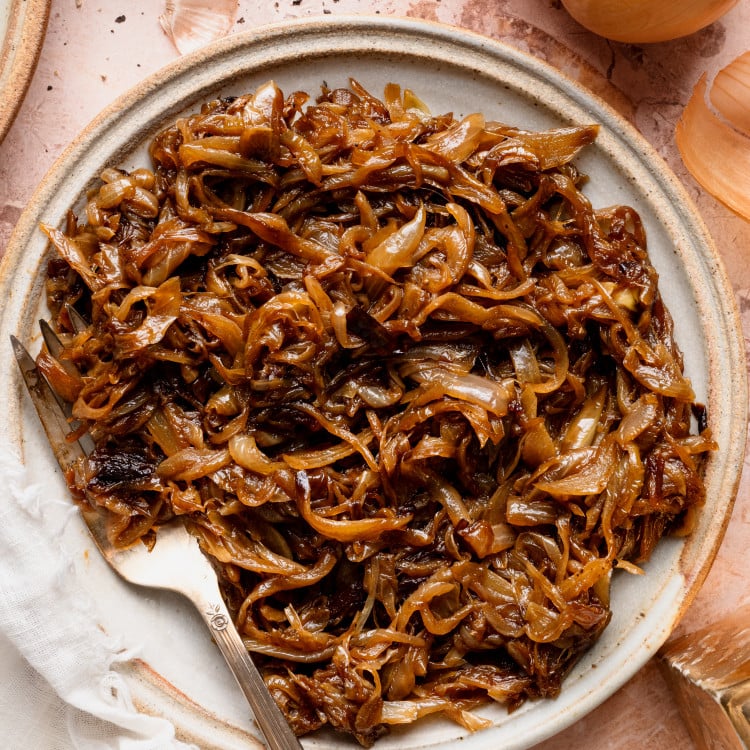
If you’ve never made truly caramelized onions from scratch, this step-by-step guide is for you! With just a few pantry staples and a little patience, yellow onions slowly cook down into golden, jammy perfection.
Learning how to caramelize onions is one of those foundational kitchen skills that instantly level up any meal. Add them to burgers, rice bowls, sandwiches, scrambled eggs, pizzas, you name it. Once you have a batch in your fridge, you can just about make any meal feel fancier with almost no extra effort.
And the best part? It’s incredibly simple. All you need is low heat, steady stirring, and a little time.
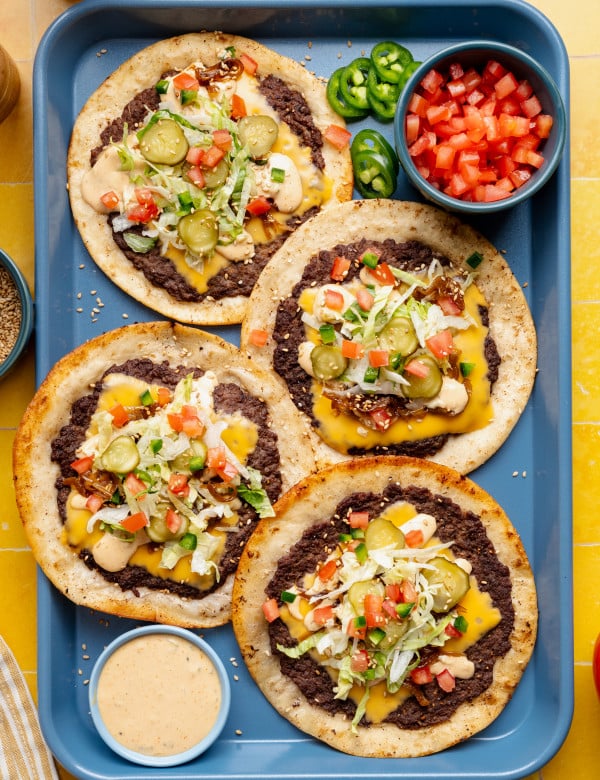
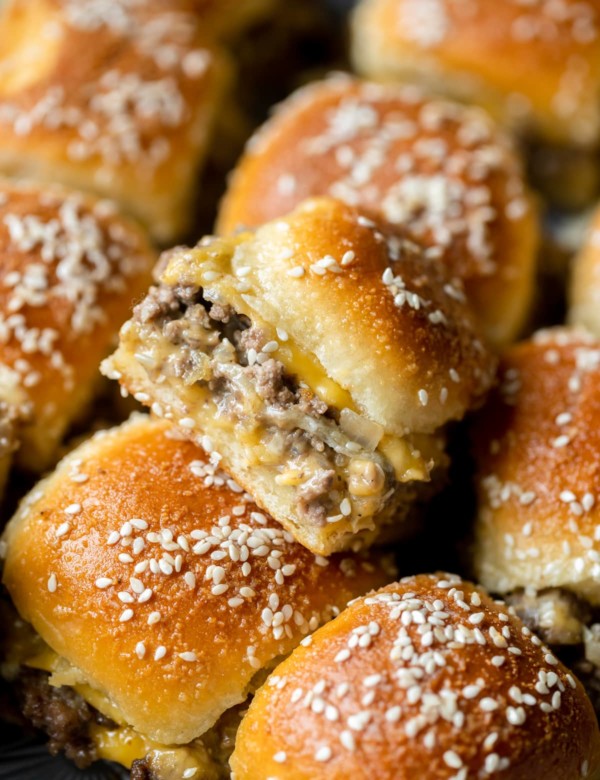
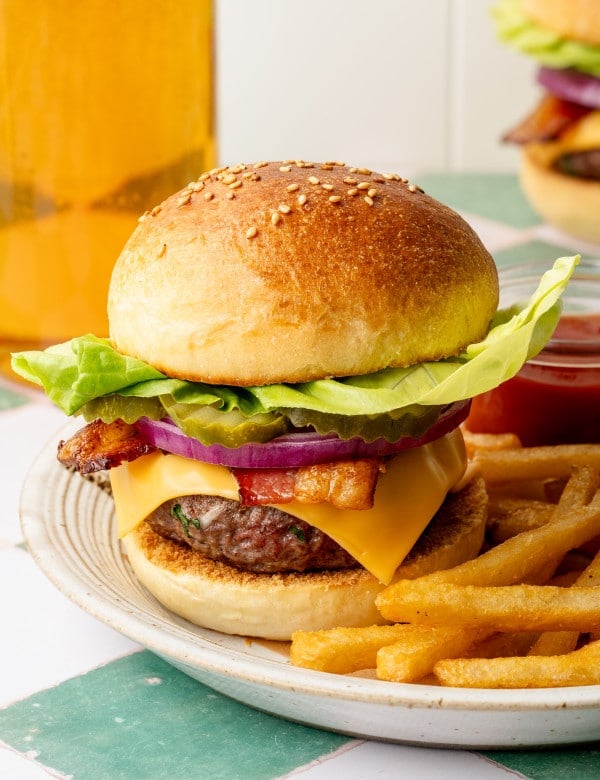
Some of my favorite recipes to add these caramelized onions to are my Cheeseburger Tacos, Homemade Burgers, Garlic Bread Pizza, Philly Cheesesteak Sliders, or Chipotle Chicken Quesadillas, but honestly, you really can’t go wrong adding them to just about anything!😉
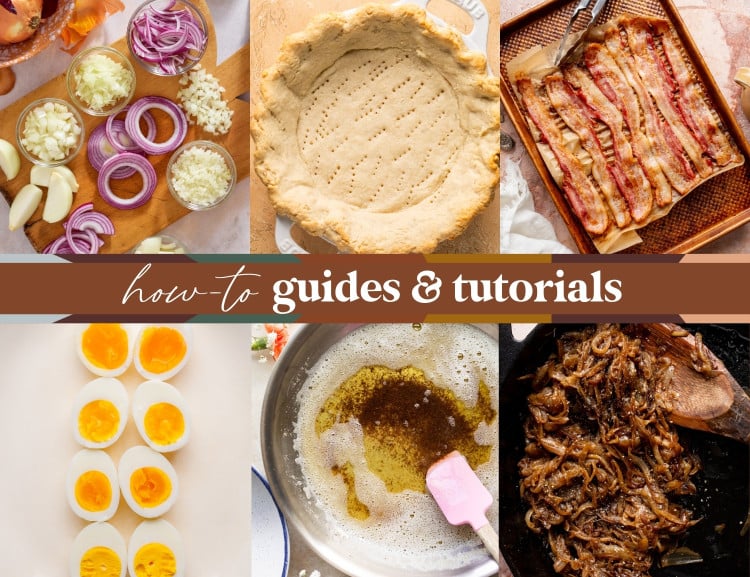
How-To Guides & Tutorials
Master essential kitchen skills with these helpful how-to guides featuring step-by-step posts for everyday cooking basics like boiling eggs, cutting onions, caramelizing onions, and more. Perfect for beginner cooks or anyone looking to build confidence in the kitchen.

 Table Talk with Tawnie

Caramelized onions are pure magic if you ask me😍 Savory, sweet, umami, rich, aromatic goodness all from a humble onion. Caramelizing onions to me is therapeutic, which sounds funny I know! The process forces you to slow down (you literally can’t speed up the process), the slow stirring, scraping of the pan every few minutes, slows the brain down, and the repetitive process is like meditative cooking. Maybe you think I’m coo-coo, or maybe you agree with me 😂 but either way, I hope this how-to post helps you enjoy the magic of caramelized onions!
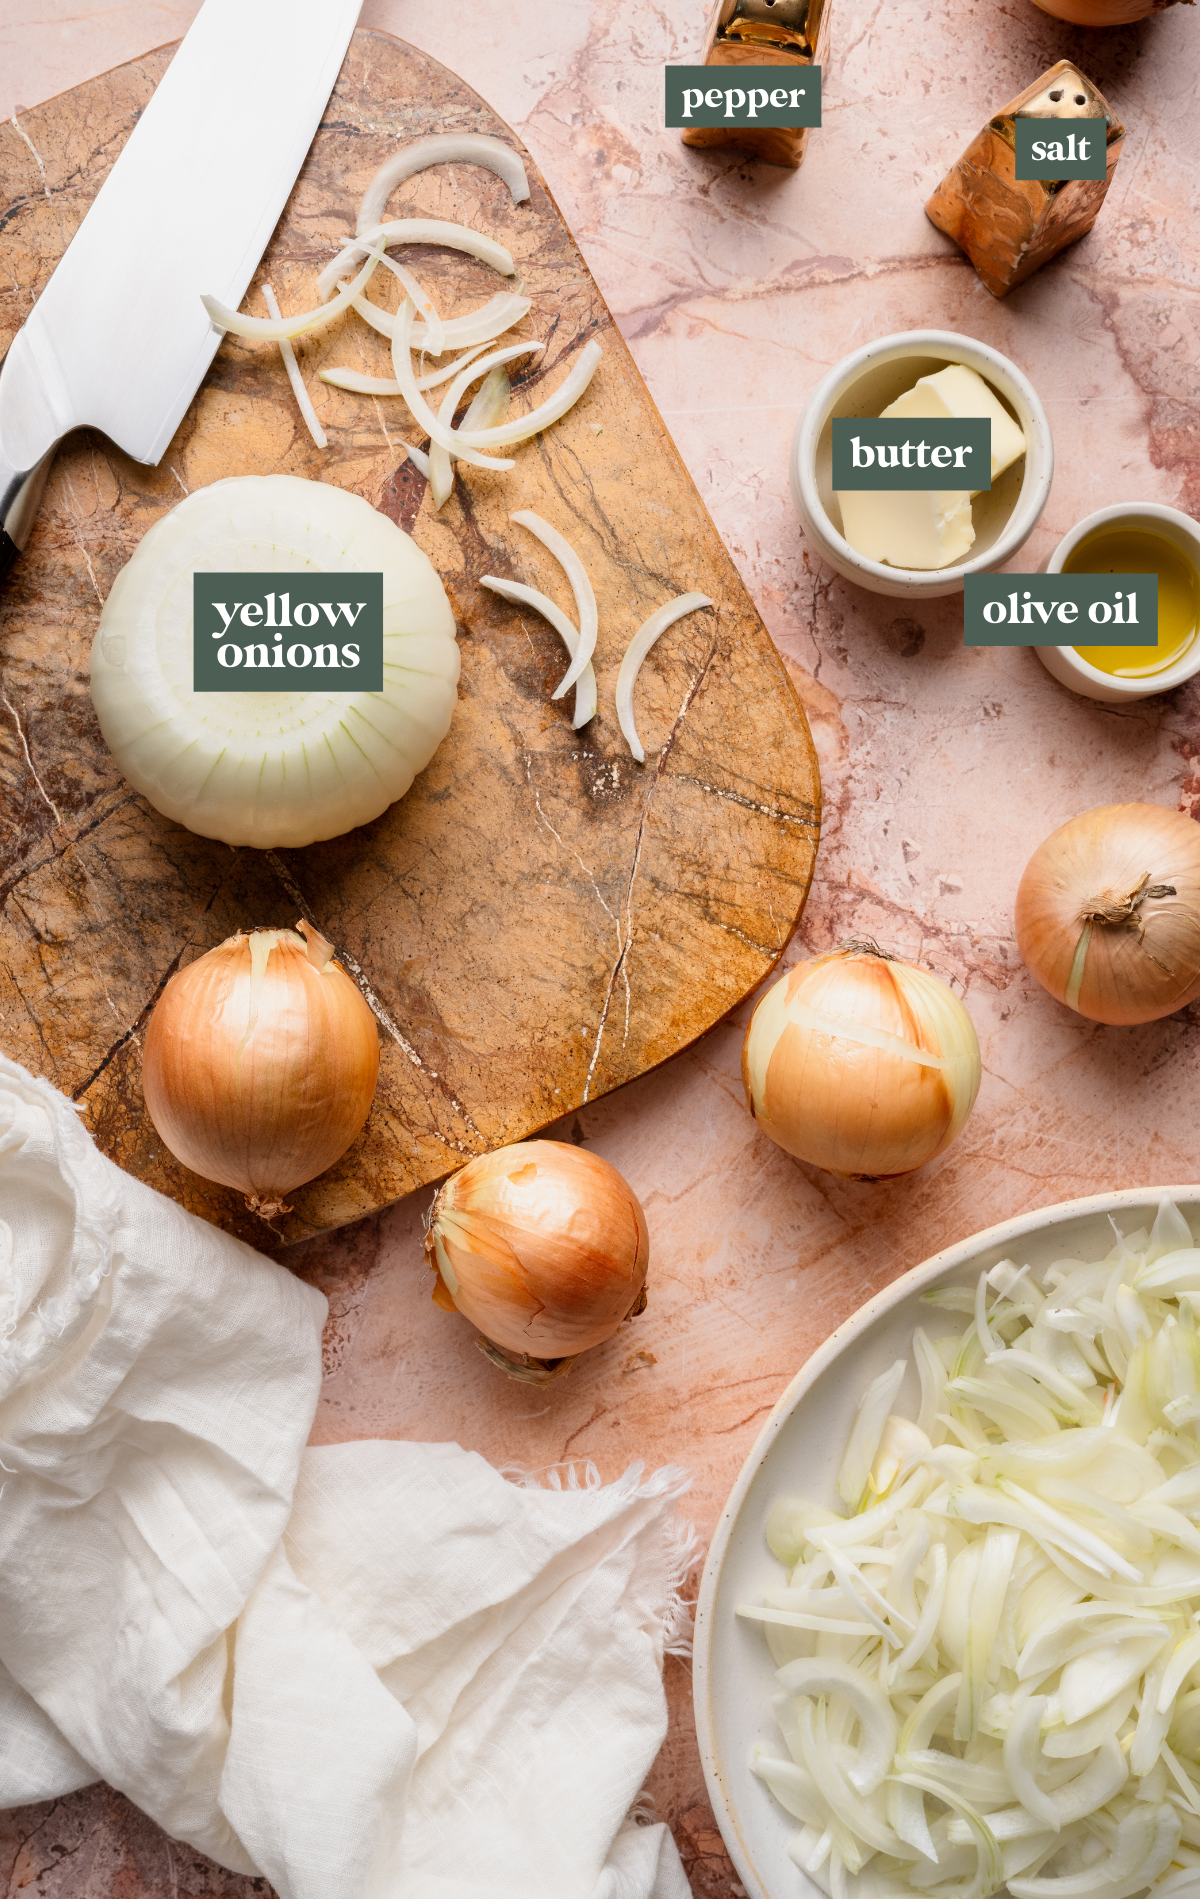
- Yellow onions: You’ll need 4–6 large yellow onions. Yellow onions are ideal for caramelizing because they have the perfect balance of sweetness and savory depth, and they break down beautifully as they cook. Feel free to use more if you’d like to make a bigger batch, just add a little extra olive oil to the pan so they soften evenly.
- Unsalted butter and olive oil: This combo gives you the best of both worlds. The olive oil helps prevent burning and keeps the onions silky as they cook low and slow, while the butter adds rich, slightly sweet flavor that makes the finished onions taste extra luxurious.
- Kosher salt and black pepper: Season the onions at the end based on your preference!
- Water for deglazing: A splash of water helps lift all those golden, flavorful bits (the fond) from the bottom of the pan as the onions cook. This keeps them from sticking or burning and builds even more deep, caramelized flavor into every bite.
Step by Step Directions
(For the full recipe, scroll down to the recipe card below)
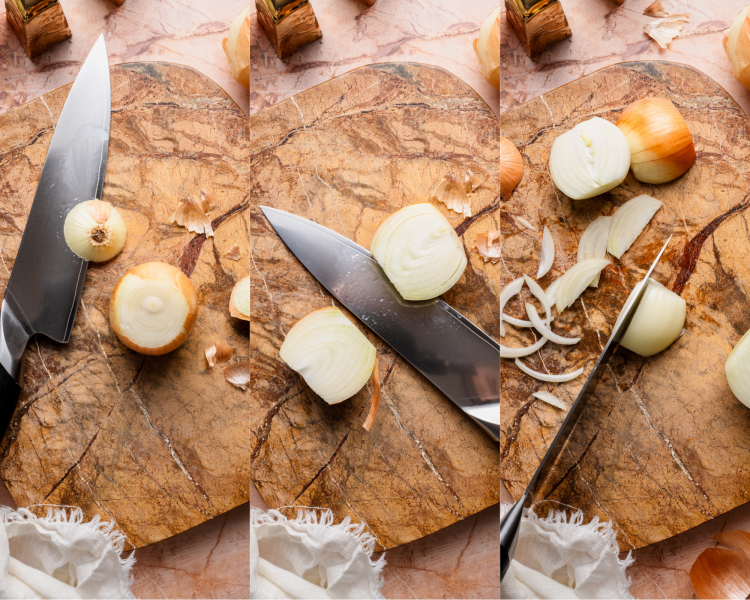
Slice the onions
Start by cutting the roots and tops off of the onions, then cut them in half. Peel the onion, then slice “with the grain”, making julienne slices about 1/4-1/8-inch thick. Use this guide for how to cut an onion.
Add to the pan
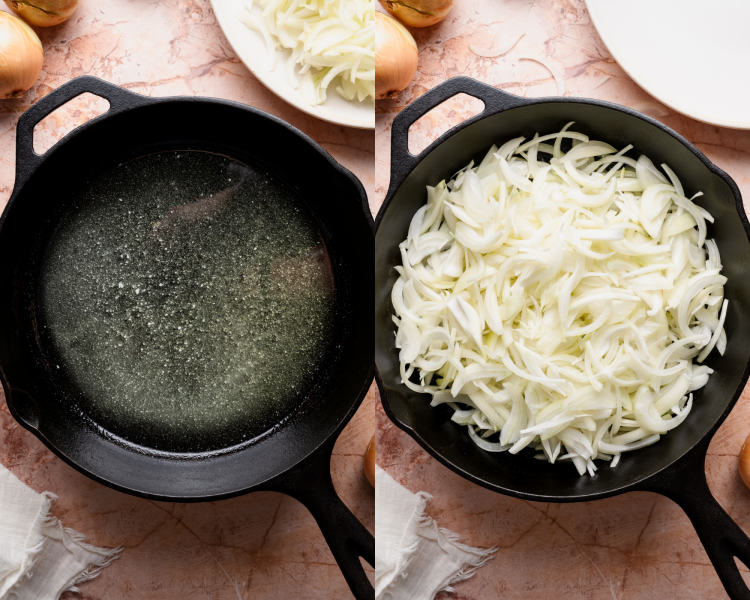
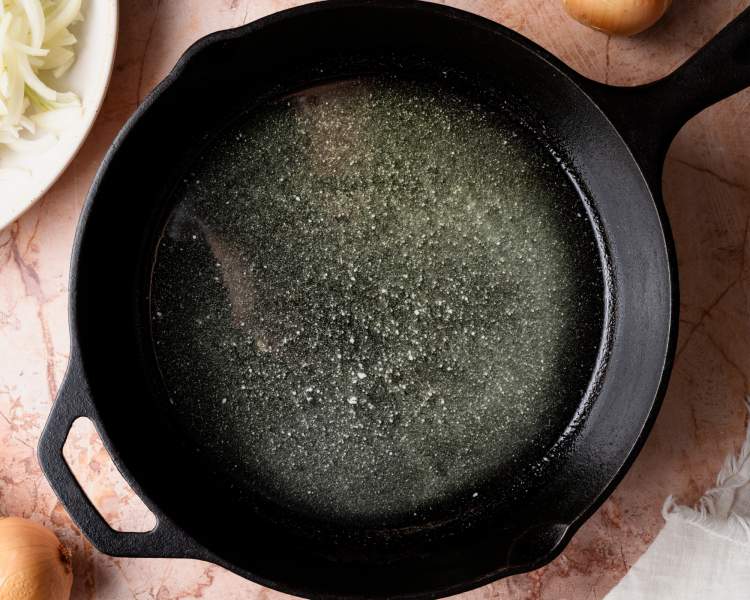
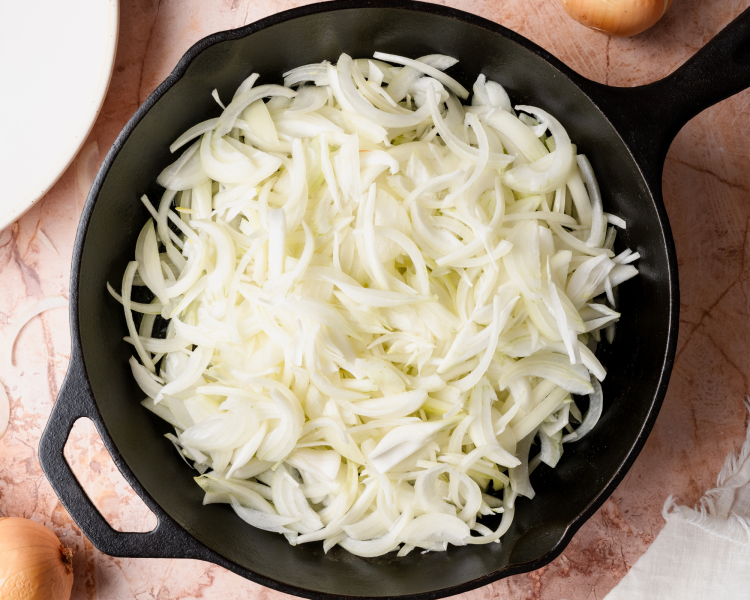
Next, heat a large cast-iron skillet (NOT non-stick) over medium-high heat. Add the butter and oil, and allow the butter to melt. Then add the onions.
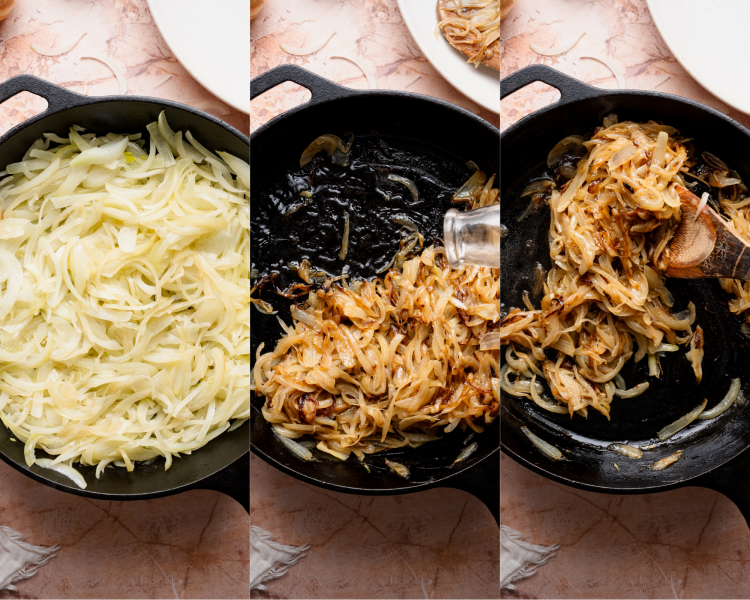
Cook
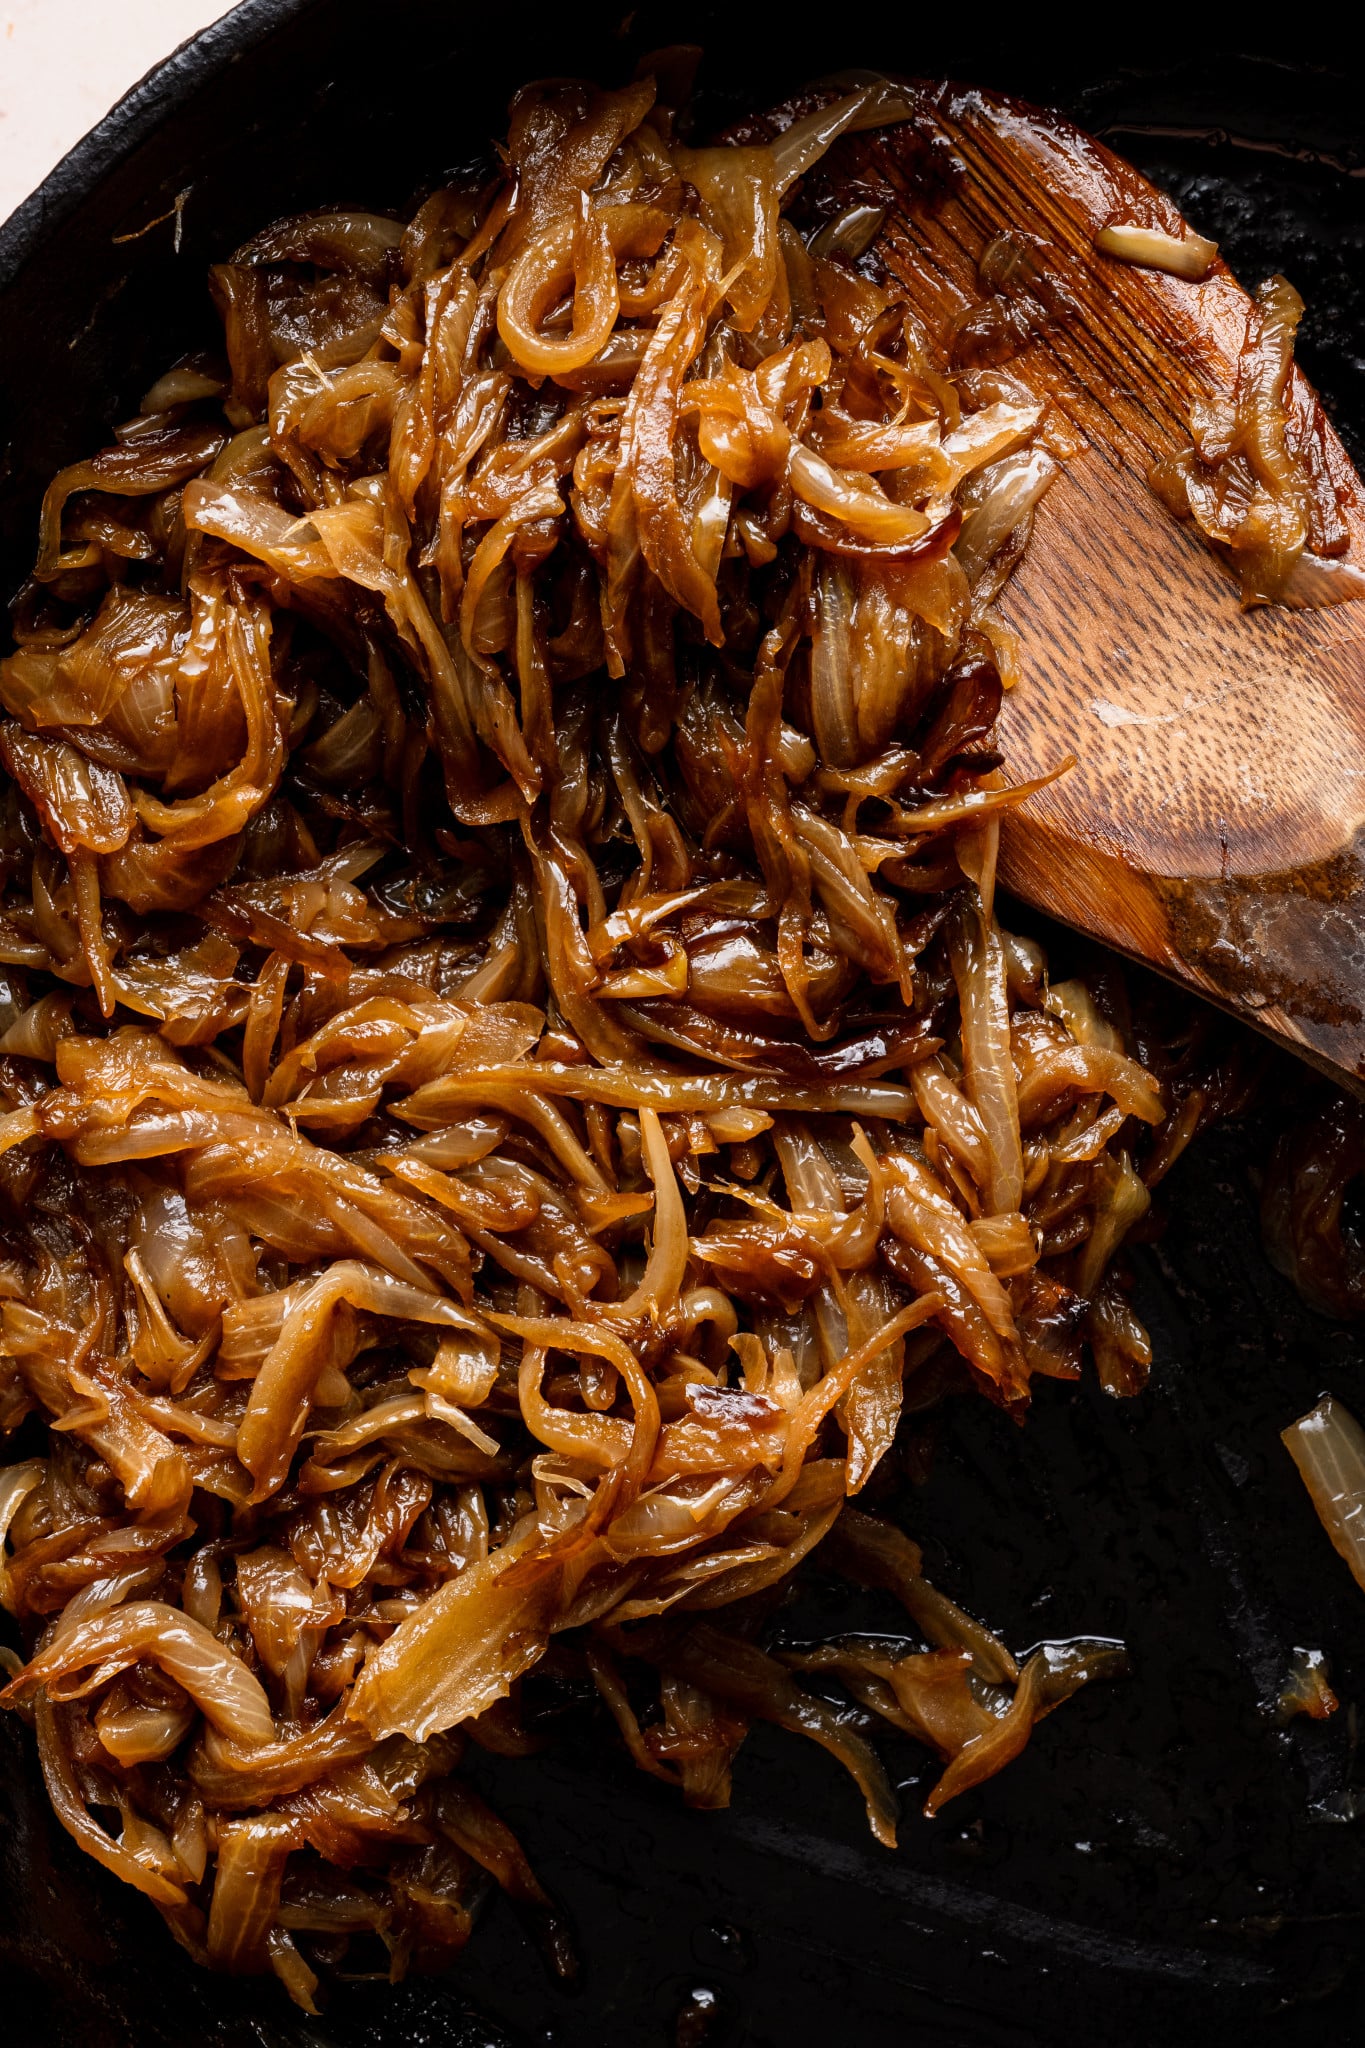
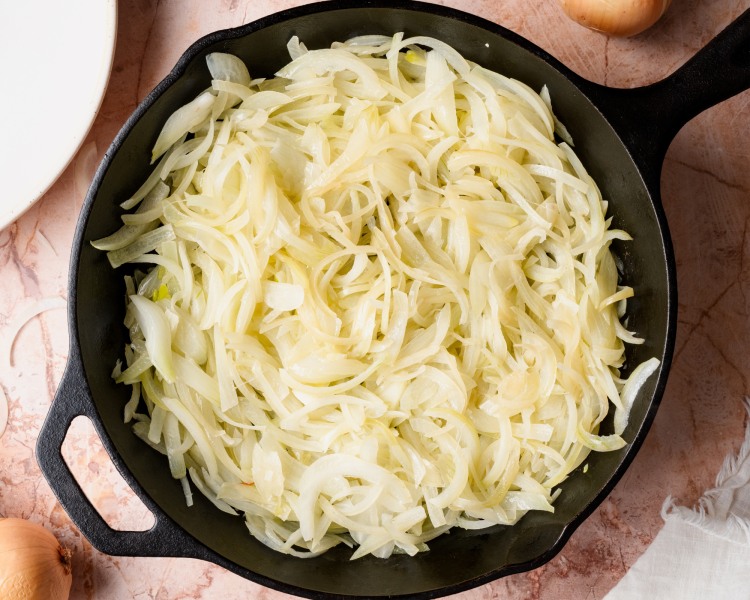
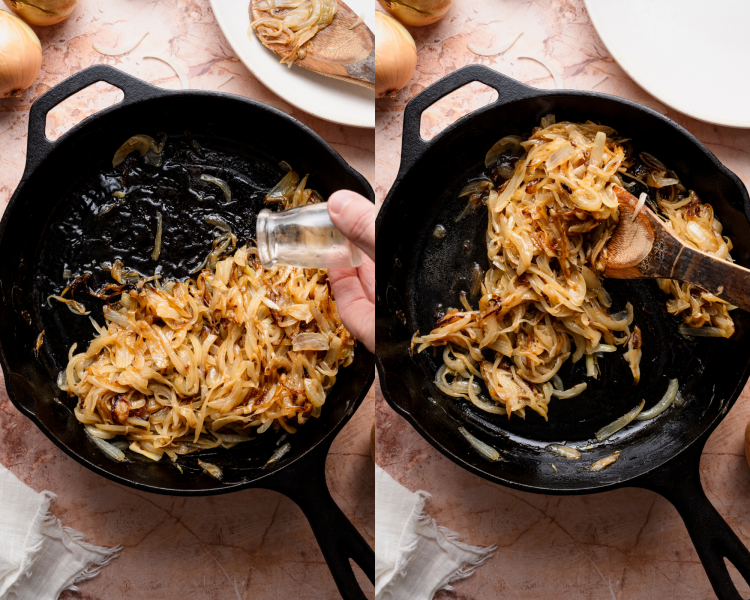
Cook on high for about 8-10 minutes until onions soften a bit. The onions will become soft and glossy but not browned in this step. Turn the heat to medium-low and continue to stir every 3 minutes or so for the next 30 minutes. You’ll most likely begin to see brown bits on the bottom of your pan now. Add a small splash of water and scrape it back into the onions for delicious flavor.
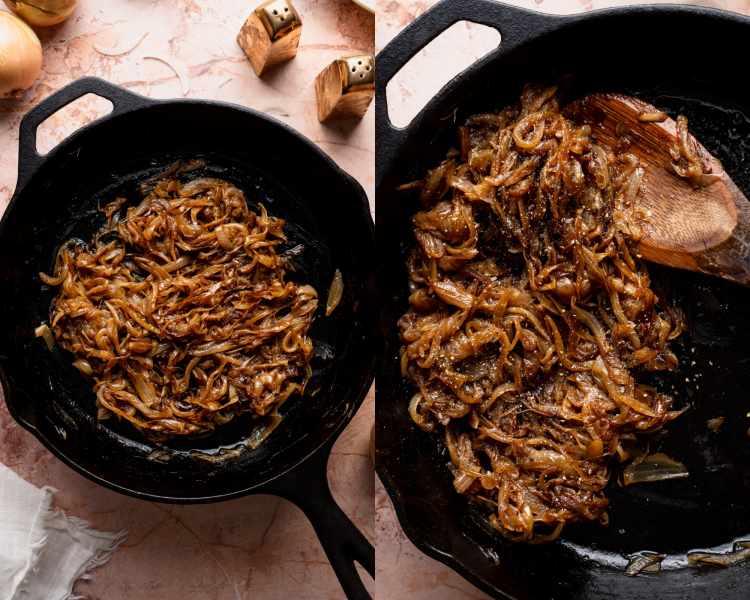
Keep cooking
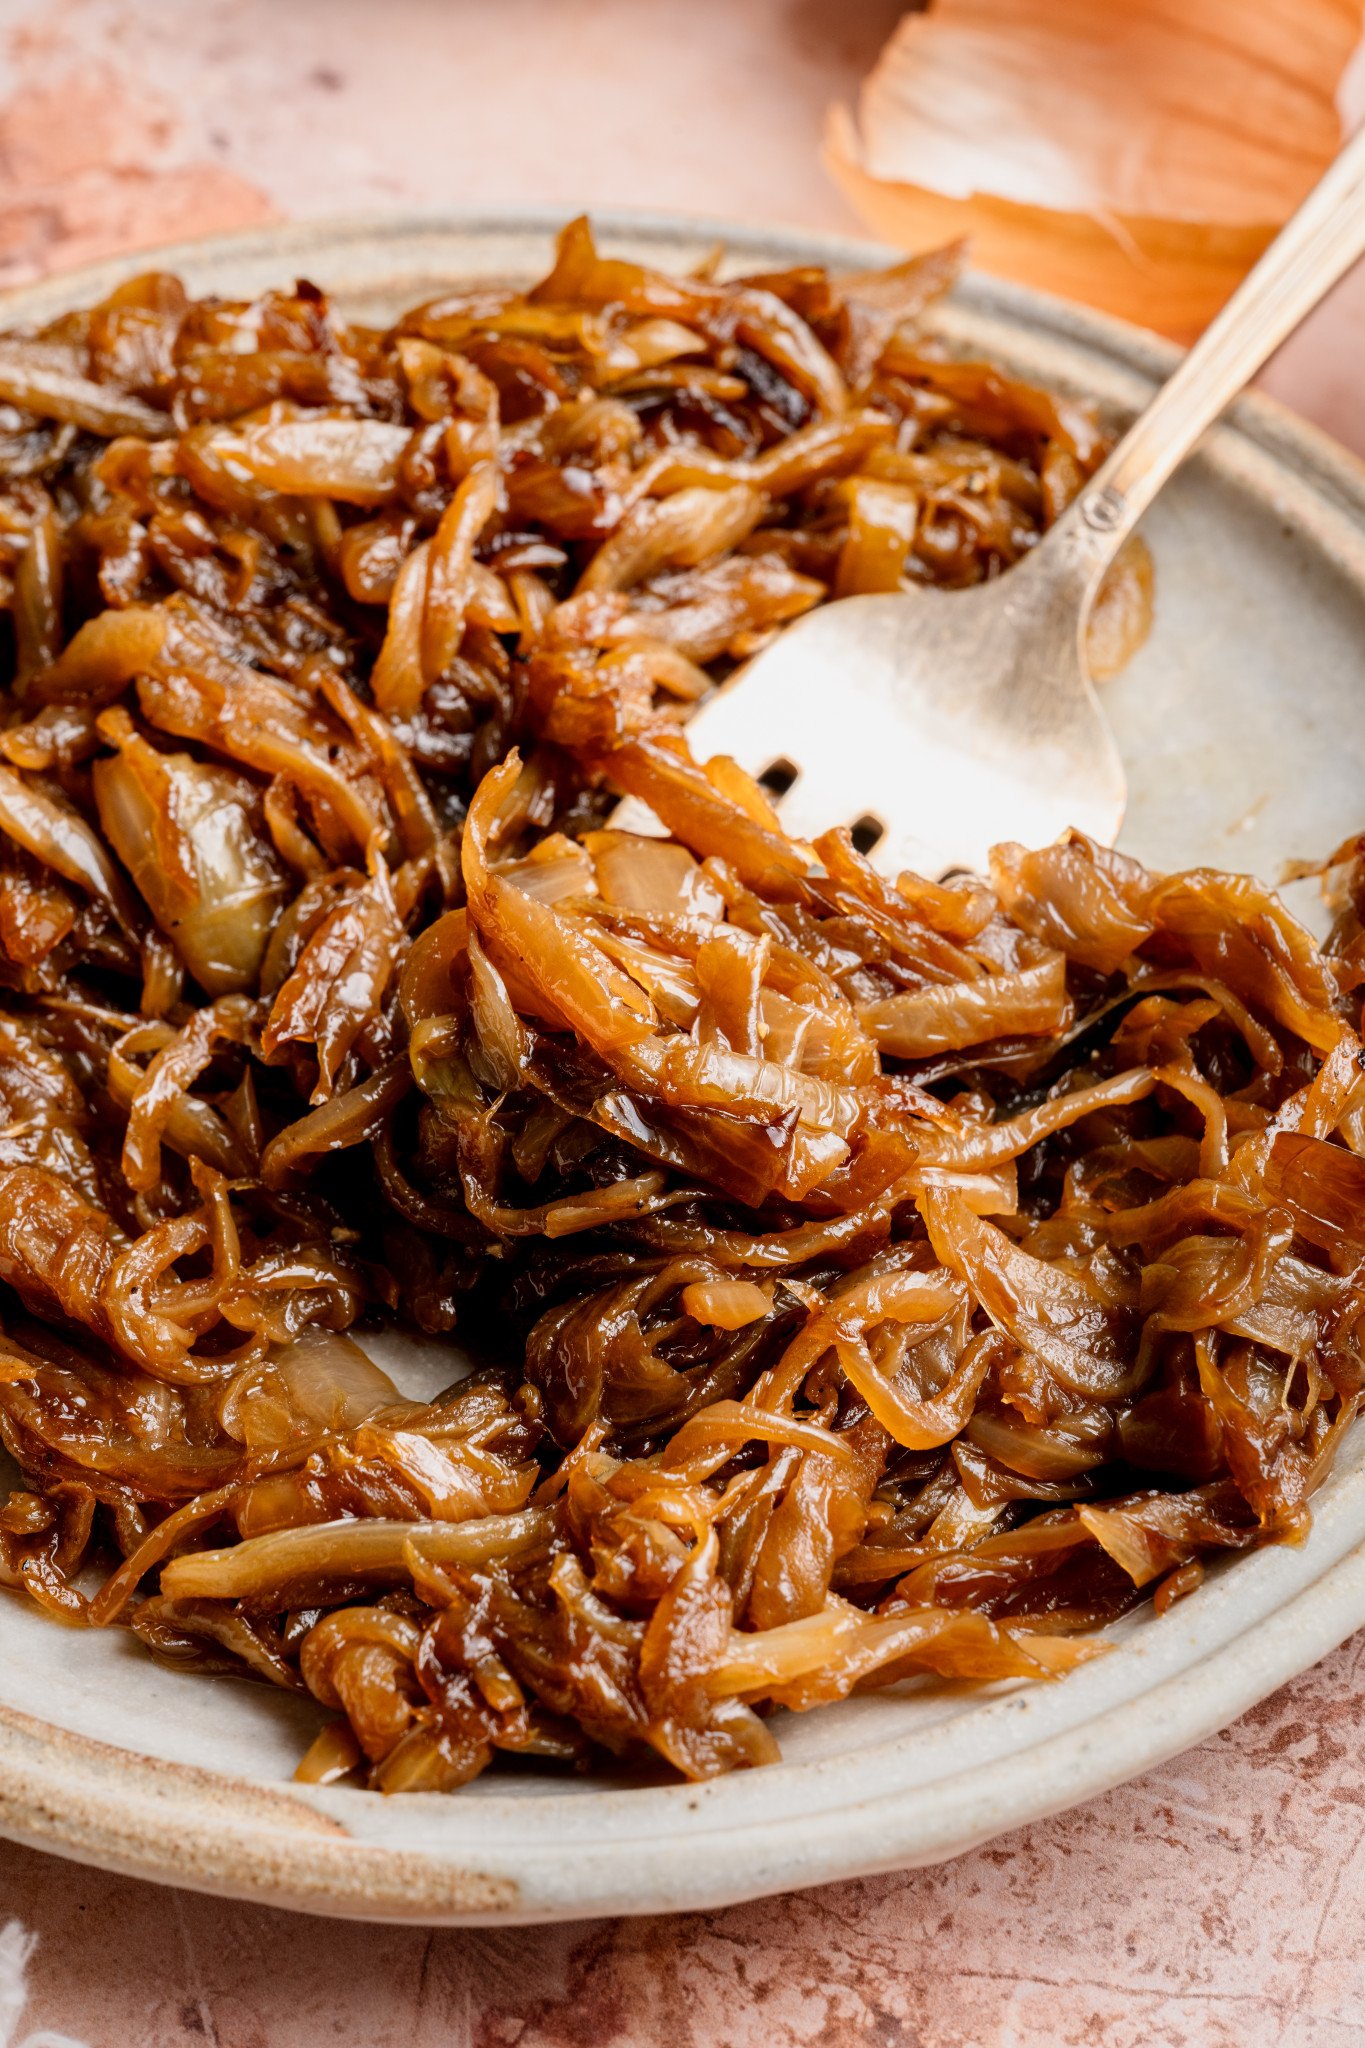
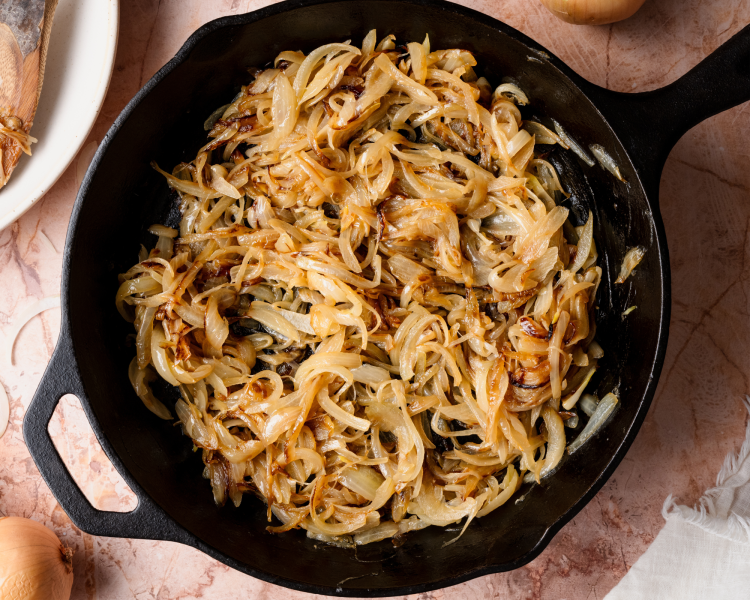
Continue to cook for 10-15 minutes. It’s important not to rush the process. The slow development of the sugars is important and helps the onions become jammy, deep golden, and smell sweet!

Finish & enjoy!
Season with salt and pepper and enjoy!
Expert Tips
- Julienned cut: Curious how to cut your onion for the best caramelized onions? Use my How To Cut an Onion post to give you step-by-step instructions on the best way to cut an onion for these caramelized onions.
- Use the right pan: Make sure to use a large stainless steel skillet (wide-heavy bottom) or a cast-iron pan. Try NOT to use a nonstick.
- Don’t rush: True caramelization takes patience. Keep the heat at medium-low for the bulk of cooking and let the onions gradually break down. Rushing with high heat will burn them before they properly sweeten.
- Stir occasionally, not constantly: You want the onions to have some contact with the pan to build color. Stir every few minutes (I recommend about every 3 minutes).
- Deglaze as needed: If you notice browned bits building up on the bottom of the pan (that’s the flavor we want!), add a small splash of water and scrape it up with a wooden spoon. This prevents burning and adds even more depth.
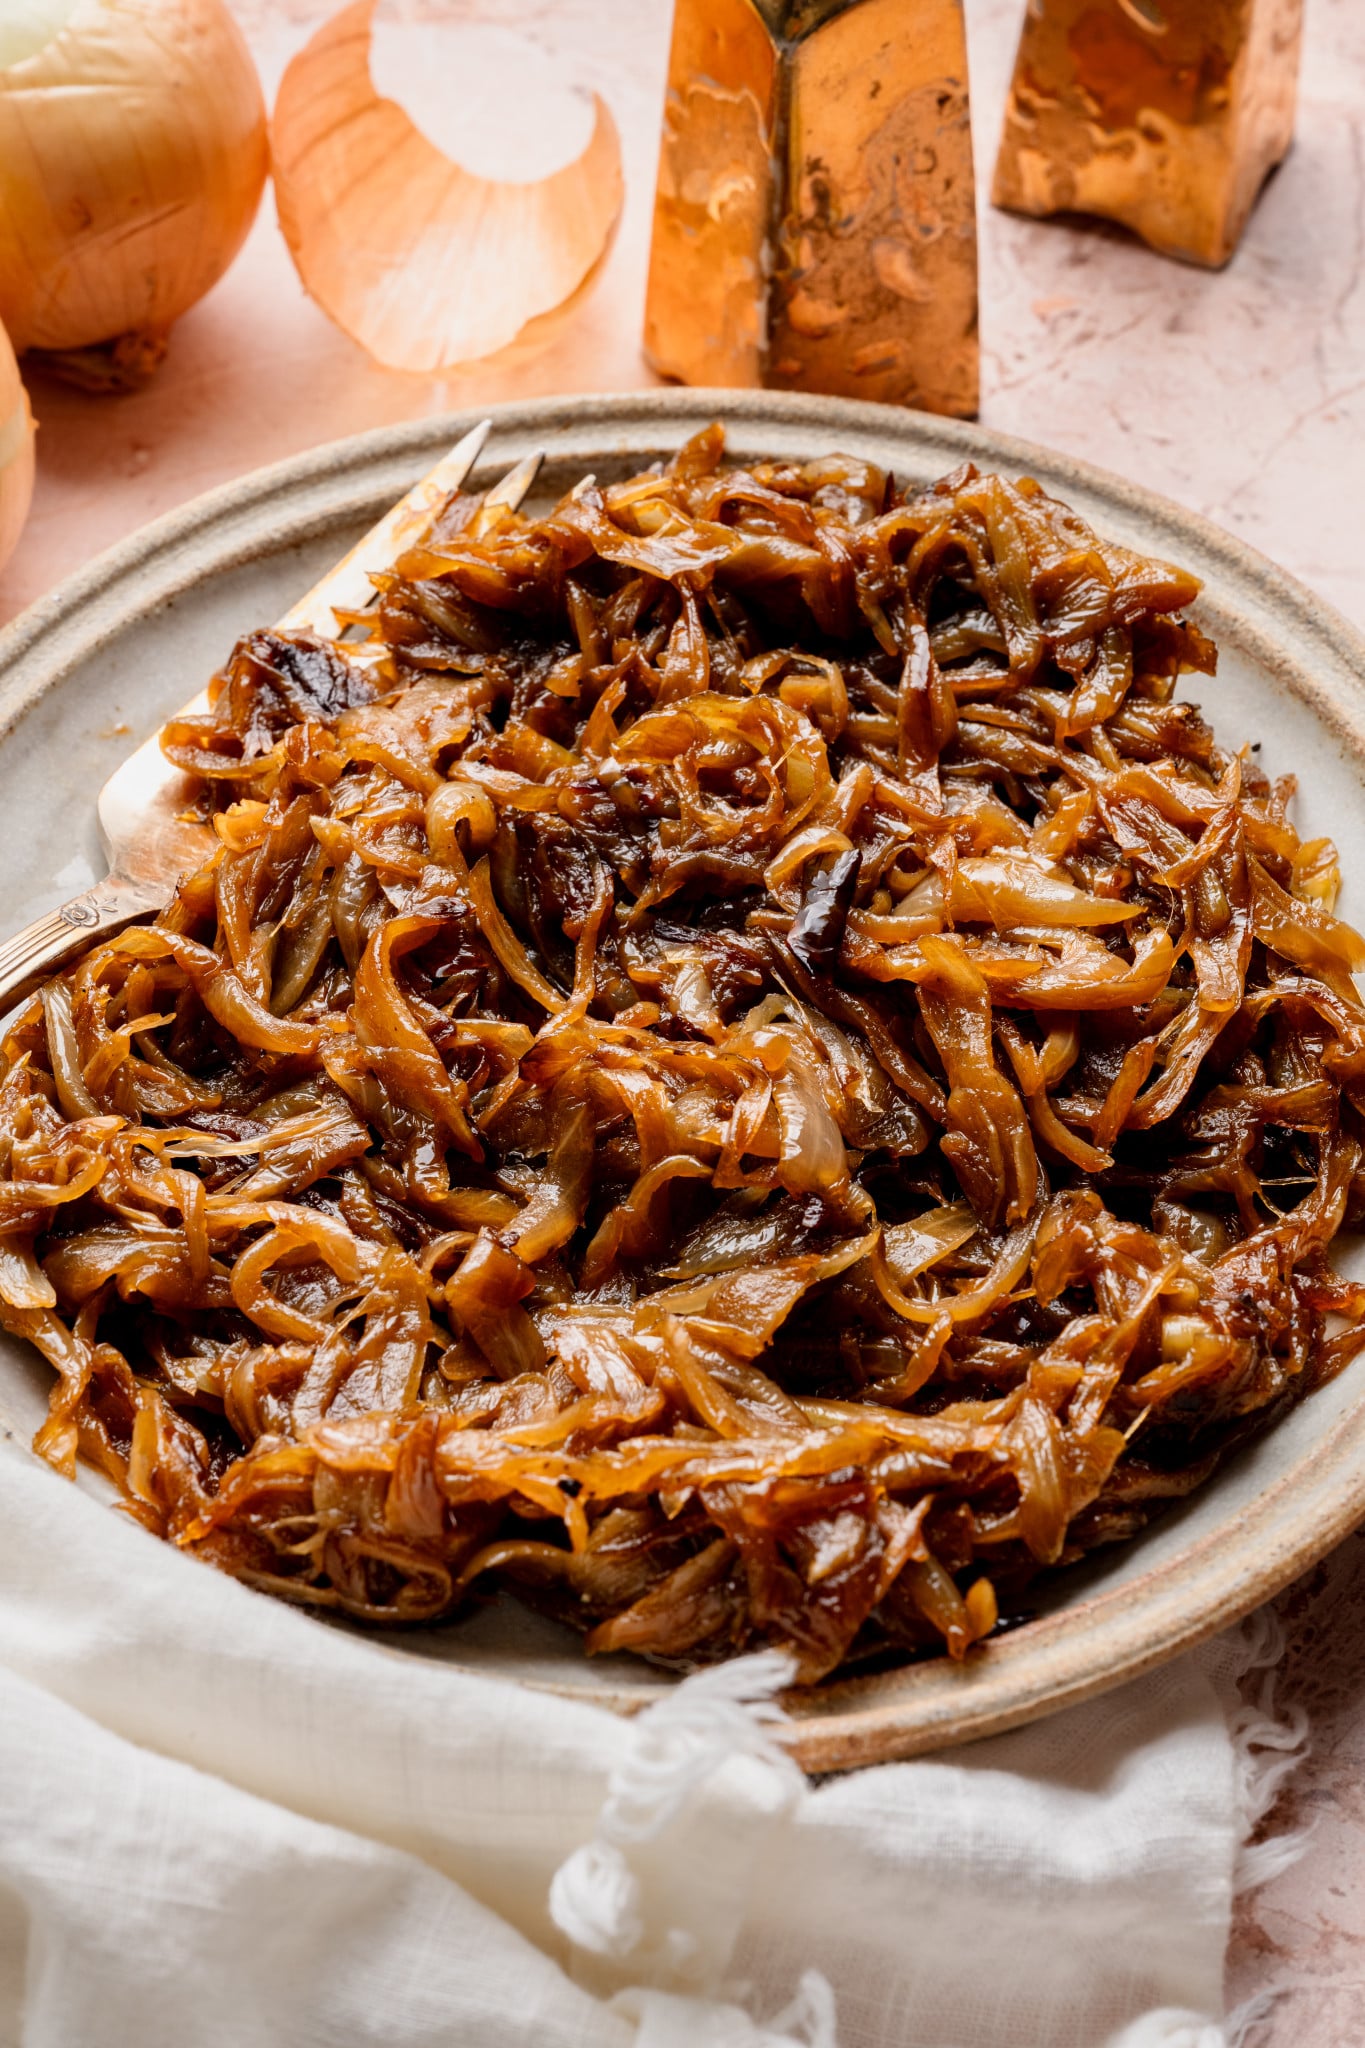
- Give them time to fully transform: Properly caramelized onions should be deep golden brown, very soft, and jammy, not just lightly sautéed. It’s important not to rush the process. The slow development of the sugars is important.
- Make a big batch: Since caramelized onions take time, it’s worth doubling up. They freeze beautifully and elevate everything from burgers to grain bowls to breakfast scrambles.
Storage / Freezing
- Store: Let the onions cool completely, then store them in an airtight container in the fridge for up to 5 days.
- Freeze: You can also freeze caramelized onions if you want to save some for later. Just portion them into small containers or silicone ice cube trays for easy grab-and-go servings. Freeze for up to 3 months. Thaw overnight in the fridge or gently reheat straight from frozen.
- Reheating: Warm in a skillet over low heat or microwave in short intervals until heated through. If they seem dry, add a tiny splash of water or olive oil to loosen them up.
FAQs
How long does it take to caramelize onions?
True caramelized onions typically take 45 minutes to 1 hour. The exact time depends on your pan, heat level, and how many onions you’re cooking. If they’re done in 15–20 minutes, they’re likely just sautéed, not fully caramelized.
What’s the best type of onion to use?
Yellow onions are the best all-purpose choice because they have the perfect balance of sweetness and savory flavor. Sweet onions will caramelize faster and taste slightly sweeter, while red onions work too, but will have a milder, slightly different flavor.
Why are my onions burning instead of caramelizing?
Your heat is likely too high. Caramelized onions need gentle, steady heat. If you see dark spots forming too quickly, lower the heat and add a splash of water to deglaze the pan and prevent burning.
Why are my onions watery and not browning?
This usually happens if the pan is overcrowded or the heat is too low. The onions will release moisture at first (that’s normal), but as the water cooks off, they’ll begin to brown. Make sure you’re using a wide skillet and give them time.
shop this post
 Buy Now →
  Buy Now →
 Try Adding Caramelized Onions To These Recipes!
Before You Begin! If you make this, please leave a review and rating letting us know how you liked this recipe! This helps our business thrive & continue providing free recipes.
How To Caramelize Onions
Ingredients
- 4-6 large yellow onions (you can use more onions if you’d like for a larger batch, just add a little more olive oil to the pan)
- 2 Tbsp. unsalted butter
- 1 Tbsp. olive oil
- Kosher salt and black pepper
- Water for deglazing
Last step! If you make this, please leave a review and rating letting us know how you liked this recipe! This helps our business thrive & continue providing free recipes.
Instructions
- Grab the correct pan: You’ll want a large stainless steel skillet (wide-heavy bottom) or a cast iron pan. Try NOT to use a nonstick.
- Slice the onions: Cut the roots and tops off of the onions, then cut them in half, then slice “with the grain”, making julienne slices about 1/4-1/8-inch thick. Check out this post for reference on how to cut onions. 🤗4-6 large yellow onions

- Butter & oil: Heat a skillet over medium-high heat to start. Add the butter and oil and allow the butter to melt.2 Tbsp. unsalted butter, 1 Tbsp. olive oil
- Add the onions: Add in all the onions (it’s a lot, I know, but they will cook down!).
- Cook on high to start: Cook for about 8-10 minutes until onions soften a bit. The onions will become soft and glossy but not browned in this step. Start Timer
- Caramelization starts: Turn the heat to medium-low. Over the next 30 minutes, you’ll really begin to see the onions changing color. You’ll want to stir every 3 minutes or so. Start Timer
- Fond: You’ll most likely begin to see brown bits on the bottom of your pan now. This is fond and it’s added flavor we want in the onions so just add a small splash of water and scrape it back into the onions. Add small amounts of water, you don’t want to flood the onions.Water for deglazing
- Last 10-15 minutes: This last bit of time is where the onions will start to become jammy, deep golden, and smell sweet! It’s important not to rush the process. The slow development of the sugars is important. *Note: this can take longer, sometimes up towards 90 minutes. Don't rush the process! 🤗 Start Timer
- Finish: Season with salt and pepper and enjoy on burgers, grilled cheese, breakfast sandwiches, add to charcuterie boards, etc.Kosher salt and black pepper
Notes
- Store: Let the onions cool completely, then store them in an airtight container in the fridge for up to 5 days.
- Freeze: You can also freeze caramelized onions if you want to save some for later. Just portion them into small containers or silicone ice cube trays for easy grab-and-go servings. Freeze for up to 3 months. Thaw overnight in the fridge or gently reheat straight from frozen.
- Reheating: Warm in a skillet over low heat or microwave in short intervals until heated through. If they seem dry, add a tiny splash of water or olive oil to loosen them up.
- Some of my favorite recipes to add these caramelized onions to are my Cheeseburger Tacos, Homemade Burgers, Garlic Bread Pizza, Philly Cheesesteak Sliders, or Chipotle Chicken Quesadillas, but honestly, you really can’t go wrong adding them to just about anything!😉
Nutrition Information
Nutritional information is provided as a courtesy and is automatically calculated. It should only be construed as an estimate rather than a guarantee. Ingredients can vary and Kroll’s Korner can’t make any guarantees to the accuracy of this information.
📸 Photography by Creating Kaitlin
