How to Make Perfect Hard-Boiled Eggs (Stove Top)
This post may contain affiliate links. Please read our disclosure policy.
Hard-boiled eggs should be easy (and they are!!)… but somehow they’re one of those things that can go very wrong. Rubbery whites, gray-green yolks, shells that refuse to peel… we’ve all been there! After weeks of testing (and yes, a very egg-scented kitchen 😅), I found two reliable stove top methods that consistently produce perfect hard-boiled eggs. The biggest game changer?
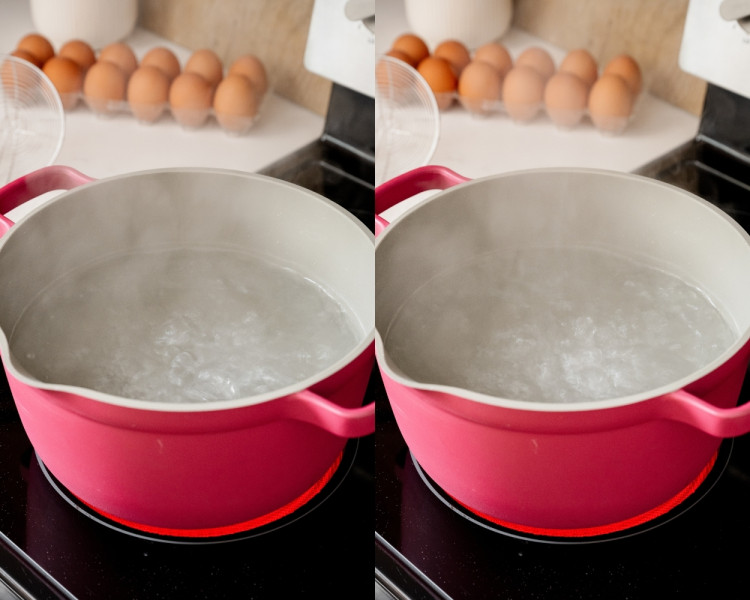
Starting with boiling water.
That quick hit of heat helps the whites pull away from the membrane, making peeling so much easier.
In this How to Guide, I’m walking you through both of my favorite stove top methods: a simmer-with-lid approach and a steady-boil-no-lid option. Both are reliable, simple, and give you beautifully cooked, easy-to-peel eggs every time.
Whether you prefer soft, jammy yolks or fully set centers, you’ll love the perfect hard-boiled eggs you get from either of these stove-top methods.
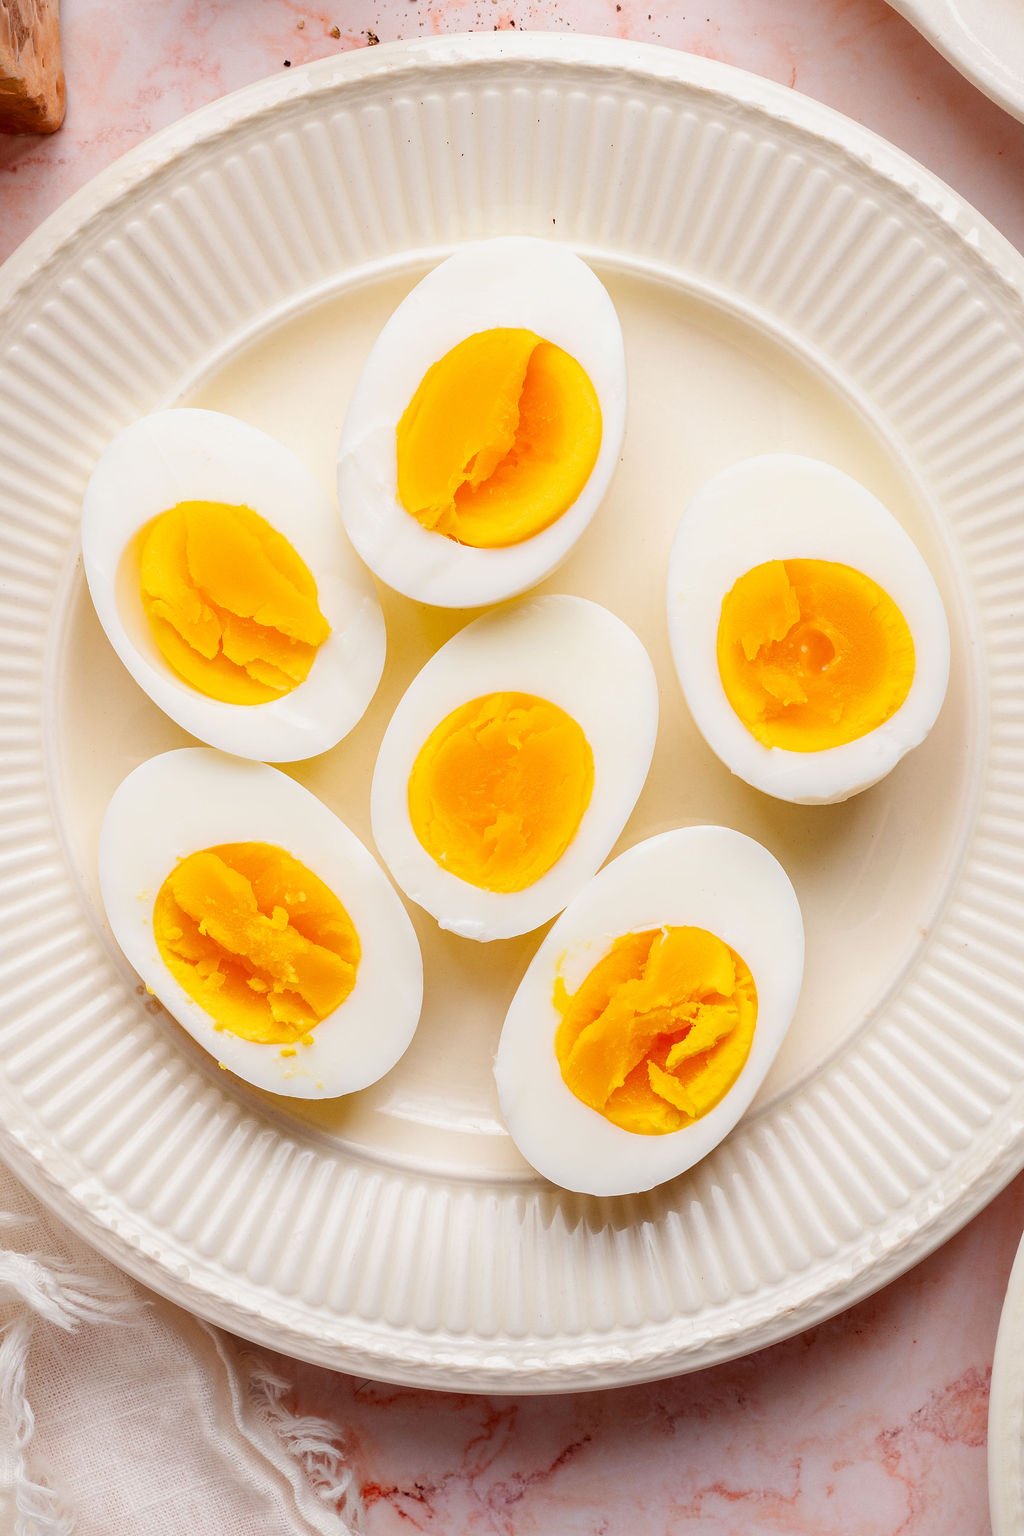

 Table Talk with Tawnie

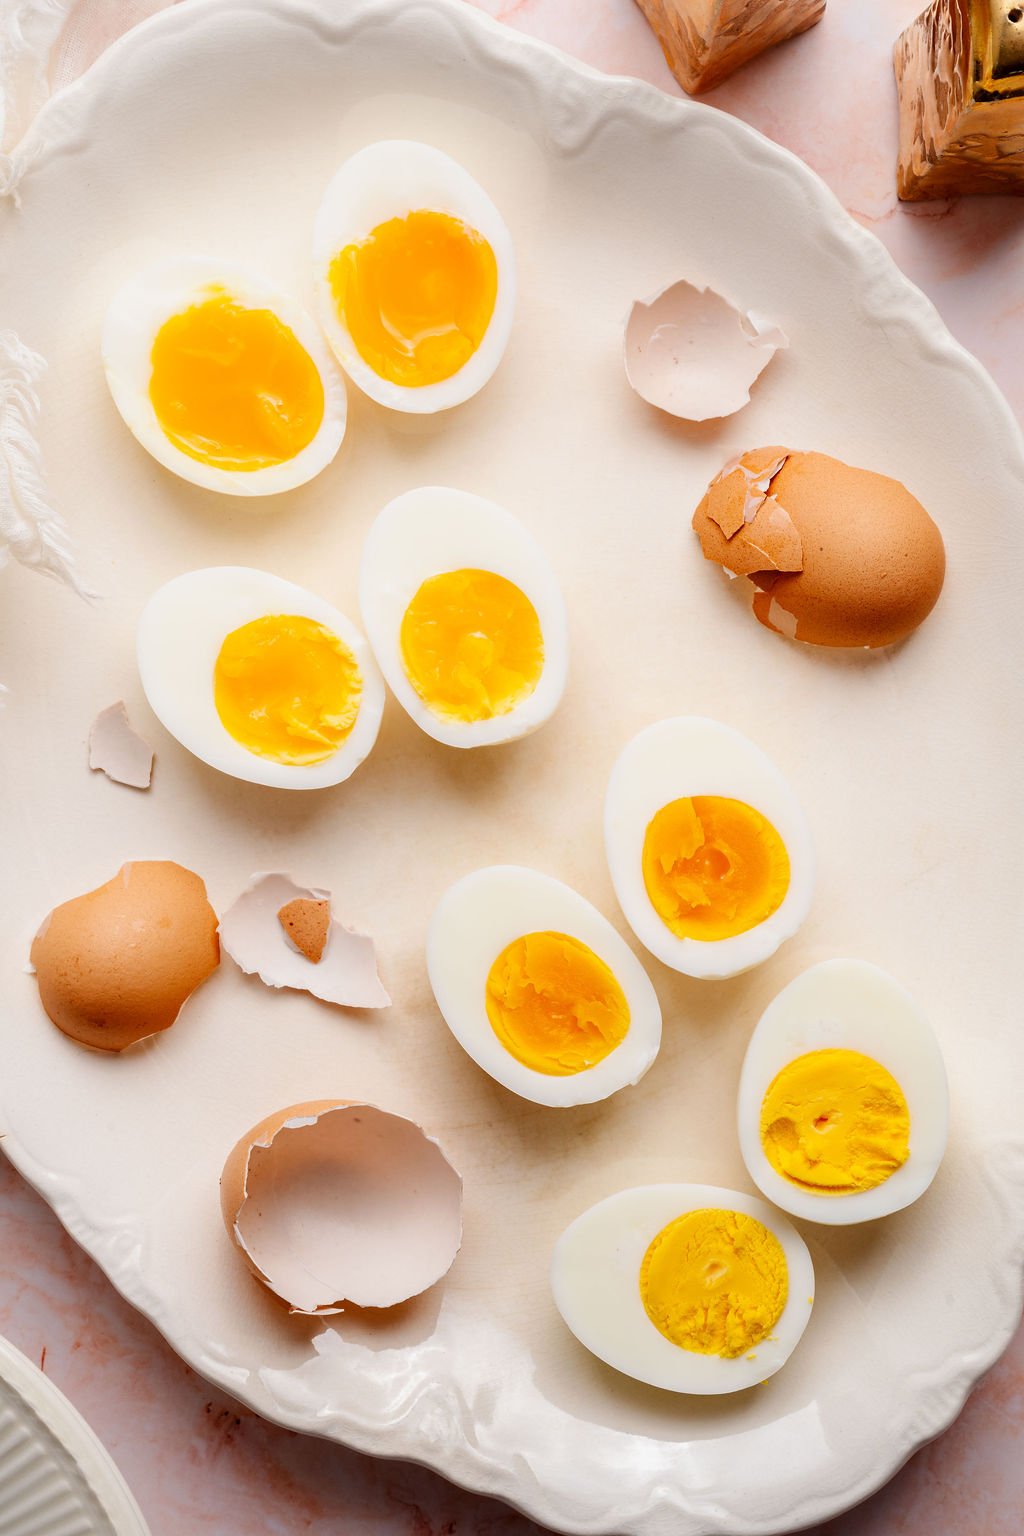
Over the last several weeks I’ve spent time testing out several different hard boiled egg methods to see what works best. (The house smelled like hard boiled eggs for a while hahaha). But, smelly house and all, I found the 2 methods below to be the best options for hard boiling eggs using the stove top. (I know there are a lot of other methods like Instant Pot, Air Fryer, etc. and I’ll get to that! 🤗) One thing I learned for sure is to BOIL the water first. The cold water start method can cause the egg white proteins to cook slowly and bond strongly to the inner shell membrane, making them difficult to peel. But when you start with boiling water, the sudden, high temperature causes the egg white to immediately contract and pull away from the shell membrane, resulting in an easy-to-peel egg! Voila! Try out my two methods below and let me know what you think!
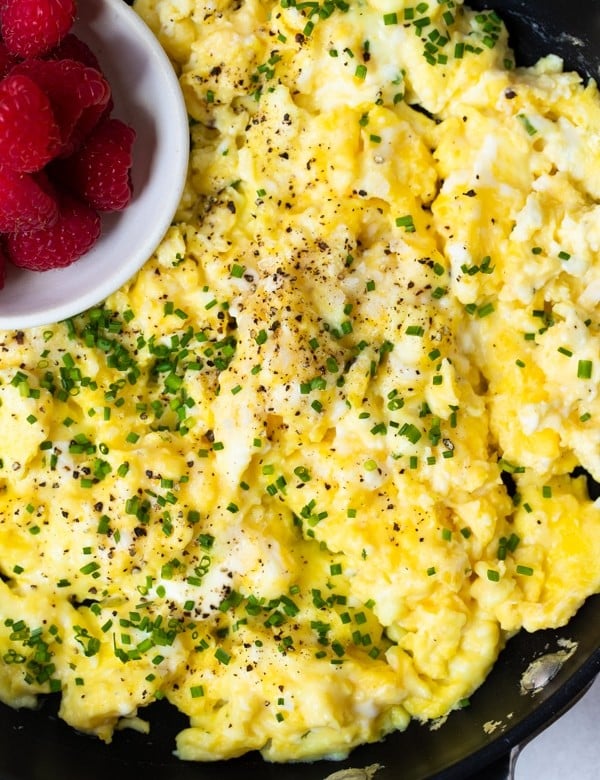
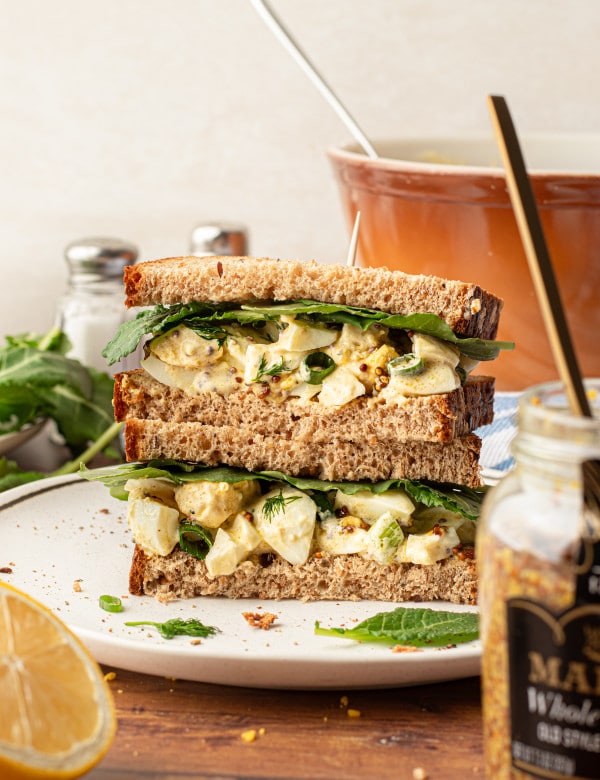
Looking for recipes to use your perfect hard-boiled eggs in? Check out my Chicken Cobb Salad, High-Protein Egg Salad Sandwich, and Healthy Potato Salad for a few of my faves!
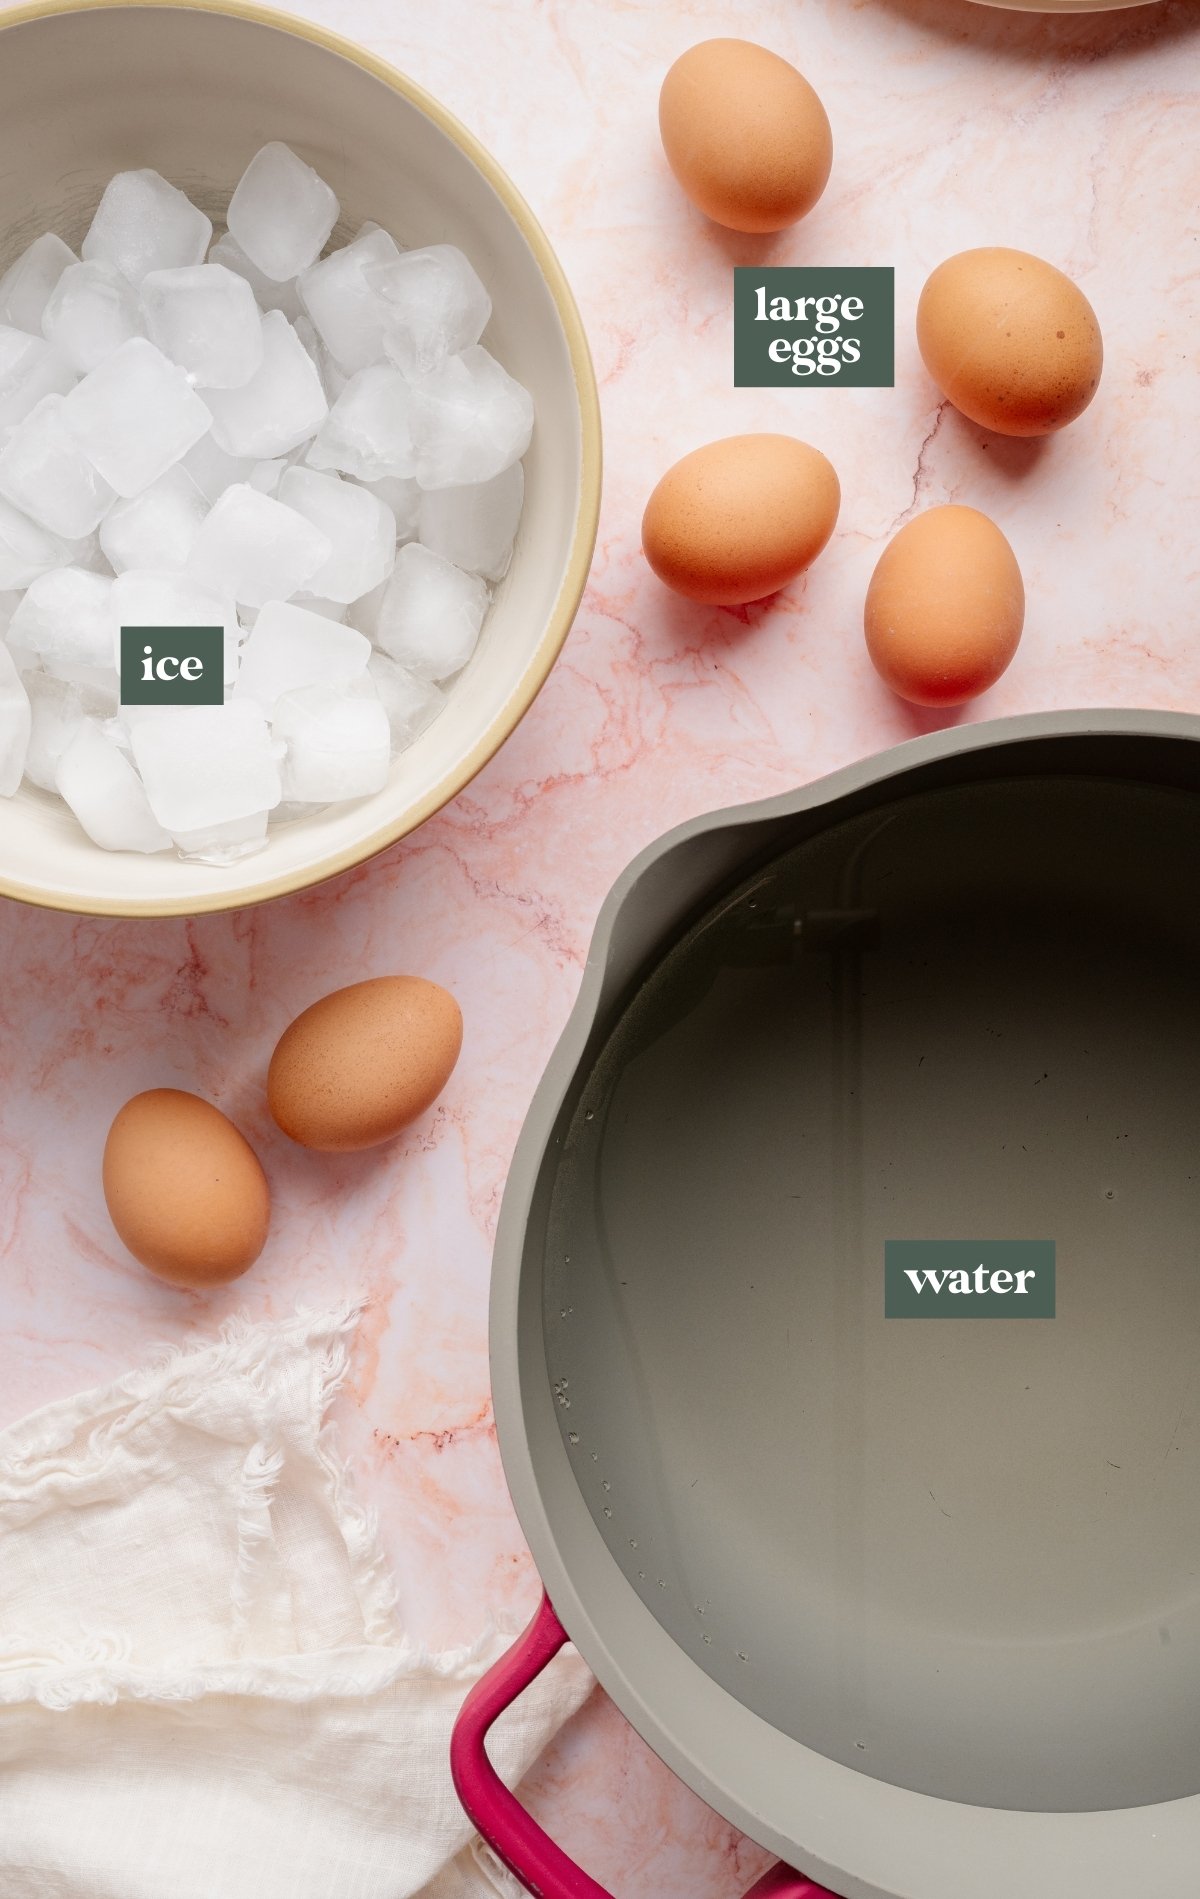
- Large Eggs: I use large eggs for consistent timing and reliable results. I didn’t test this method using different-sized eggs, but if you use medium, extra-large, or jumbo eggs, you may need to adjust the cook time slightly (usually 30–60 seconds more for larger eggs). I recommend using fridge-cold eggs for these two stove top methods. You can let them sit out at room temperature for 10 minutes if you prefer, but it’s not necessary. I also found that slightly older eggs (about a week old) tend to peel a bit easier than very fresh eggs.
- Water: You’ll need enough water to fully submerge the eggs. Roughly 3 quarts in a large pot works well for 6-12 eggs. No need to add vinegar or baking soda to the water. If you follow these cooking and chilling instructions, the eggs will peel beautifully without anything extra added to the water.
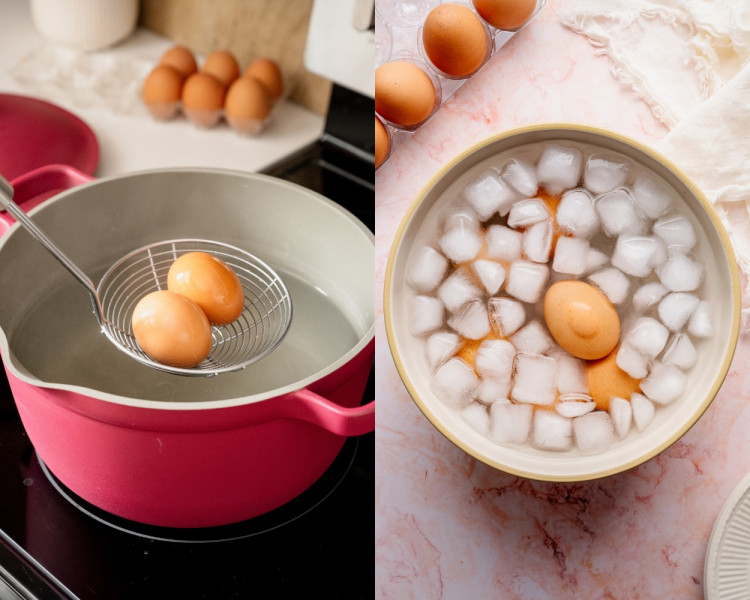
- Ice: The ice bath is crucial for easy-to-peel hard boiled eggs. This immediately stops the cooking process and helps make the eggs easier to peel. The longer the eggs chill, the better they release from the shell. I found that just 15-minutes in the ice bath resulted in the easiest peel but you can of course let them chill longer!
Step-by-Step Directions
(For the full recipe, scroll down to the recipe card below)
When I started testing different cooking methods in my quest for perfect hard-boiled eggs, I really wanted to find ONE best stove top method to share with you. In my many rounds of testing, I found that BOTH of the below stove top methods (Simmer / Lid method and the Steady Boil / No Lid method) produced really great results.
I really can’t say that one method is definitely better than the other, so I wanted to give you both! Let’s get into how the methods are alike and where they differ:
Start: Rolling Boil & Fridge-Cold Eggs
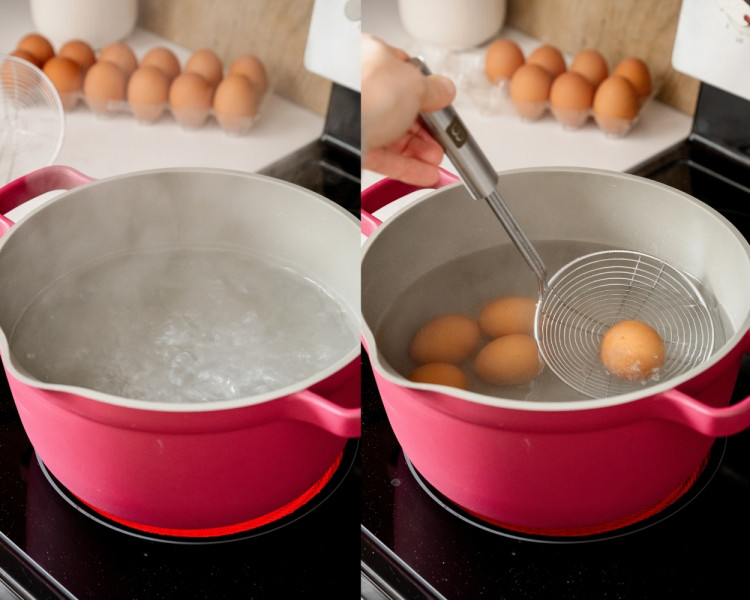
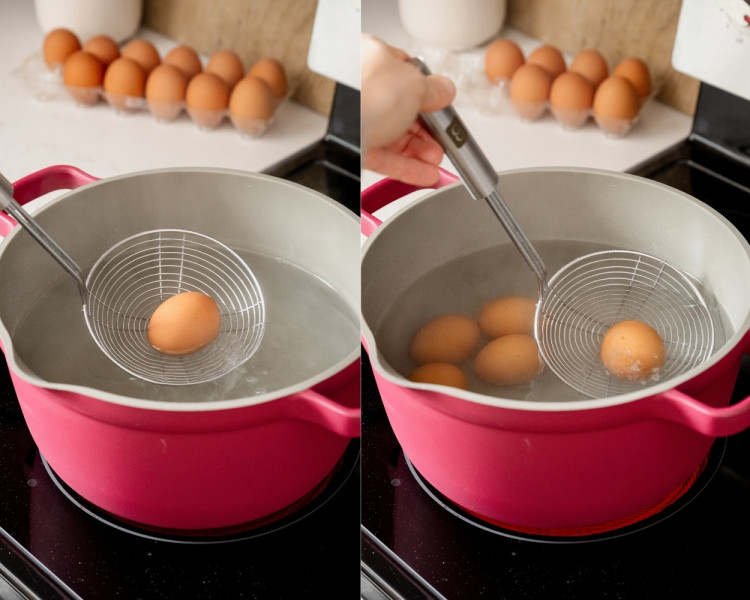
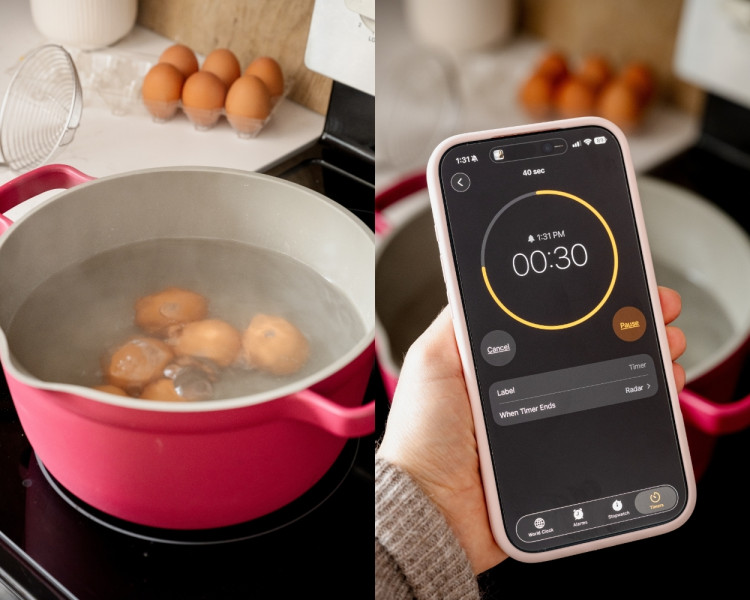
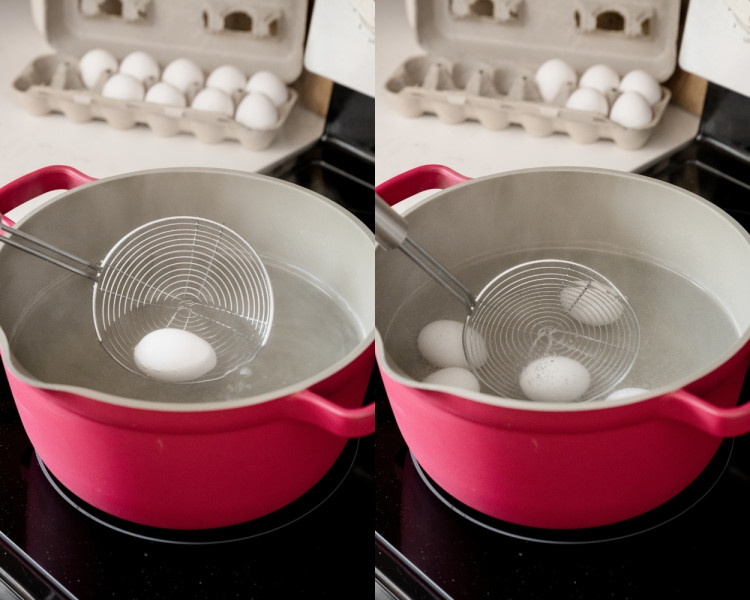
Both of these stove top methods start with bringing your pot of water to a full, rolling boil over high heat. You’ll then turn the temp down to low and carefully lower fridge-cold eggs into the water. In my testing, I found that starting with a full boil and using fridge-cold eggs consistently yielded the easiest-to-peel shells.
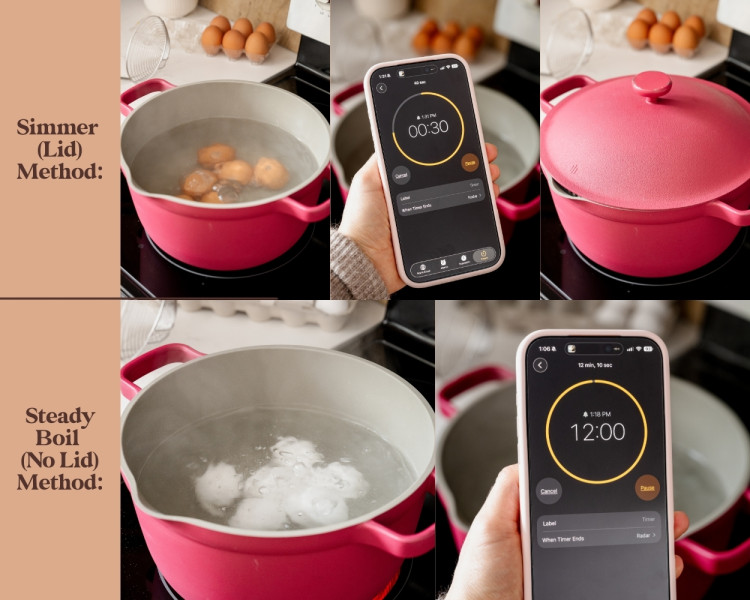
Cook: Simmer (Lid) vs. Steady Boil (No Lid)
After carefully lowering the eggs into the pot with water, this is where the two methods differ:
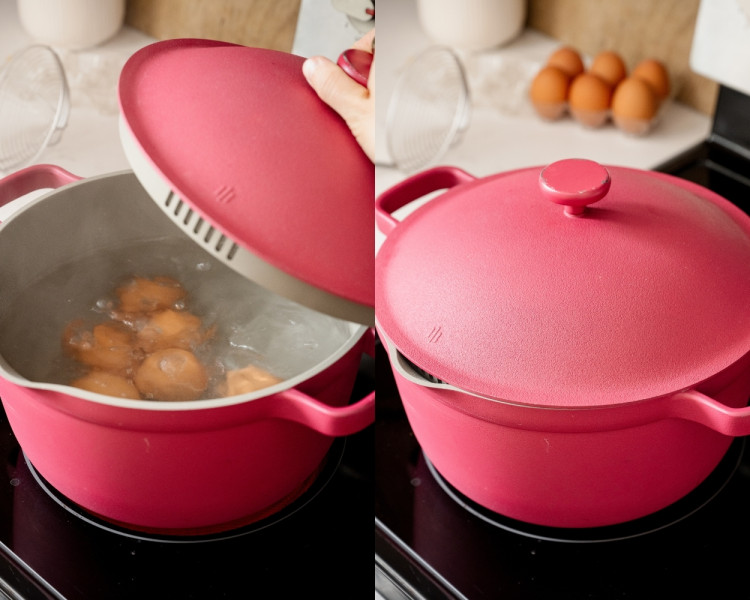
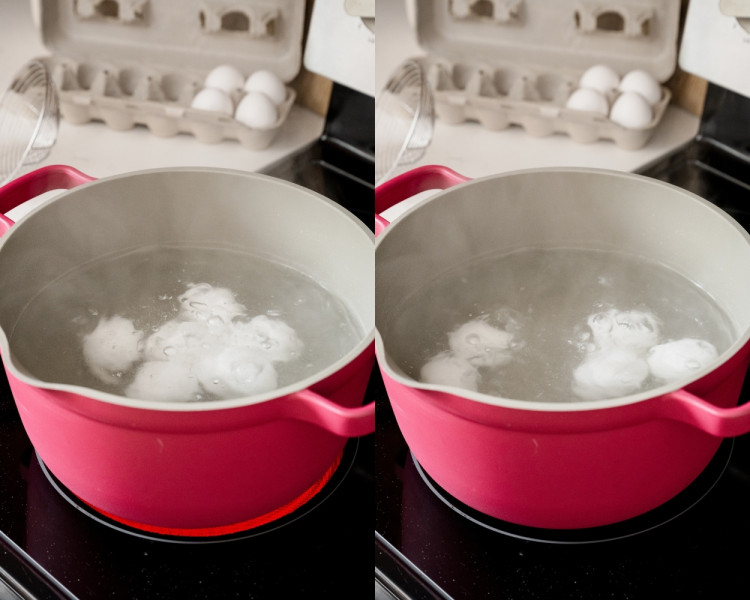
For the simmer (lid) method: you’ll turn the temp up, return the water to a medium-boil, and boil the eggs uncovered for 30 seconds. Then you’ll turn the temperature back to low, place the lid on the pot, and simmer for your desired cook time.
For the steady boil (no lid) method: you’ll turn the temp up, return the water to a medium-boil, and boil the eggs without a lid for your desired cook time.
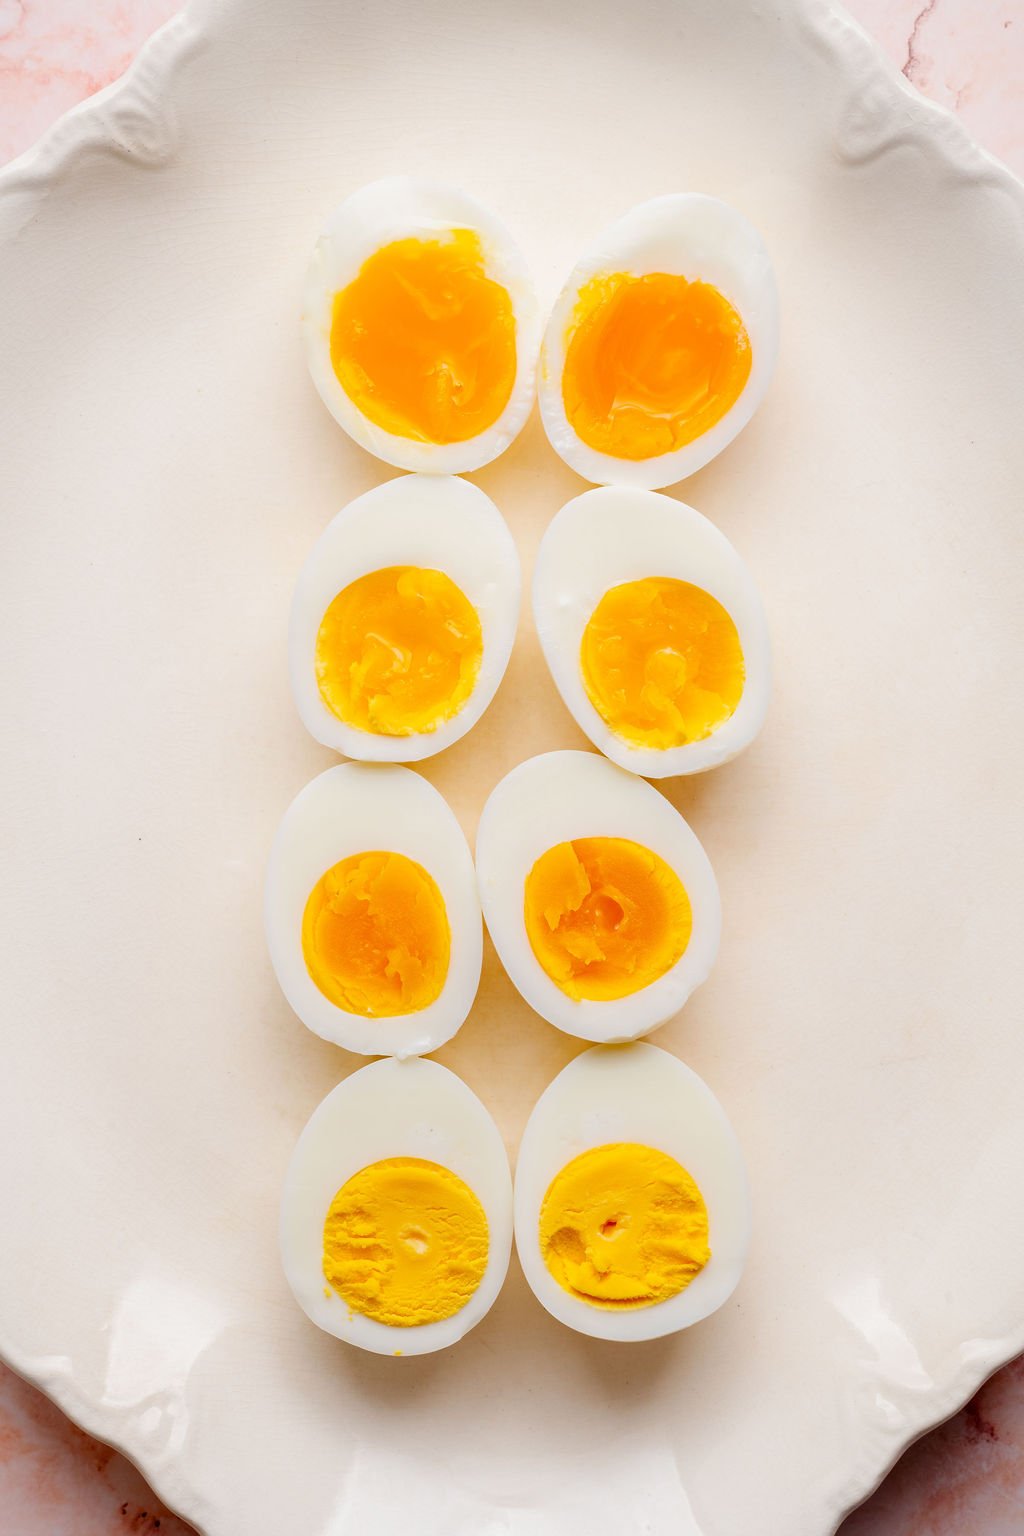
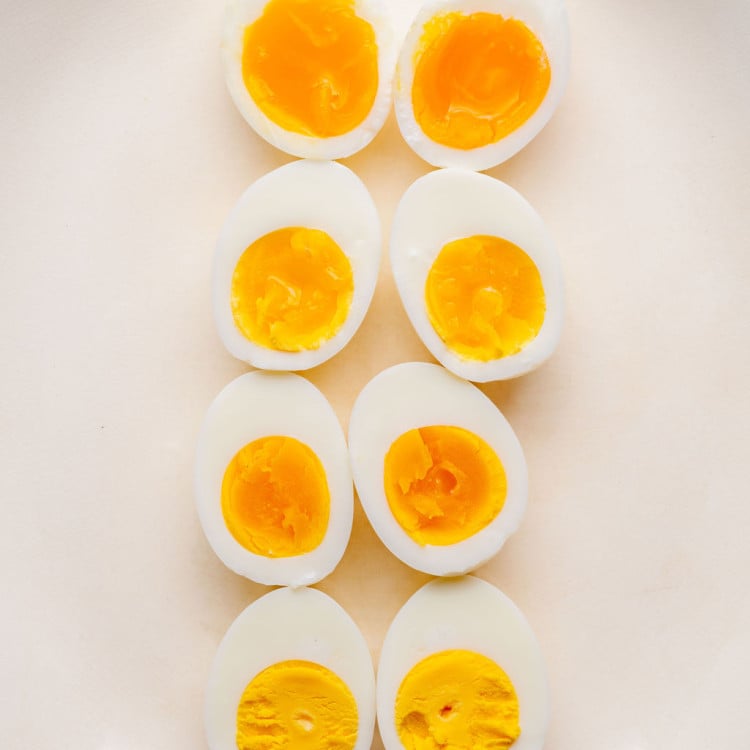
Choose Your Doneness Level
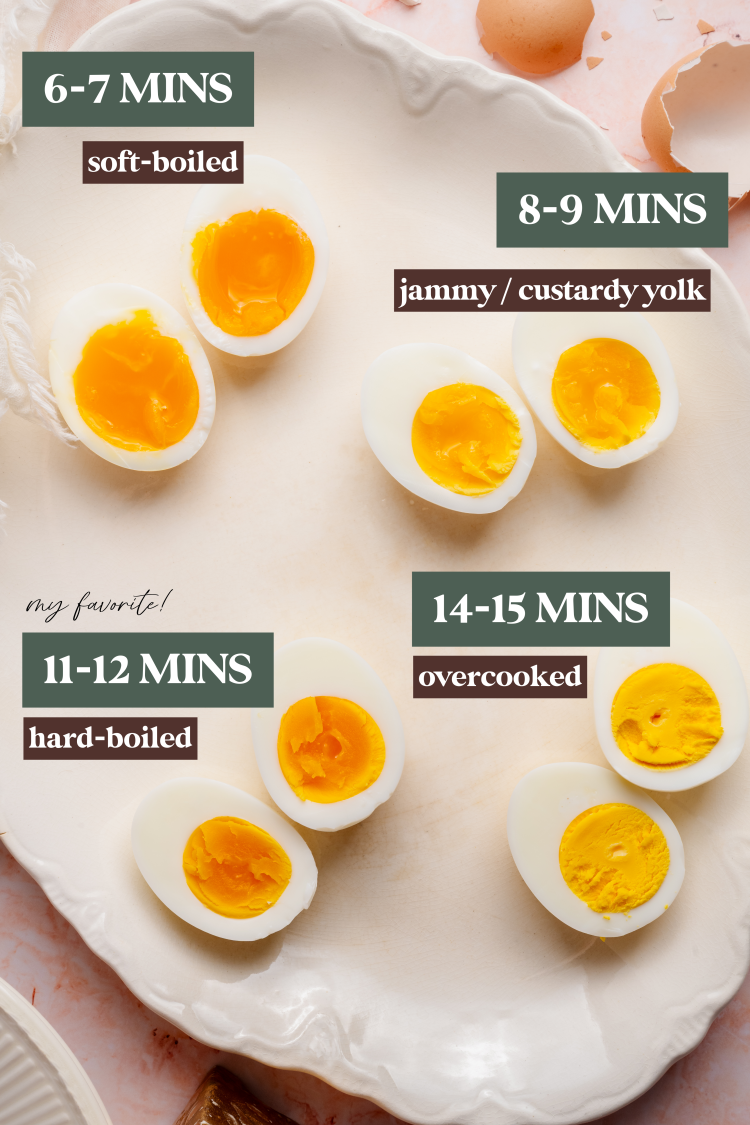
For both methods, follow the below timing to get your eggs to your desired doneness level:
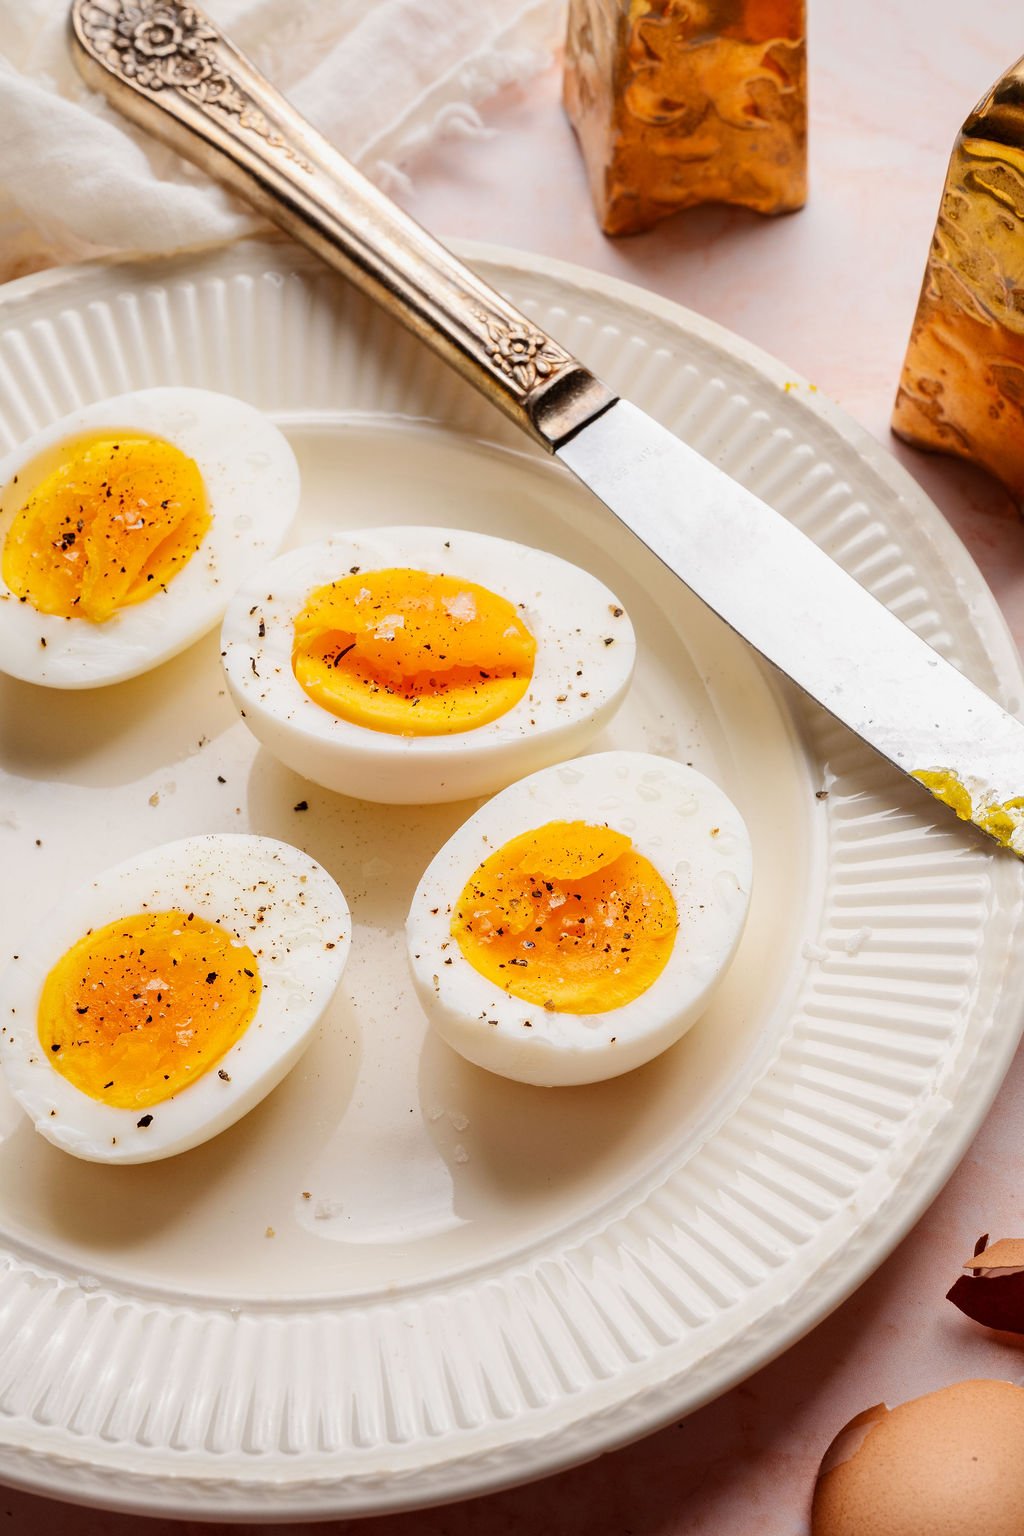
6-7 minutes: soft-boiled eggs
8-9 minutes: jammy / custardy yolk
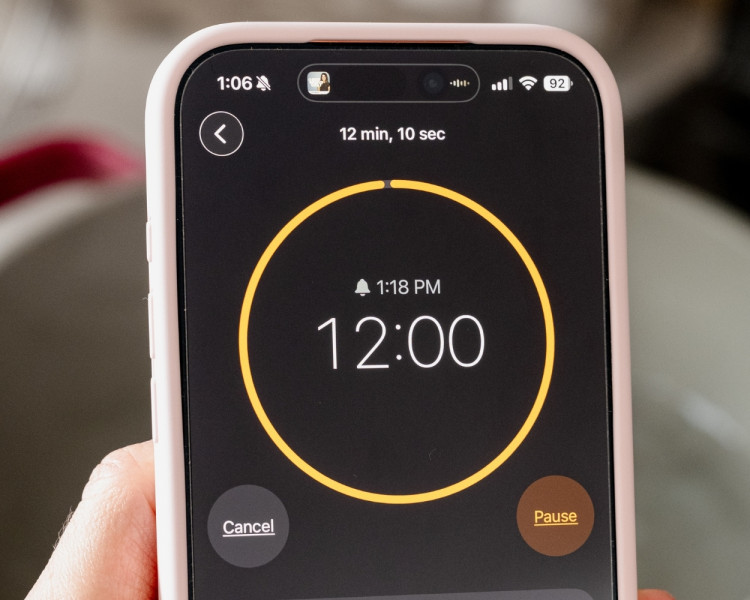
11-12 minutes: hard-boiled eggs (I always do 12 minutes for my preferred doneness!)
14-15 minutes: overcooked (not recommended)
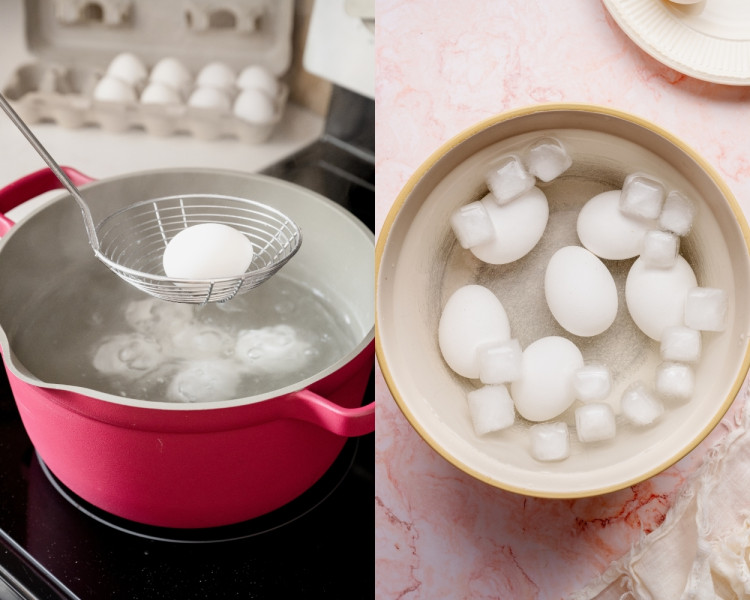
Finish: Ice Bath & Peeling
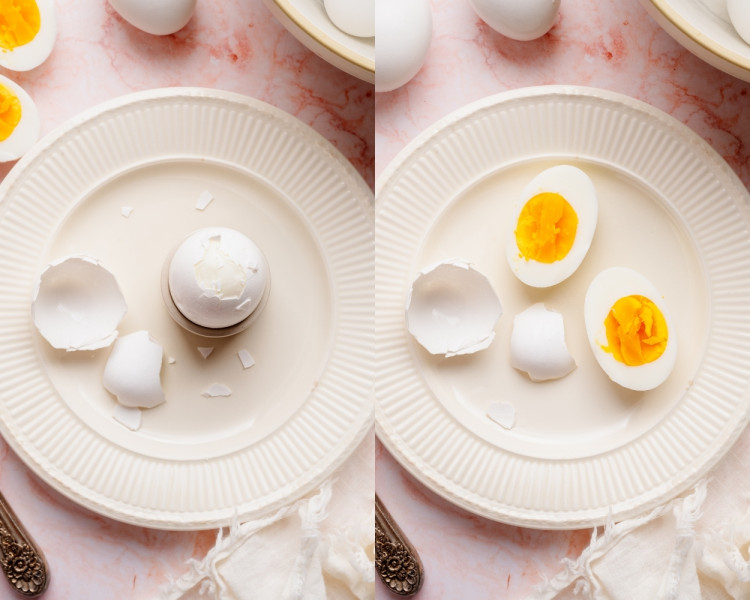
For both methods, carefully remove them from the pot, place them immediately into an ice water bath, and let them chill for a minimum of 15 minutes. The ice bath and chill time is what stops the eggs from continuing to cook, helping to ensure your desired texture and making the shells easier to peel.
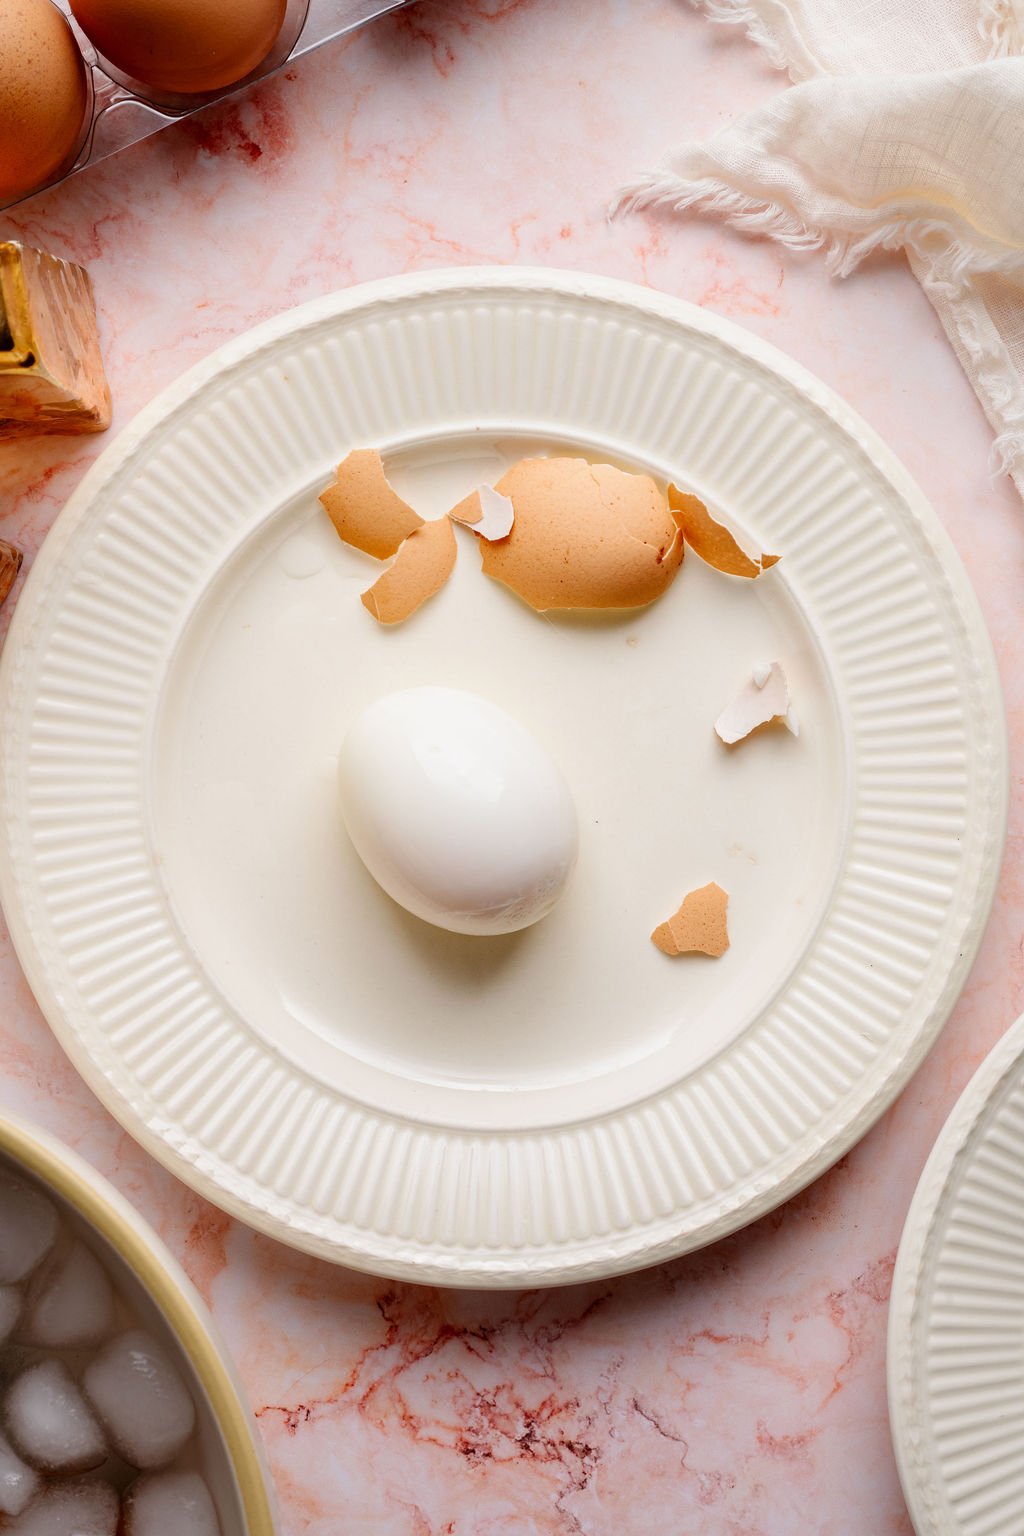
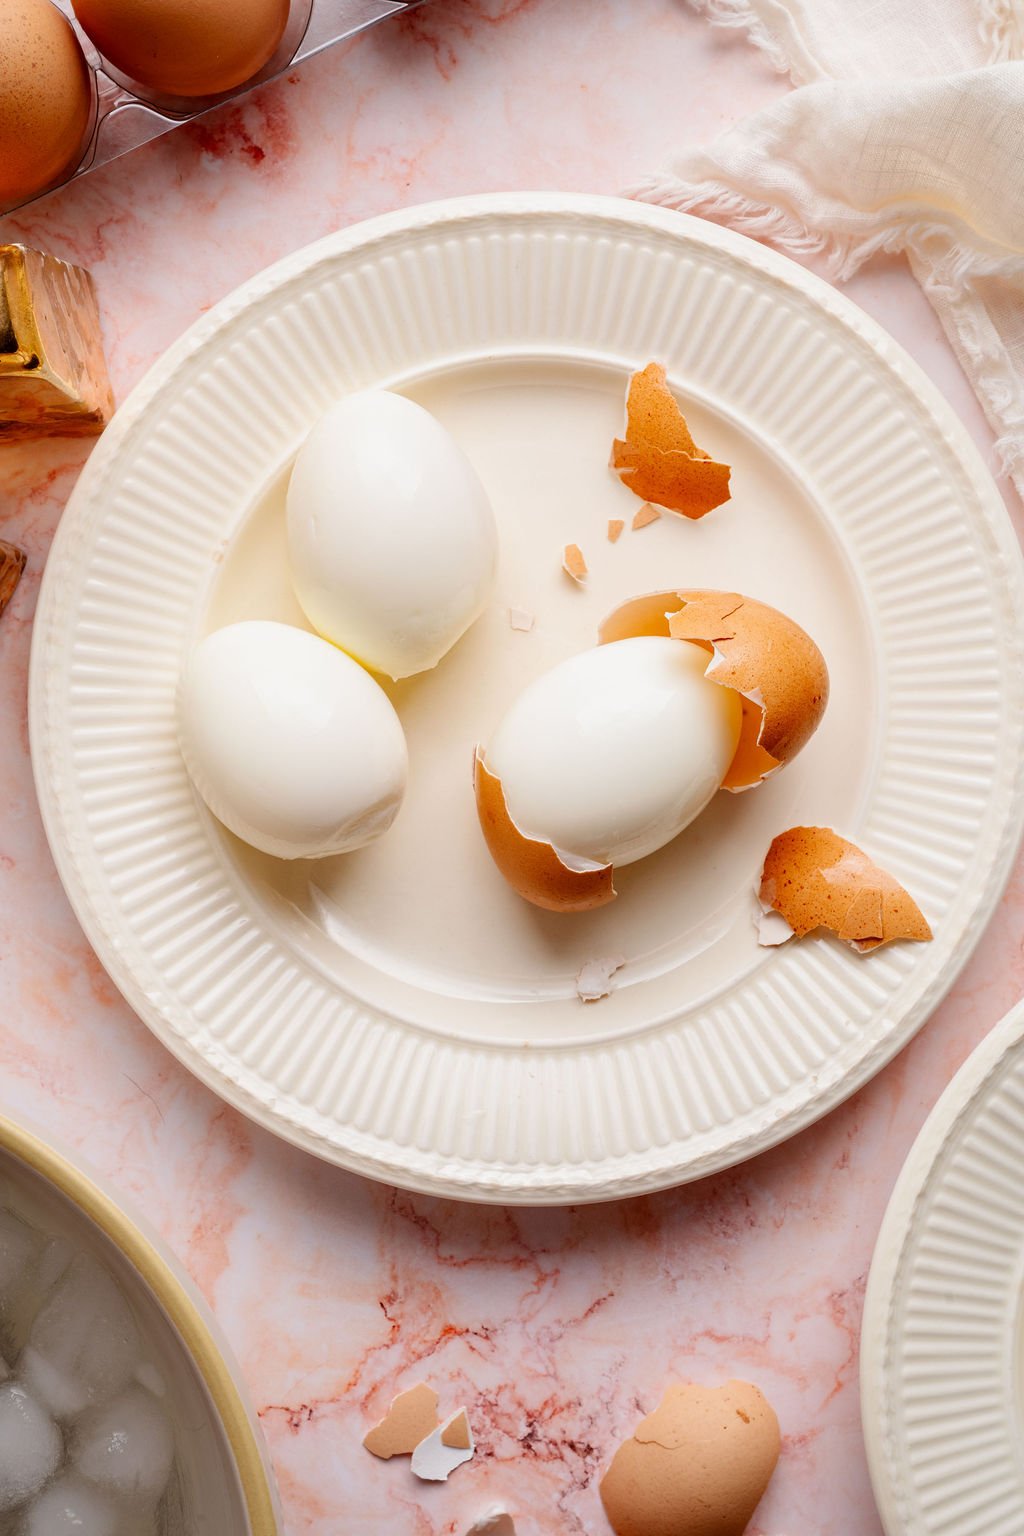
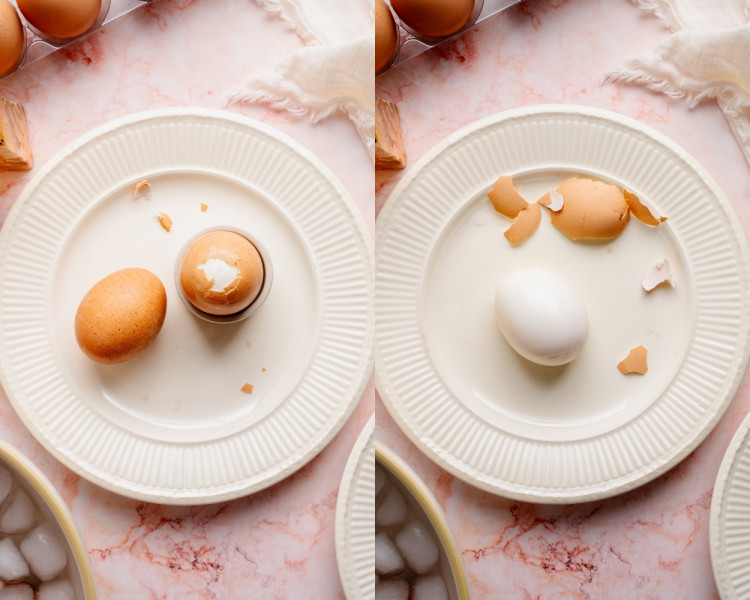
After you’ve let your eggs cool, gently tap the bottom (wide end) of the egg to crack the shell. I found that peeling the eggs under a thin stream of cold running water helped contribute to the easy peel as well!
The above steps are a really quick run-through of the two different stove top methods. Make sure to scroll down to the Recipe Card for each method broken down step-by-step with additional details! 🥰
Tips for Perfect Hard-Boiled Eggs on the Stove Top
- Use slightly older eggs: In my rounds of testing, I found that eggs that are 5–10 days old tend to peel more easily than very fresh eggs.
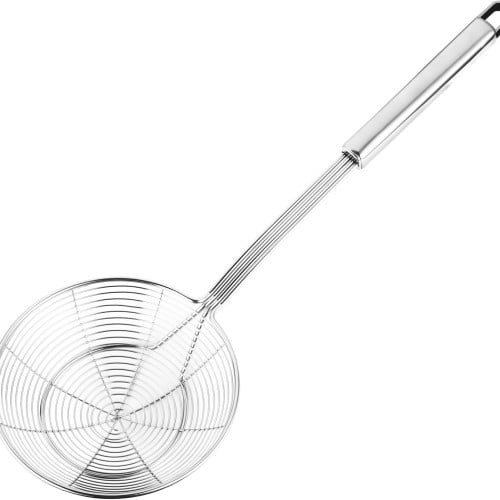
- Lower eggs gently: Use a spider strainer or slotted spoon to carefully lower eggs into the water. Dropping them in can cause cracking from impact or sudden temperature shock.
- Cook in a single layer: Eggs should fit in a single layer and be fully submerged in water for even cooking, whether making 6 or 12 at a time.
- Stick to 12 minutes for large eggs: For fully set, bright yellow yolks without a chalky center, 12 minutes is the sweet spot for large eggs. Extra-large eggs may need an additional 30–60 seconds.
- Set a timer: Even one extra minute can change the texture of the yolk, especially for jammy or soft-boiled eggs. Use a timer for consistent results.
- Avoid overcooking: Overcooked eggs can develop a gray ring around the yolk and a rubbery texture. Proper timing and quick chilling prevent this.
- Don’t skip the ice bath: Transfer eggs immediately to an ice bath to stop the cooking process, prevent a gray-green ring around the yolk, and make peeling easier. Chill at least 15 minutes for best results.
- Peel from the wide end: Crack the shell at the base of the egg where the air pocket is located. This helps the shell release more cleanly.
- Peel under running water: A thin stream of cool water helps separate the shell from the membrane, making peeling smoother and less frustrating.
Storage
- Store with shell on for longest freshness: Hard-boiled eggs keep best in their shells. Store them in an airtight container in the refrigerator for up to 7 days.
- If peeled, store properly: Peeled eggs should be stored in an airtight container with a damp paper towel to prevent them from drying out. Use within about 3 days.
- 2-hour mark: After cooking, make sure to refrigerate your hard-boiled eggs within two hours. You also shouldn’t leave refrigerated cooked eggs out at room temperature for more than two hours.
- Keep away from strong odors: Eggs can easily absorb smells from other foods. Store them sealed and away from other strongly scented ingredients like onions.
- Label with the date: If you batch cook eggs for the week, jot the date on the container so you know when they were made.
- No freezing: While I love freezing leftovers or intentionally meal-prepping meals to go in the freezer, hard-boiled eggs are NOT a good candidate for the freezer. The whites become rubbery and watery after thawing. You’re better off making them when you need them, or just a few days before.
shop this post
 Buy Now →
  Buy Now →
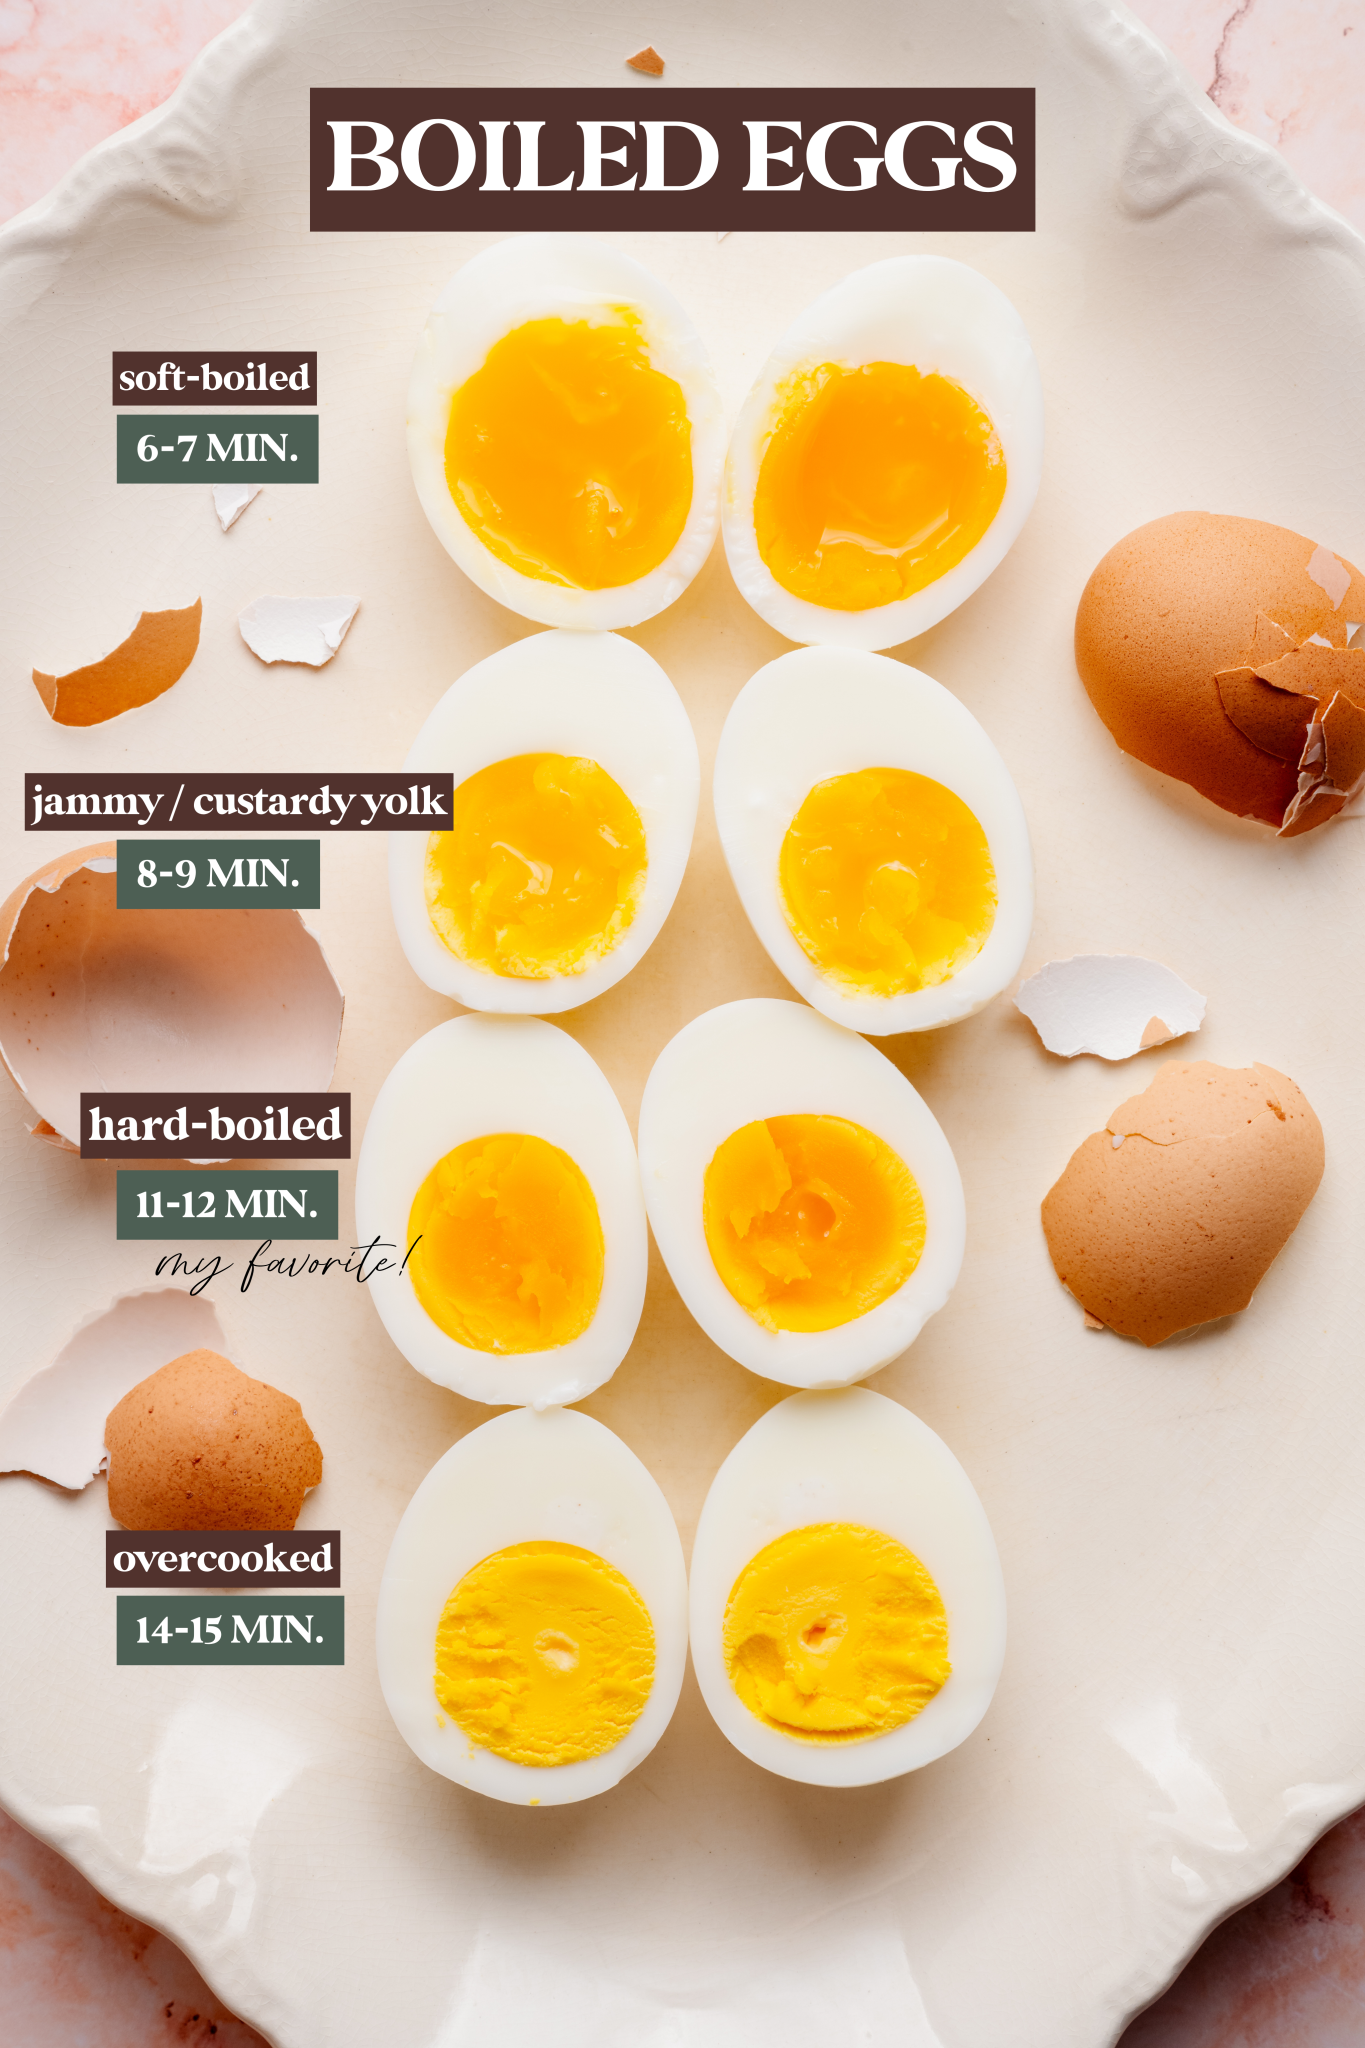
Before You Begin! If you make this, please leave a review and rating letting us know how you liked this recipe! This helps our business thrive & continue providing free recipes.
How to Make Perfect Hard-Boiled Eggs (Stove Top)
Ingredients
- 6-12 large eggs
- water
- ice (for ice bath)
Last step! If you make this, please leave a review and rating letting us know how you liked this recipe! This helps our business thrive & continue providing free recipes.
Instructions
Simmer / Lid Method
- Bring water to a boil: Bring a large pot (about 3 quarts) of water to a full, rolling boil over high heat.water

- Lower the heat & add in eggs: Use fridge-cold eggs (they can sit out for about 10 minutes if you prefer). Reduce the heat to low, then carefully lower the eggs into the water using a stainless steel spider skimmer/strainer or slotted spoon. Do not just drop the eggs in with your hands; they run the risk of cracking.6-12 large eggs
- Return to a medium boil to boil briefly: Bring the water back to a medium boil (not aggressive) and boil the eggs, uncovered, for 30 seconds.
- Cover & reduce heat: Cover the pot, reduce the heat to low, and maintain a gentle simmer for your desired cook time (next step).
- Cook (choose your doneness):•Soft-boiled: 6-7 minutes•Jammy / custardy yolk: 8-9 minutes•Hard-boiled (large eggs): 11-12 minutes (I always do 12 for my perfect hard-boiled eggs!)•Overcooked (not recommended): 14-15 minutes
- Ice bath: Remove eggs with a slotted spoon and transfer immediately to an ice water bath. Chill in the ice bath (or refrigerate) for at least 15 minutes. Longer chill time = easier peeling.ice
- Peel: Gently tap the bottom (wide end) of the egg to crack the shell. Peel under a thin stream of cold running water. Enjoy!

Steady Boil / No Lid Method
- Bring water to a boil: Bring a large pot (about 3 quarts) of water to a full, rolling boil over high heat.water
- Lower the heat & add in eggs: Use fridge-cold eggs (they can sit out for about 10 minutes if you prefer). Reduce the heat to low, then carefully lower the eggs into the water using a stainless steel spider skimmer/strainer or slotted spoon. Do not just drop the eggs in with your hands; they run the risk of cracking.6-12 large eggs
- Return to a medium boil: Bring the water back to a gentle, medium boil (not aggressive). No lid needed!
- Cook: Set a timer for 12 minutes for fully hard-boiled eggs. (If you want a doneness other than hard-boiled, see Step #5 above for other doneness levels and their designated cook times.)
- Ice bath: Remove eggs with a slotted spoon and transfer immediately to an ice water bath. Chill in the ice bath (or refrigerate) for at least 15 minutes. Longer chill time = easier peeling.ice
- Peel: Gently tap the bottom (wide end) of the egg to crack the shell. Peel under a thin stream of cold running water. Enjoy!

Notes
- Don’t crowd the eggs: if wanting to make more than 6 eggs but sure to use a large pot and know that making several eggs at once can change the cook time. Due to the water to egg ration and eggs changing the temperature of the water.
- Egg sizing: This recipe was tested using large eggs. If using extra large or jumbo eggs, adjust your cook time by ~1 minute more.
- Storage: I recommend consuming unpeeled eggs within 5-7 days and unpeeled eggs less than 3 days.
Nutrition Information
Nutritional information is provided as a courtesy and is automatically calculated. It should only be construed as an estimate rather than a guarantee. Ingredients can vary and Kroll’s Korner can’t make any guarantees to the accuracy of this information.
📸 Photography by Creating Kaitlin
