Coffee Cookie Bars
This post may contain affiliate links. Please read our disclosure policy.
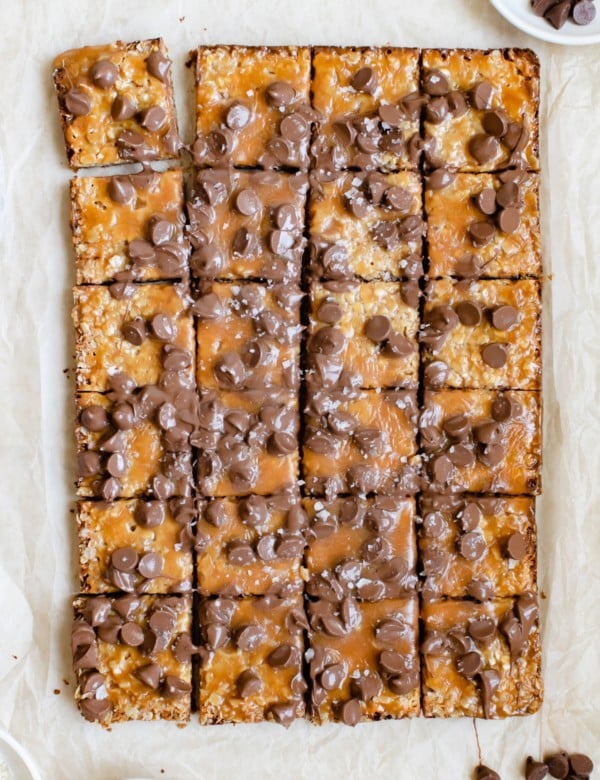
Okay, you may know these bars as “Coffee Toffee Bars” or “Coffee Cookie Crack Bars.” No matter what you call them, one thing is certain, they’re completely irresistible!
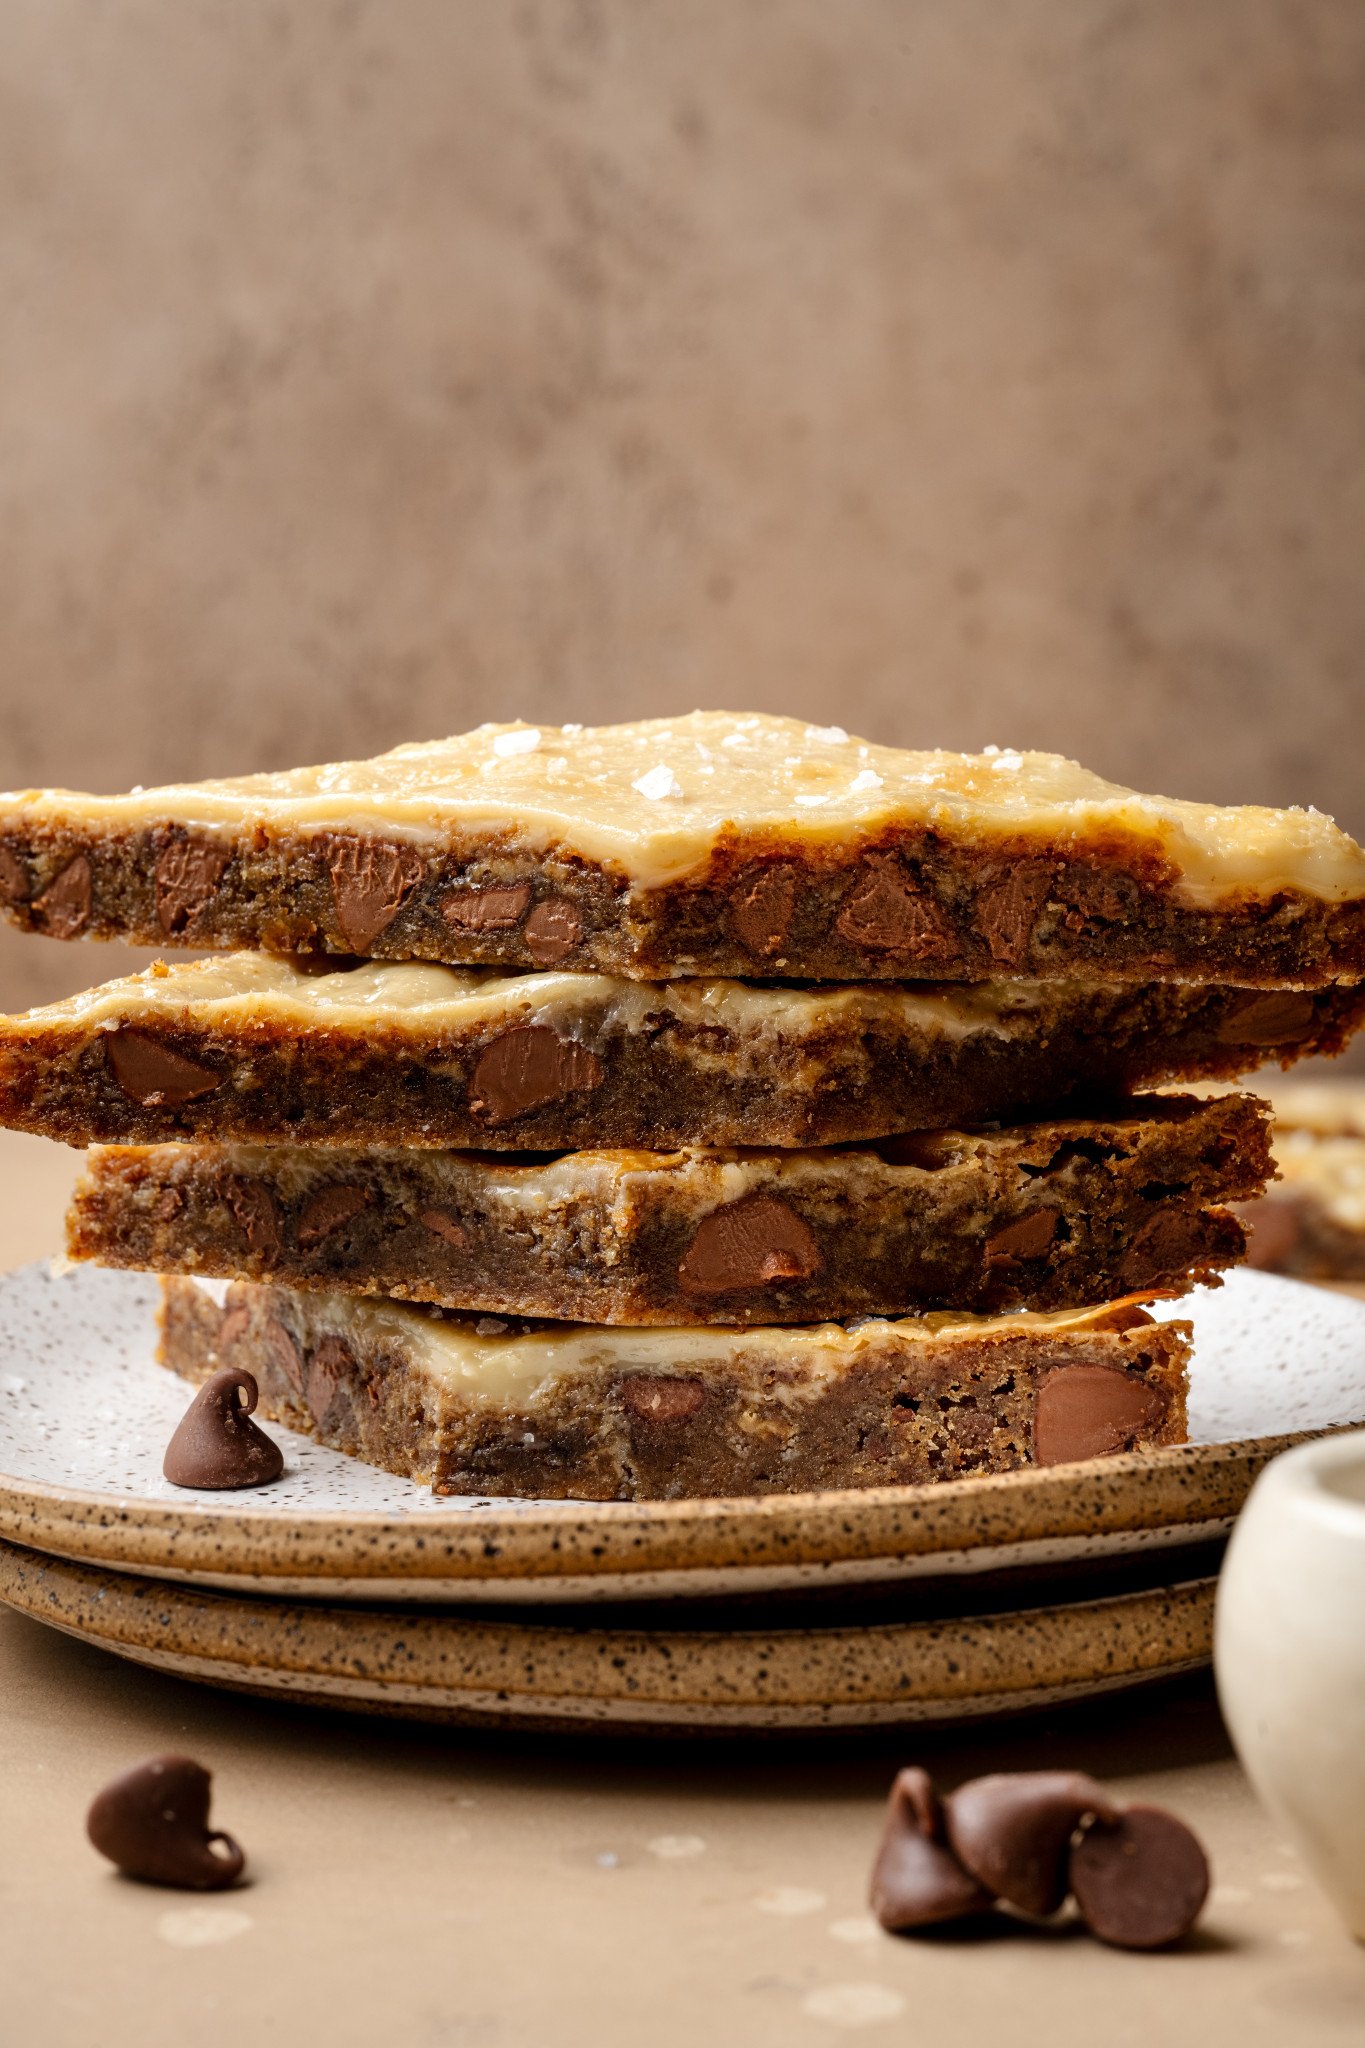
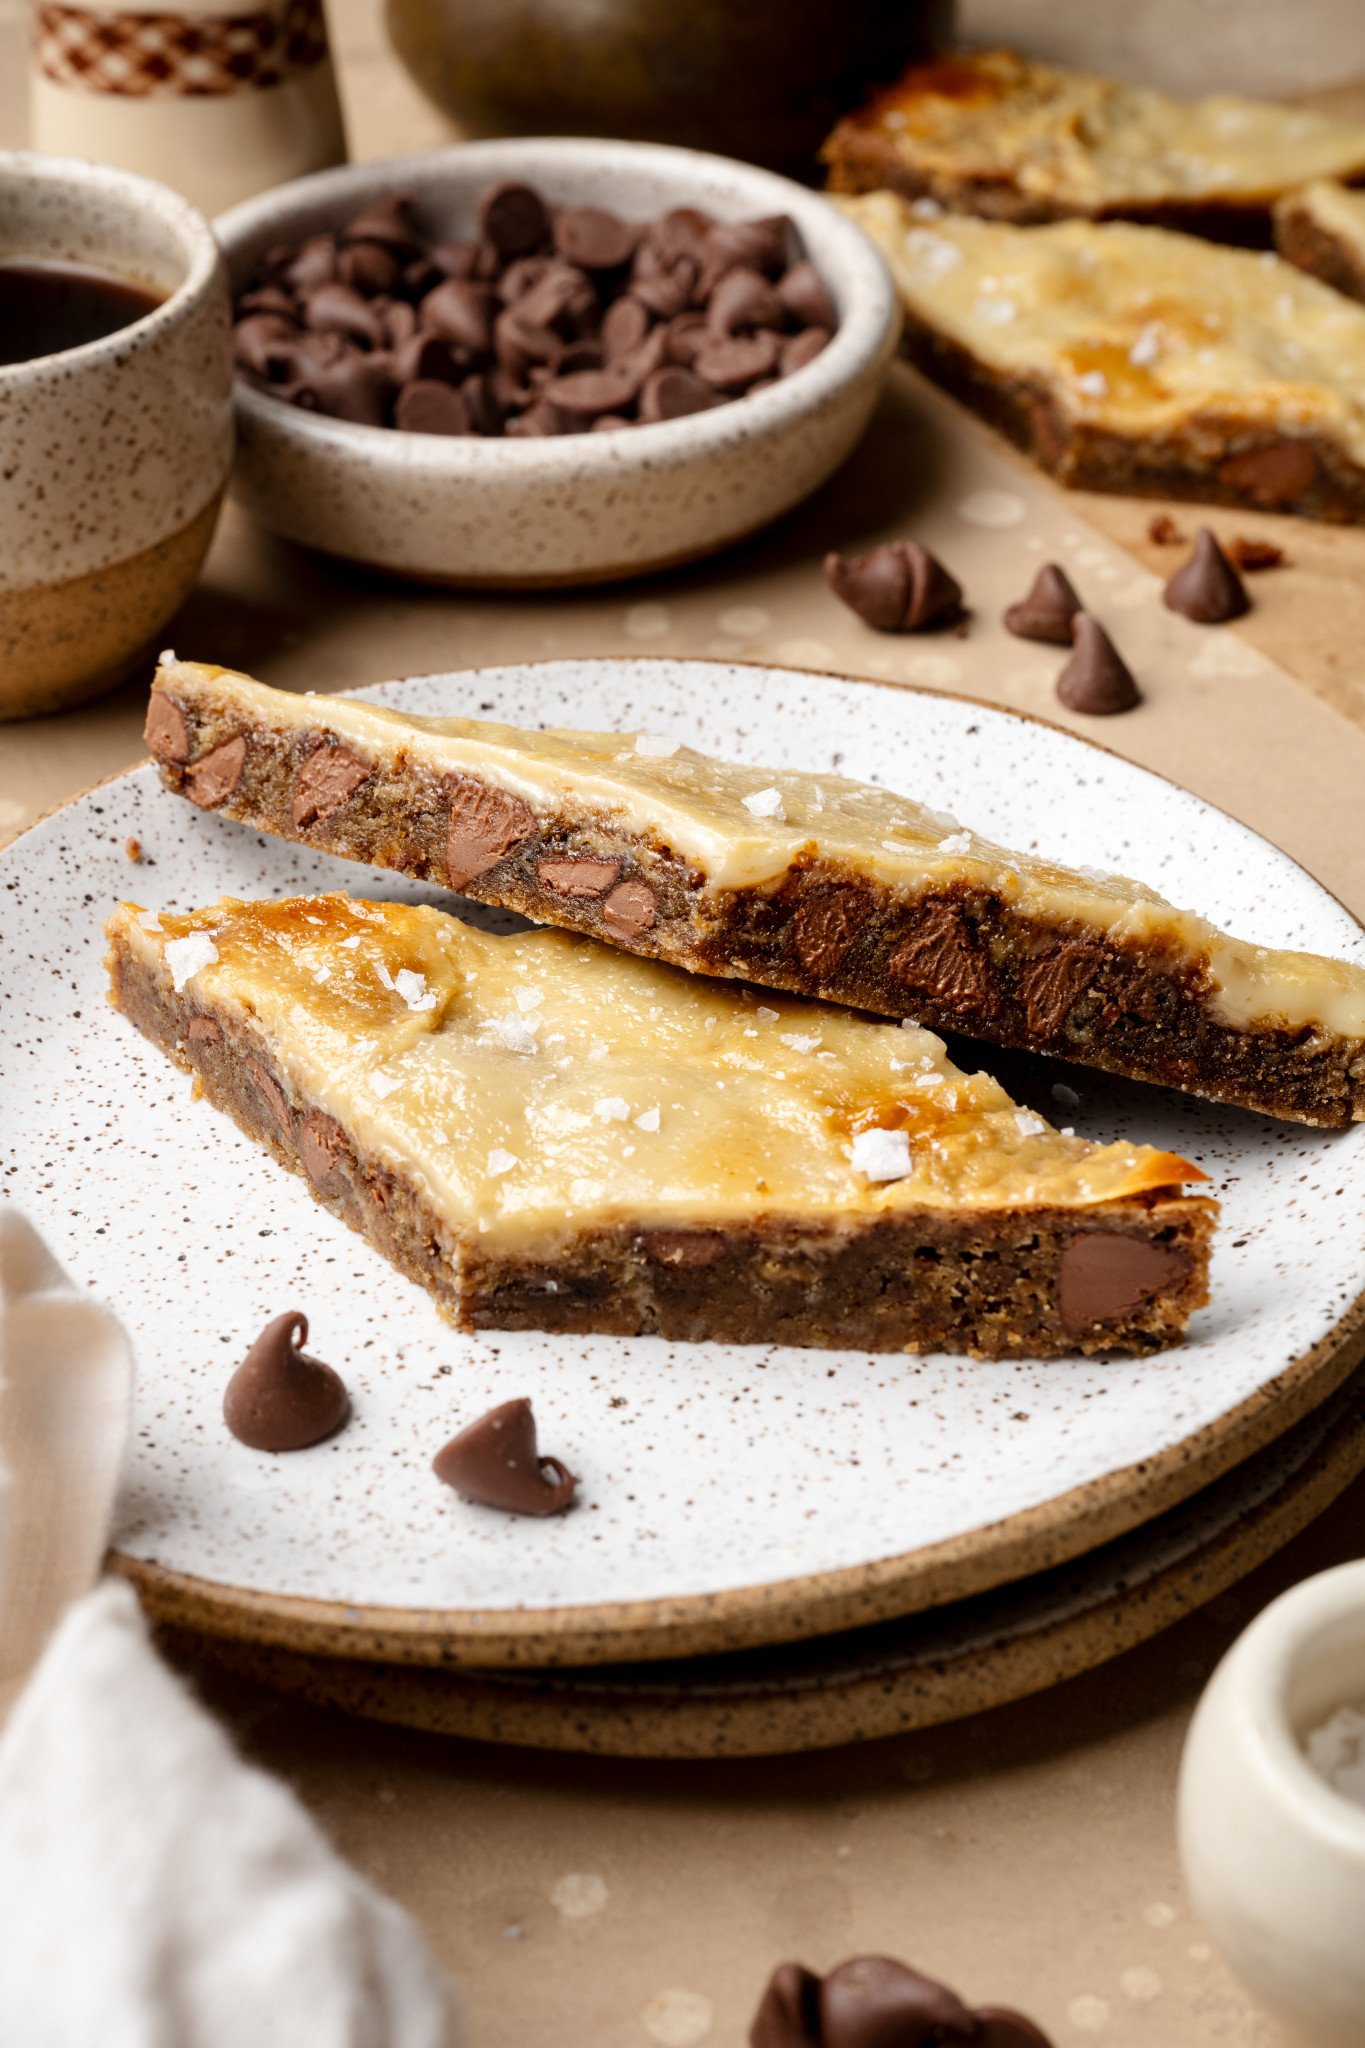
These chewy, coffee-infused cookie bars are packed with rich toffee flavor, making them the perfect sweet pick-me-up any time of day. They’re the kind of dessert you’ll want to cut into, saying, “just one more square”…until suddenly half the pan is gone.
And the best part of my version is they’re egg-free and nut-free, so they’re also great for sharing with a crowd! Plus, they’re freezer-friendly, so you can always keep a batch stashed away for when that sweet craving hits. Trust me, you’ll thank yourself later!
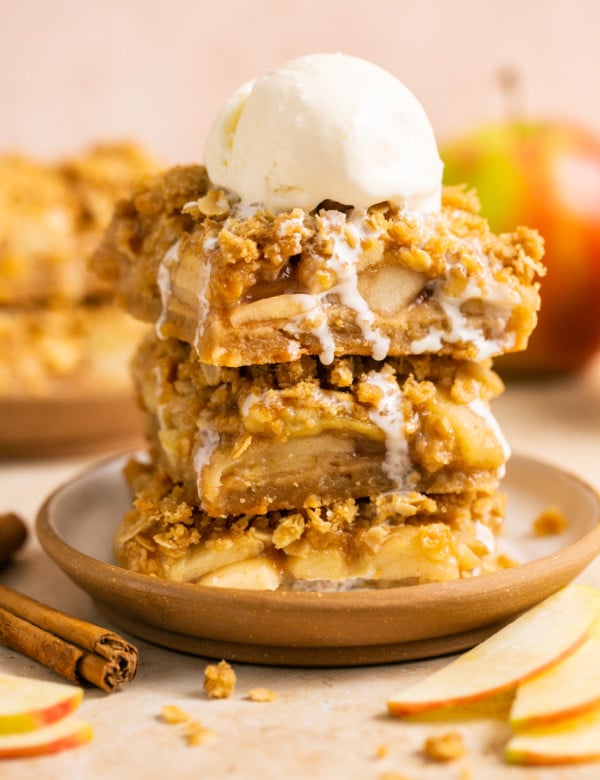
Some other desserts you’ll probably like if you like these Coffee Cookie Bars are my Caramel Chocolate Bars, Brown Butter Chocolate Chip Blondies, and Coffee Cake Cookies!


 Table Talk with Tawnie

So here’s the story about these Coffee Cookie Bars (aka Coffee Toffee Bars). Cameron’s grandmother makes a delicious recipe for Coffee Toffee Bars. Her recipe is made with almonds and almond extract and well, unfortunately, Cameron is allergic to nuts. After having these bars so many times at her house, I knew I needed to figure out a nut-free version so everyone could enjoy this recipe. Once one day we walked over to her house and I asked if she would share the recipe with me. She gave me the recipe on a handwritten on a 3×5 card. I excitedly ran home and started testing and 3 batches later, I nailed the recipe for these Coffee Cookie Bars. I was so happy I had made a nut-free version of her toffee bars that still tasted just as delicious and Cameron was equally as happy too, haha!
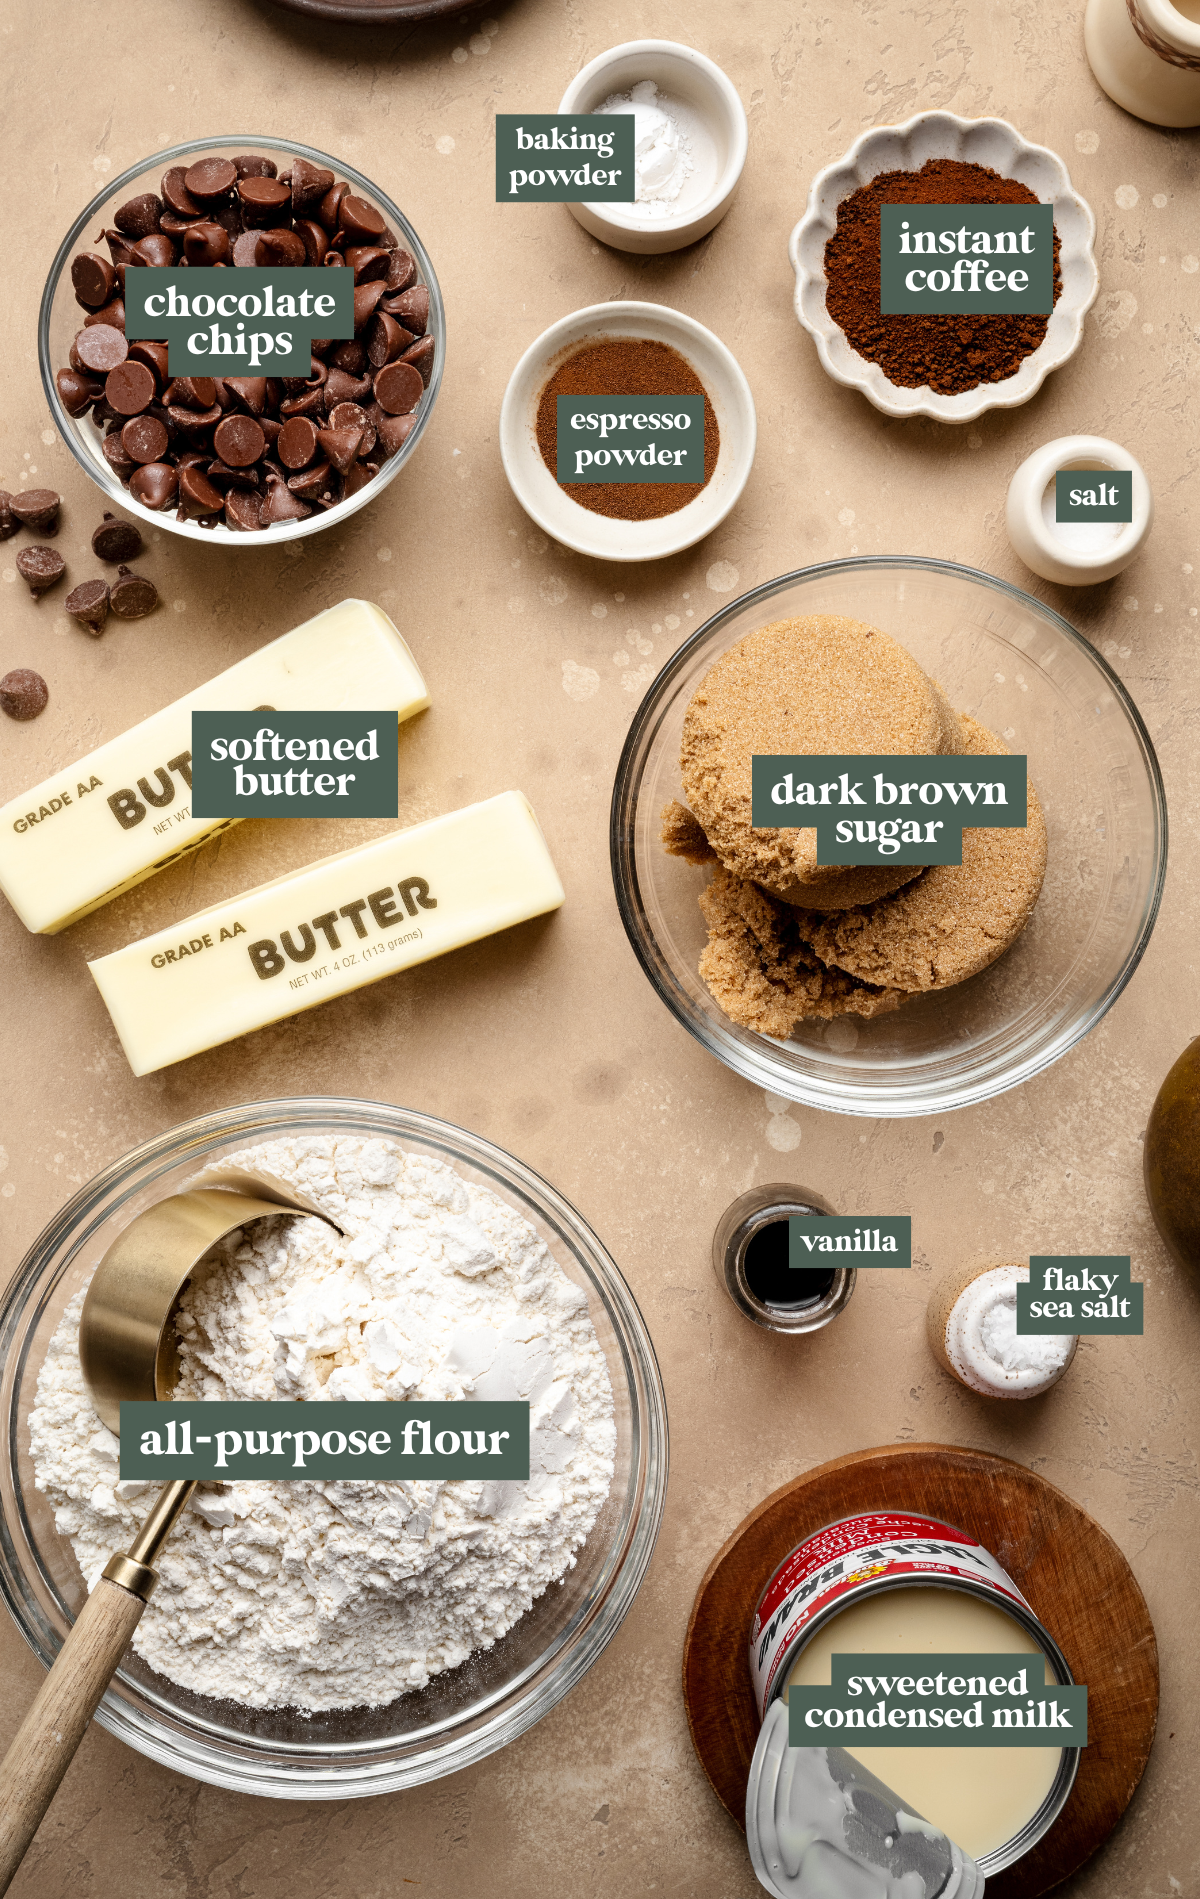
- Brown sugar: I used a dark brown sugar in this recipe. The brown sugar will get creamed with the softened butter in the first step.
- Instant coffee granules: You’ll need two hefty tablespoons of instant coffee. I use Nescafé, but any brand works.
- Flour: All-Purpose flour is the only flour I’ve tested with this recipe. Be sure to spoon and level the flour to ensure accurate measurements.
- Chocolate chips: Milk chocolate chips are the best in this recipe!
- Sweetened condensed milk: You will need one can of sweetened condensed milk for the top layer of these toffee bars.
Step by Step Directions
(For the full recipe, scroll down to the recipe card below)
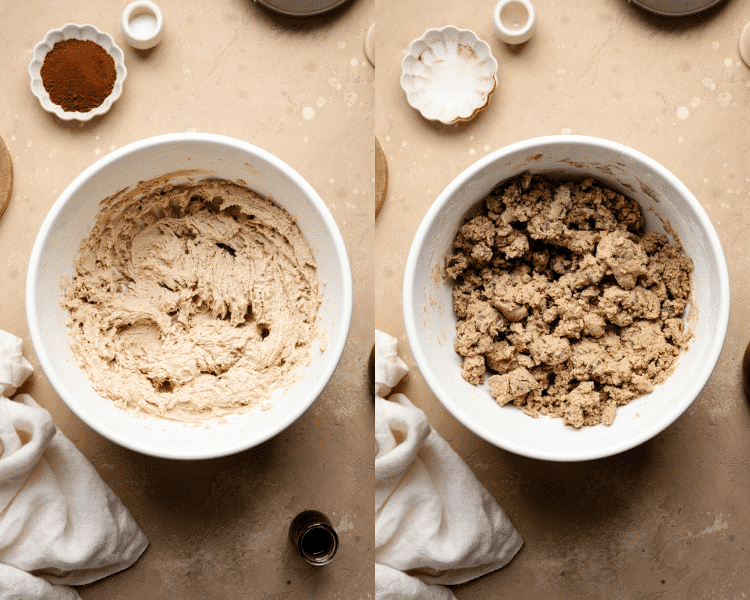
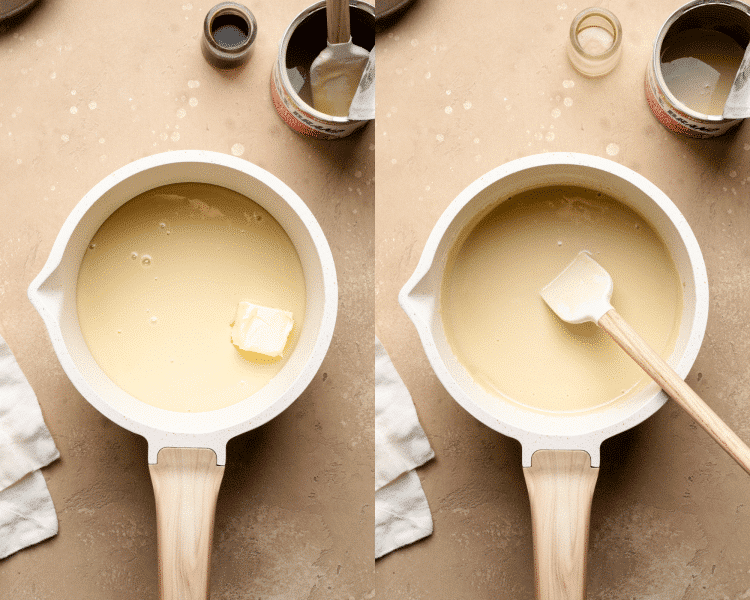
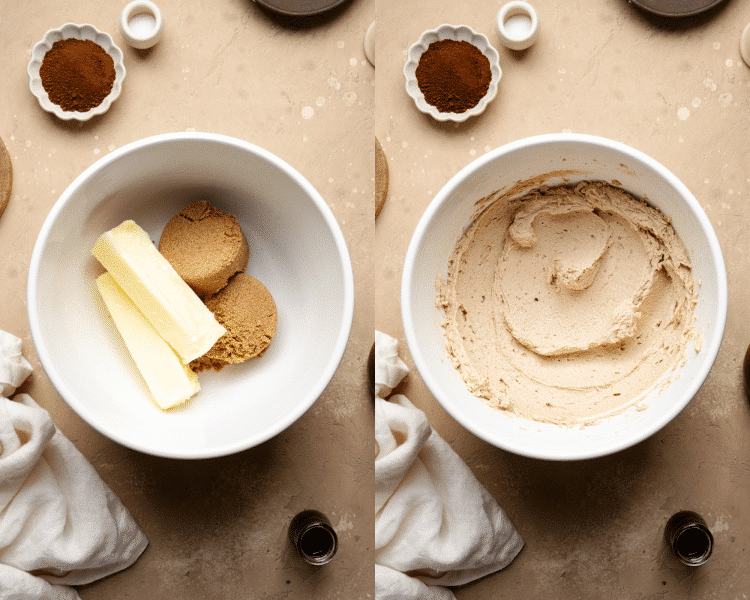
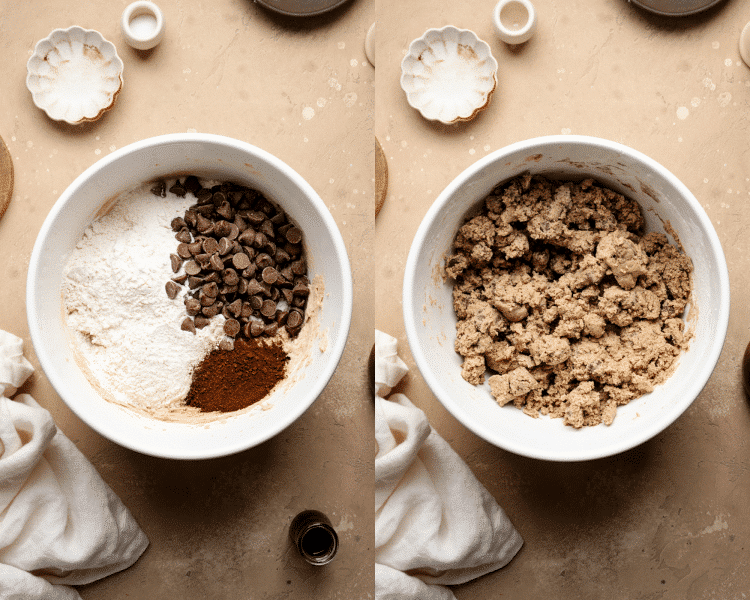
Cream the butter and sugar. Then add the rest of the coffee cookie ingredients and mix to combine.
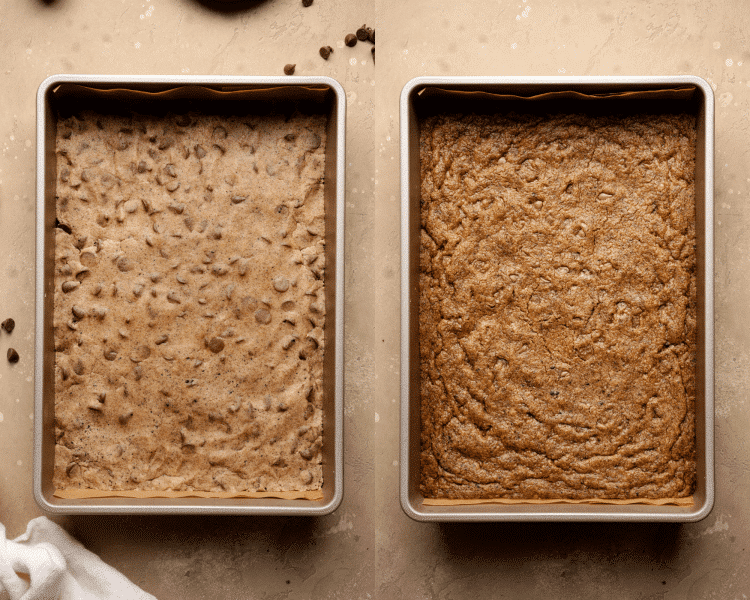
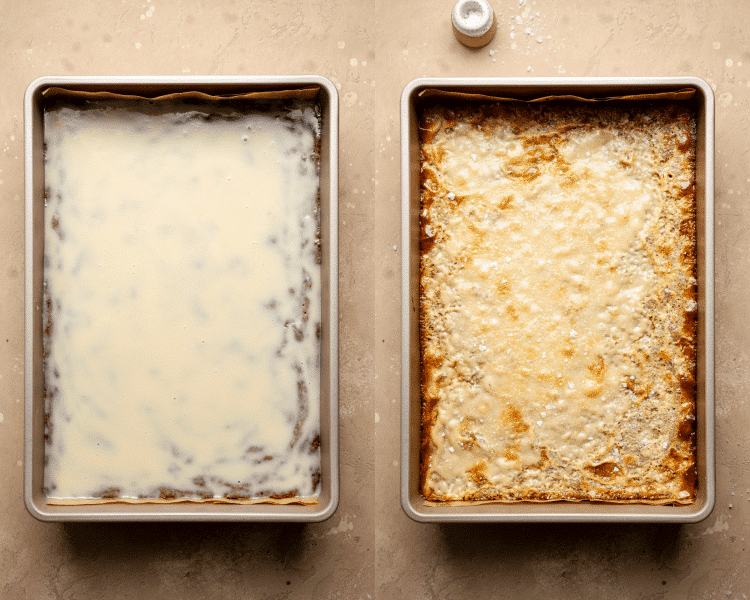
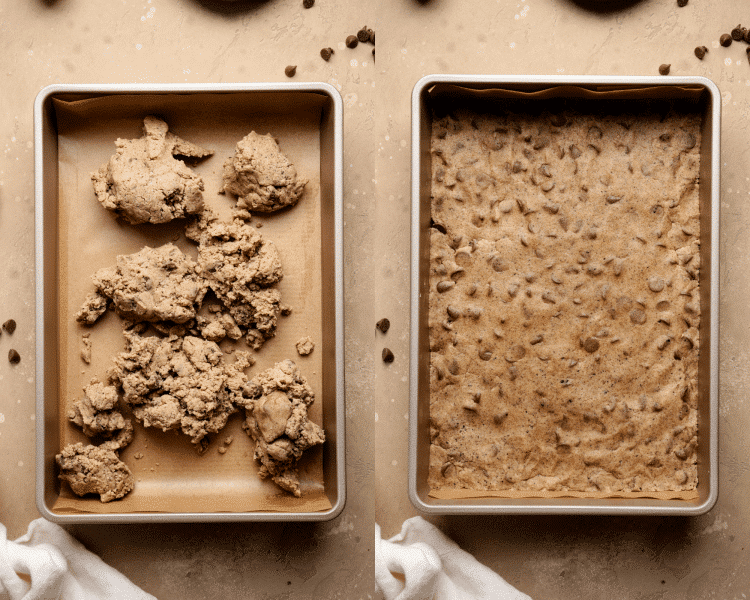
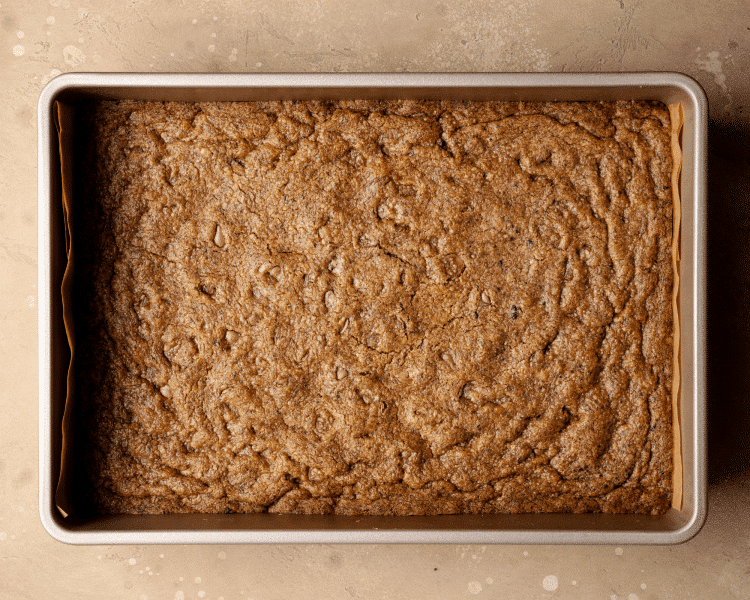
Press into pan & bake
Press mixture into a prepared 9×13 pan and bake for 18-20 minutes.
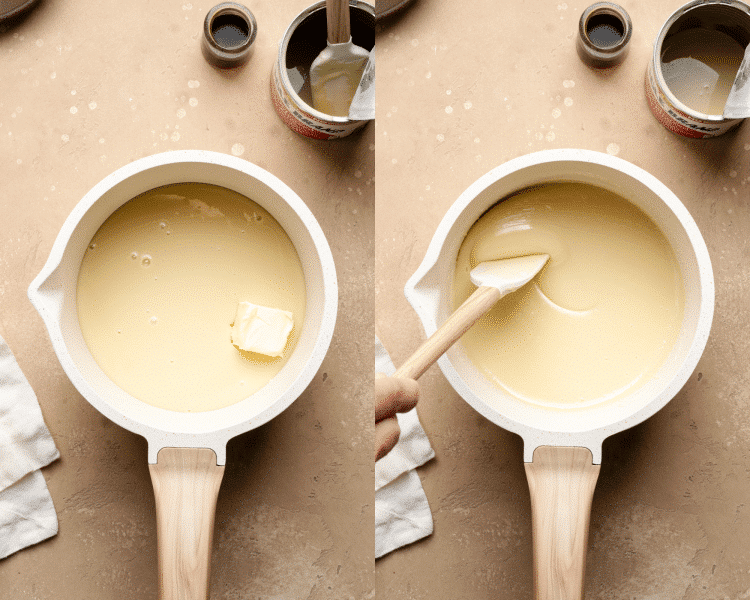
Make topping
Meanwhile, combine the ingredients for the top layer in a small saucepan over low heat.
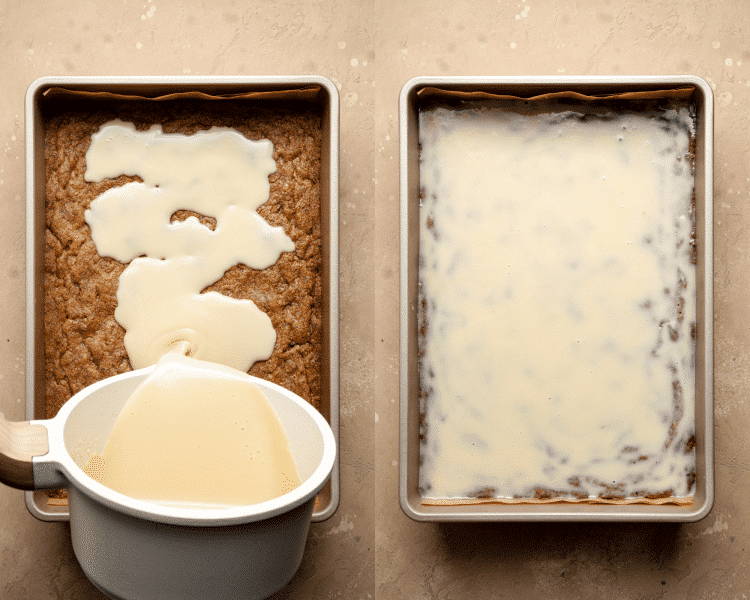
Bake again
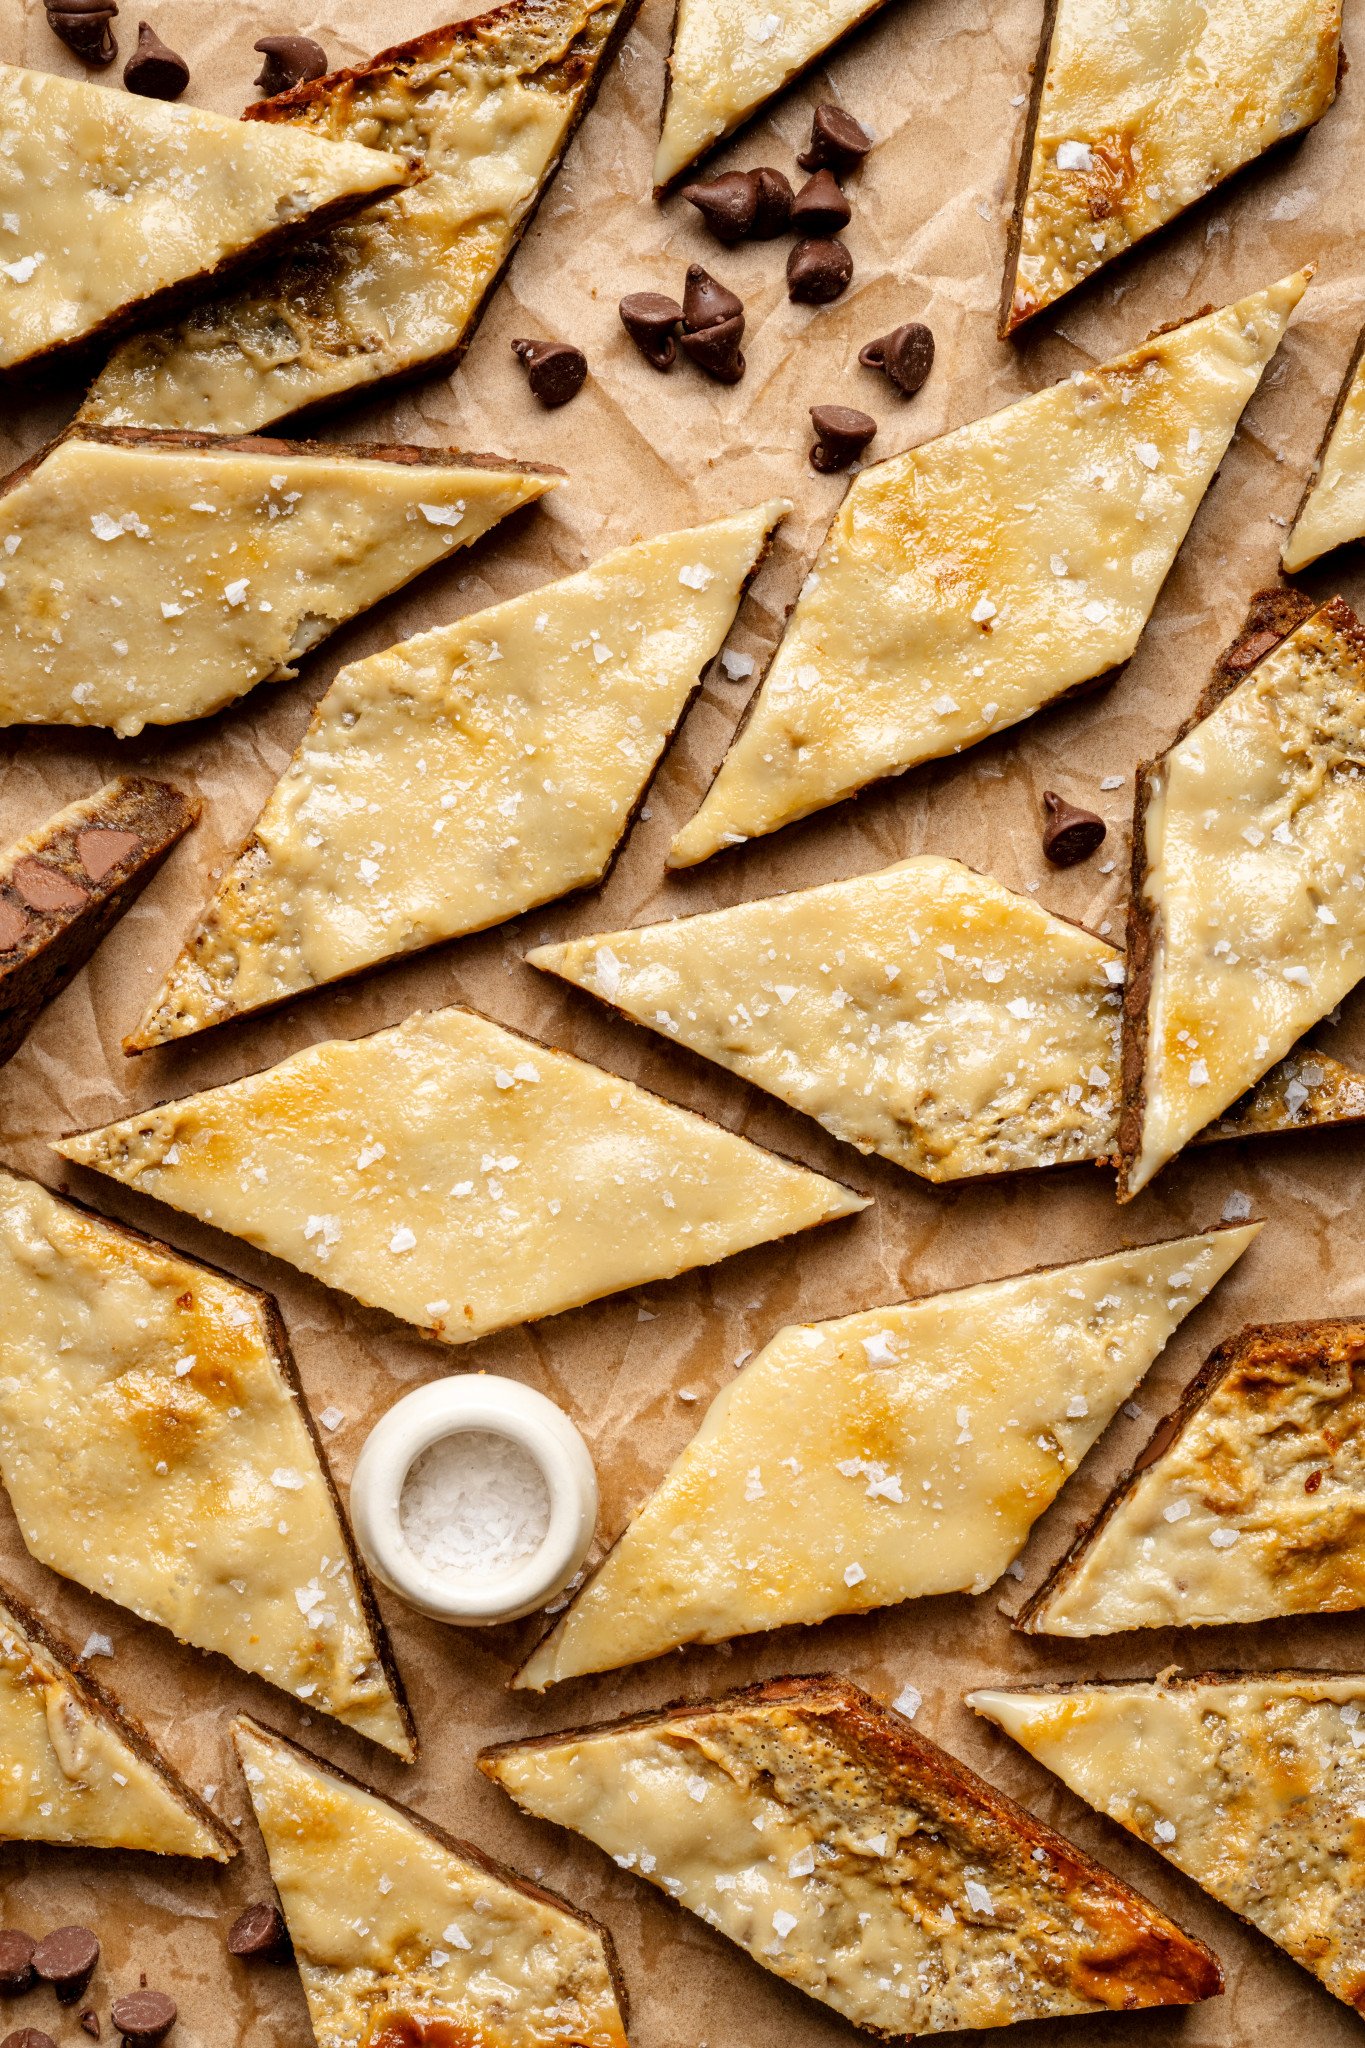
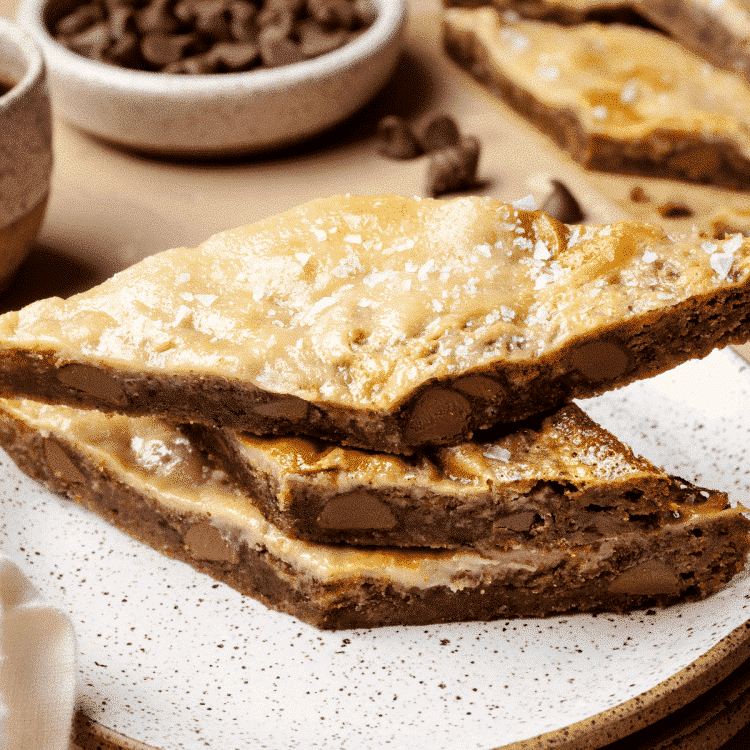
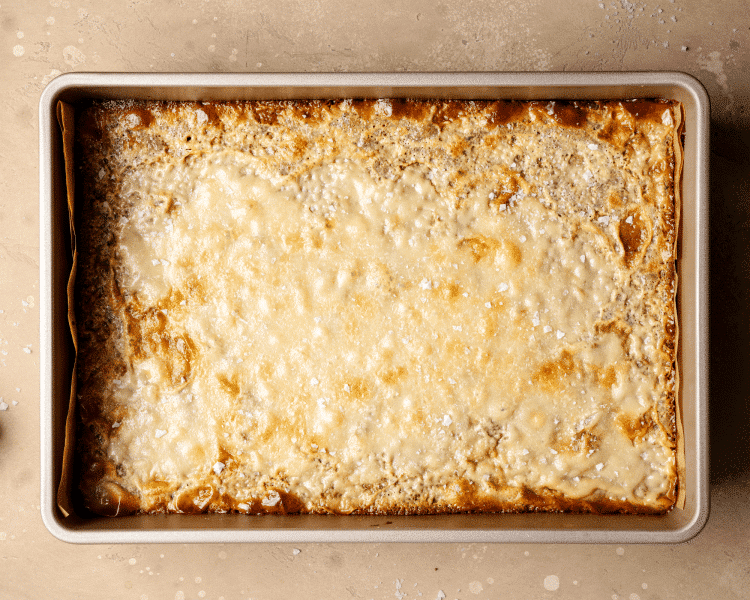
add the top layer and bake again for 8-10 minutes (or until top layer is set). Remove from oven and sprinkle flaky salt.
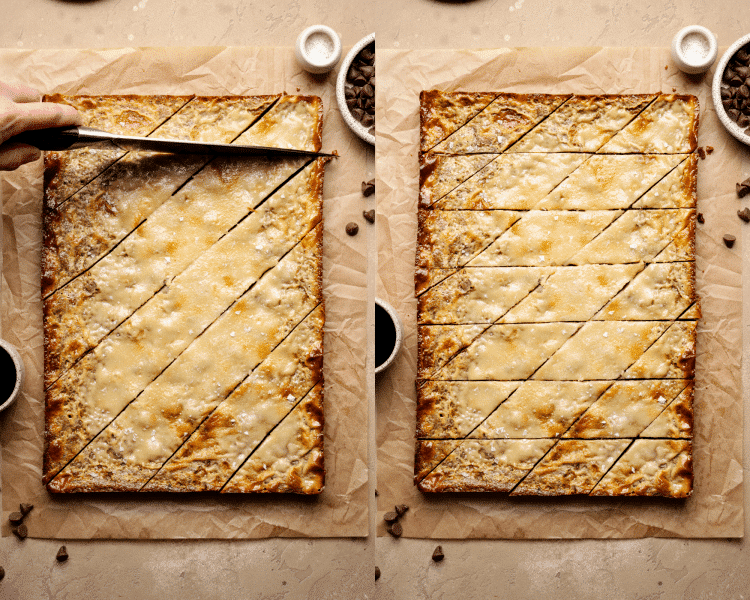
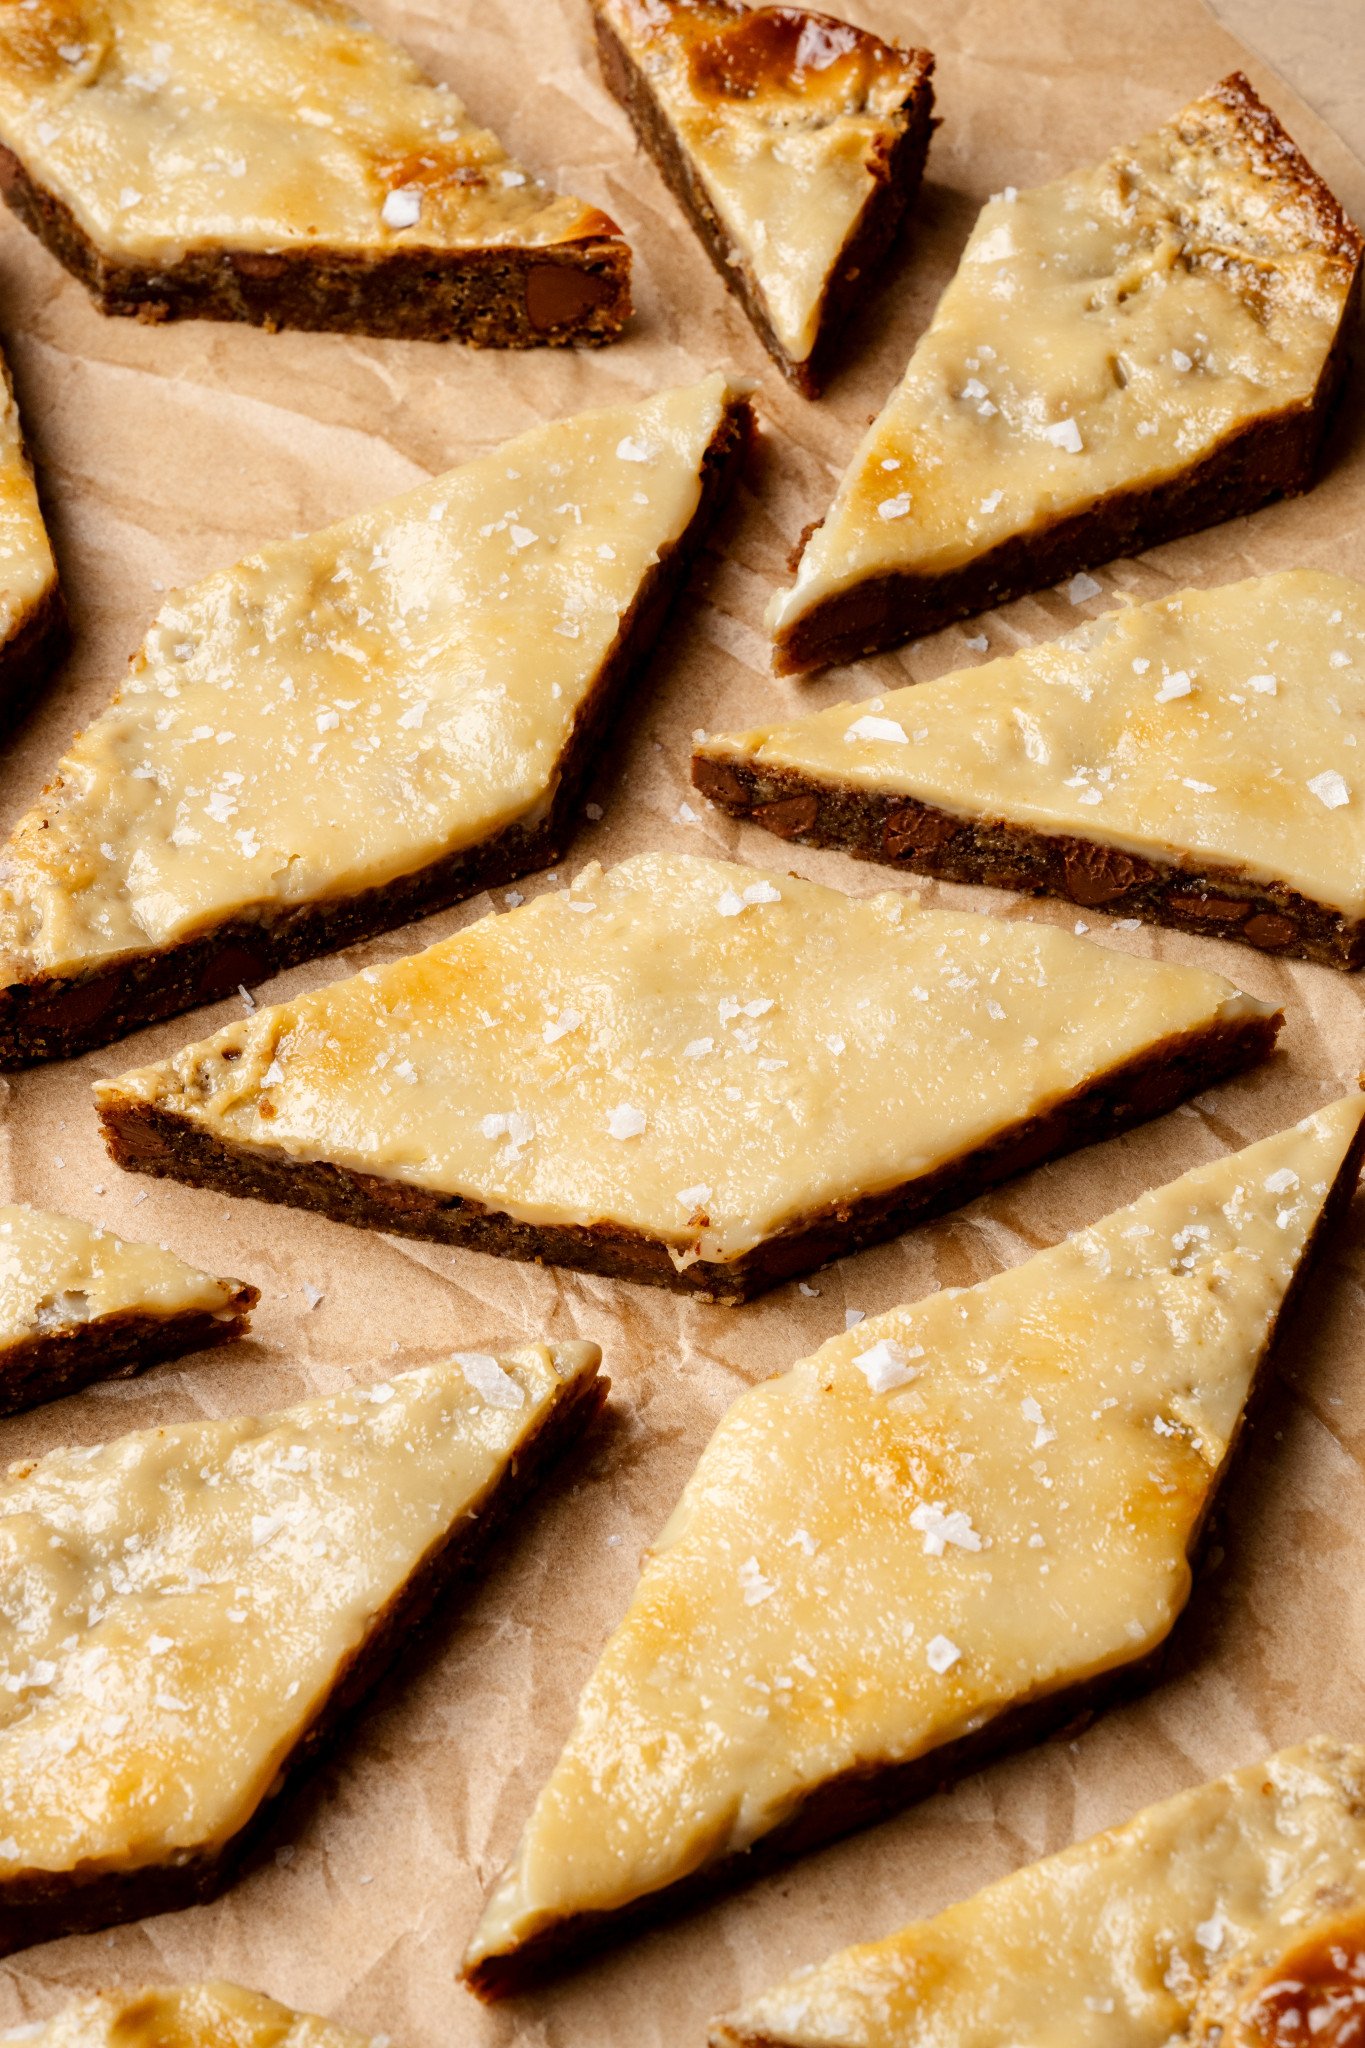
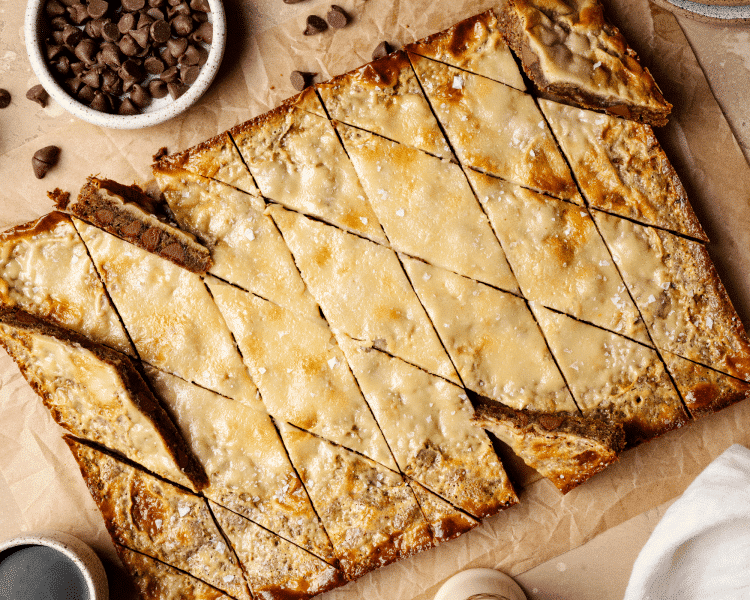
Cut into bars and enjoy!
Then let the bars cool COMPLETELY (at least 30 minutes-1 hour). The longer the better, so the topping has time to set and not be goopy. Cut into diamond-shaped bars and ENJOY!
Expert Tips
- Don’t use the microwave to soften butter: The microwave method typically melts the butter a little, and melted butter will result in a different baked good that you don’t want.
- To soften butter quickly: You can cut the butter into small chunks and place it near a warming stove or windowsill, or put the butter in a baggie and use a rolling pin or meat pounder to flatten the butter.
- Spoon and level flour: Spoon the flour into your measuring cup and be sure it’s leveled. Do not scoop the flour out of the container/bag with your measuring cup because you could end up with 50% more than you need. Spoon and level by using a spoon to scoop the flour into the measuring cup and use the back of a knife to level off the top of it.
- Baking times: My oven tends runs hot, so I baked these bars at 350°F for 18 min, and then after the condensed milk, I just did another 7-8 min. Just keep an eye on it 🙂 Some people say the topping is too “goopy,” so they may need to bake a little longer (~10-15 minutes).
- Let bars cool completely: Make sure to let the bars cool for at least 30 minutes to an hour. The longer the better, so the topping has time to set and not be goopy. You can place them in the fridge or freezer to help speed up this process.
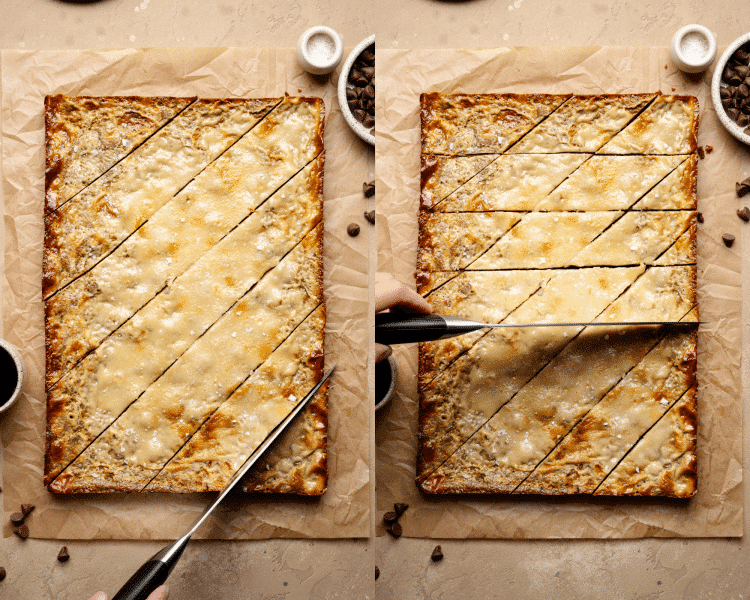
- Diamond-shaped bars: Once the bars have cooled, cut diagonally across the bars beginning in one corner—the lower left corner is an easy place to make your first cut—and cutting from one toothpick to the next closest on the perpendicular side. Continue making cuts across the bars, moving from left to right. When you’ve cut all the way across, begin cutting from the corner above where you started.
Variations / Substitutions
- Add nuts: If you do want to add nuts like Cameron’s Grandma’s original recipe, use almond extract instead of the vanilla extract in both the cookie layer and the top condensed milk layer, and add 1/2 cup chopped almonds in the cookie bar layer.
- Chocolate chips: I love milk chocolate chips in these bars since they’re meant to be sweeter, but feel free to use semi-sweet or dark chocolate chips if you prefer.
Storage / Freezing
- Storage: Store these bars in an airtight container in the fridge for up to 1 week.
- To freeze: Let bars cool completely then place in the freezer for up to 3 months.
FAQs
Do I need a candy thermometer for this recipe?
No, even though this recipe is often referred to as “Coffee Toffee Bars” these bars don’t actually have toffee in them so you do not need a candy thermometer. It’s one of the reasons I love these soft, chewy bars!
Do I have to use espresso powder?
No, the espresso powder is optional but it just gives these bars a bolder coffee flavor.
Do these bars have a strong coffee flavor?
The coffee flavor is present but not overpowering. It gives the bars a rich depth that pairs perfectly with the sweet toffee flavor. If you aren’t a fan of a deep coffee flavor, you can omit the optional espresso powder.
shop this post
 Buy Now →
  Buy Now →
 More Recipes You’ll Love
Before You Begin! If you make this, please leave a review and rating letting us know how you liked this recipe! This helps our business thrive & continue providing free recipes.
Ingredients
- 1 cup softened unsalted butter (2 sticks, 16 Tbsp.)
- 1 cup dark brown sugar (packed)
- 2 cups all-purpose flour (spooned and leveled)
- 1 cup milk chocolate chips
- 2 Tbsp. instant coffee granules
- 1/2 tsp. baking powder
- 1/2 tsp. salt
- 1/2 tsp. vanilla extract
- 1/2 Tbsp. espresso powder (optional)
For the top layer:
- 1 (14 oz.) can sweetened condensed milk
- 2 Tbsp. unsalted butter
- 2 tsp. vanilla extract
- 2 tsp. flaky sea salt
Last step! If you make this, please leave a review and rating letting us know how you liked this recipe! This helps our business thrive & continue providing free recipes.
Instructions
- Preheat: Preheat the oven to 350° F and line a 9×13 baking pan with parchment paper.
- Cream butter and sugar: Cream the softened butter and brown sugar using either a stand mixer or a hand mixer until light and fluffy, 2-3 minutes.1 cup softened unsalted butter, 1 cup dark brown sugar

- Add in the rest of the ingredients: Add the all-purpose aflour, chocolate chips, instant coffee, baking powder, salt, vanilla extract (and optional espresso powder if you have it!) Mix until combined on medium speed. The mixture may seem crumbly, but should come together when you press it between your fingertips.2 cups all-purpose flour, 1 cup milk chocolate chips, 2 Tbsp. instant coffee granules , 1/2 tsp. baking powder, 1/2 tsp. salt, 1/2 tsp. vanilla extract, 1/2 Tbsp. espresso powder
- Press into pan: Press into a 9×13-inch oven-safe baking dish (you can line with parchment paper to make it easier to remove bars from the pan). Use clean hands to press the mixture down. Or use the back of a measuring cup or a rubber spatula to press down in an even layer.
- Bake: Bake for 18-20 minutes.
- Make the top layer: While the cookie layer is baking, heat the condensed milk and the butter in a small saucepan over low heat. Stir occasionally and heat on low until the condensed milk becomes nice and smooth, ~5 minutes. (Keep on low so it doesn't burn the bottom).
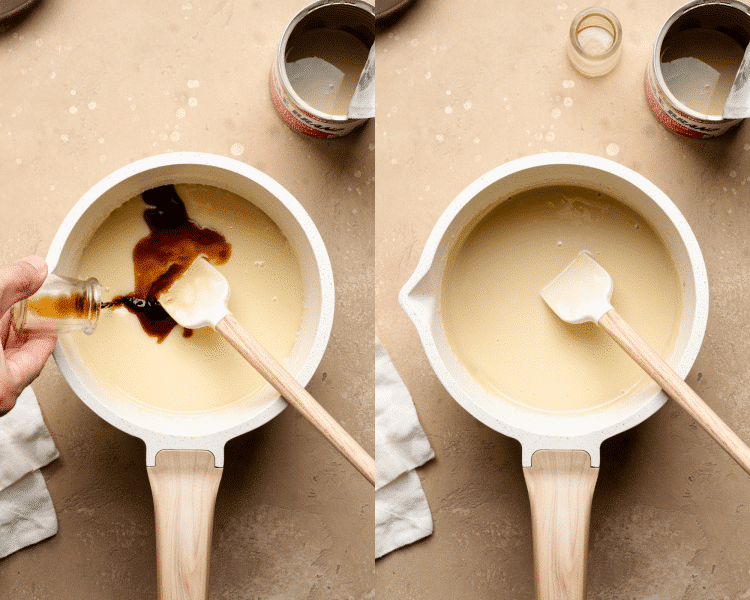
- Add the vanilla: Remove from heat and stir in the vanilla extract.
- Add the top layer: Once the cookie layer is done, pour the condensed milk on top in an even layer. Place back in oven and bake again for 8-10 minutes, or until the top layer looks set.
- Let cool: Remove from the oven, it will be bubbling, and sprinkle with sea salt flakes. Let cool for at least 30 minutes-1 hour. The longer the better so the topping has time to set and not be goopy. You can place in the fridge or freezer to speed this process up.2 tsp. flaky sea salt
- Cut into diamond-shaped bars: Once the topping has cooled, cut diagonally across the bars beginning in one corner. Continue making cuts across the bars, moving from left to right. When you’ve cut all the way across, begin cutting from the corner above where you started.
- Store and enjoy : Store in the fridge or freezer. We love these even more day 2 and 3…and 4, so they can easily be made in advance if needed.
Notes
- Softened butter: We’re all human and sometimes forget to take the butter out early to let it soften. Do not place in the microwave, it will melt, and we don’t want that in this recipe. If you need to soften quickly, here are two ways I’ve tried: You can cut the butter into small chunks and place it near a warming stove or windowsill, or put the butter in a baggie and use a rolling pin or meat pounder to flatten the butter.
- But if you have the time, I recommend letting it come to room temperature on the counter. Butter is officially softened and ready to use when it can be easily squished between your thumb and forefinger.
- Storage: Let bars cool completely, then store in the fridge or freezer.
- Add nuts: If you do want to add nuts like Grandma’s original recipe, use almond extract instead of the vanilla extract in both the cookie layer and the top condensed milk layer, and add 1/2 cup chopped almonds in the cookie bar layer.
- Baking times: My oven tends runs hot, so I baked these bars at 350°F for 18 min, and then after the condensed milk, I just did another 7-8 min. Just keep an eye on it 🙂 Some people say the topping is too “goopy,” so they may need to bake a little longer (~10-15 minutes).
Nutrition Information
Nutritional information is provided as a courtesy and is automatically calculated. It should only be construed as an estimate rather than a guarantee. Ingredients can vary and Kroll’s Korner can’t make any guarantees to the accuracy of this information.
📸 Photography by Creating Kaitlin

Delicious! The whole family loved them. easy to prepare. I will definitely be making these again. !
Thank you so much Linda! 🙂
Overall an easy and delicious recipe! This was my first time making it and while it wasn’t perfect, it still came out very well. My husband wanted to eat all of it right away.
Maybe it was because I made some small errors, but I found it difficult to cut. I broke it into pieces and that was perfectly fine.
Glad you it was yummy thank you for making! Sorry it was hard to cut. I would recommend a sharp knife or if you had in fridge letting it sit a little prior to cutting.
I’ll be making these soon but I was wondering, would you share Grandma’s original almond bar recipe?
Hello! It had 1 tsp. Almond extract added in and 1/2 cup nuts stirred into the dough 🙂
I made these recently and they turned out so good! I used 2 tbs of nespresso powder and baked for a few minutes longer than stated. I did accidentally make this recipe a 2 day process but it still turned out good lol. I made the cookie base when I realized i grabbed evaporated milk not sweetened condensed milk. So I just did the topping the next day and honestly turned out great. Personally, I think they taste better if they’ve been sitting out for a day rather than right out of the oven. But either way the whole pan was eaten! Great and easy recipe!
I agree they taste better after they completely set up 🙂 thank you so much for making!
The cookie layer looks so delicious. How does it taste if you serve it without the topping?
Thank you! I am not sure, I haven’t even made it without. If you want just a cookie bar, you can try any of these recipe: https://krollskorner.com/recipes/desserts/cookies/sheet-pan-chocolate-chip-cookies/ or https://krollskorner.com/recipes/desserts/bars-brownies/chocolate-chip-blondies/
These bars are to die for! I’ve made them on several occasions and they are always such a crowd pleaser! I follow the directions exactly every time and they turn out perfect. I have had to refrigerate them on a couple occasions to help them set up. You won’t be disappointed if you try these. 🙂
Thank you soo much Sue, happy you are enjoying them! 🙂
I am wondering if these have to be kept in the fridge? They seemed too hard being on the fridge. Also is there a way to make the topping more appealing to the eye?
Hi Lisa! No they don’t have to be kept in fridge 🙂 and are you topping with the flaky sea salt? That helps. Other than that, I feel like this is just how they look haha I’m sorry!
I am always looking for new recipes to make for Christmas for family and friends. This one sounds awesome and easy. I know they will love them just from the ingredients. Thanks for all your great recipes.
Thank you so much!! 🙂 i hope you love them!
rich and wonderful! pretty simple and had most of the ingredients on hand!
yay! thank you! 🙂
These are really good! Great coffee flavor.
So glad you enjoyed these, Lisa!! 🫶🏻🫶🏻