Meal Prep Breakfast Sandwiches
This post may contain affiliate links. Please read our disclosure policy.

Meal Prep Breakfast Sandwiches are a staple in my household. I love whipping up a batch (or two!) on the weekend and then knowing that I have them in my freezer for mornings when I just don’t have it in me to cook something from scratch for breakfast.
I love how easy they are to prepare and how you really can customize the ingredients to your specific liking. One of my favorite things is to sneak some veggies into the eggs so I start my day off with protein and lots of nutrients (and I mean, what drive-thru breakfast sandwich can say that?!).
These Breakfast Sandwiches are perfect for popping in the microwave for a quick breakfast at home or taking with you to heat up at the office once you get settled. (Cameron is known for this!)
If you want to meal prep a ton of these breakfast sandwiches at once, I highly recommend checking out my Sheet Pan Eggs recipe. Some of my other favorite make-ahead breakfast recipes are my Slow Cooker Breakfast Casserole, Copycat Starbucks Spinach and Feta Wraps, and Breakfast Enchiladas!
Or if you’re not in the mood for eggs for breakfast, check out my Instant Pot Yogurt, Steel Cut Oats, and Berry French Toast Casserole for more options of dishes you can prep ahead of time.


 Table Talk with Tawnie

I’m a HUGE fan of quick, simple breakfast recipes to help make my mornings as easy as possible. I love having a stash of these Meal Prep Breakfast Sandwiches always on hand in my freezer to pop in the microwave on busy mornings or ones where I just don’t want to fuss over cooking breakfast. These sandwiches are super simple to make, are customizable with your favorite ingredients, and freeze and reheat SO well. I’ve included LOTS of tips and tricks in this post, including notes on egg cooking times, variation ideas, and notes on how to reheat these breakfast sandwiches! Enjoy!
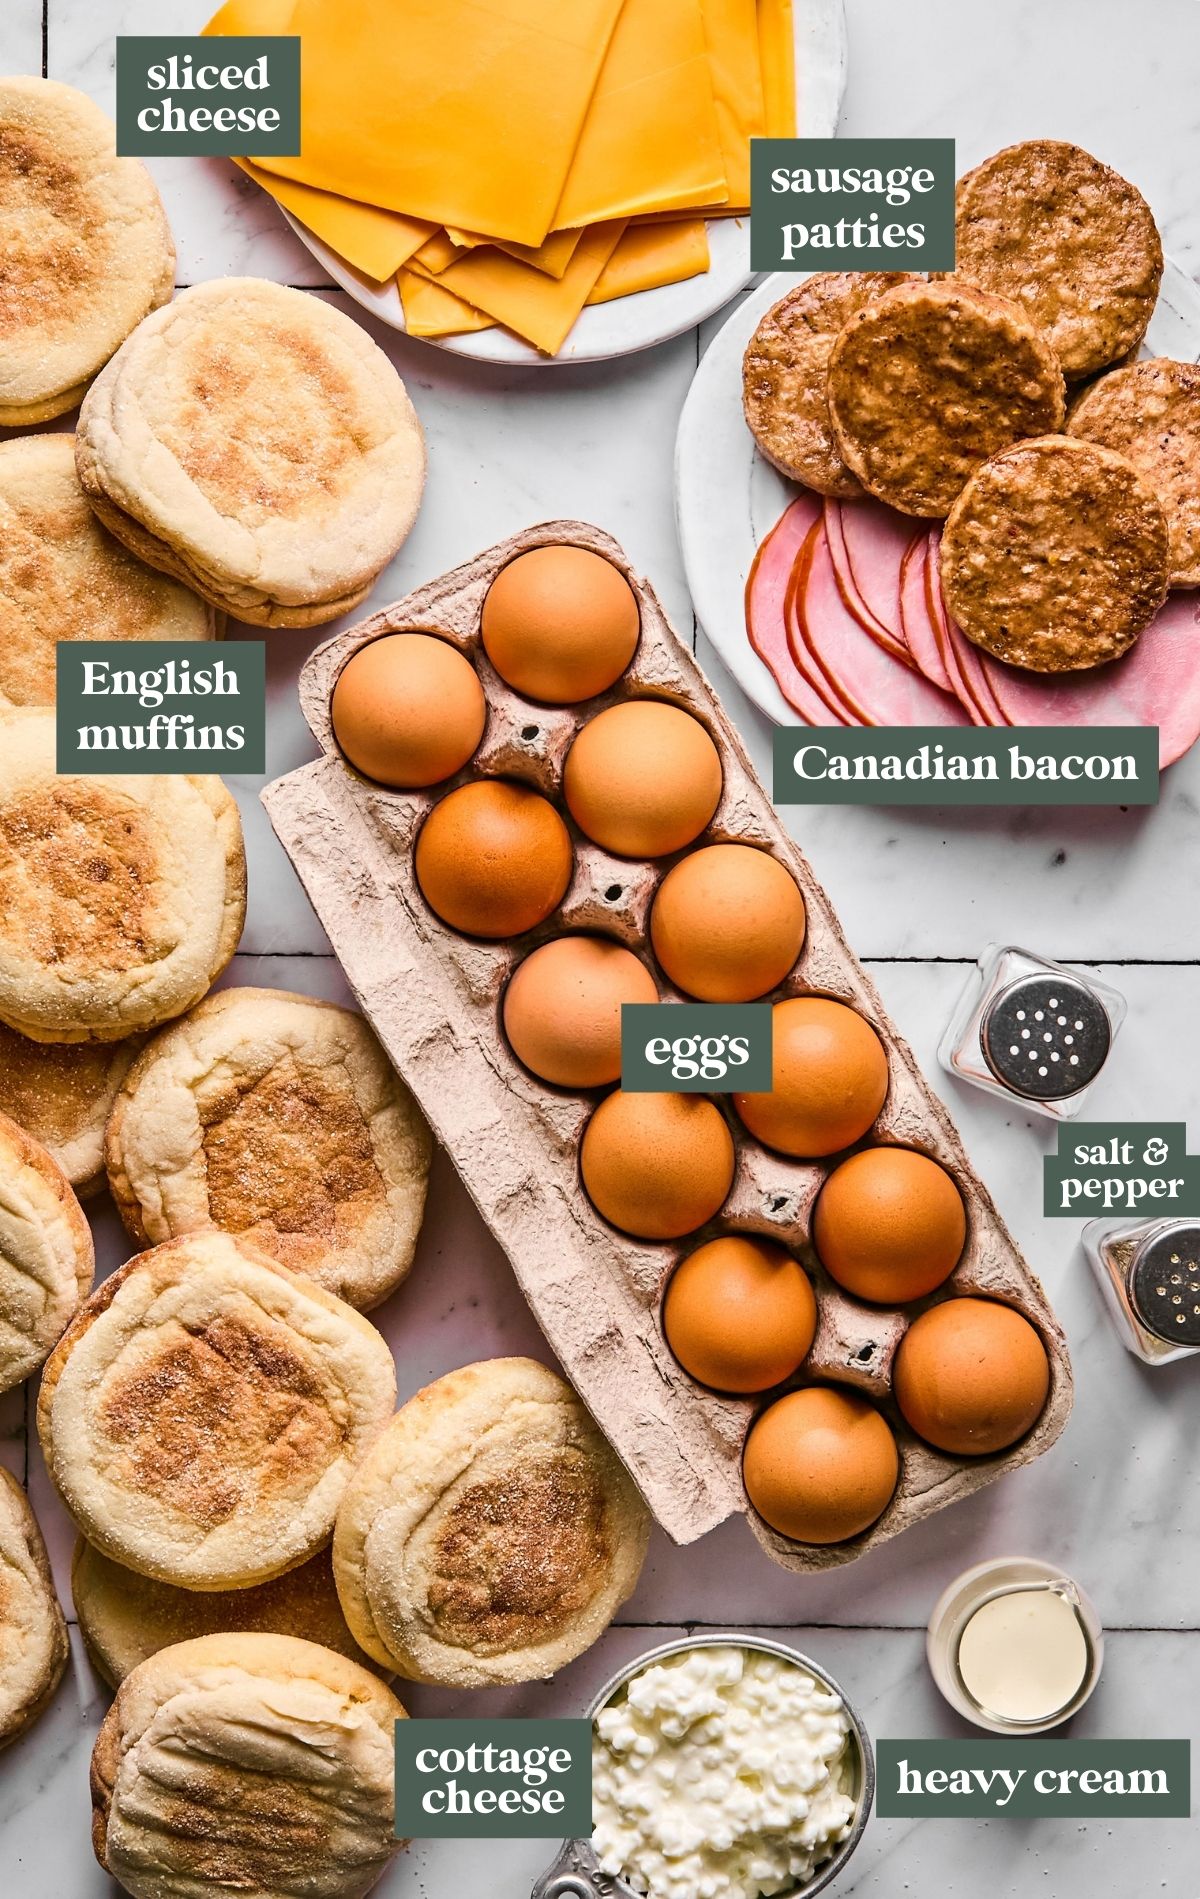
- Eggs: I use 12 eggs when making this recipe in a 9×13 pan. You can also refer to my Sheet Pan Eggs recipe if you want to make a larger pan of eggs – just know that those are a bit thinner than the ones you see in this post.
- Cottage cheese: If you’re someone who dislikes the texture of cottage cheese – don’t worry – you’ll be putting the cottage cheese in a blender with the eggs and heavy cream, so you won’t have that texture at all. The cottage cheese helps make the eggs soft, creamy, and fluffy. Not to mention, cottage cheese adds a pack of extra protein to these eggs, making your breakfast more filling and satisfying.
- Meat options: I love how easy it is to customize these Meal Prep Breakfast Sandwiches to your liking. Here are some of the meat options I recommend: cooked bacon, sausage patty, turkey sausage patty, ham, Canadian bacon, turkey bacon, chorizo
- Sliced cheese: You’ll need 12 slices of cheese for these breakfast sandwiches. I recommend American cheese or thinly sliced cheddar cheese, but feel free to mix it up as you like!
- English muffins: One of my tips to elevate your Meal Prep Breakfast Sandwiches is to toast the English muffins and spread a little butter on them prior to assembling the sandwiches!
- Other ingredients needed: heavy cream or whole milk, salt, fresh black pepper

Step by Step Directions
(For the full recipe, scroll down to the recipe card below)
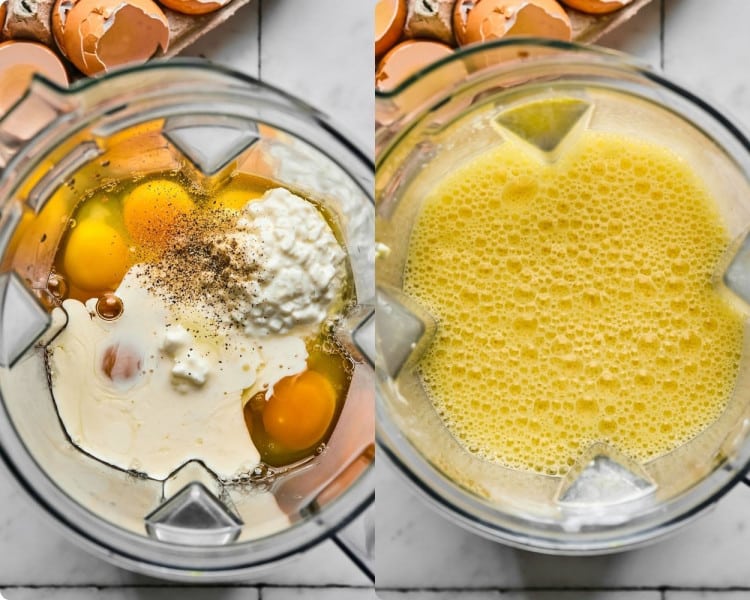
Prepare the egg mixture
Mix the eggs, cream, cottage cheese, salt, and pepper in a high-powered blender until combined.
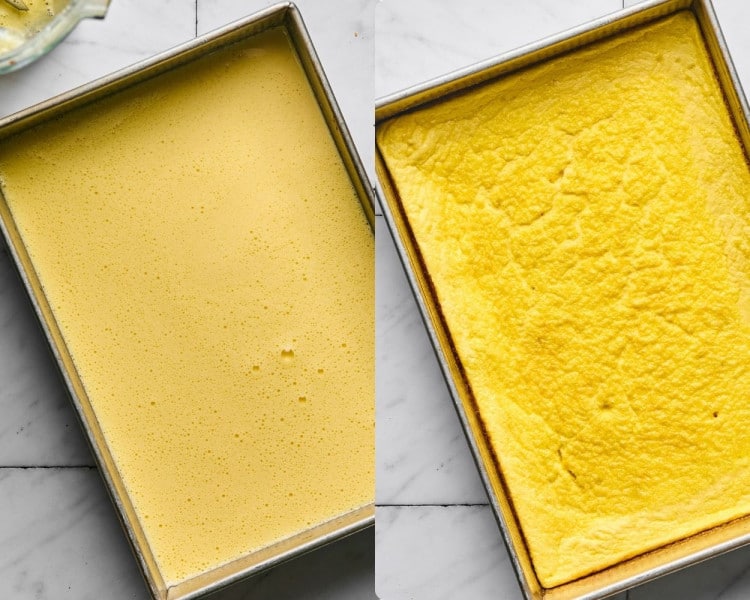
Bake the eggs
Pour eggs into prepared pan and bake for 22-25 minutes, or until center is set.

Cut the eggs & start assembling
Allow the eggs to cool then cut into 12 squares. Lay out the halved English muffins and add one egg square to each, followed by your fully-cooked meat of choice.

Finish assembling & enjoy!
Add cheese slices on top of the meat, and then finish each sandwich with the other half of the English muffin. Then wrap the sandwiches in plastic wrap and foil to freeze, or pop one in the oven to enjoy right away!
Notes on Egg Cooking Times
- Oven temperature: It’s important to note that all ovens vary, so the amount of cook time needed for the eggs will be different from household to household. (For example, my oven runs really hot so things cook faster for me). I recommend cooking the eggs for the low end of the time range and checking them periodically to add more time as needed. Remember: you can always add more time, but can’t undo time once they’ve already cooked!
- Metal 9×13 pan: Metal conducts heat quickly so anything you bake in a metal pan will cook faster than in glass, especially around the edges. Watch your eggs closely to avoid overcooking or browning too much on the edges. You can cover the tops with foil if they’re browning too quickly, or reduce the oven temp to 325°F. I’d recommend targeting 18-22 minutes when cooking with a metal pan, but obviously use your best judgement and test for doneness.
- Glass 9×13 pan: Glass pans heat slower than metal pans and cook evenly across the pan with slower browning. I’d recommend 22-25 minutes when using a glass pan, but again – be sure to check the eggs for doneness and use your best judgement.
Expert Tips
- If you want to make more than 12 sandwiches at once, check out my Sheet Pan Eggs recipe that can easily make 18 sandwiches.
- If you want to cut your eggs in circles for your sandwiches use a circle biscuit cutter, and save the leftover scraps for a breakfast scramble or breakfast burrito.
- A donut pan is another fun option for cooking the eggs! You’ll want to reduce your cooking time, likely to 10-15 minutes, and of course watch for overcooking.

Variations / Substitutions
One of my favorite things about these Meal Prep Breakfast Sandwiches is how they are SO easy to mix and match and really customize to your own preferences! Here are some variations I think would be fun to try:
- Swap the bread! Swap the English muffin for your favorite bagel or even bagel thins!
- Bring on the veggies! Adding diced veggies to the eggs is a great way to add nutrients and even more flavor to these sandwiches.
- Try adding onion, bell pepper, broccoli, mushrooms, cherry / grape tomatoes, chives, spinach, or kale for a fun twist!
- I recommend sauteing the veggies a bit before adding to the egg mixture.
- Just remember that veggies will add a bit of water to the eggs, so you don’t want to add TOO many and end up with watery eggs.
- The cheesier, the better! Feel free to add shredded cheese directly to the egg mixture for more cheesy goodness! Mozzarella, Monterey Jack, Gruyere, Swiss, Cheddar – the options are endless! I also think they’d be delicious with some crumbled feta!
- Kick up the spice! Wanting to add some heat to your breakfast sandwiches? Use hot Italian sausage for your meat or add some chopped jalapenos to the egg mixture. (Or both!)
- Toppings galore! Have some fun adding toppings to these Breakfast Sandwiches. After you’ve reheated them, add some avocado, hot sauce, microgreens, pickled red onions… whatever sounds good! (Mmm, a drizzle of hot honey on top of the bacon sounds heavenly, doesn’t it?!)

Storage / Freezing
- Keep in the fridge for up to 5 days
- Store in the freezer for up to 2 months.
- When freezing, I like to wrap the sandwiches tightly in plastic wrap, then wrap in foil (to help prevent any freezer burn) and then place in a resealable, plastic, freezer-safe baggie.
- If you’re using different types of meat in your breakfast sandwiches, I recommend labeling the foil or the baggies so it’s easier to know what type of sandwich you’re pulling out of the freezer.
Home-cooked meals are such a great way to show love to your friends and family. These Meal Prep Breakfast Sandwiches are a great choice when you’re wanting to bring something to a friend who is recovering from surgery, just had a baby, or really anyone who could just use a little extra help. You don’t have to do anything different when making these, just make sure you include the reheating instructions and tips when you deliver the frozen sandwiches.
Reheating Tips
- Microwave: Leave the sandwich to thaw in the fridge overnight (or on the counter for 30 minutes). Take the plastic wrap and foil off, wrap the sandwich loosely in a damp paper towel, and microwave for 1-2 minutes or until heated through
- Oven: If you have more time, take the plastic wrap off but keep the sandwich wrapped in foil. Pop it in your toaster oven or oven at 350°F for 15-20 minutes. This method is great because the bread gets nice and toasty!
shop this post
 Buy Now →
  Buy Now →


Before You Begin! If you make this, please leave a review and rating letting us know how you liked this recipe! This helps our business thrive & continue providing free recipes.

Meal Prep Breakfast Sandwiches
Ingredients
For the eggs:
- 12 large eggs
- 2 tbsp. heavy cream (or whole milk)
- 1 cup whole milk cottage cheese
- ½ tsp. salt + a few cracks of fresh black pepper
For the sandwiches:
- Meat options: Cooked bacon, sausage patty, turkey sausage patty, ham, Canadian bacon, turkey bacon, chorizo
- 12 slices American cheese or thinly sliced cheddar cheese
- 12 English muffins (Pro Tip: toast the English muffins and spread a little butter on them prior to assembly)
Last step! If you make this, please leave a review and rating letting us know how you liked this recipe! This helps our business thrive & continue providing free recipes.
Instructions
- Prep your baking dish: Preheat the oven to 350°F and grease a 9×13 inch oven-safe baking dish with nonstick cooking spray or line with parchment paper. (You can use a metal or glass 9×13 pan, just know that the cook time might differ slightly between the two. I have more info on cook time below in the Recipe Notes section.)
- Make the egg mixture: Mix the eggs, cream, cottage cheese, salt, and pepper in a high-powered blender until combined.12 large eggs, 2 tbsp. heavy cream, 1 cup whole milk cottage cheese, ½ tsp. salt + a few cracks of fresh black pepper

- Bake: Pour into prepared pan and bake at 350°F for 22-25 minutes (glass pan) or 18-22 minutes (metal pan), or until center is set. Be careful not to overbake. The internal temperature of the eggs should be 160°F. You can cover them with foil if the tops are getting browned too fast. (See Recipe Notes below for more information about egg cook times.)
- Cook meat option: Meanwhile, cook your meat of choice for the sandwiches. You want your meat of choice to be fully cooked before assembling and freezing the sandwiches. If using a frozen sausage patty and making the sandwiches to enjoy right away, be sure to cook the patty according to package directions before assembling the sandwiches. (If you're using a frozen patty and preparing the sandwiches to freeze, no need to cook it only to freeze the whole sandwich. ☺️)Meat options: Cooked bacon, sausage patty, turkey sausage patty, ham, Canadian bacon, turkey bacon, chorizo
- Cool: Allow the eggs to cool briefly before cutting into 12 squares. Or you can use a circular biscuit cutter to cut into circles, and save the leftover scraps for another use like in a breakfast scramble, in stir-fries, or in a breakfast burrito. Note: if cutting in circles, you’ll only get 6 circles. (Note: If you want more than 12 sandwiches, make my sheet pan eggs recipe!)
- Assemble: On one half of the English muffin, add the egg, meat, then a slice of cheese and cover with the top half of the muffin. If you plan to enjoy it right away, pop a sandwich in the oven at 350°F and cook for 5 minutes or until warm and melty.12 English muffins, 12 slices American cheese or thinly sliced cheddar cheese
- Wrap: Wrap each individual sandwich with foil, parchment paper, or wax paper. Label the sandwiches if desired with which protein option you used, and place in a resealable plastic freezer safe baggie.
- Storage: Keep in the fridge for up to 5 days or store in the freezer for up to 2 months. When freezing, I like to wrap in plastic wrap tightly, then foil, to help prevent any freezer burn.
- Reheat: I recommend thawing in the fridge overnight, then heating in the morning. If you forget to take it out the night before, allow it to rest on the counter for about 30 minutes or so before heating. Microwave (for the fastest method): wrap the sandwich in a damp paper towel to prevent it from drying out, and microwave for 1-2 minutes or until heated through. Oven or toaster oven (to maintain the best texture and flavor): wrap in aluminum foil and heat at 350°F for 15-20 minutes or until heated.
- Enjoy: Enjoy as is or doctor it up with some avocado, hot sauce, microgreens, pickled red onions, etc.

Notes
Notes on Egg Cook Time:
- Oven temperature: It’s important to note that all ovens vary, so the amount of cook time needed for the eggs will be different from household to household. (For example, my oven runs really hot so things cook faster for me). I recommend cooking the eggs for the low end of the time range and checking them periodically to add more time as needed. Remember: you can always add more time, but can’t undo time once they’ve already cooked!
- Metal 9×13 pan: Metal conducts heat quickly so anything you bake in a metal pan will cook faster than in glass, especially around the edges. Watch your eggs closely to avoid overcooking or browning too much on the edges. You can cover the tops with foil if they’re browning too quickly, or reduce the oven temp to 325°F. I’d recommend targeting 18-22 minutes when cooking with a metal pan, but obviously use your best judgement and test for doneness.
- Glass 9×13 pan: Glass pans heat slower than metal pans and cook evenly across the pan with slower browning. I’d recommend 22-25 minutes when using a glass pan, but again – be sure to check the eggs for doneness and use your best judgement.
Storage Tips:
- Keep in the fridge for up to 5 days
- Store in the freezer for up to 2 months.
- When freezing, I like to wrap in plastic wrap tightly, then foil, to help prevent any freezer burn.
Reheating Tips:
- Microwave: Leave the sandwich to thaw in the fridge overnight (or on the counter for 30 minutes). Take the plastic wrap and foil off, wrap the sandwich loosely in a damp paper towel, and microwave for 1-2 minutes or until heated through
- Oven: If you have more time, take the plastic wrap off but keep the sandwich wrapped in foil. Pop it in your toaster oven or oven at 350°F for 15-20 minutes. This method is great because the bread gets nice and toasty!
Nutritional information is provided as a courtesy and is automatically calculated. It should only be construed as an estimate rather than a guarantee. Ingredients can vary and Kroll’s Korner can’t make any guarantees to the accuracy of this information.
📸 Photos by Sierra Ashleigh Photography

I have never commented on a single recipe before but my wife and I ate these up almost immediately. So much better than anything you can grab in a drive thru and unbelievably good.
Did the egg with american cheese and bacon, only change was buttering the toasted Bay’s sourdough english muffin with Garlic/Herb butter and adding a couple baby spinach leaves to the blender.
Just one sandwich is filling and very easy to grab and go.
Amazing!! Thanks so much for making && happy you enjoyed them 🙂
Fantastic ratios and directions for eggs to be the right texture for breakfast sandwiches that will be reheated. I add a few dashes of hot sauce to the egg mixture and sometimes up the egg to 13, and add another Tbsp or so of cottage cheese. Another Kroll’s Korner winner!
They look incredible! yayyy thank you!
The best egg sandwich recipe and so easy to make!! Mornings are easier with these fresh or frozen and my hubby loves them!!
Yayyy those look so perfect, Elke!! I’m so happy your hubby loves these. Isn’t it so nice to have a batch prepped?? 🥰
Made this a few times and it’s great. Trying yo cut the carbs so I just cut it into 6 pieces and have the sausage on thr side
Yay!! Glad you enjoyed this one, Marie! 🥰
I love these breakfast sandwiches! The recipe is perfect just as written. I forgot to take a picture, but they were picture perfect!
So happy you like them! I need to prep more for myself! 🙂
Made a double batch of these over the weekend & am so happy to have breakfast prepped in the freezer for so long. I grabbed one to heat up at work this morning – so easy & delicious!
They look perfect Danika 🙂 yay, thank you!!