How To Make A Galette: From Dough to Dessert
This post may contain affiliate links. Please read our disclosure policy.

Have you wanted to learn how to make a rustic, photogenic galette like the one you see on Pinterest and in magazines?
I’ve got all the tips and tricks to help you make the perfect galette from dough to dessert.
What is a galette?
Hailing from France, a galette is typically a round, rather flat cake made of flaky pasty dough, yeast dough, or sometimes unleavened dough. Today I am showing you how to make a galette using flaky pastry dough.
The term galette also applies to a variety of tarts, both savory and sweet, topped with fruit, jams, nuts, meat, cheese, etc.
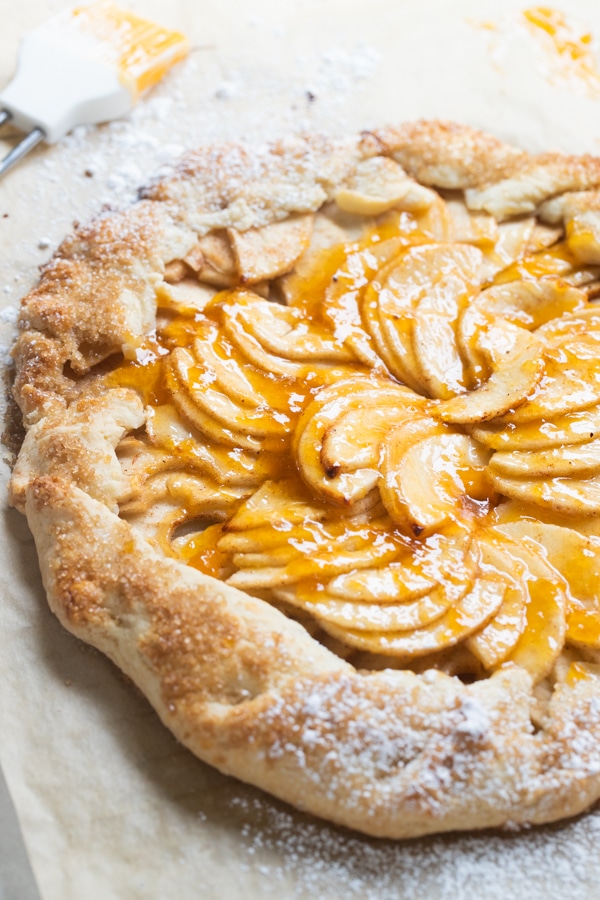
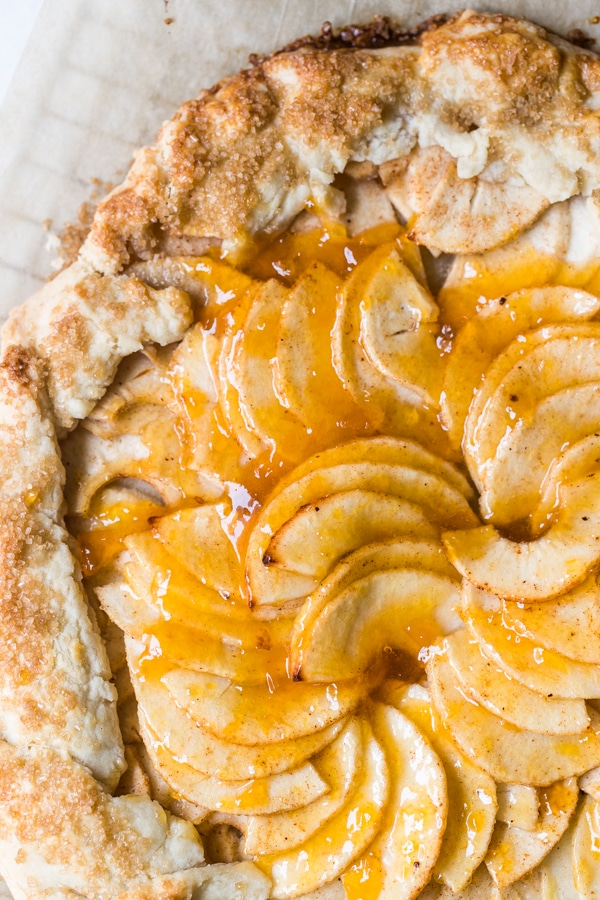
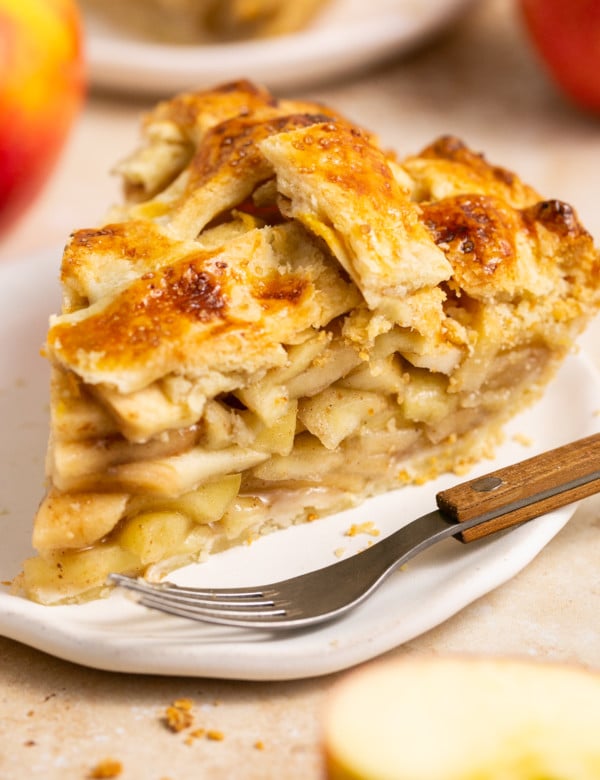
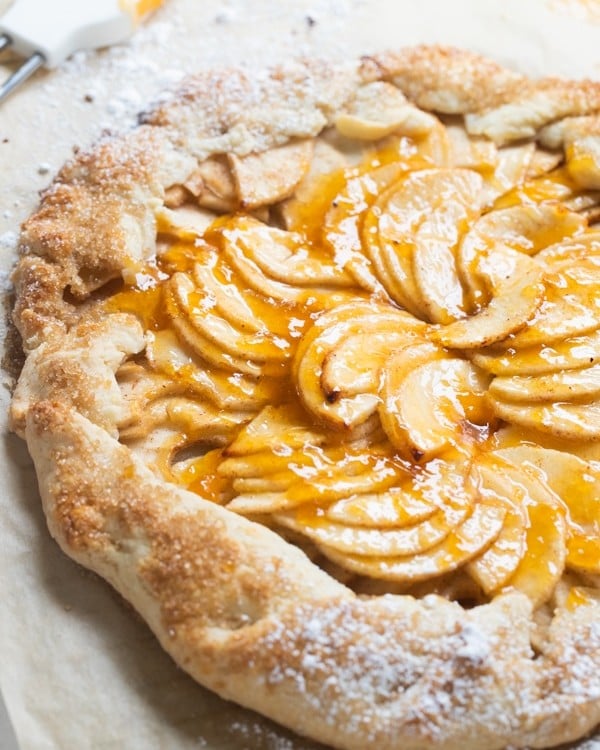
All in all, a galette is a round dessert wrapped with your choice of fruit (apples, plums, peaches, berries, cherries) and is baked on a baking sheet pan. *Note: Galette des Rois is the traditional cake name.
Some other galette recipes featured on Kroll’s Korner are the Rustic Homemade Grape Galette and the Peach Galette! And be sure to scroll down for tips on how to turn this recipe into a Blueberry Galette!
Ingredients needed to make the flaky pasty dough:
Only 4 ingredients! (not including water)
- Sugar
- Salt
- All-Purpose Flour
- Butter

Note!
I recommend using a mix of Granny Smith Apples and Honey Crispy/Pink Lady for color. But you can use all Granny Smith if you prefer.
Tools needed to make a galette
- Measuring cups and spoons
- A bench scraper
- Pastry brush
- Baking Sheet
- Parchment paper
- Plastic Wrap
- Rolling pin (A French rolling pin is great if you have one!)
- Mixing bowl
- Marble slab (not necessary but works well)
How to make a Galette
Gather all of your ingredients to make the dough first.
You can either make the dough by hand, or using a food processor. I’ve demonstrated how to make it in the food processor in the video below, and by hand photos below.
Making the dough in the food processor:
(For the full recipe, scroll down to the recipe card below)
- Pour the flour, sugar and salt in the food processor. Pulse a few times to combine.
- Add in cubed butter and pulse again until butter pieces are the size of peas.
- Slowly pour in ice water, 3-4 Tbsp. should be enough for the dough to come together. 5 Tbsp. water max.
- Remove the dough from the food processor and place on a clean, floured surface.
- Roll the dough into a ball and slightly flatten into a disk. Cover in plastic wrap and place in the fridge to chill.
Making the dough by hand (without a food processor)
(For the full recipe, scroll down to the recipe card below)
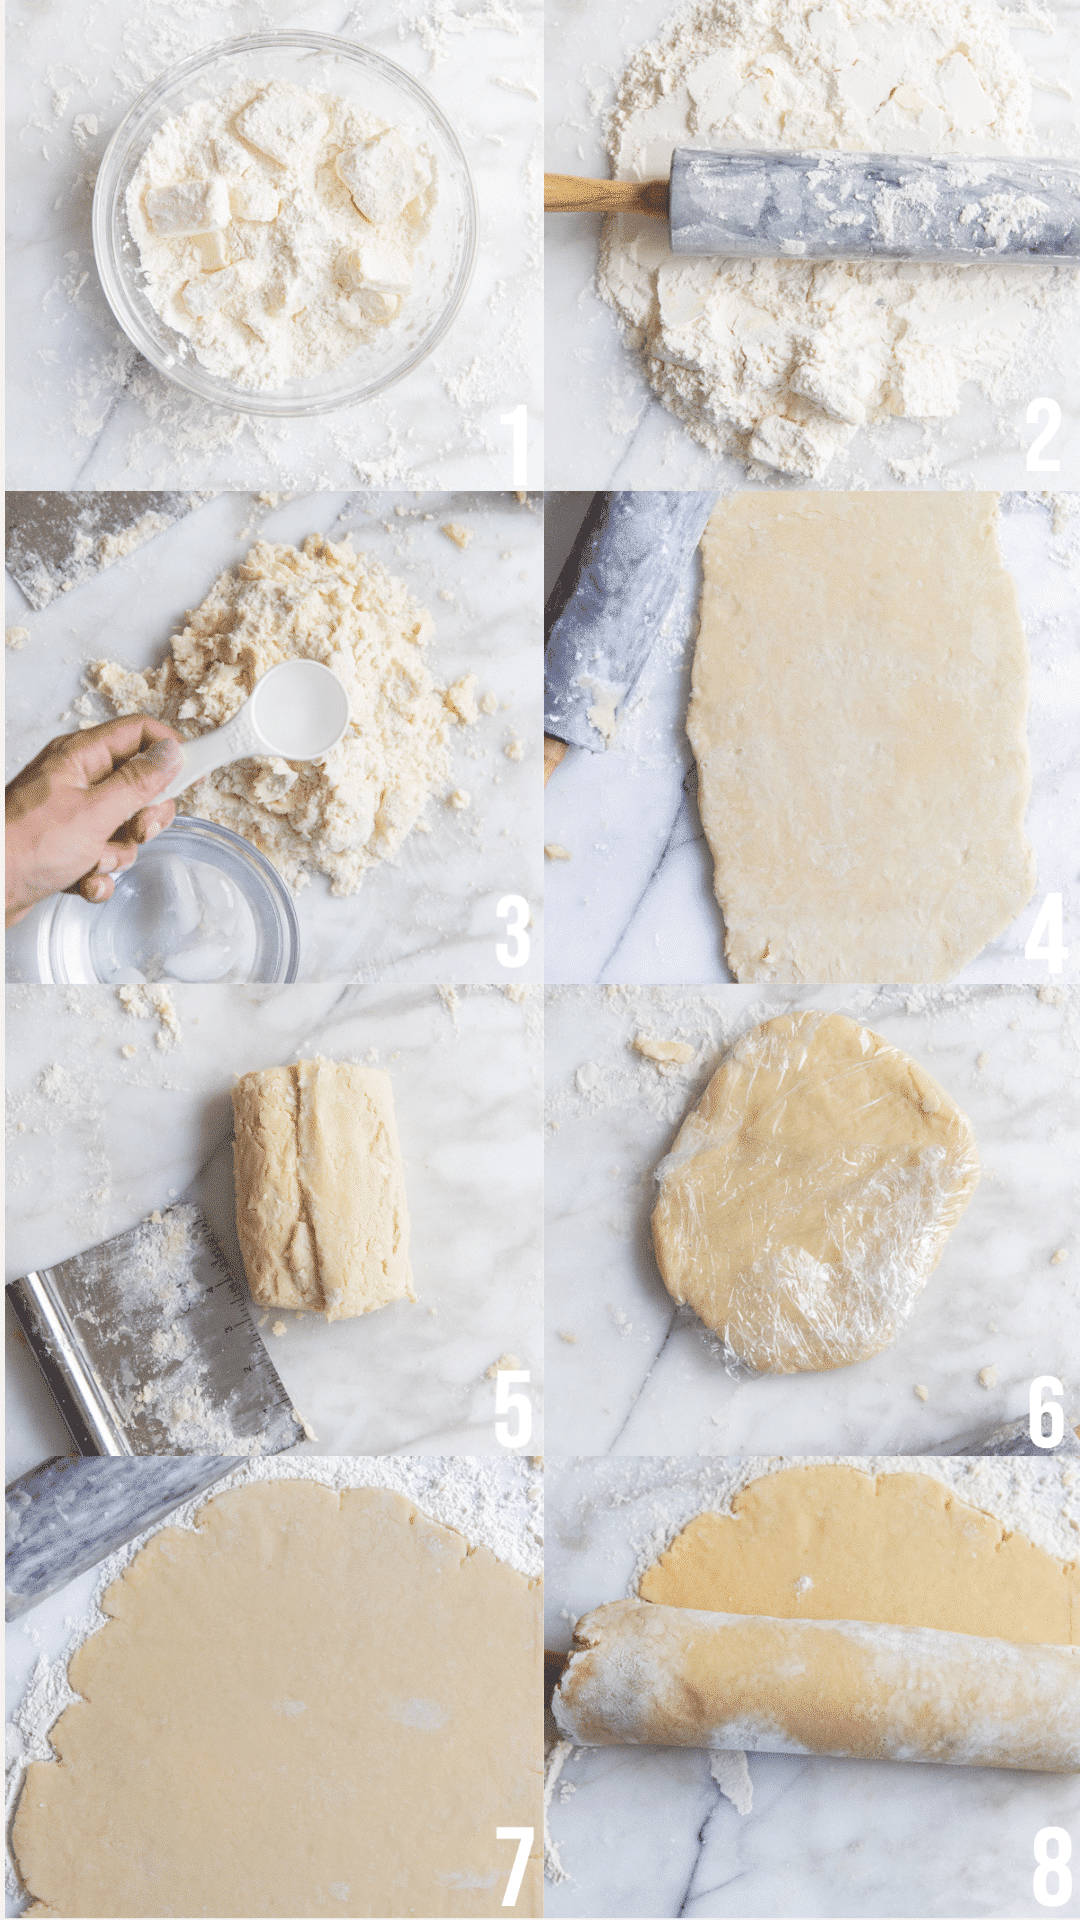
- Whisk the flour, sugar and salt together in a medium sized bowl and then cut your cold butter into pieces and toss it into the dry ingredients.
- Pour onto a flat surface.
- Roll the butter into the dough with a rolling pin until it starts to incorporate with the flour.
- Use a bench scraper to bring the dough together into a loose pile. Slowly pour the 4 Tbsp. ice cold water into the dough 1 tablespoon at a time. Use your finger tips to incorporate the water into the dough after each tablespoon of water added.
- Form it into a rectangle and then roll the dough out into a flat long rectangle.
- Fold the dough into thirds. You are essentially folding the dough over itself a few times to pick up any dry bits from the bottom. Repeat a few times, turning and folding. The dough should be holding together at this point; if you squeeze some into your palm it should hold together.
- Flatten the dough out into a circle and wrap in plastic wrap. Dough should be about 1 inch thick. Place in the fridge to chill for 30-60 minutes.
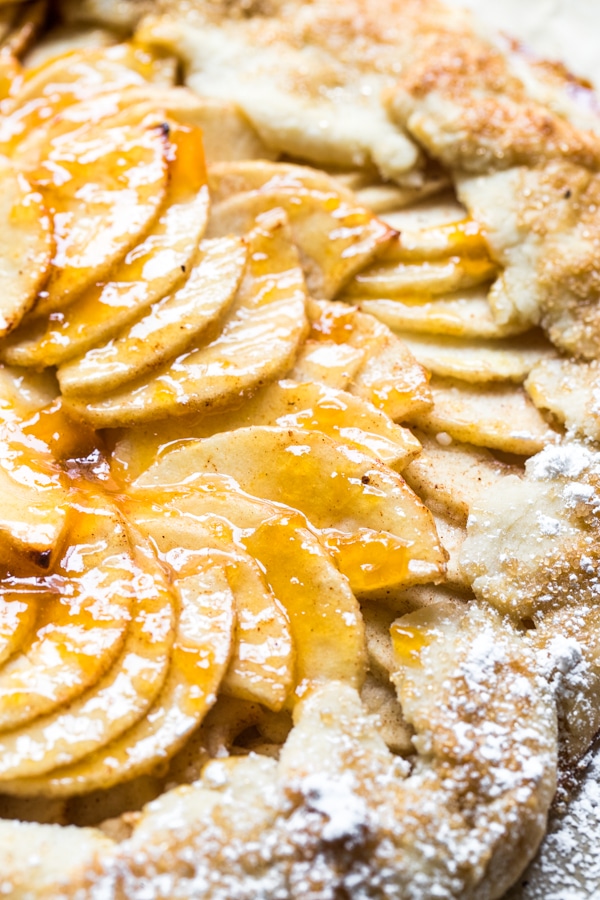
- Mix all of the ingredients into the apples and toss gently to coat. You can use a wooden spoon or your hands.
- Roll out the dough. Mend any cracks or tears by pressing them back together with your fingers.
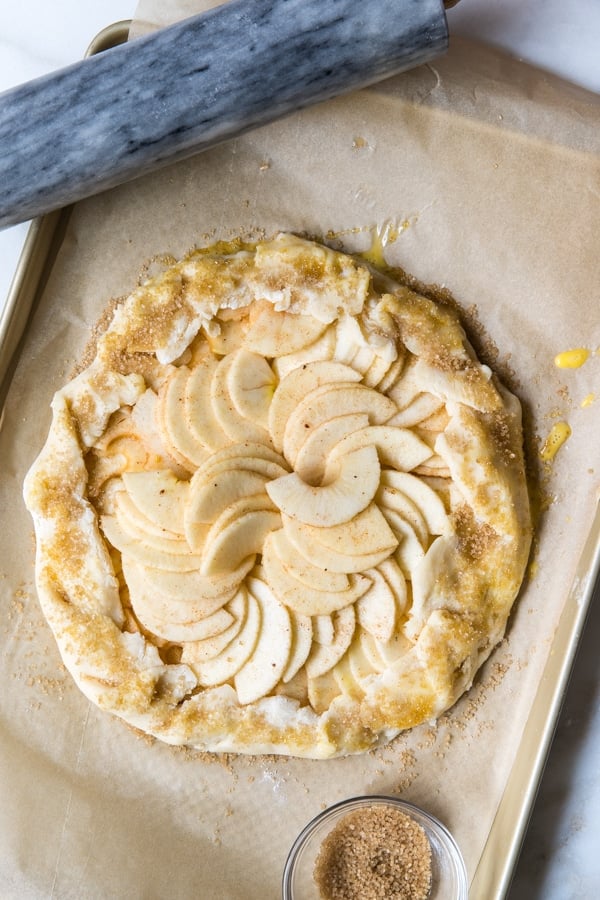
- Preheat the oven to 375° F. Arrange the apples on the dough.
- Before baking, use a pastry brush to brush 1 Tbsp. heavy cream or egg wash all over the dough.
- Bake, cool, and enjoy!
How do you store a galette?
You’ll want to keep the galette at room temperature on the day it is baked. Wrap leftovers in plastic wrap or foil and place in fridge.
Can you use this galette dough for pie dough?
Yes, I use them interchangeably and it just depends on what pie you are making if you need to pre-bake the dough or not.
the goods
 Buy Now →
 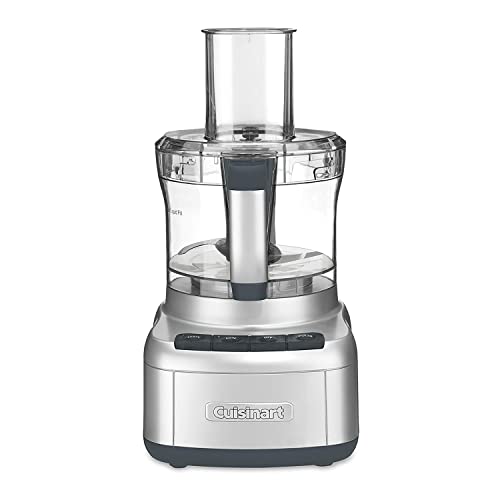 Buy Now →
 If you love this galette, you’ll be sure to love:
Before You Begin! If you make this, please leave a review and rating letting us know how you liked this recipe! This helps our business thrive & continue providing free recipes.
How to make a Galette: From Dough to Dessert
Ingredients
For the dough
- 1 1/2 cups All-Purpose Flour
- 1 Tbsp. sugar
- 3/4 tsp. salt
- 1 1/2 sticks cold butter (3/4 cup)
- 4-5 Tbsp. ice cold water
For the apple filling
- 2 lbs. Apples (Granny Smith and Piny Lady/Honey Crispy mix)
- 1/3 cup granulated sugar
- 1 Tbsp. lemon juice or Apple Cider Vinegar
- 1/2 Tbsp. cornstarch
- 1 tsp. salt
- 1 tsp. vanilla extract
- 1/2 tsp. cinnamon
- 1/2 tsp. nutmeg
- 1 Tbsp. heavy cream or 1 egg whisked (for brushing on the crust)
- 1/3 cup Apricot Jam for brushing on apples
- 1 pint Vanilla Ice cream for serving
Last step! If you make this, please leave a review and rating letting us know how you liked this recipe! This helps our business thrive & continue providing free recipes.
Instructions
- Pour the flour, sugar and salt in the food processor. Pulse a few times to combine. Add in cubed butter and pulse again until butter pieces are the size of peas, ~7-8 times.1 1/2 cups All-Purpose Flour, 1 Tbsp. sugar, 3/4 tsp. salt, 1 1/2 sticks cold butter (3/4 cup)
- Slowly stream in the ice water, 3-4 Tbsp. should be enough for the dough to come together. 5 Tbsp. water max.4-5 Tbsp. ice cold water
- Remove the dough from the food processor and place on a clean, floured surface. Roll/form the dough into a ball and slightly flatten into a disk.
- Cover in plastic wrap and place in the fridge for 30 minutes – 1 hour.
- While the dough is chilling, prep the apple filling (or filling of choice!) Slice thin, ~1/4 inch thick and place in a large bowl. You can peel or not peel them, up to you.2 lbs. Apples (Granny Smith and Piny Lady/Honey Crispy mix)
- Mix all of the ingredients (from Apples to the nutmeg from the list above) into the apples and toss gently to coat. You can use a wooden spoon or your hands.1/3 cup granulated sugar, 1 Tbsp. lemon juice or Apple Cider Vinegar , 1/2 Tbsp. cornstarch , 1 tsp. salt, 1 tsp. vanilla extract, 1/2 tsp. cinnamon, 1/2 tsp. nutmeg
- By this time your dough should be chilled. Roll the dough out on a floured surface into a 12-inch round about 1/8-inch thick. Mend any cracks or tears by pressing them back together with your fingers or use a knife to make clean edges.
- Use your rolling pin to roll the flattened dough onto the pin so you can transfer it onto a sheet of parchment paper on your baking sheet. PRO TIP: Place a 9-inch pie pan in the center of the dough and gently press down so it creates an indentation. This helps you to know how far out to place the filling! (see video for guidance)
- Preheat the oven to 375° F. Arrange your apples onto the dough. Fold the rim of the dough up and over the edge of the filling, overlapping the dough as you go around and pleating the dough.
- Before baking, use a pastry brush to brush 1 Tbsp. heavy cream or egg wash all over the dough. Sprinkle crust with coarse sugar, if desired.1 Tbsp. heavy cream or 1 egg whisked (for brushing on the crust)
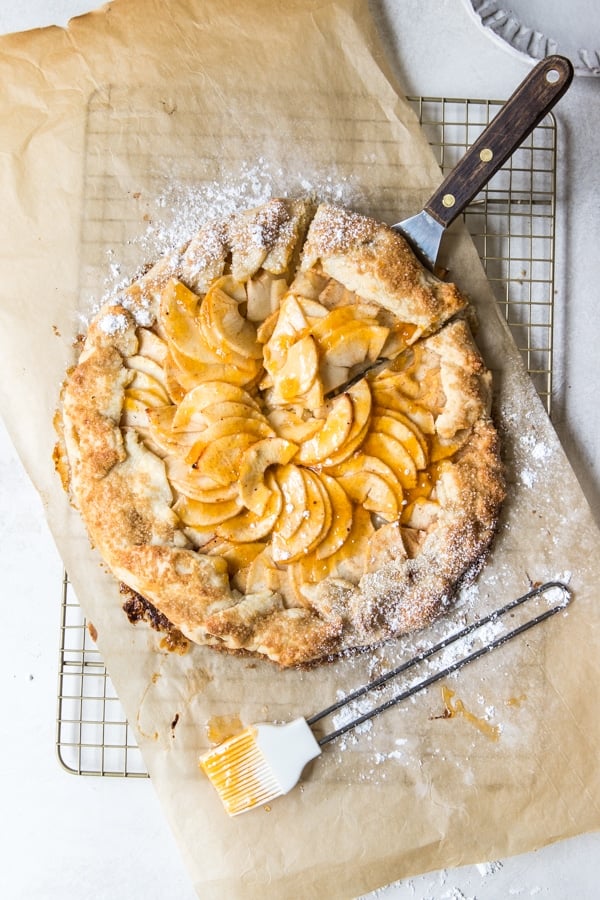
- Bake for ~35-45 minutes or until the crust becomes golden brown. Transfer the galette with the parchment paper on to a wire cooling rack and cool.
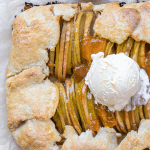
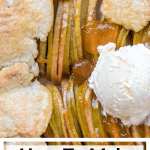
- Once cooled, dilute your apricot jam with 1-2 teaspoons of water and brush the apples with the apricot jam. YUM. Cut into wedges and serve with vanilla bean ice cream.1/3 cup Apricot Jam for brushing on apples , 1 pint Vanilla Ice cream for serving
Equipment
Notes
- Whisk the flour, sugar and salt together in a medium sized bowl and then cut your butter into pieces and toss it into the dry ingredients. Pour this mixture onto a flat surface so you can start to roll the butter into the flour mixture.
- Using your rolling pin, roll the butter into the dough until it starts to incorporate with the flour. Use your bench scraper to bring the dough together into a loose pile. Slowly pour the 4 Tbsp. ice cold water into the dough 1 tablespoon at a time. Use your finger tips to incorporate the water into the dough after each tablespoon of water added.
- The water will help the dough come together. Be sure to get it equally distributed into the dough and use your hands and the bench scraper to form it into a rectangle. Then roll the dough out into a flat long rectangle.
- Next, you will fold the dough into thirds. You are essentially folding the dough over itself a few times to pick up any dry bits from the bottom. Repeat a few times, turning and folding. The dough should be holding together at this point; if you squeeze some into your palm it should hold together.
- Flatten the dough out into a circle and wrap in plastic wrap. Dough should be about 1 inch thick. Place in the fridge to chill for 30-60 minutes.
Nutrition Information
Nutritional information is provided as a courtesy and is automatically calculated. It should only be construed as an estimate rather than a guarantee. Ingredients can vary and Kroll’s Korner can’t make any guarantees to the accuracy of this information.
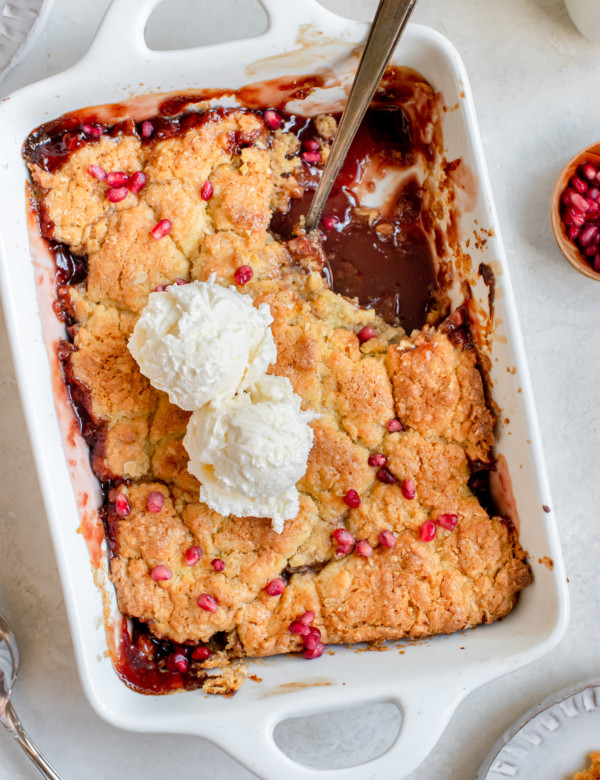
Blueberry Galette
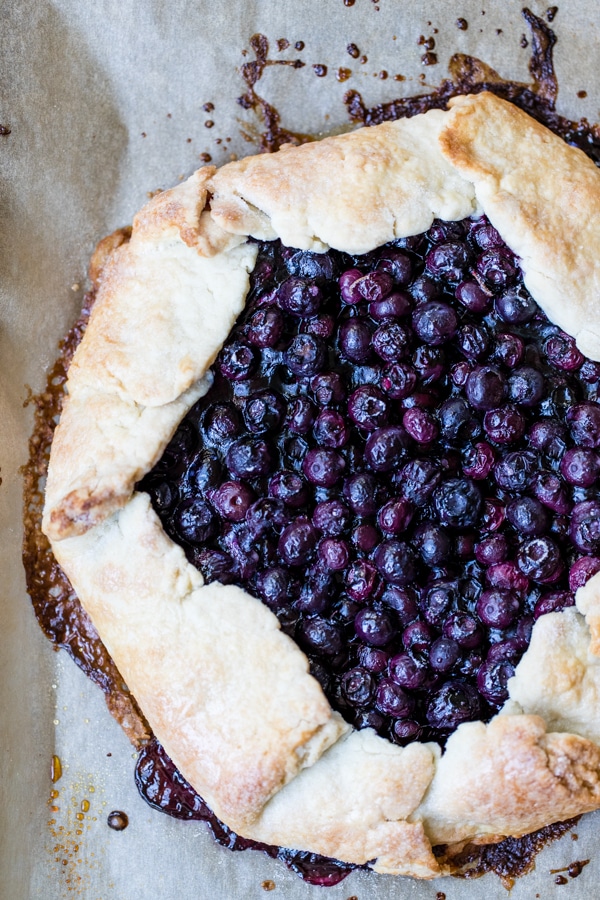
For the blueberry galette you will follow the same steps for the crust but the filling is a little different:
- Filling: 16 oz. blueberries, 1 Tbsp. cornstarch, 1 1/2 tsp. lemon juice, 1/4 cup sugar. Toss all of those ingredients together and mound the blueberries in the center of your dough.
- Leave a 2-inch boarder and fold the edges over, overlapping slightly.
- For a strawberry galette filling: 4 cups sliced strawberries, 1 Tbsp. cornstarch and 1/3 cup sugar.

Such a great tutorial! Love the texture of that galette crust. Looks perfect!
Thank you so much!!
This rustic dessert deserves our special attention! It is so delicious that it is served in restaurants nowadays!
I’ve never heard of this before! It seems like the French version of apple pie 🙂
Exactly!! Thank you 🙂 I hope you love it Liz!
It’s been a while since I last made a galette, so really keen to follow your instructions – they look amazingly easy. Can’t wait to have this deliciousness in front of me 🙂
They are actually SO easy to make! Thank you so much Danielle, enjoy!
This looks incredible. I can’t wait to try it.
Thank you so much Krissy! Enjoy!!