Brown Butter Chocolate Chunk Cookies
This post may contain affiliate links. Please read our disclosure policy.

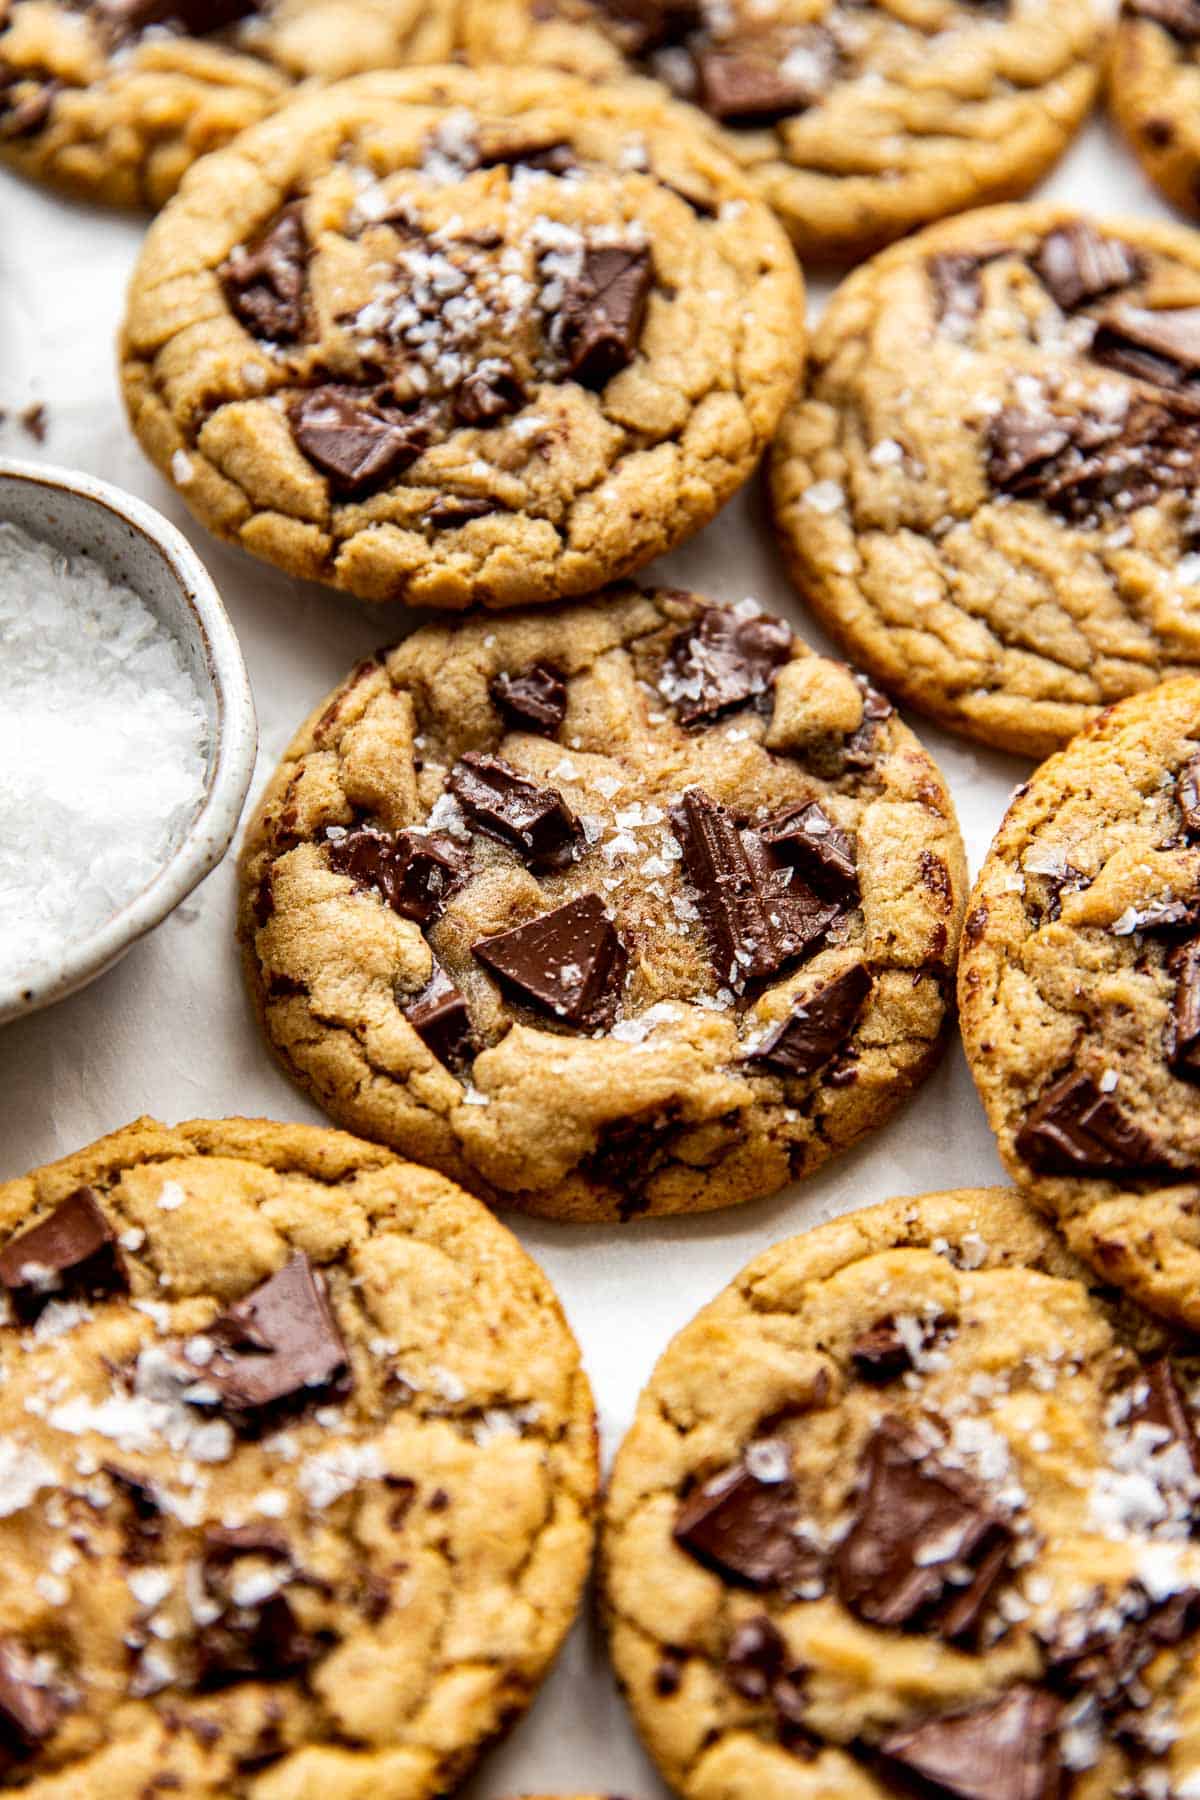
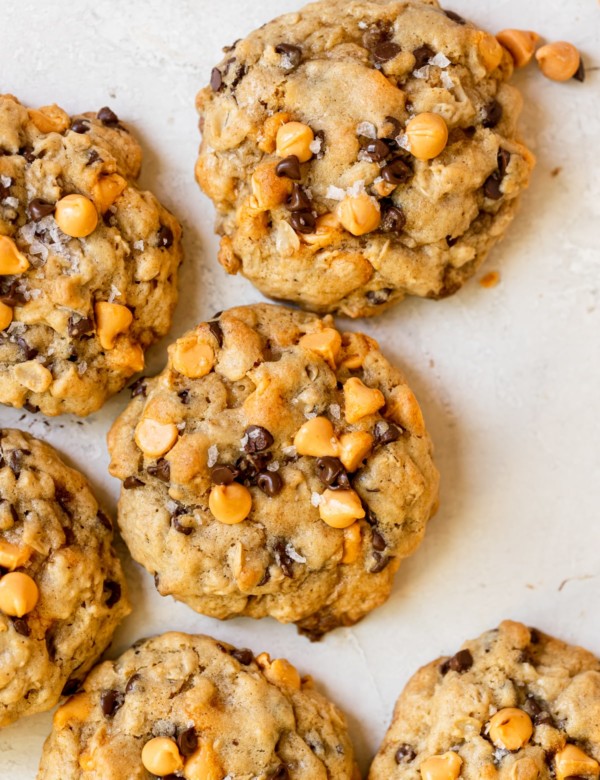
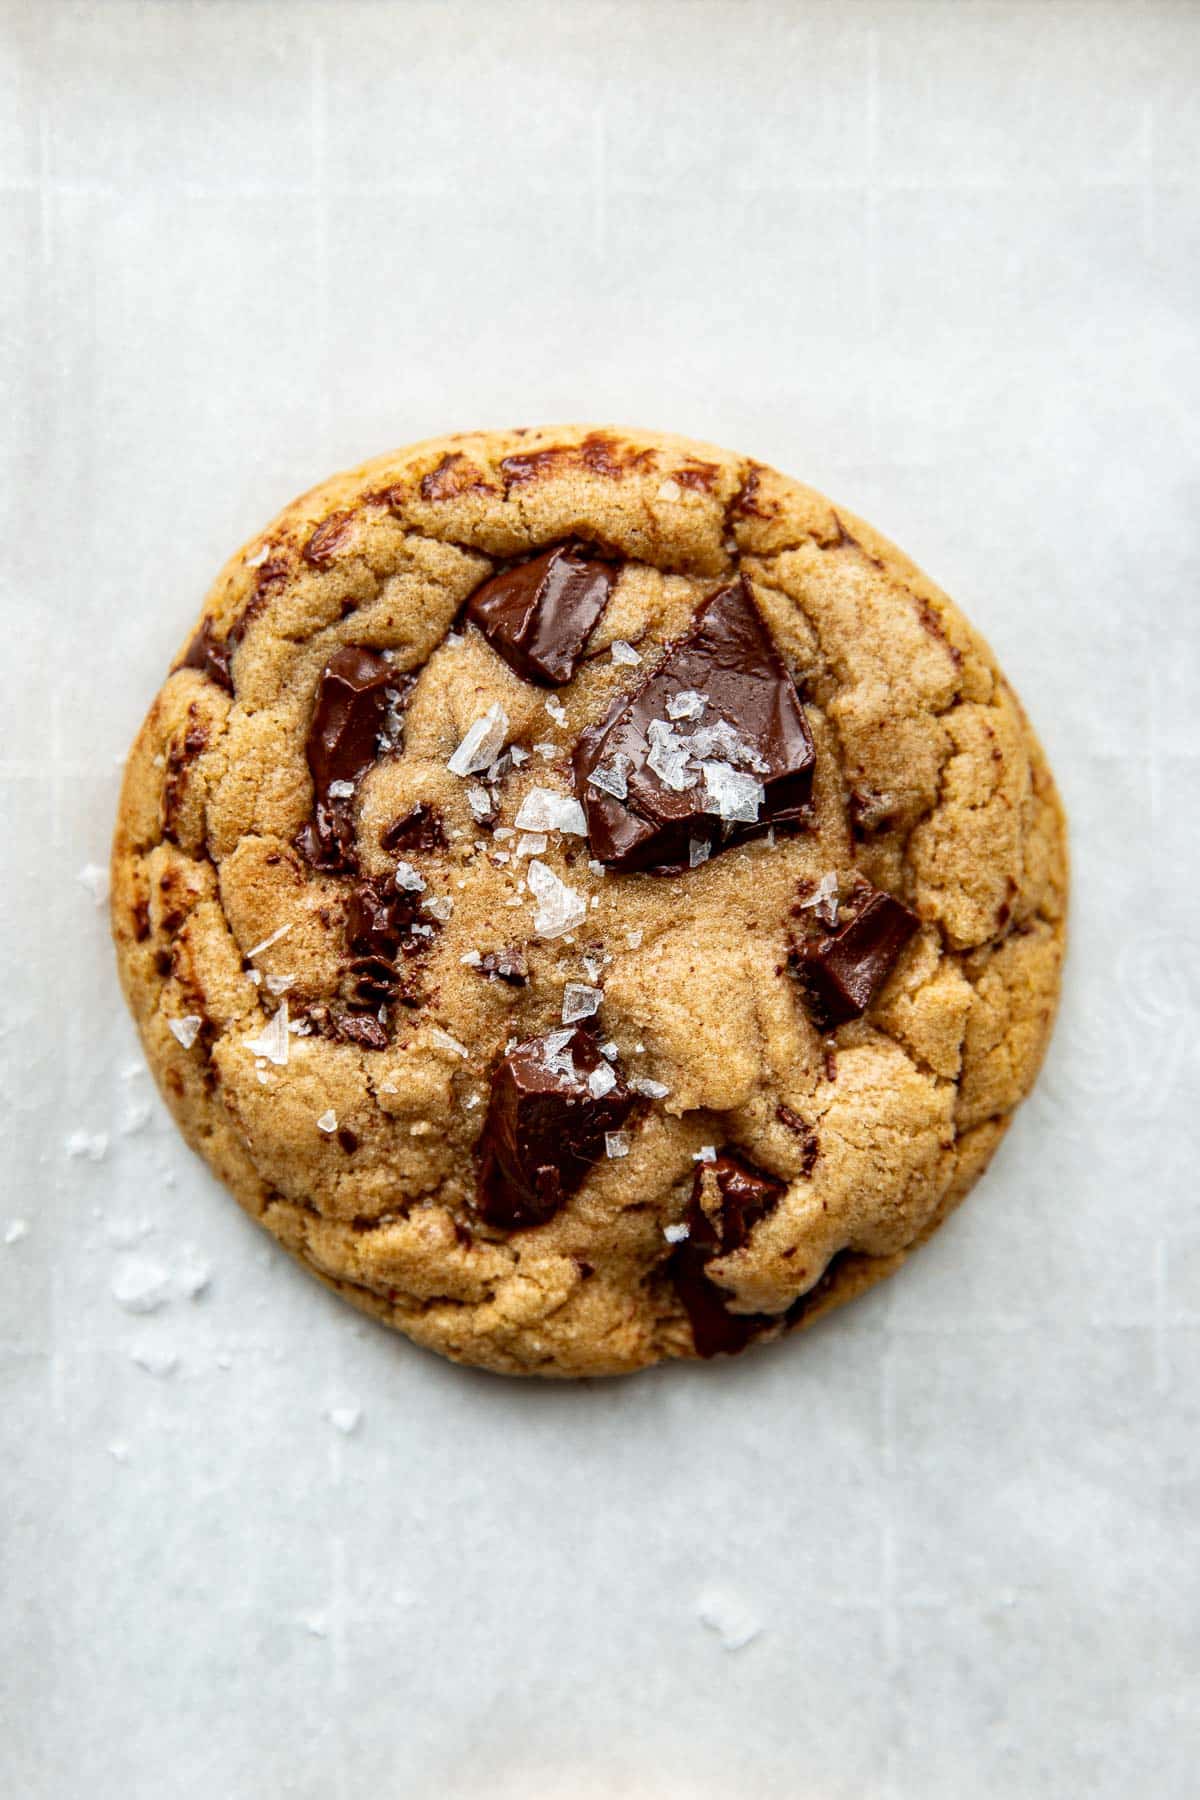
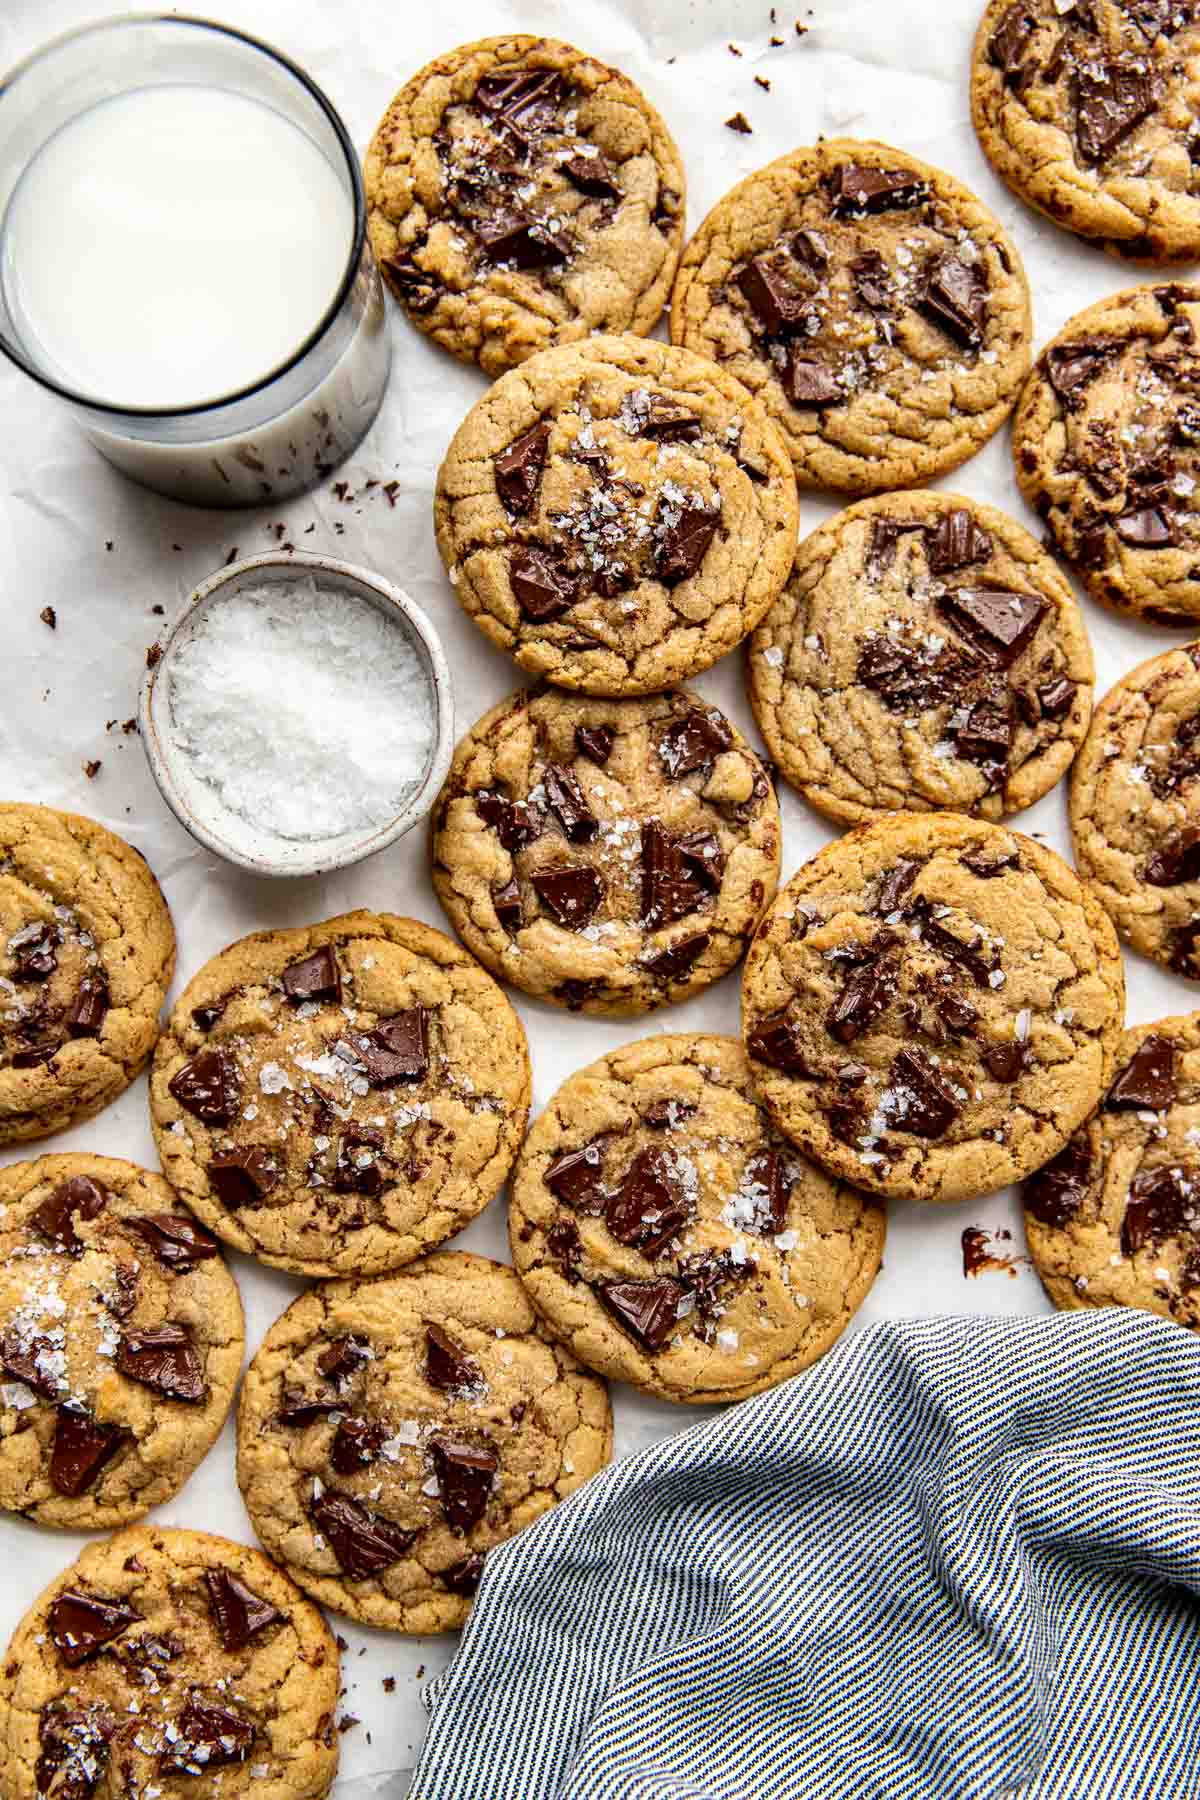
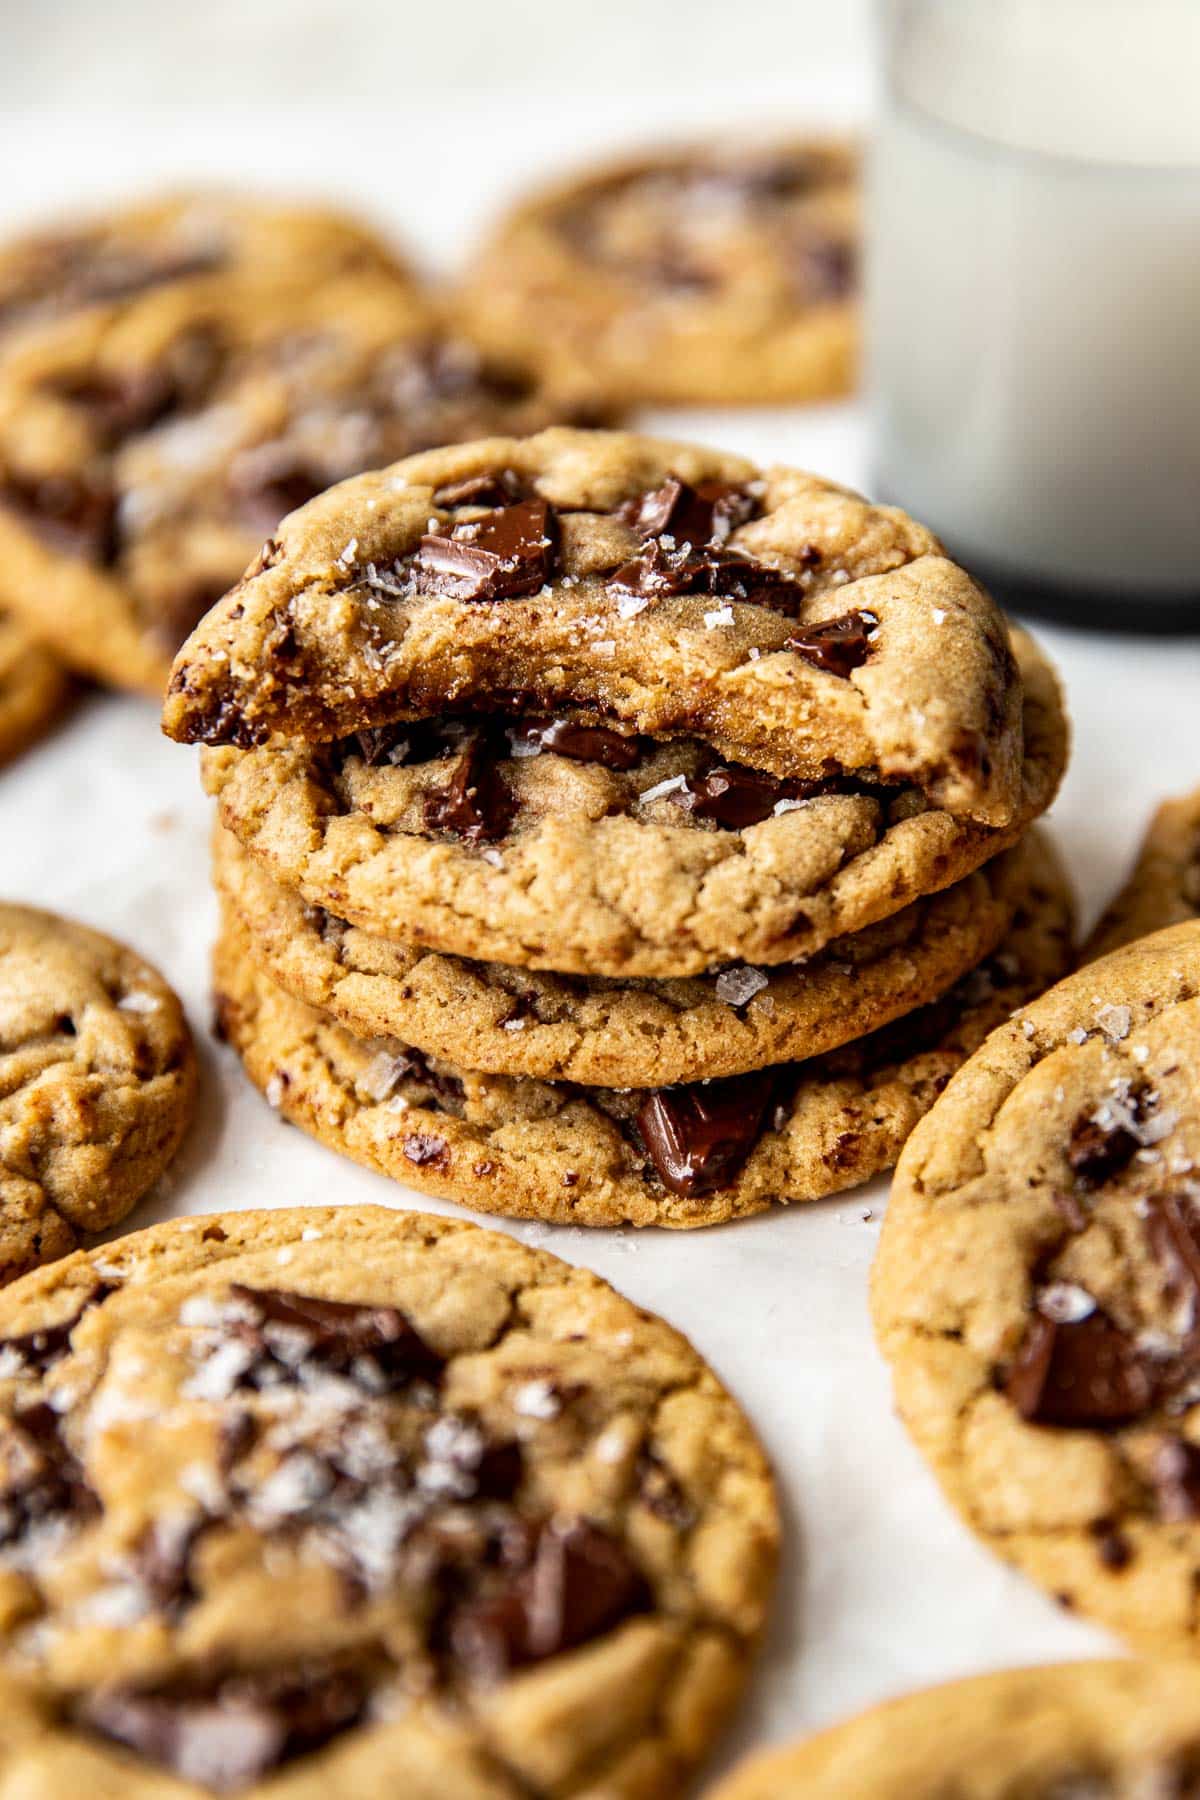
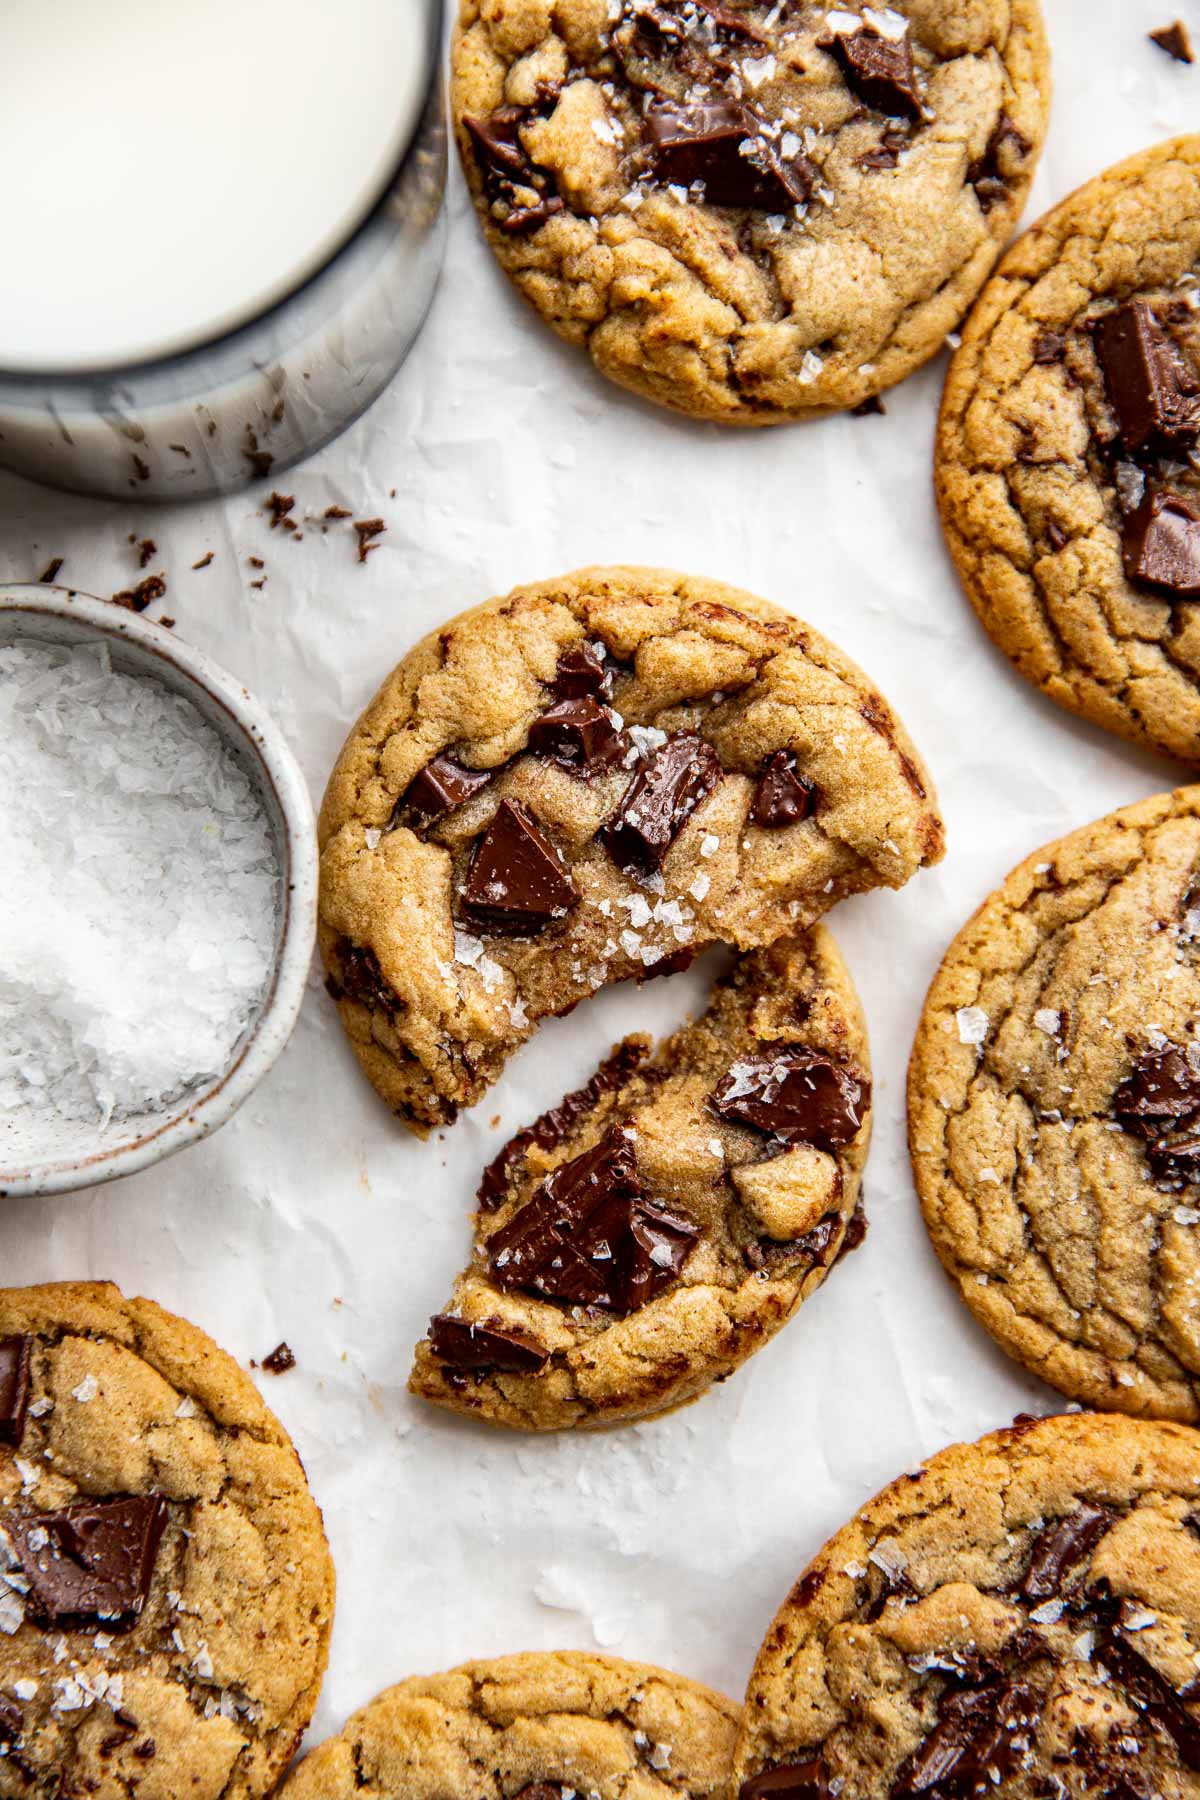
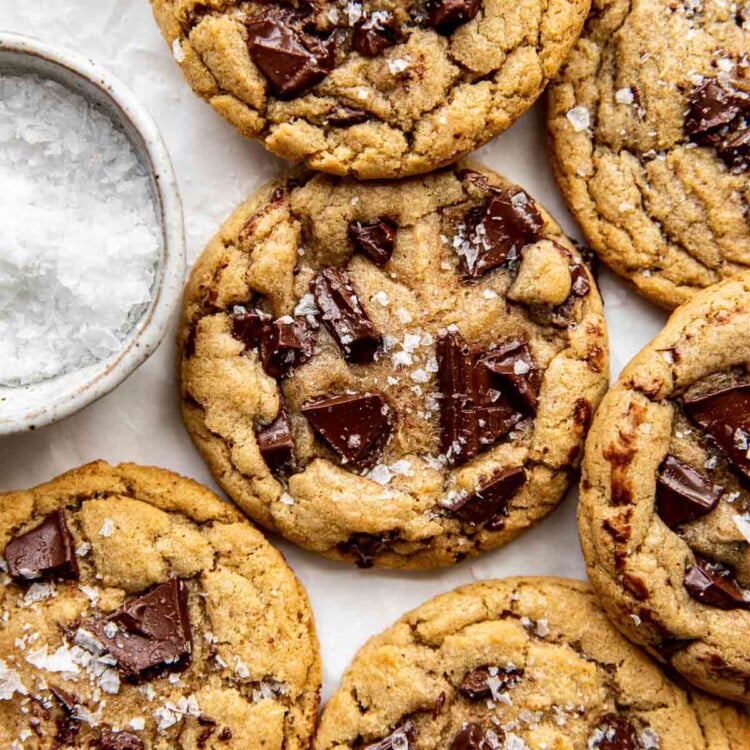
My Brown Butter Cookies made with chocolate chunks (or you can use chocolate chips, but I highly recommend the chunks!) have a rich, caramel-like, nutty flavor. They’re made with generous pockets of semi sweet chocolate in the cookie and more melty chocolate goodness on top!
They are thin, but not too thin, super chewy and have this wonderful depth of flavor thanks to the brown butter.
If you don’t want to fuss with browning butter, you’ll love my classic Kroll’s Kookies, my 4-in-1 Sheet Pan Cookies, or my Single Serve Chocolate Chip Cookie.
But the brown butter is really what helps make these cookies stand out. It only takes a few extra minutes to brown butter and the results truly create an exceptional and irresistible cookie.
What is brown butter?
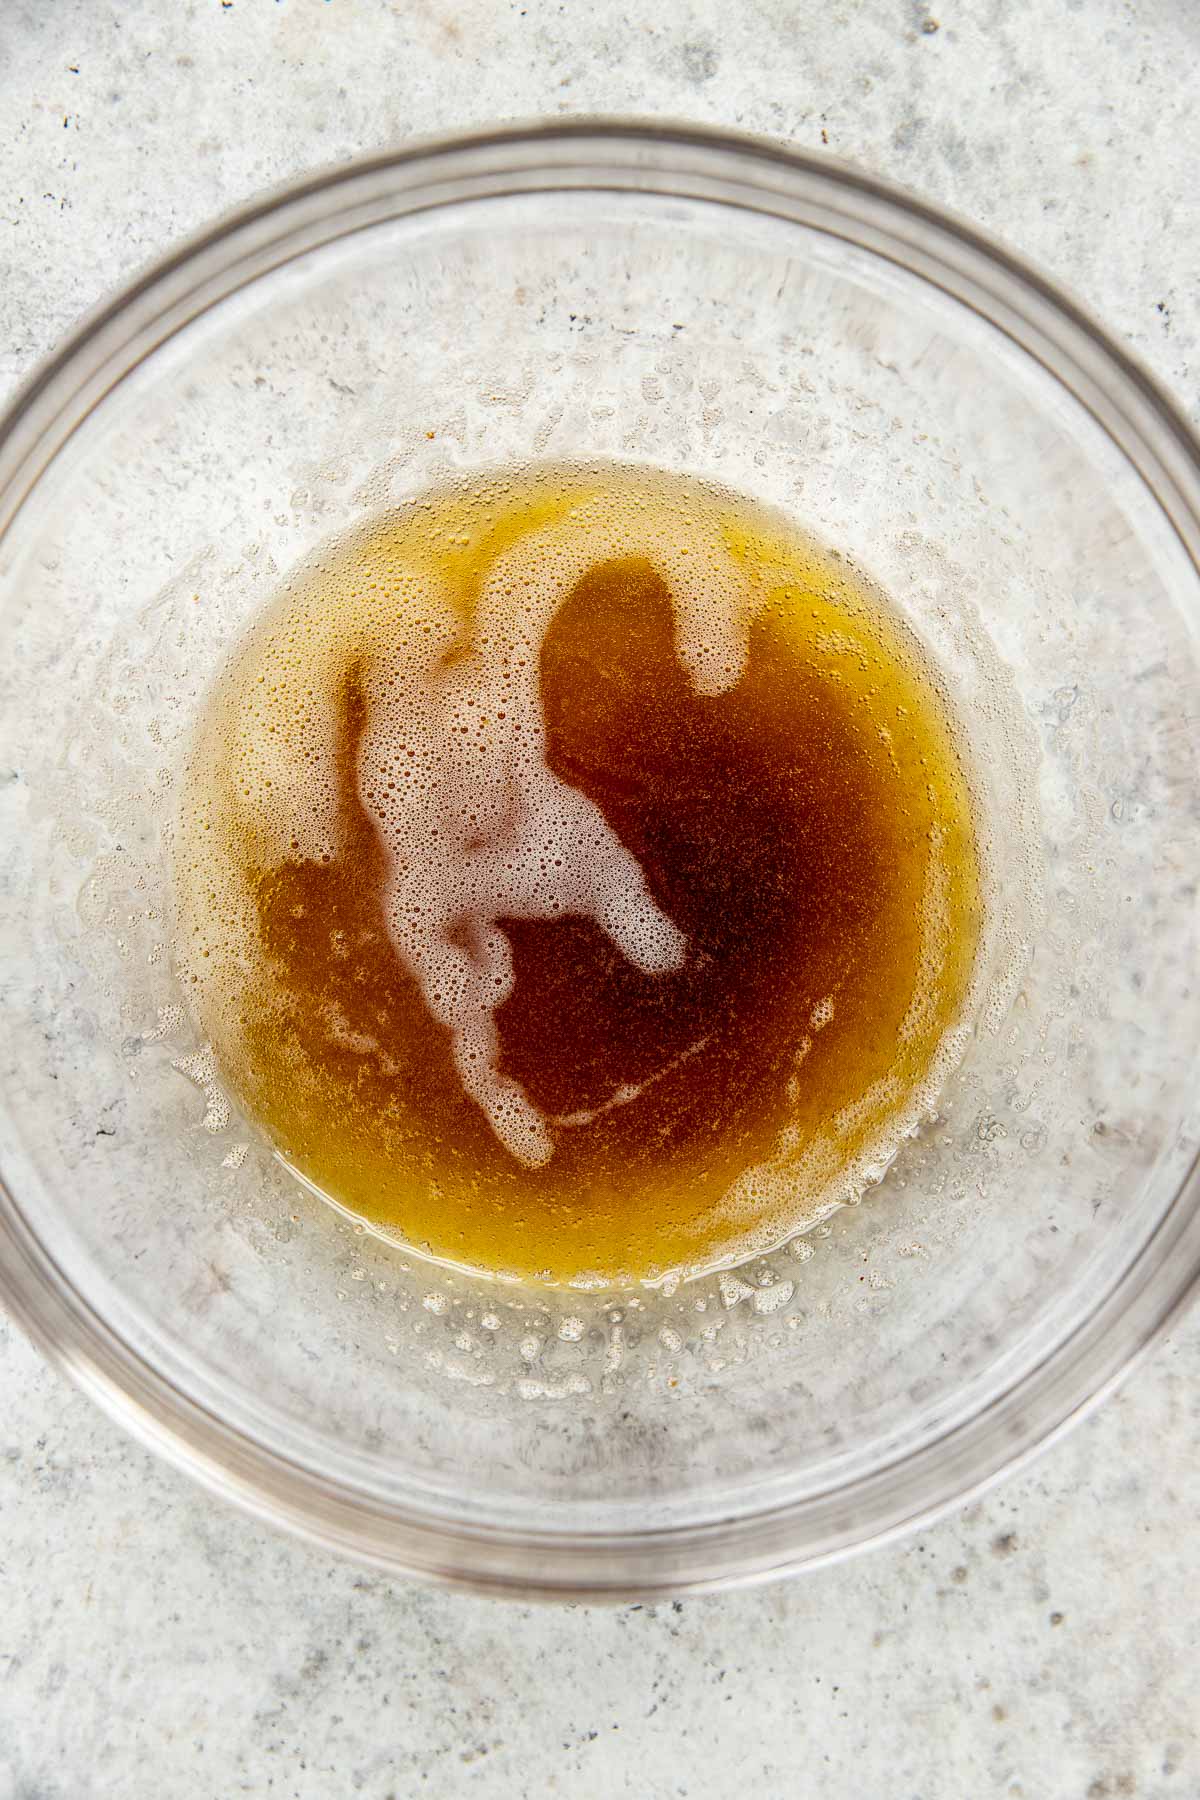
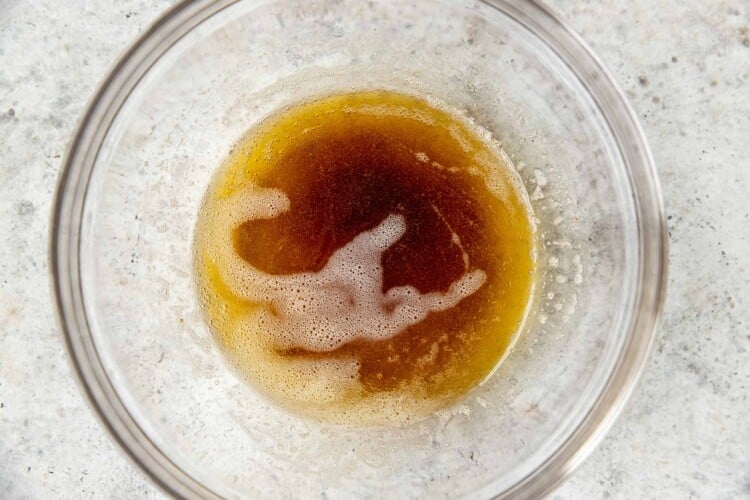
Brown butter is simply taking a stick of regular butter and then melting and toasting it on the stove until the milk solids turn brown. The butter simply gets heated until the water content evaporates, and those milk solids in the butter caramelize! The end result is magical, nutty, heavenly brown butter. Once you start baking with brown butter you won’t be able to stop! More details down below on how to brown butter.
How to make brown butter
It may sound intimidating, but it’s really easy, only takes a few minutes and is the backbone of these cookies. The nutty flavor compliments the cookie beautifully and I love it’s culinary use in baking so much! Let’s do it:
- Use a stainless steel skillet. This is best to easily monitor the butter’s color and gauge when the butter has browned.
- Place the unsalted butter in the cold, stainless steel skillet. Unsalted is truly best because salted butter foams more.
- Melt the butter over medium heat. Swirl the pan occasionally to help the butter melt evenly. As the butter melts, it separates into butter fat and milk solids. The milk solids will naturally sink to the bottom of the pan and begin to brown as they heat up.
- You’ll notice the butter begin to foam. This is good! The foam will begin to subside.
- Use a heat resistant spatula to continually gently stir the butter. You’ll begin to see tiny specks at the bottom of the pan, constantly stir and scrape so these don’t stick. (These are the milk solids that give brown butter its yummy flavor.)
- As soon as the butter turns chestnut brown and omits a nutty aroma, remove the pan from the heat and scrape the brown butter and all of the yummy brown bits into a heat proof bowl. It’s important to remove to a bowl immediately so the residual heat from the pan doesn’t burn the butter.
- Depending on your heat setting, this process should only take less than 10 minutes.
More Brown Butter Recipes You’ll Love
Why this recipe works
- Just a touch of milk in the cookie dough batter helps keep these cookies moist and hydrates the starches in the flour.
- No chill time required!
- The brown butter enhances the flavor profile and adds depth and complexity to the cookies. This helps make them more interesting and indulgent than other cookies!
- These cookies are a bit more dense thanks to the brown butter and super chewy!
Ingredient Notes
For the ingredient measurements and entire recipe, be sure to scroll down to the bottom of the blog post where the recipe card is located.
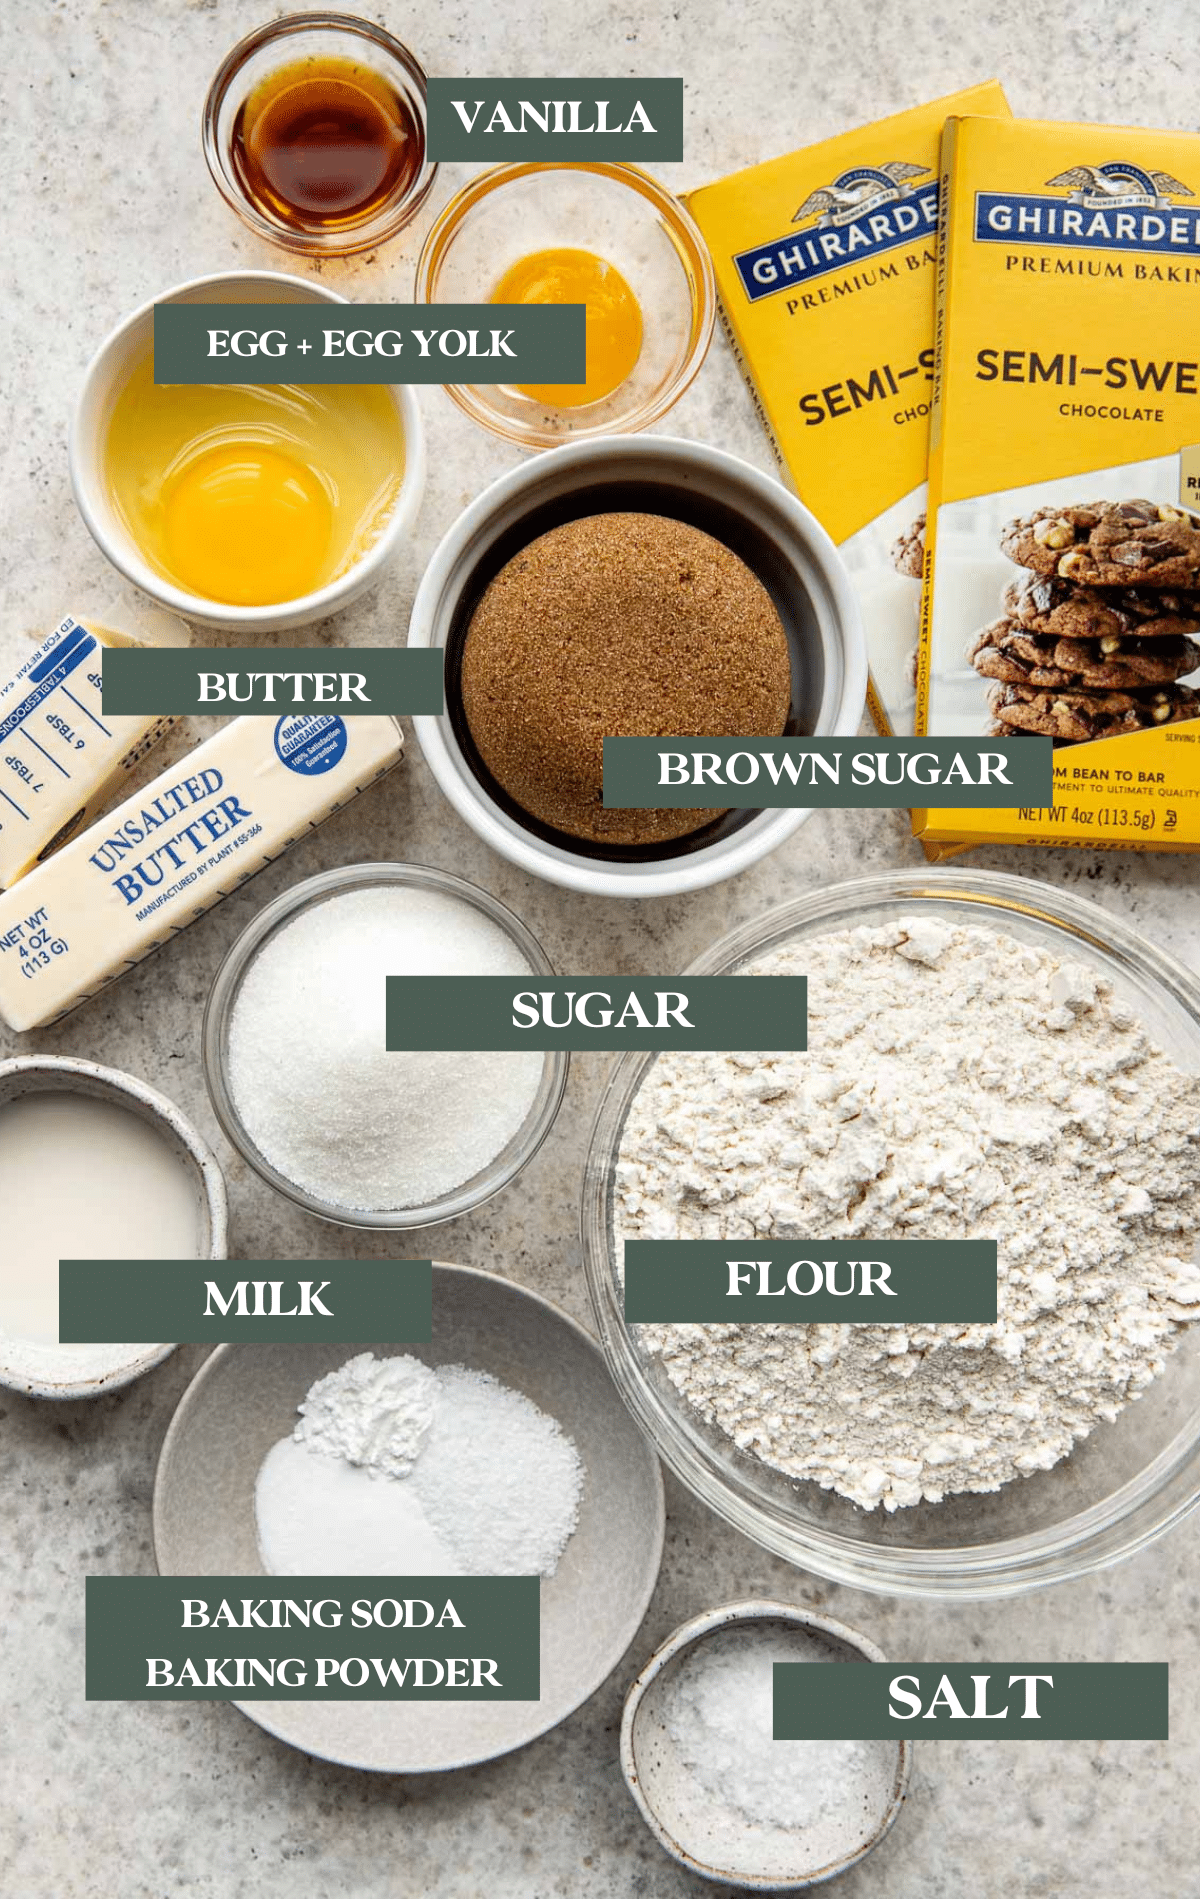
- All-Purpose Flour: All Purpose Flour provides a delicious texture and gives the cookies the perfect chewiness you love.
- Semi sweet chocolate bars: I like to use Ghirardelli.
- Unsalted Butter: The biggest benefit of unsalted butter lets you control the overall flavor of your cookies, plus we’re really focusing on the nutty brown butter in these cookies.
- Brown Sugar: I use dark brown sugar, but you can easily substitute light brown sugar.
- Granulated Sugar: granulated sugar adds to the crispiness of the cookie, and makes for a lighter colored cookie.
- Vanilla: Vanilla is a must in cookies, it adds a complex and subtle spice, and I always recommend using real vanilla extract.
- Egg & 1 egg yolk: The protein in eggs adds to a chewy texture, so adding an extra yolk, gives the cookie the extra chewiness that makes these cookies perfect.
- Milk: like I mentioned above, just a touch of milk in the cookie dough batter helps keep these cookies moist and hydrates the starches in the flour.
Step by Step Directions
For the full recipe instructions, scroll down to the bottom of the blog post to the recipe card.
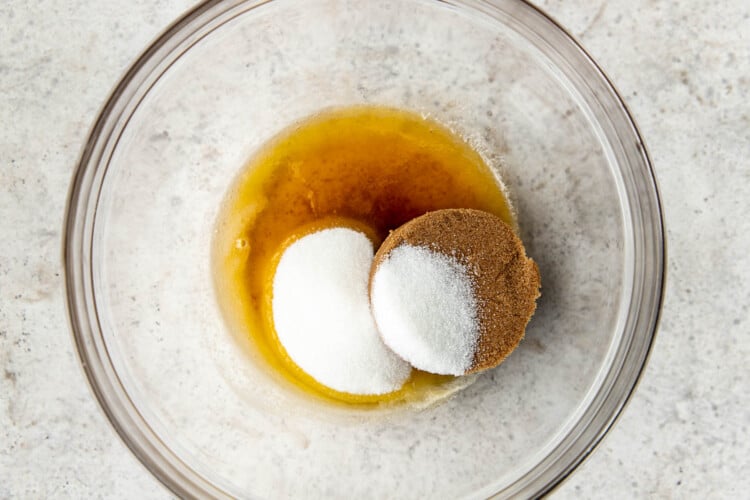
- Brown the butter then set aside in a bowl to cool slightly.
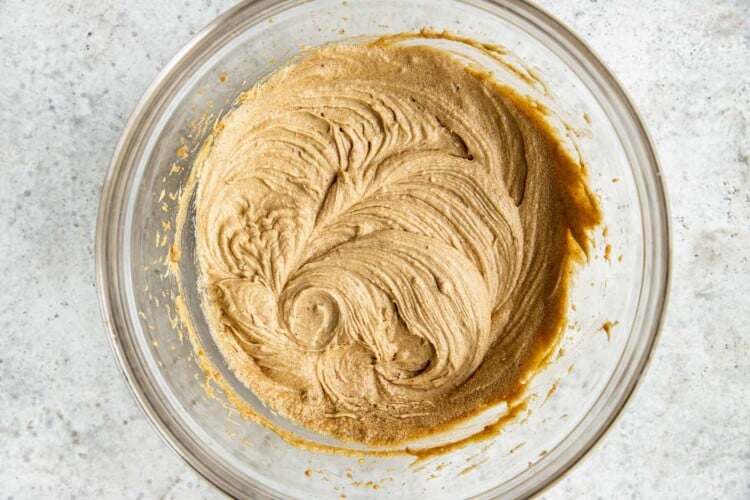
- Beat in the sugars then add the eggs, milk and vanilla.
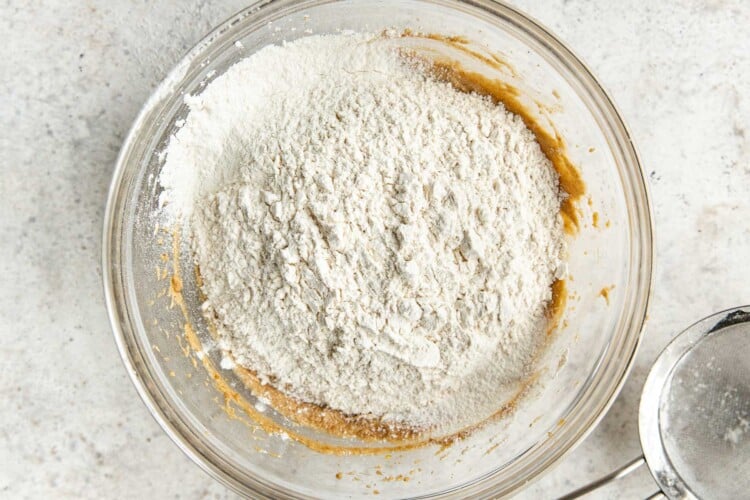
- Sift in the dry ingredients and fold to combine.
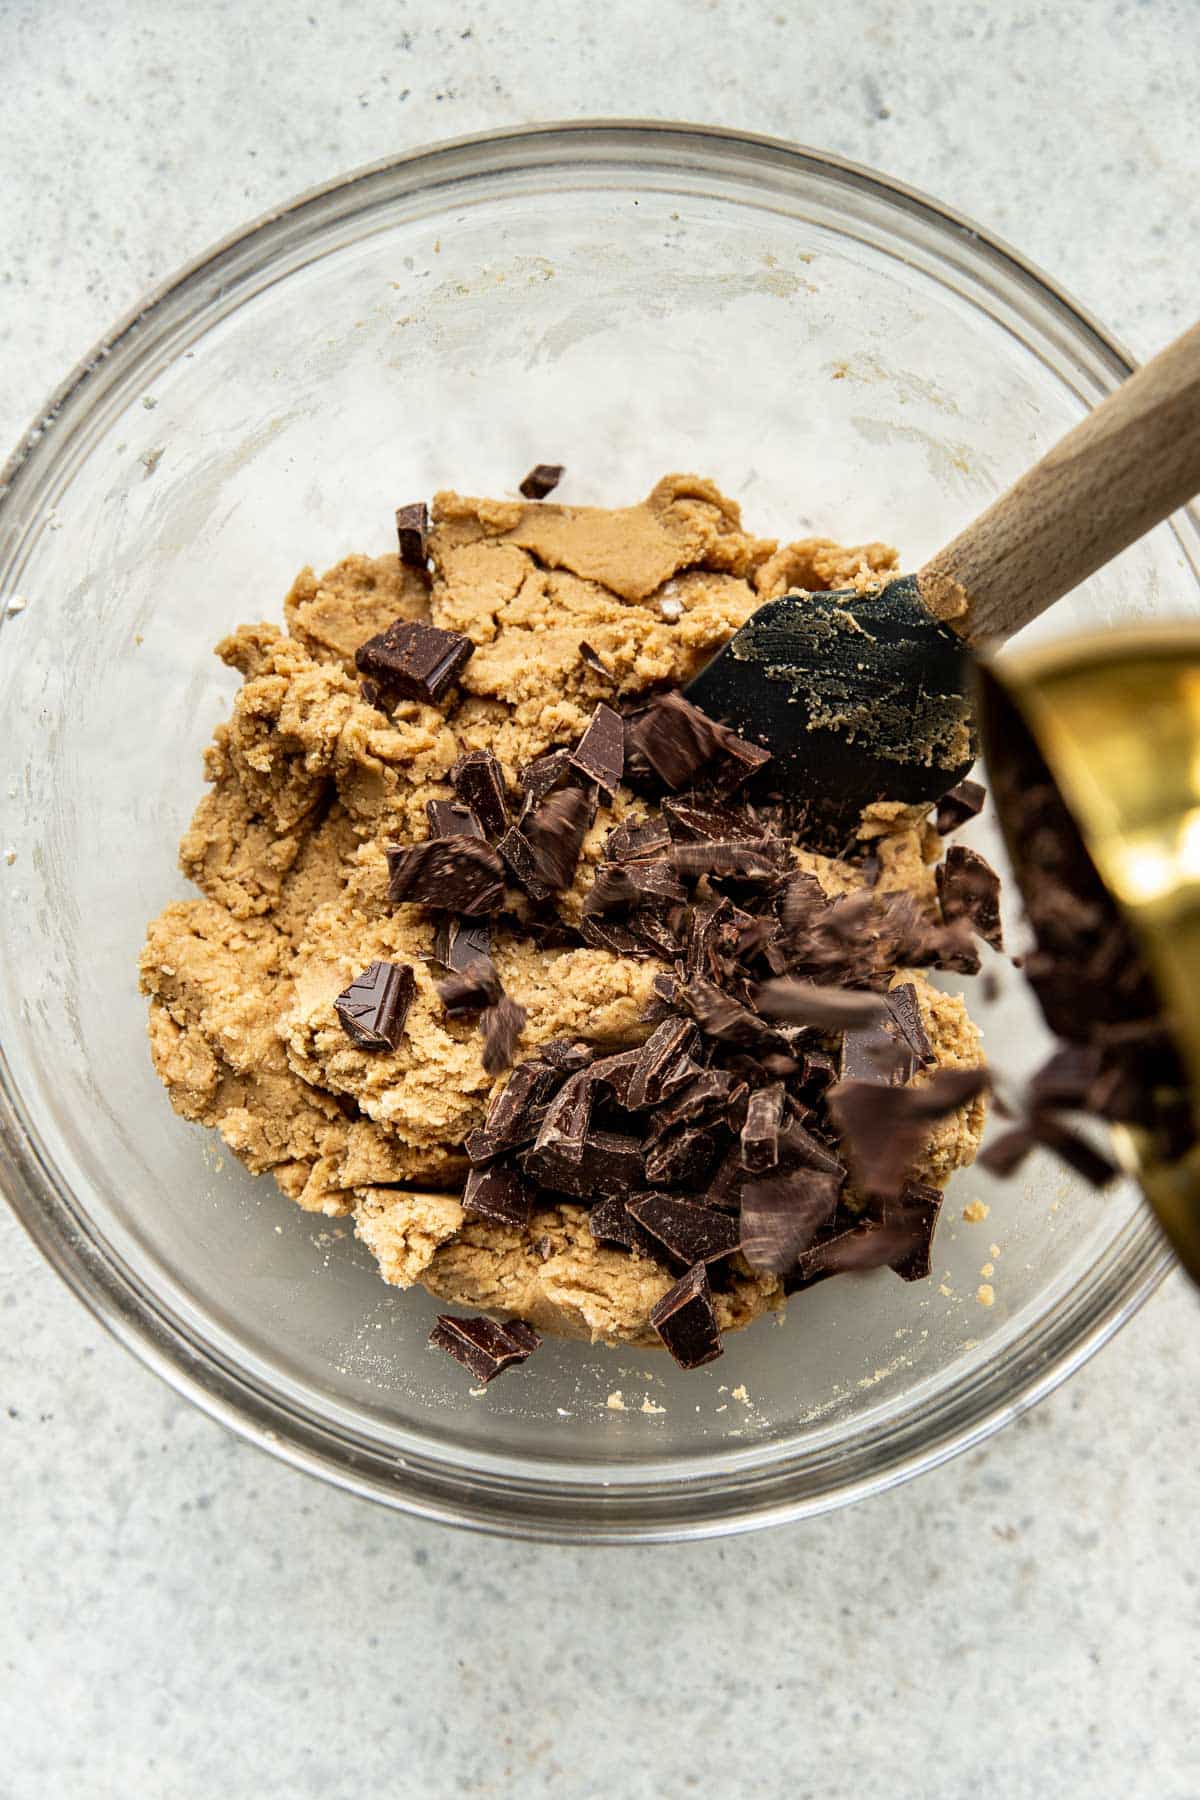
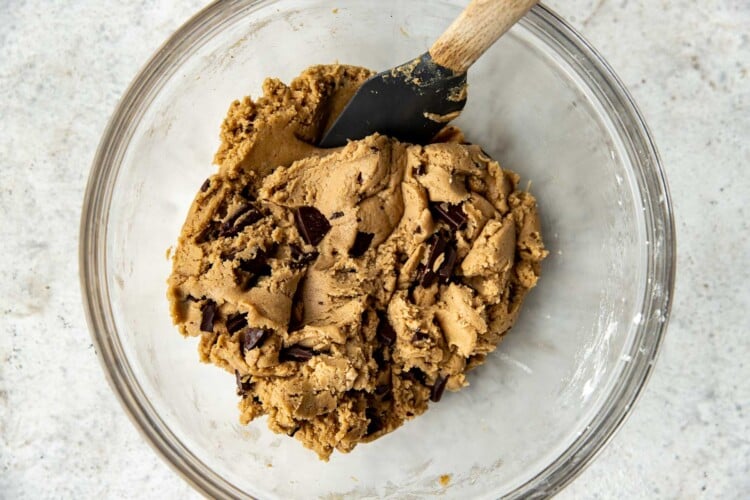
- Add 3/4 cup of the chocolate chunks.
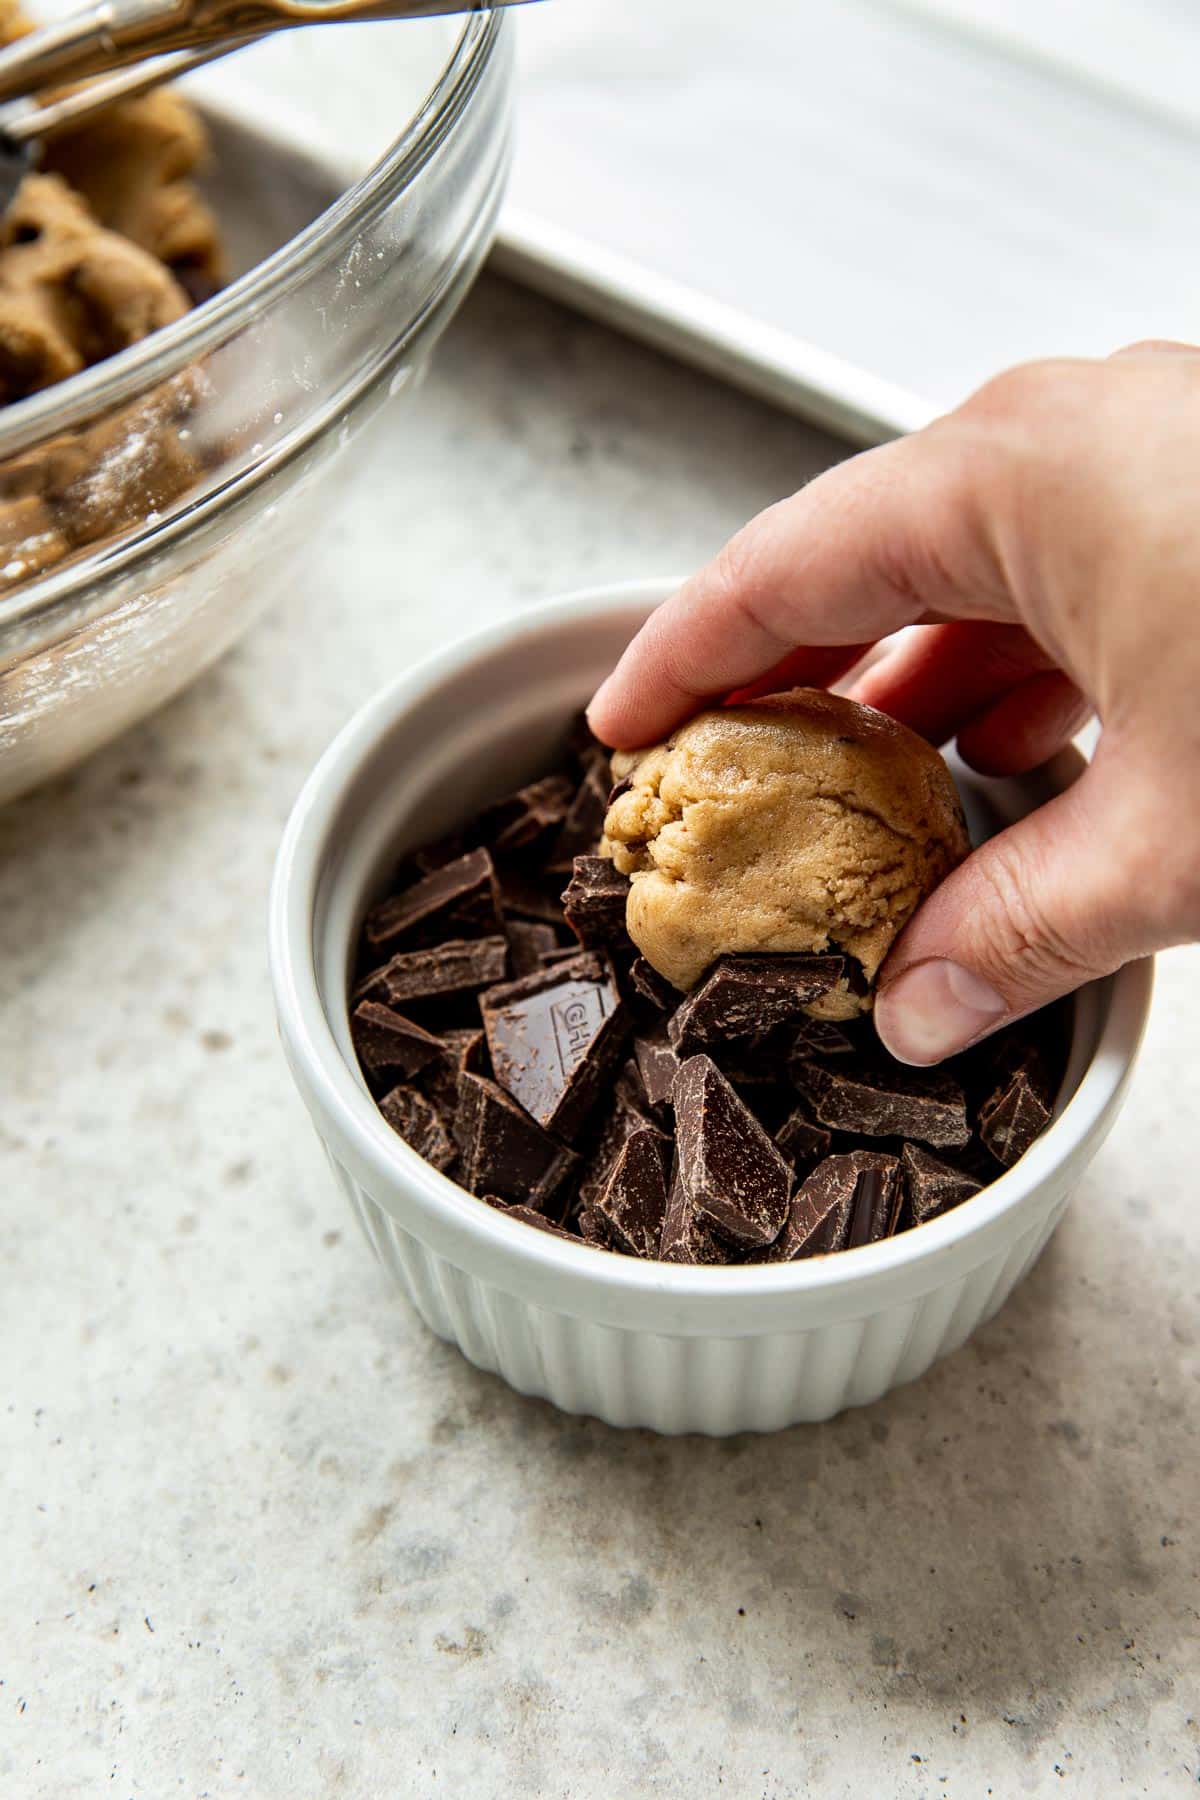
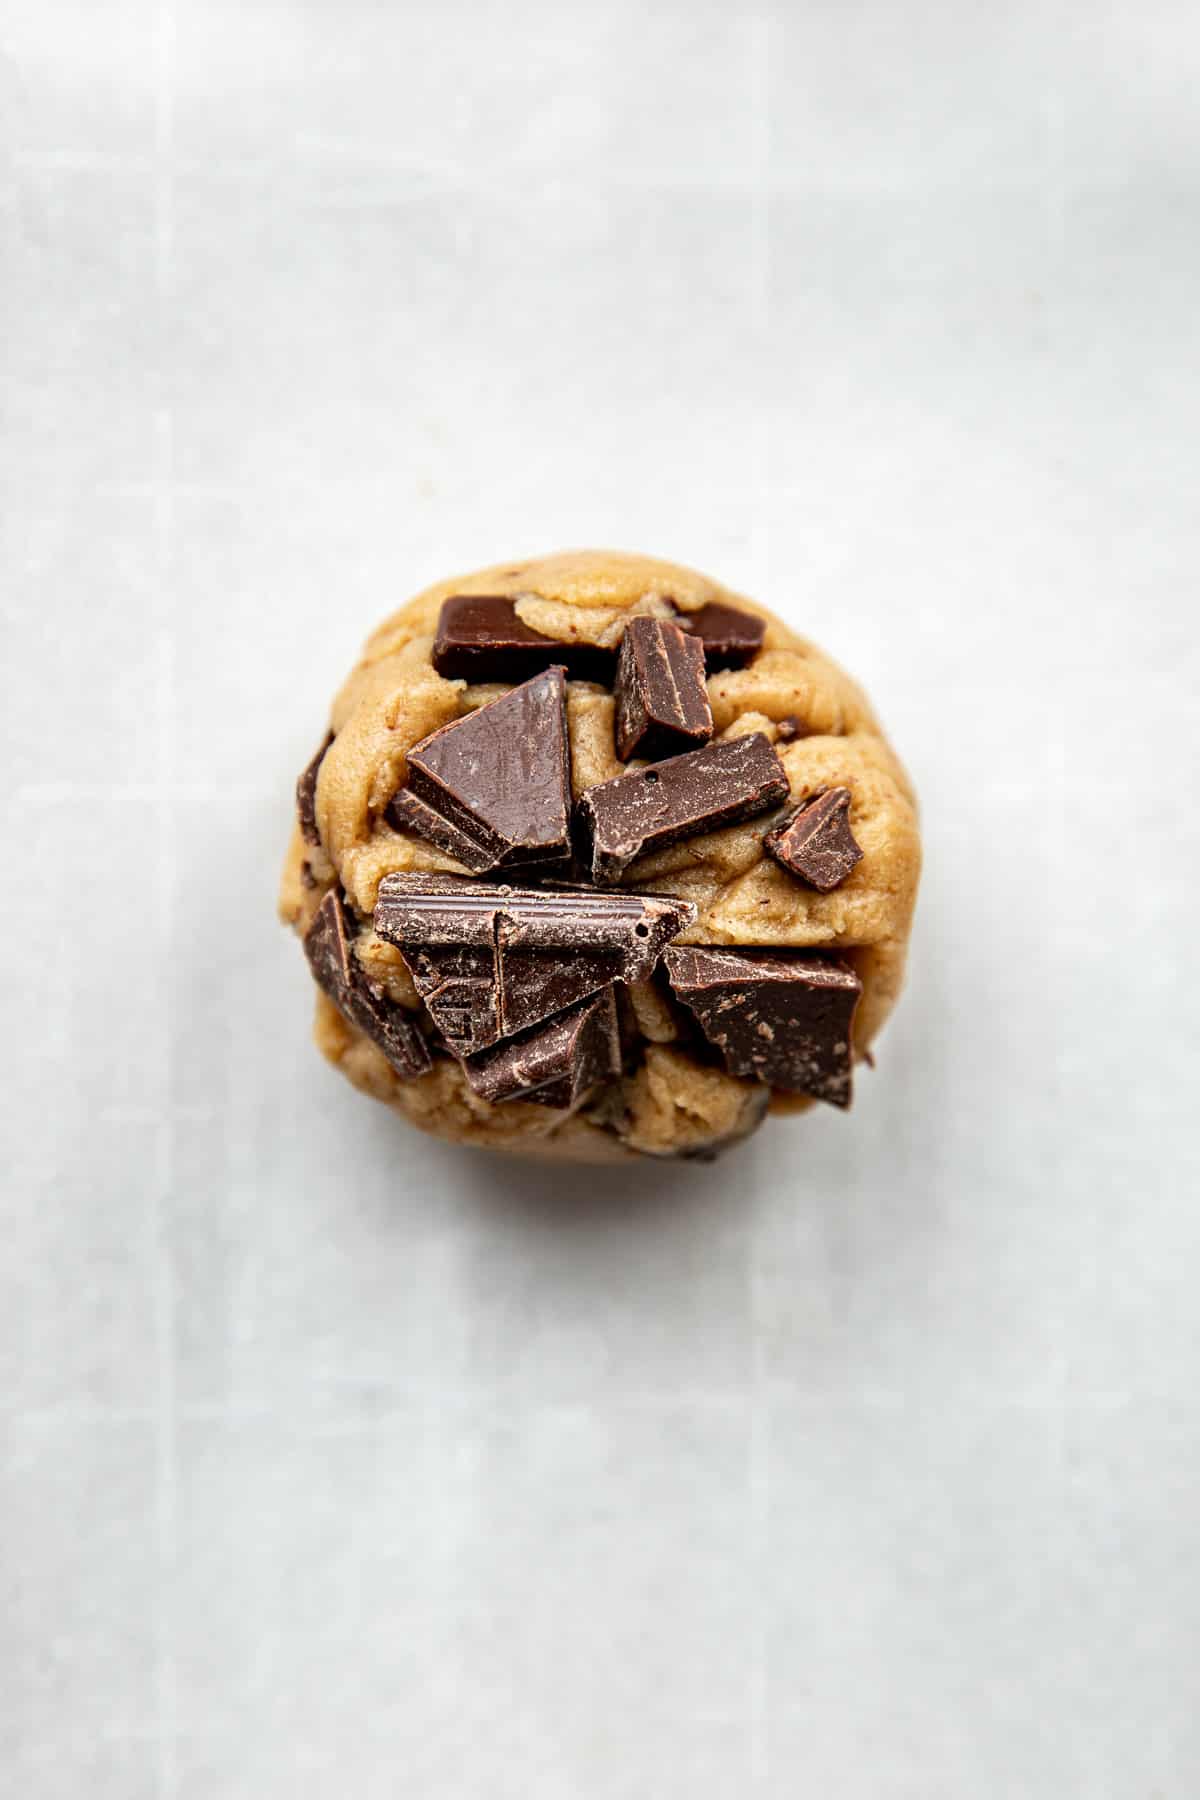
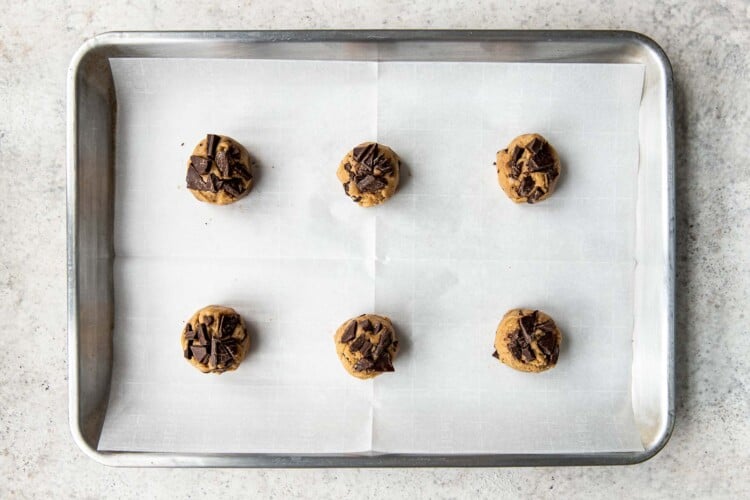
- Scoop into balls, add more chunks on top, and bake!
Tips to make brown butter
- Use Unsalted Butter: Start with unsalted butter to have control over the final saltiness of your dish. You can always add salt later to the cookie dough to taste.
- Choose a Light-Colored Pan: Opt for a light-colored or stainless steel pan to help you monitor the color of the butter as it browns. Avoid using a dark-colored pan, as it can make it challenging to gauge the color accurately.
- Cut Butter Uniformly: Cut the butter into evenly sized pieces. Smaller pieces melt and brown more evenly. I usually cut the butter in tablespoon sized pieces.
- Low to Medium Heat: Start with low to medium heat to melt the butter slowly. This gives you better control over the browning process and reduces the risk of burning.
- Stir Constantly: Stir the butter continuously with a heat-resistant spatula or whisk. This keeps the milk solids in motion, preventing them from sticking to the bottom of the pan and promoting even browning.
- Watch for Foam and Bubbles: As the butter melts, it will foam and bubble. Continue stirring as the foam subsides and you start to see golden specks at the bottom of the pan. These specks are the browned milk solids.
- Smell the Aroma: Pay attention to the scent of the butter. When it’s close to being browned, it will develop a nutty aroma. This is a good indicator of its progress.
- Remove from Heat Promptly: As soon as the butter reaches a rich golden brown color and has a nutty scent, remove it from the heat. The browning process can happen quickly, so be attentive to avoid burning.
- Transfer Immediately: To prevent carryover cooking (which can lead to over-browning or burning), transfer the browned butter to a heatproof bowl as soon as it’s ready. Leaving it in the hot pan can cause it to continue cooking.
Variations
- Toasted Nuts: Add toasted and chopped nuts like pecans, walnuts, or almonds to your cookie dough for added crunch and flavor.
- Coconut: Incorporate shredded coconut into the dough for a tropical twist. You can use sweetened or unsweetened, depending on your preference.
- Caramel Bits: Fold in caramel bits or pieces for a gooey caramel surprise in each bite.
- Dried Fruit: Mix in dried fruits like raisins, cranberries, or chopped apricots for a chewy and fruity addition.
- Spices: Add warm spices like cinnamon, nutmeg, or cardamom to the dough for a cozy, spiced cookie.
- Chocolate Variety: Experiment with different types of chocolate chips or chunks, such as dark chocolate, white chocolate, butterscotch chips, or even chunks of your favorite chocolate bars.
- Citrus Zest: Add citrus zest, such as orange or lemon, to brighten up the flavors and complement the richness of the brown butter.
- Espresso Powder: Incorporate a small amount of espresso powder to intensify the chocolate flavor and add a hint of coffee.
Storage and Freezing
- Store these brown butter cookies in a sealed container at room temperature for up to 5 days, or in the freezer for up to 3 months.
- To freeze the cookie dough, scoop the dough into 2 Tbsp. balls, press the chocolate pieces on top and freeze in a single layer in an airtight container for up to 3 months. You can bake the frozen cookie dough from frozen, just add an extra minute or so to your bake time. Ovens vary.
- Make Ahead: You can make the cookie dough and chill it in the refrigerator for up to 2–3 days. Allow to come to room temperature then continue to bake as directed.
shop this post
 Buy Now →
  Buy Now →
 Before You Begin! If you make this, please leave a review and rating letting us know how you liked this recipe! This helps our business thrive & continue providing free recipes.
Ingredients
- 12 Tbsp. unsalted butter (cut into pieces (this helps it melt evenly and brown better))
- 1 cup dark brown sugar, packed (light brown will be ok too)
- 1/2 cup granulated sugar
- 1 large egg (room temperature)
- 1 large egg yolk (room temperature)
- 2 Tbsp. whole milk
- 1 Tbsp. pure vanilla extract
- 2 2/3 cups all purpose flour (spooned and leveled, I recommend weighing the flour (~300 grams) for best results )
- 1 tsp. salt
- 1 tsp. baking soda
- 1/2 tsp. baking powder
- 2, 4 oz. bars semi sweet chocolate, chopped, divided (*Note: chopped chocolate spreads much better than chocolate chips so if your cookies aren't spreading very much and you're using chocoate chips, that may be the culprit. )
- flaky sea salt, for finishing
Last step! If you make this, please leave a review and rating letting us know how you liked this recipe! This helps our business thrive & continue providing free recipes.
Instructions
- Note: see recipe notes below about cookies not spreading or cookie dough being dry.
- Preheat the oven to 350°F. Line 2 baking sheets with parchment paper or silicone baking mats. Set aside.
- Brown the butter: For a detailed tutorial, see this post on how to brown butter. Allow the butter to cool slightly, ~10-15 minutes.12 Tbsp. unsalted butter

- Beat in the sugars into the brown butter using a hand mixer.1 cup dark brown sugar, packed, 1/2 cup granulated sugar
- Add in eggs, milk and vanilla. Beat again.
- Sift in the dry ingredients and fold just until combined. (Keep stirring, the cookie dough will come together!)2 2/3 cups all purpose flour, 1 tsp. salt, 1 tsp. baking soda, 1/2 tsp. baking powder
- Fold in only 3/4 cup of the chocolate chunks (we will use the rest of the chunks to decorate the tops). Dough should feel like cookie dough, if it feels dry still add a splash more milk and stir to combine.2, 4 oz. bars semi sweet chocolate, chopped, divided
- Dunk a cookie dough ball in the remaining chopped chocolate so the pieces cover the tops of the cookie dough balls. Press chocolate into cookie slightly just to be sure it sticks. You can slightly flatten them to get a good surface so the chocolate sticks if thats easier! Repeat with remaining cookie dough balls and place 6 cookies on a baking sheet at a time. (Should yield ~22 cookies)
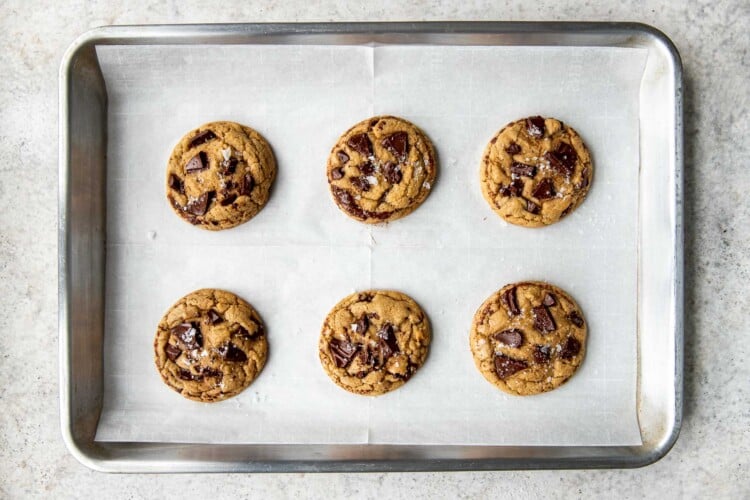
- Bake for 10-11 minutes (I like to go slightly underbaked for a delicious chewy cookie, the edges should be a light golden brown and centers still a little gooey looking, they will continue to bake on baking sheet when removed from oven). Swirl a cup around the edges of the cookies to give them a perfect circular look if needed.
- Rest on cookie sheet just 2-3 minutes then gently transfer to a cooling rack to cool and garnish with flaky sea salt if desired.

Notes
Nutrition Information
Nutritional information is provided as a courtesy and is automatically calculated. It should only be construed as an estimate rather than a guarantee. Ingredients can vary and Kroll’s Korner can’t make any guarantees to the accuracy of this information.

This is by far the best cookie recipe I’ve ever used! Every single time they turn out fantastic, I will never be using another chocolate chip cookie recipe. My whole family loves them!
omg amazing! I am so glad. I love these ones a lot too. thank you!
These cookies are so good, I have made them as a cookie pie and regular cookies and they were so delicious both ways!
Oooo I love the cookie pie idea, yummm thank you!!
Just made a batch of these yesterday to share with my partner and coworkers. This is absolutely the best batch of cookies I have ever made! The recipe is perfect (no notes) and was super easy to follow. Coworkers all adored them and my partner text me today saying he expects us to always have these around the house now! 😆 Thank you for this recipe. It’s going in the saved file!
OMG I am soo glad, thank you! They look GREAT!! 🙂
Love this recipe, such a great nutty flavor from the browned butter!
yayyy I am so glad, thank you Jaimie! 🙂
Wow, these were terrific! We didn’t have any chocolate bars and I’m sure that would’ve made them even better but my husband said they were perfect just the way they are and that I need to give them all away or he’s going to eat the entire batch. Another fantastic recipe!
Beautiful! So glad they worked out well for you! 🙂 thank you for making
These cookies were amazing! My husband even said they were better than the ones I bought from a professional baker. The recipe was quick and easy to make, and the instructions were very detailed and easy to follow. I chilled the dough for about 20 minutes before baking and they baked up beautifully. I made mine a little larger using a 1/4 cup scoop because we love big cookies. Highly recommend!
OMGGGGG yay thanks soo much Robin they look so perfect!
Hi!
Recipe works great! Was a bit worried when I saw some of the comments, but it worked out fine. One thing however: when translating to metric, I think there is a fault with the amount of chocolate. I think it should be 2 times the 4 oz right?
Maybe next time I will try to put in some spices, because there is enough chocolate, but for me the cookie itself can have a bit more of something (tbd).
Greetings from the Netherlands!
Hello! Thanks so much for making them 🙂 Glad these turned out well for you – they look so perfect! Thanks for catching that – sometimes the automation on the recipe card is incorrect and I need to be better at double checking those measurements – it is now fixed though – 4 oz. = 113.5 grams so for the 2 bars it’s 227 grams chopped chocolate bars! Thank you again, xo.
These are the best brown butter cookies I have made yet!! I added heath bits, mini white chips and jumbo dark chips….YUM! This will be my new go to!! Thanks for sharing!!
Soo happy you loved them, thanks so much for making!! 🙂 love the additions you made to them!
good in theory, not in practice. if you’re expecting a thin, crispy and delicious cookie i fear this is not it. they did not spread at all, and were not even remotely crispy. they also lack the sort of flavor that i would expect from a chocolate chip cookie, and the brown butter is not even present in the flavor column. they’re certainly not the worst i’ve ever had, just very thick, cakey, and lacking in sweetness. if you’re expecting them to look like the picture, i’d keep looking.
Hi Lauren, thanks so much for making but so sorry you didn’t care for the recipe. It’s funny, because this recipe seems to be getting mixed reviews – some people say it’s working great (which it always does for me) and others are having trouble. With that said, I think I will personally revisit it again and get to the bottom of what’s happening and see if I can make some adjustments. For anyone reading this who currently loves the recipe as is, if I make any changes I will leave notes in the recipe card notes. Thank you!
Hi there! Is there a possible explanation on why mine came out slightly puffy ? I used a scale to measure out all the ingredients.
Hi! Yes! Ahhh so sorry that happened. It looks like you used chocolate chips, instead of the chopped chocolate. Chocolate chips actually behave differently than chopped chocolate. Chips are designed to hold their shape and don’t fully melt, so they don’t loosen the dough the same way chopped chocolate does. When you use chopped chocolate, those melty pools help the cookies spread more and create that flatter, ripple-y look.
So if your cookies turned out puffier, it’s likely just the chocolate swap & nothing you did or measured wrong! If you prefer a flatter cookie, try using chopped chocolate next time or gently press the dough balls down before baking. Hope that helps! 🙂 xo, Tawnie
These cookies turned out fantastic! I’ve made these cookies twice for my family and they were a hit both times. I’m still trying to figure out what temp/time to bake from frozen but this recipe is a hit!
Hi!! Aww thank you so glad they’re a success! You might need to let them come a little bit to room temperature before baking if you froze them previously.