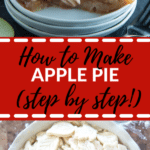
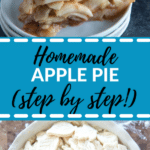
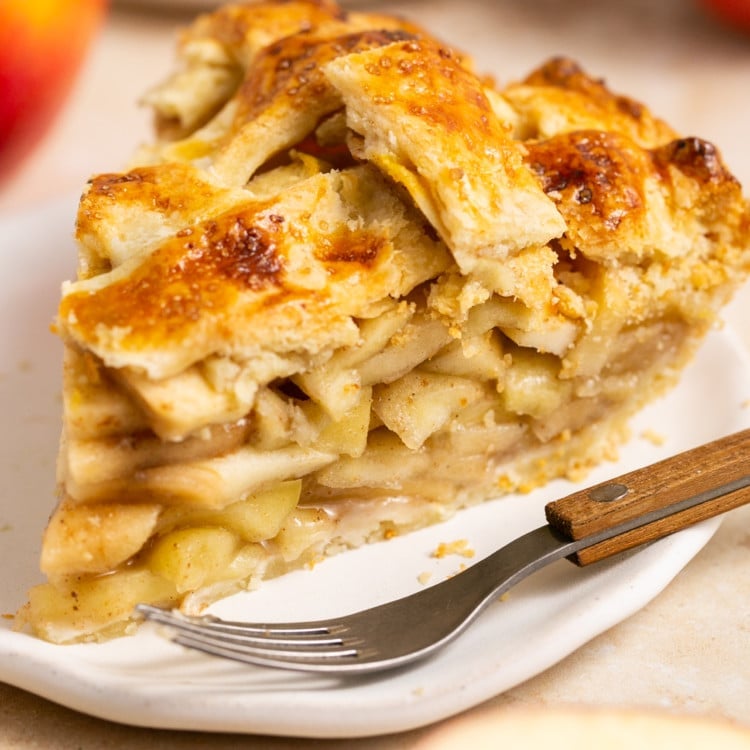
How To Make Homemade Apple Pie
This post may contain affiliate links. Please read our disclosure policy.
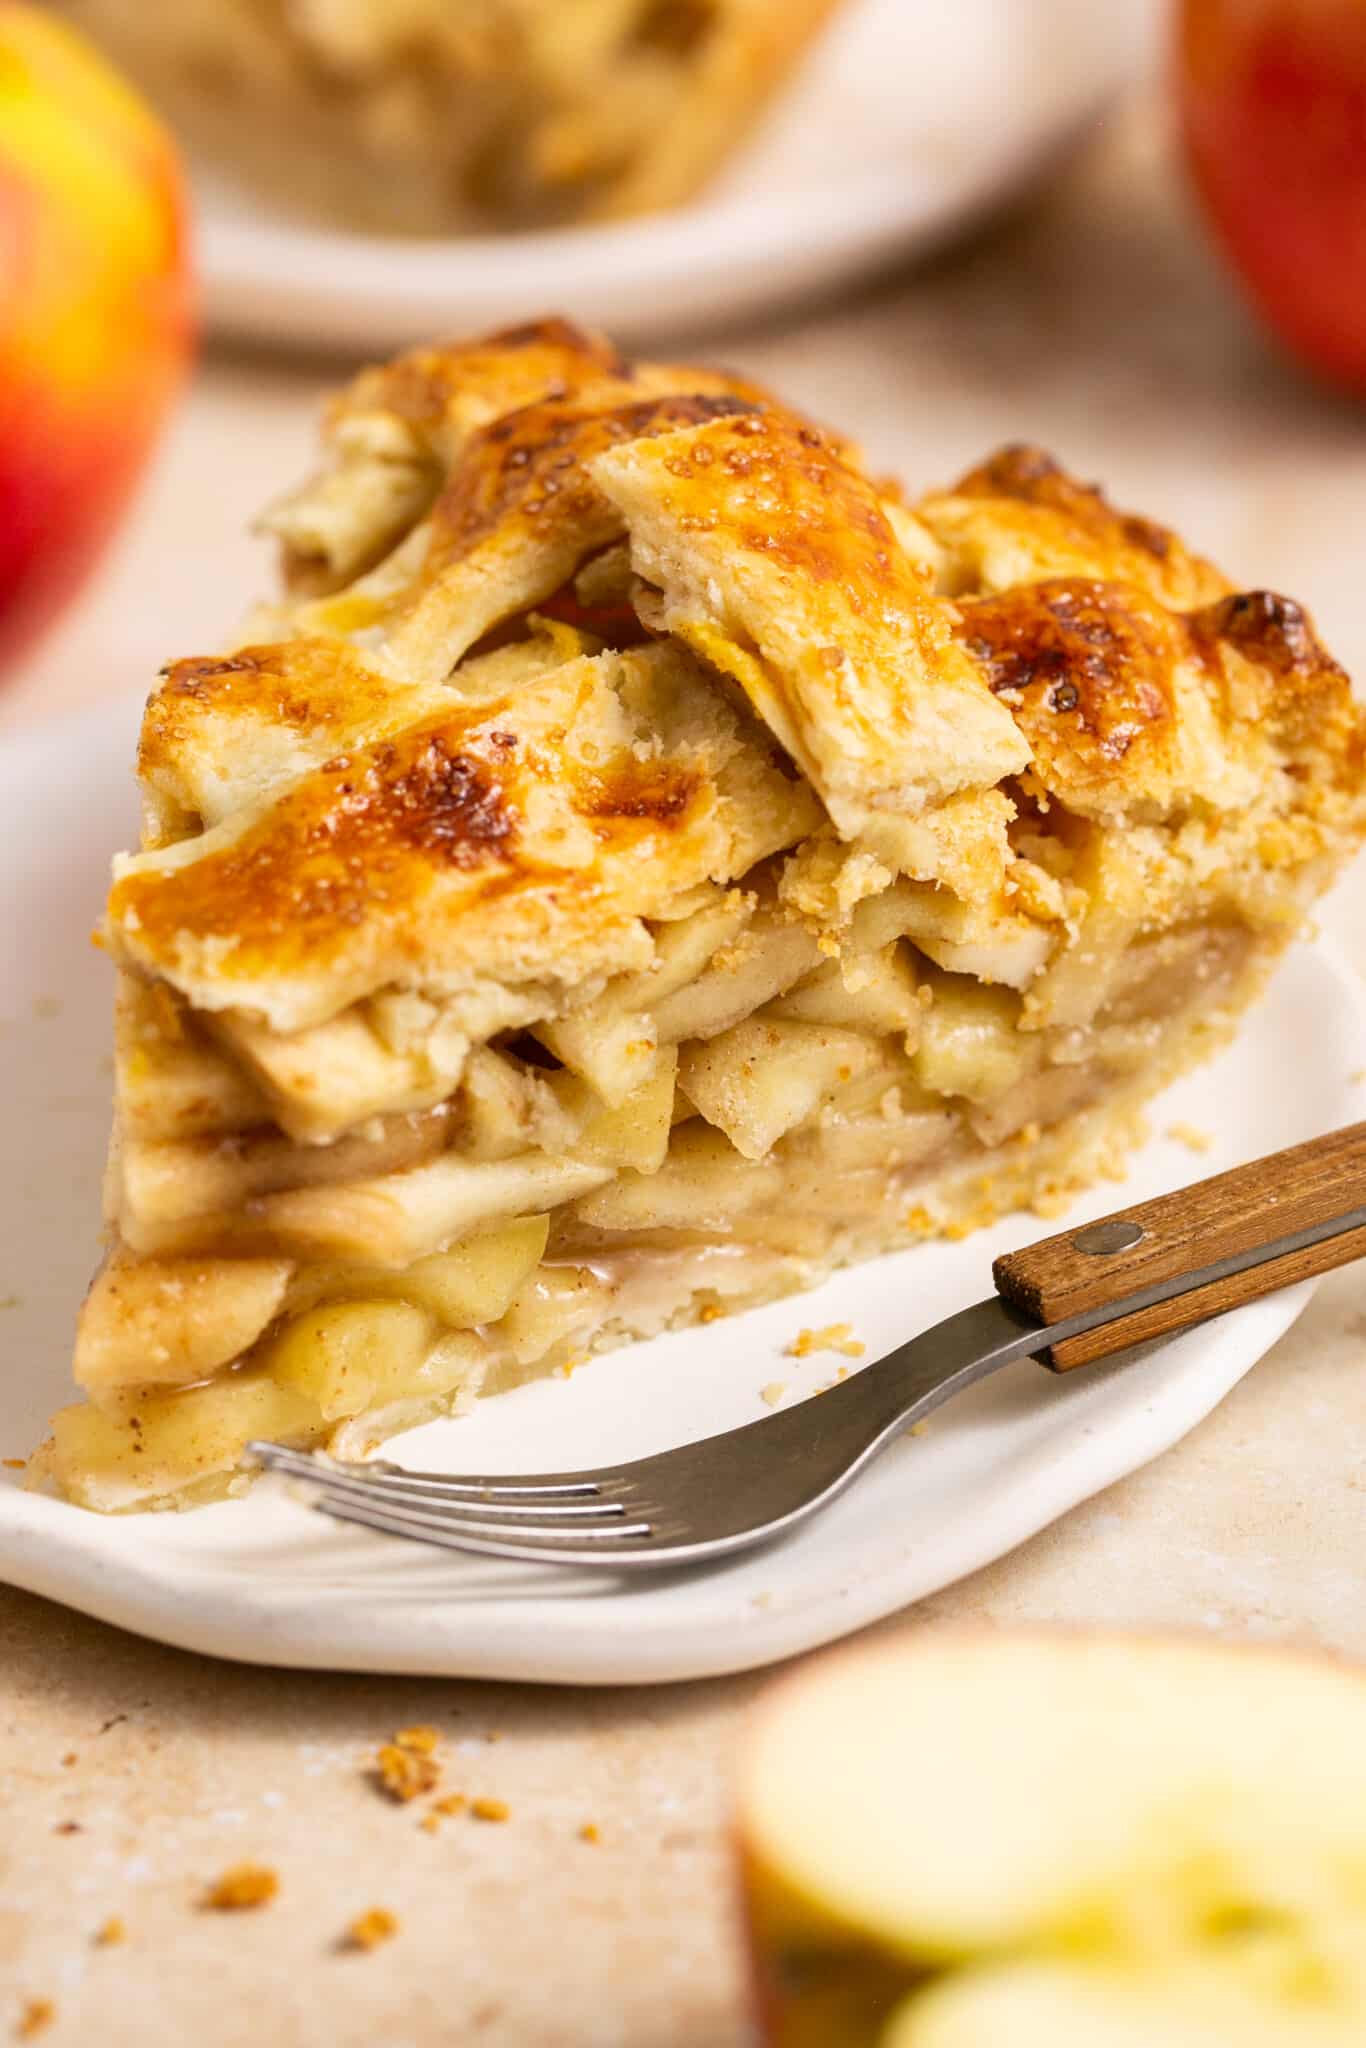
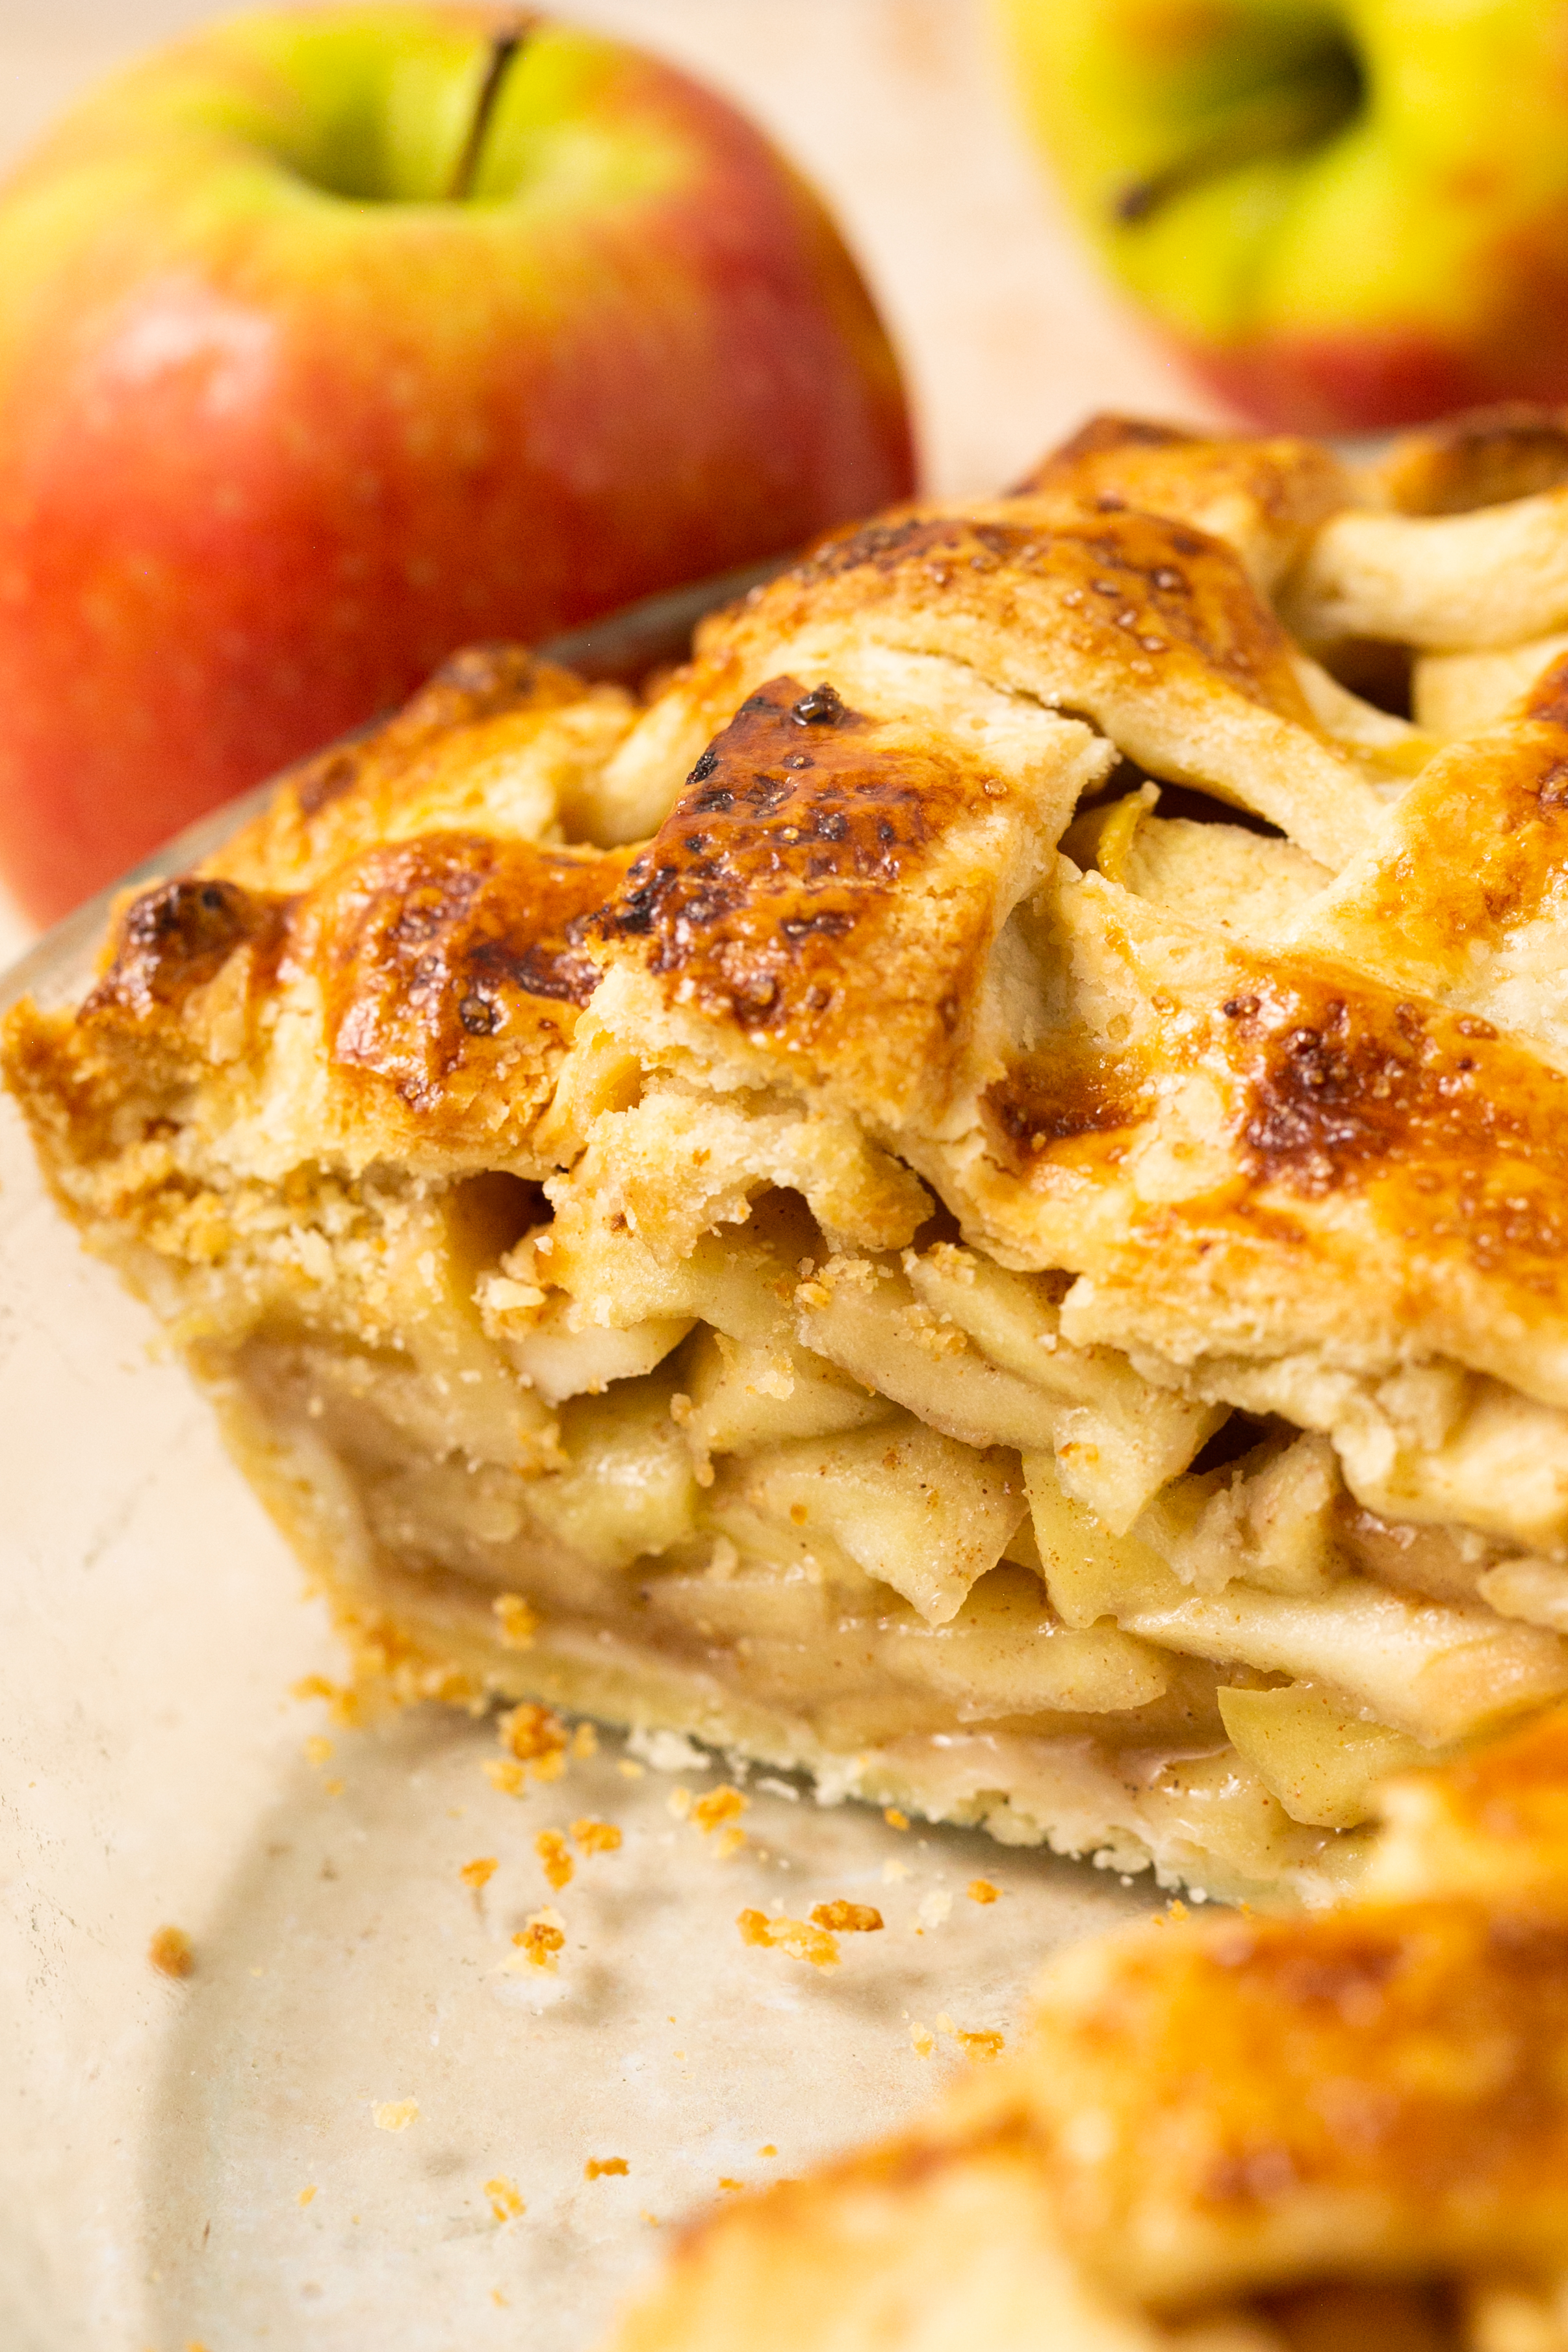
How to make a Homemade Apple Pie is less intimidating than you think and everyone needs this American classic recipe up their sleeve!
Sweet and tart apples dance with warming spice like cinnamon, cloves and ginger and get nestled in a perfectly flaky pie crust.
The crust comes together in minutes in your food processor so it’s really easy to make.
I love making homemade apple pie for the holidays and this pie in particular always gets requested. It’s real crowd pleaser not only for Thanksgiving and Christmas but during the summer months too like on 4th of July!
Some other reader-favorite fruit desserts to check out are my Puff Pastry Apple Tart, Peach Galette, Lemon Cheesecake Bars, and Mixed Berry Cobbler.
Why this recipe works:
- I use both Granny Smith and Piny Lady apples for balanced flavor.
- The crust is perfectly flaky and buttery!
- The juicy, tender apples get precooked for just 5 minutes ensuring the perfect apple pie filling texture.
- It’s easy to make! Just use my step by step photos.
- You can use a store-bought pie crust if you’re in a pinch!
Tools needed:
Here are some of the basic baking tools needed to make an apple pie:
- 9-inch pie pan
- Rolling pin
- Pie weights (If you don’t have pie weights you can use dried beans!)
- Large working surface
- Peeler for apples
- Food processor
- Mixing bowls
- Measuring spoons
Ingredients needed for homemade apple pie
For the ingredient measurements and entire recipe, be sure to scroll down to the bottom of the blog post where the recipe card is located.
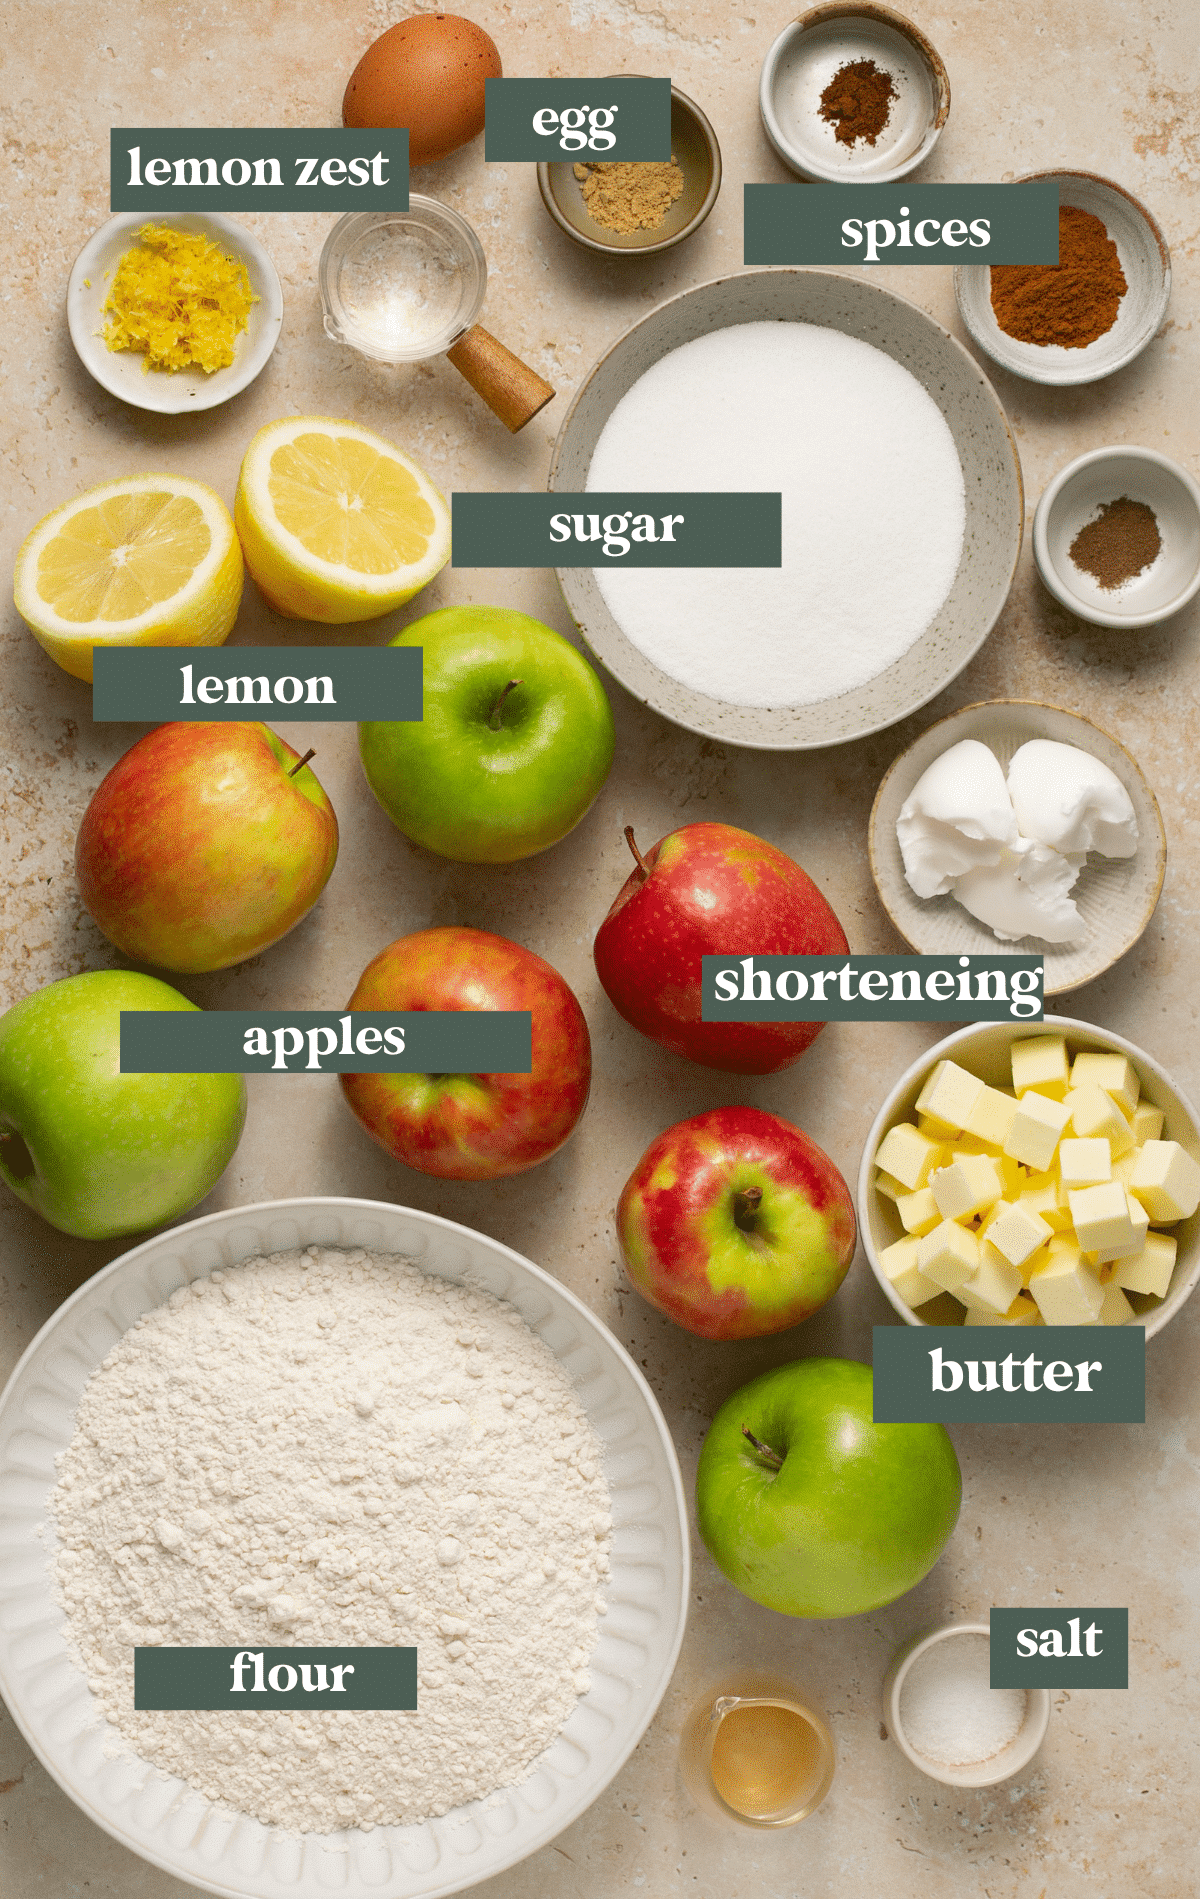
- Apples: I love using a mix of Granny Smith and Honey Crisp, Pink Lady, Braeburn or Northern Spy. Be sure to use a mix to get both the sweet and tart flavors.
- Sugar: a little for the crust and you’ll use more when making the apple pie filling too.
- Flour: all purpose flour works well here. I have not tested this recipe with a gluten free flour.
- Lemon zest & juice: Not only adds flavor and balances the sweetness but also helps prevent the apples from browning.
- Spices: I use ground ginger, ground cinnamon, ground allspice & cloves. Feel free to use more or less.
- Shortening: I use a bit of shortening in my homemade pie crust because I found doughs made with shortening hold their shape much better.
How to make the pie dough
For the full detailed recipe instructions, scroll down to the bottom of the blog post to the recipe card.
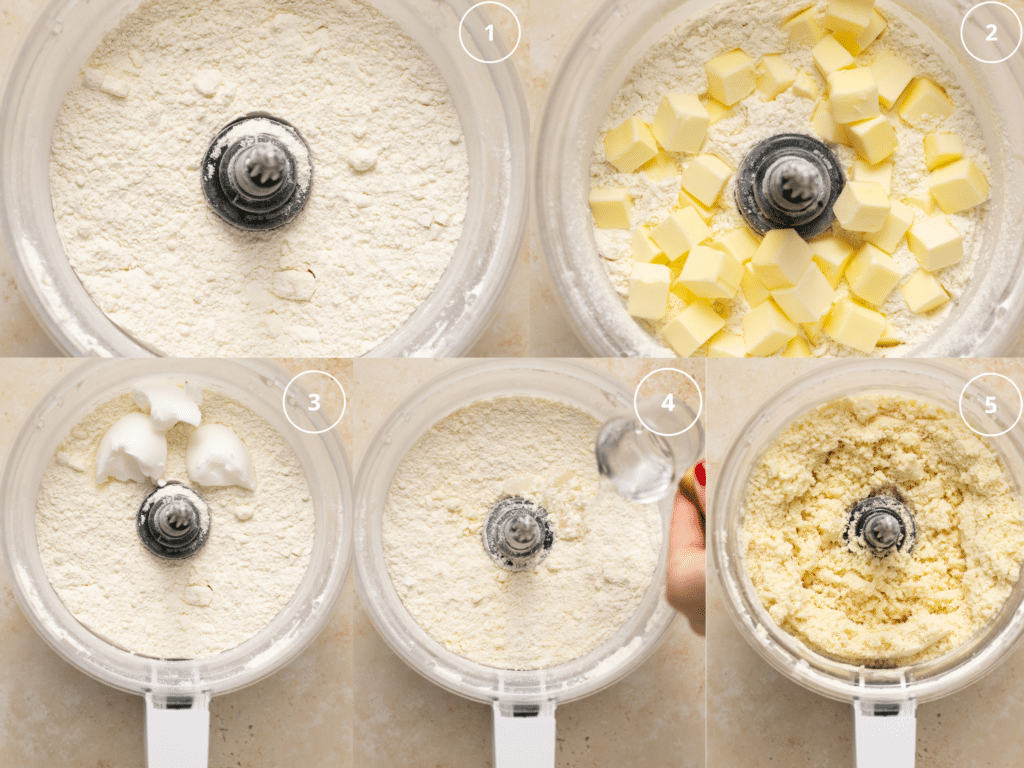
- Pulse the flour, sugar and salt in a food processor a few times.
- Add the cold, cubed butter and pulse again. Then add shortening and pulse once more.
- Slowly stream in the ice cold water and apple cider vinegar mixture until you get a shaggy dough.
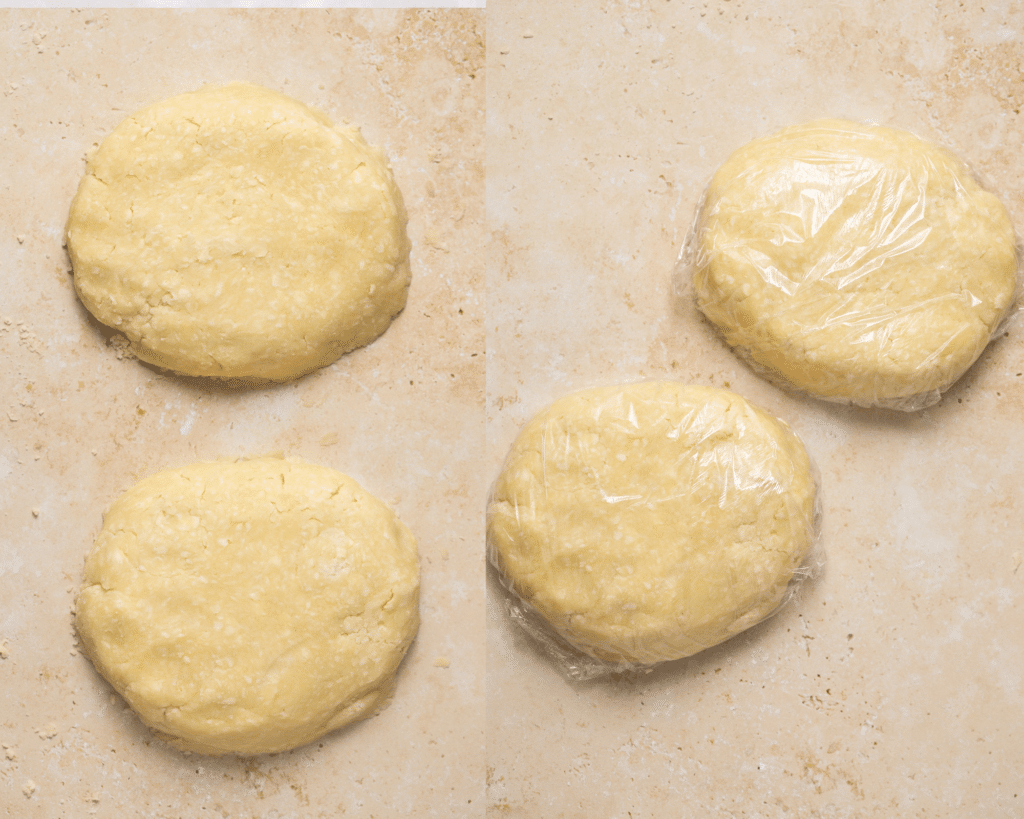
- Turn the dough out onto a clean work surface, divide into 2 sections. Knead dough just a bite to bring it together into 2 disks.
- Wrap in plastic wrap and refrigerate for at least 1 hour.
How to make the apple pie filling
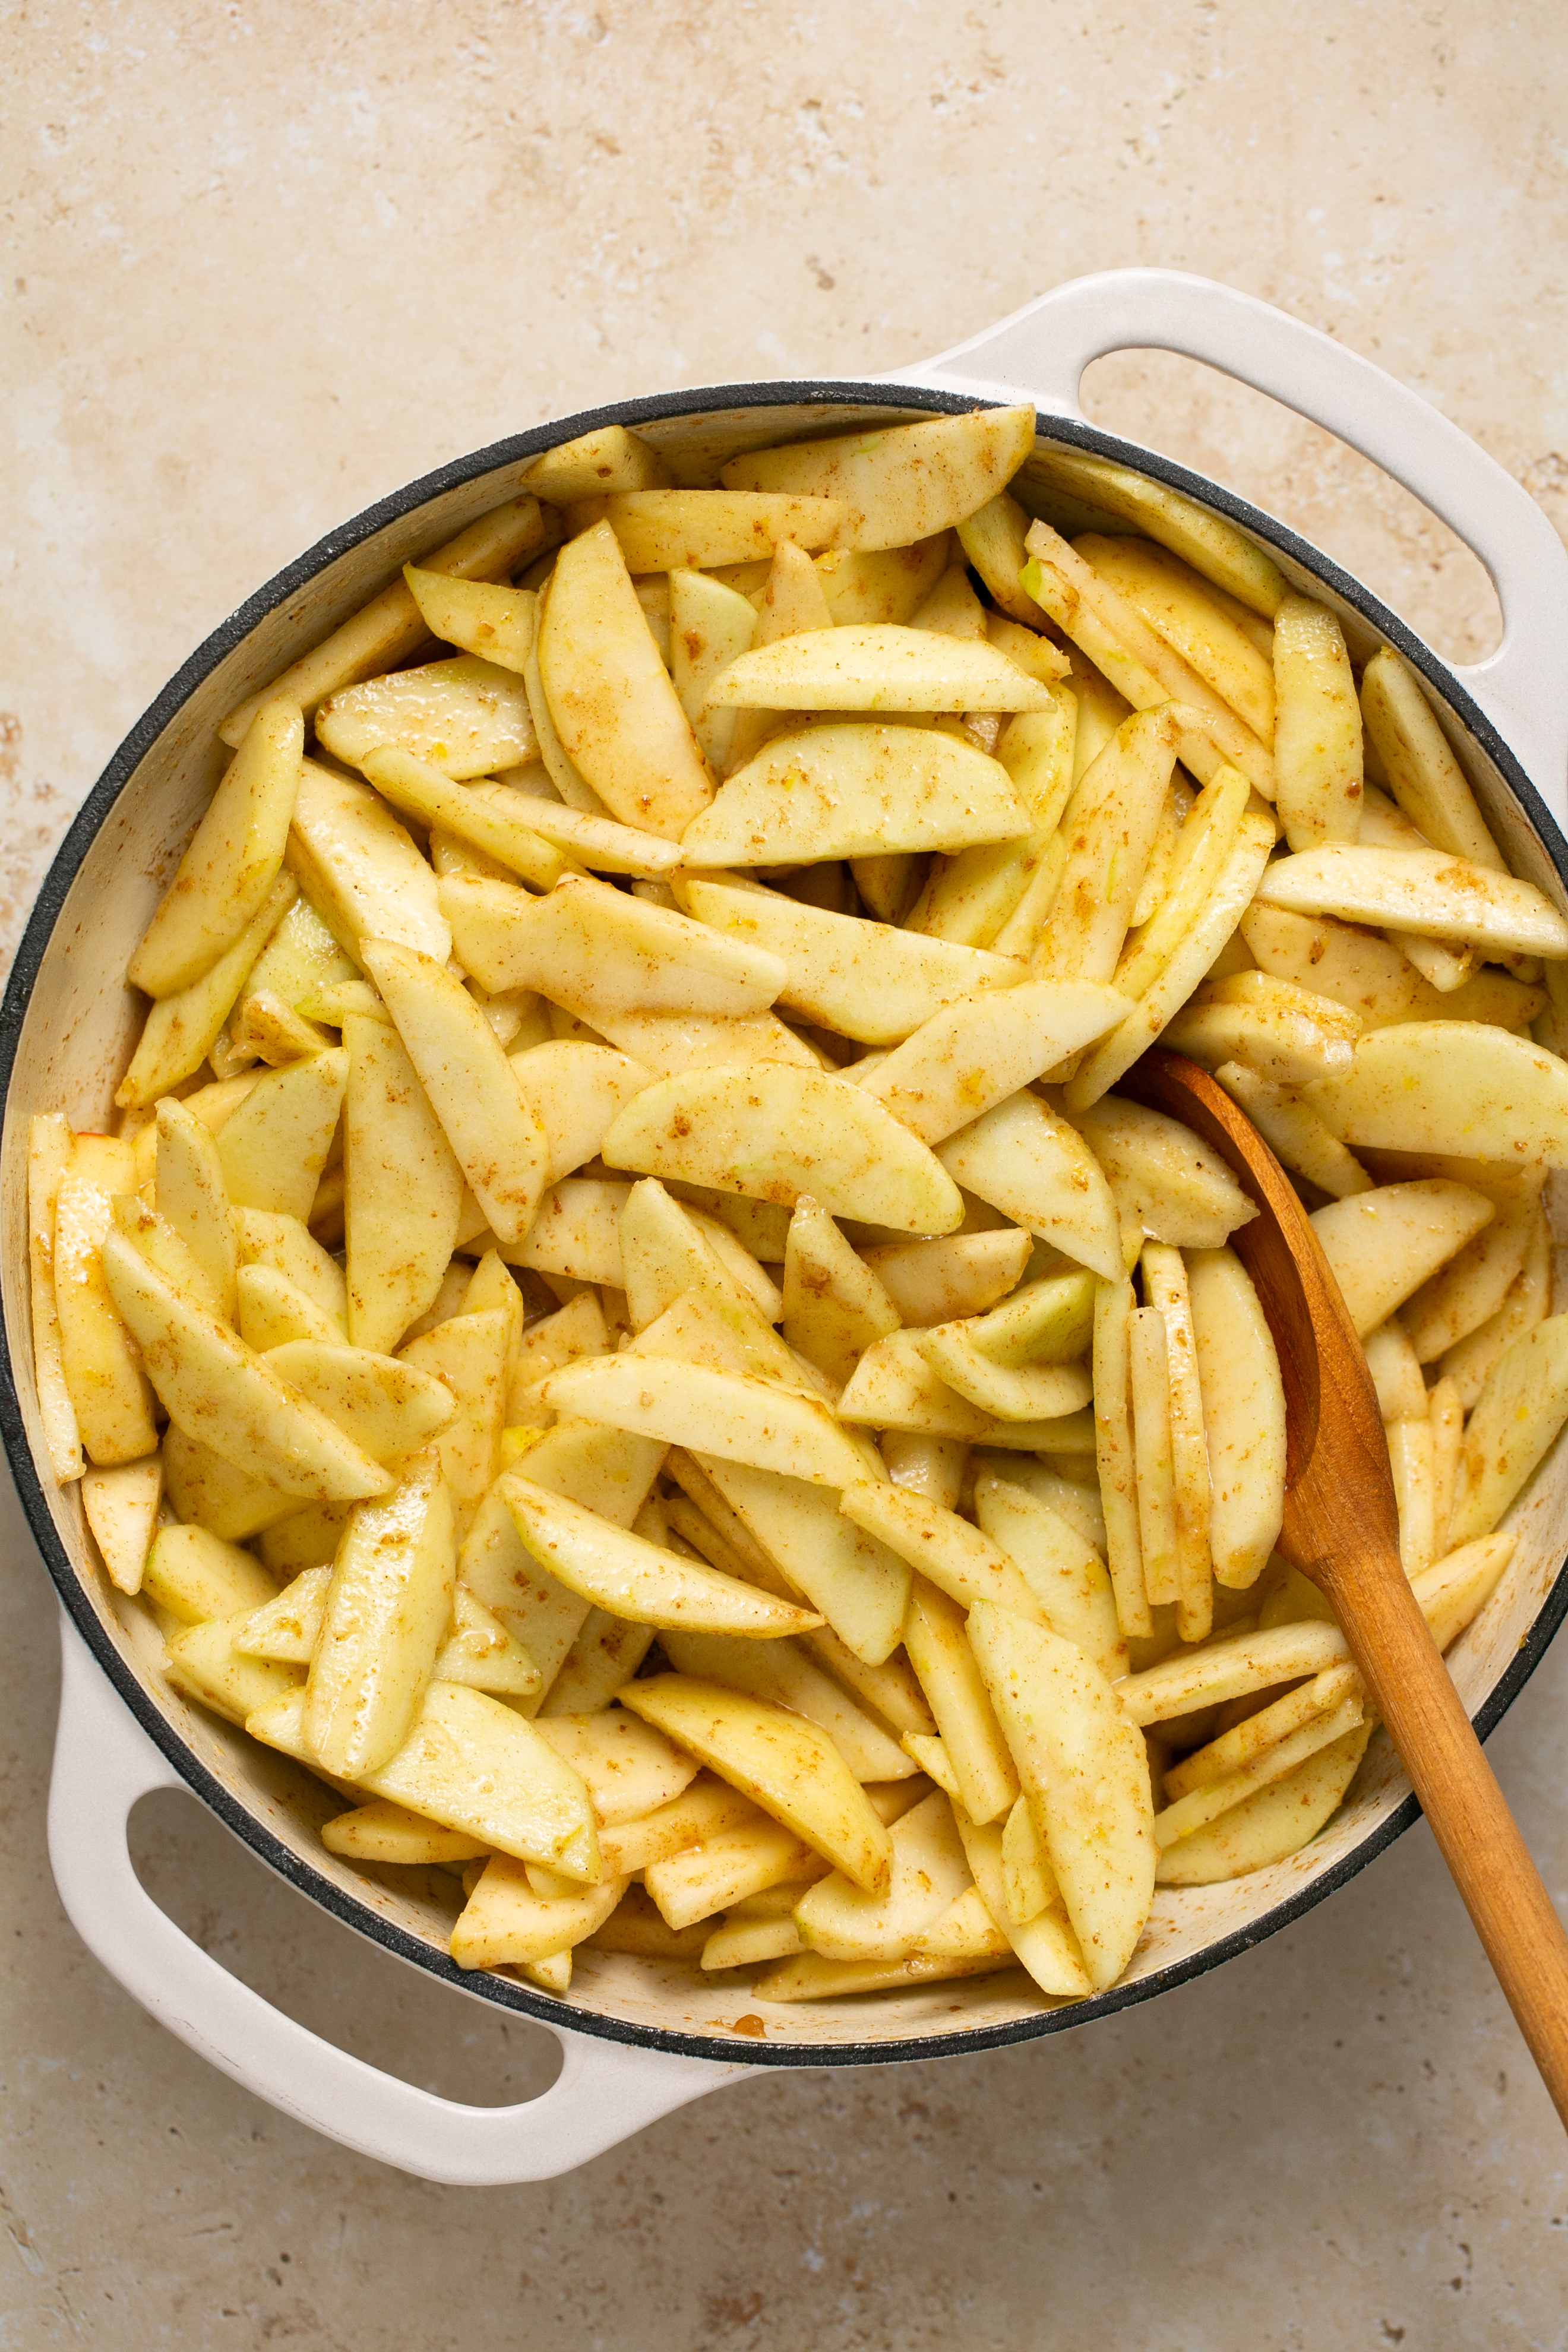
- While dough is chilling, make the filling! Peel, core and slice the apples. Slice the apples in a uniform thickness, about 1/4 inch thick.
- Add the sugar, flour, lemon zest, lemon juice, and seasonings to the apples. Mix to combine.
- Pour the apple filling into a very large skillet, or dutch oven, and place over medium heat. Stir and cook for just 5 minutes until the apples begin to soften. Remove from heat and set aside to cool.
Partially blind bake the crust
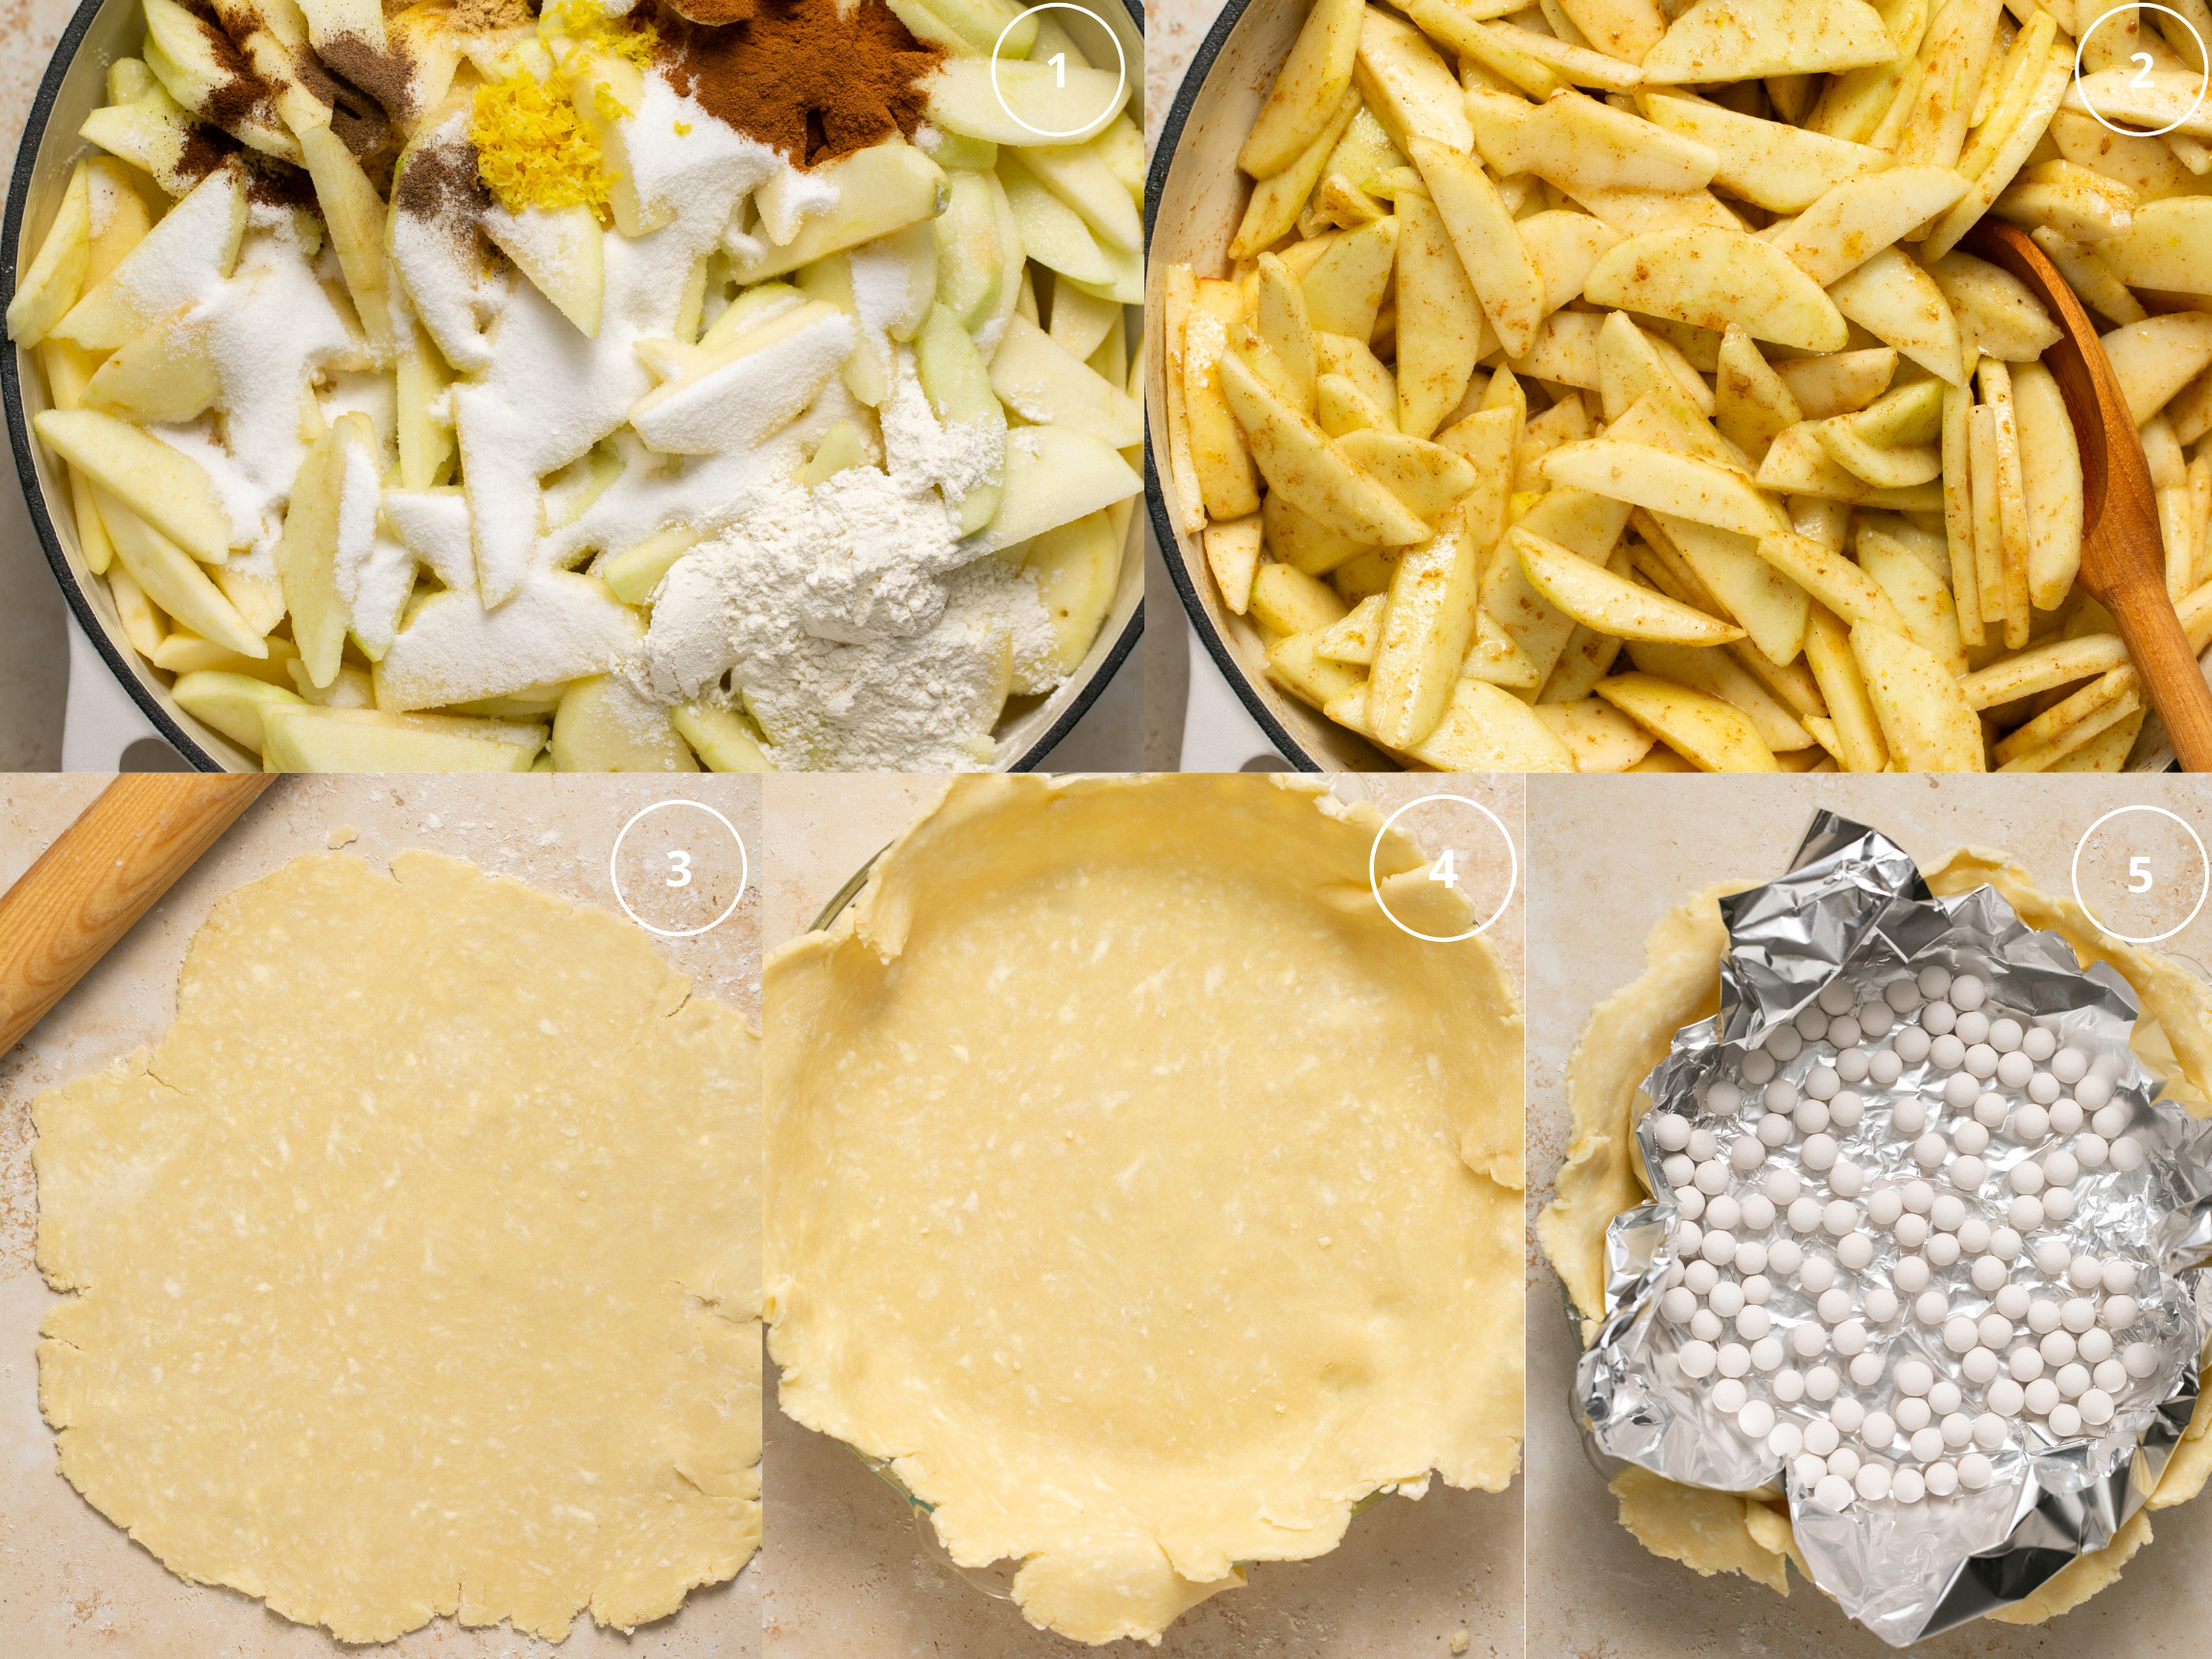
- Roll out one section of dough for the bottom crust on a lightly floured surface into a circle that is about 12 inches diameter using a rolling pin.
- Transfer the dough to a 9 inch pie dish. Trim and seal the dough OR I like to also fold the over hang of dough underneath to create a thicker wall of dough at the edge. Tucking in the excess also helps to reinforce the walls of the pie.
- Freeze the dough for 15-30 minutes to keep the dough nice and chilled, this will solidify the fat, which helps prevent shrinkage.
- Preheat the oven to 425°F. Place a piece of foil on the bottom crust and top with the pie weights. (Use dried beans, sugar or rice if you don’t have pie weights). Bake the pie crust for 10-15 minutes just until edges are set and lightly brown.
- Let the crust cool to room temperature. Fill with the apple filling, leaving the liquid behind in the bowl. Some of the juices are OK to add but not all of it.
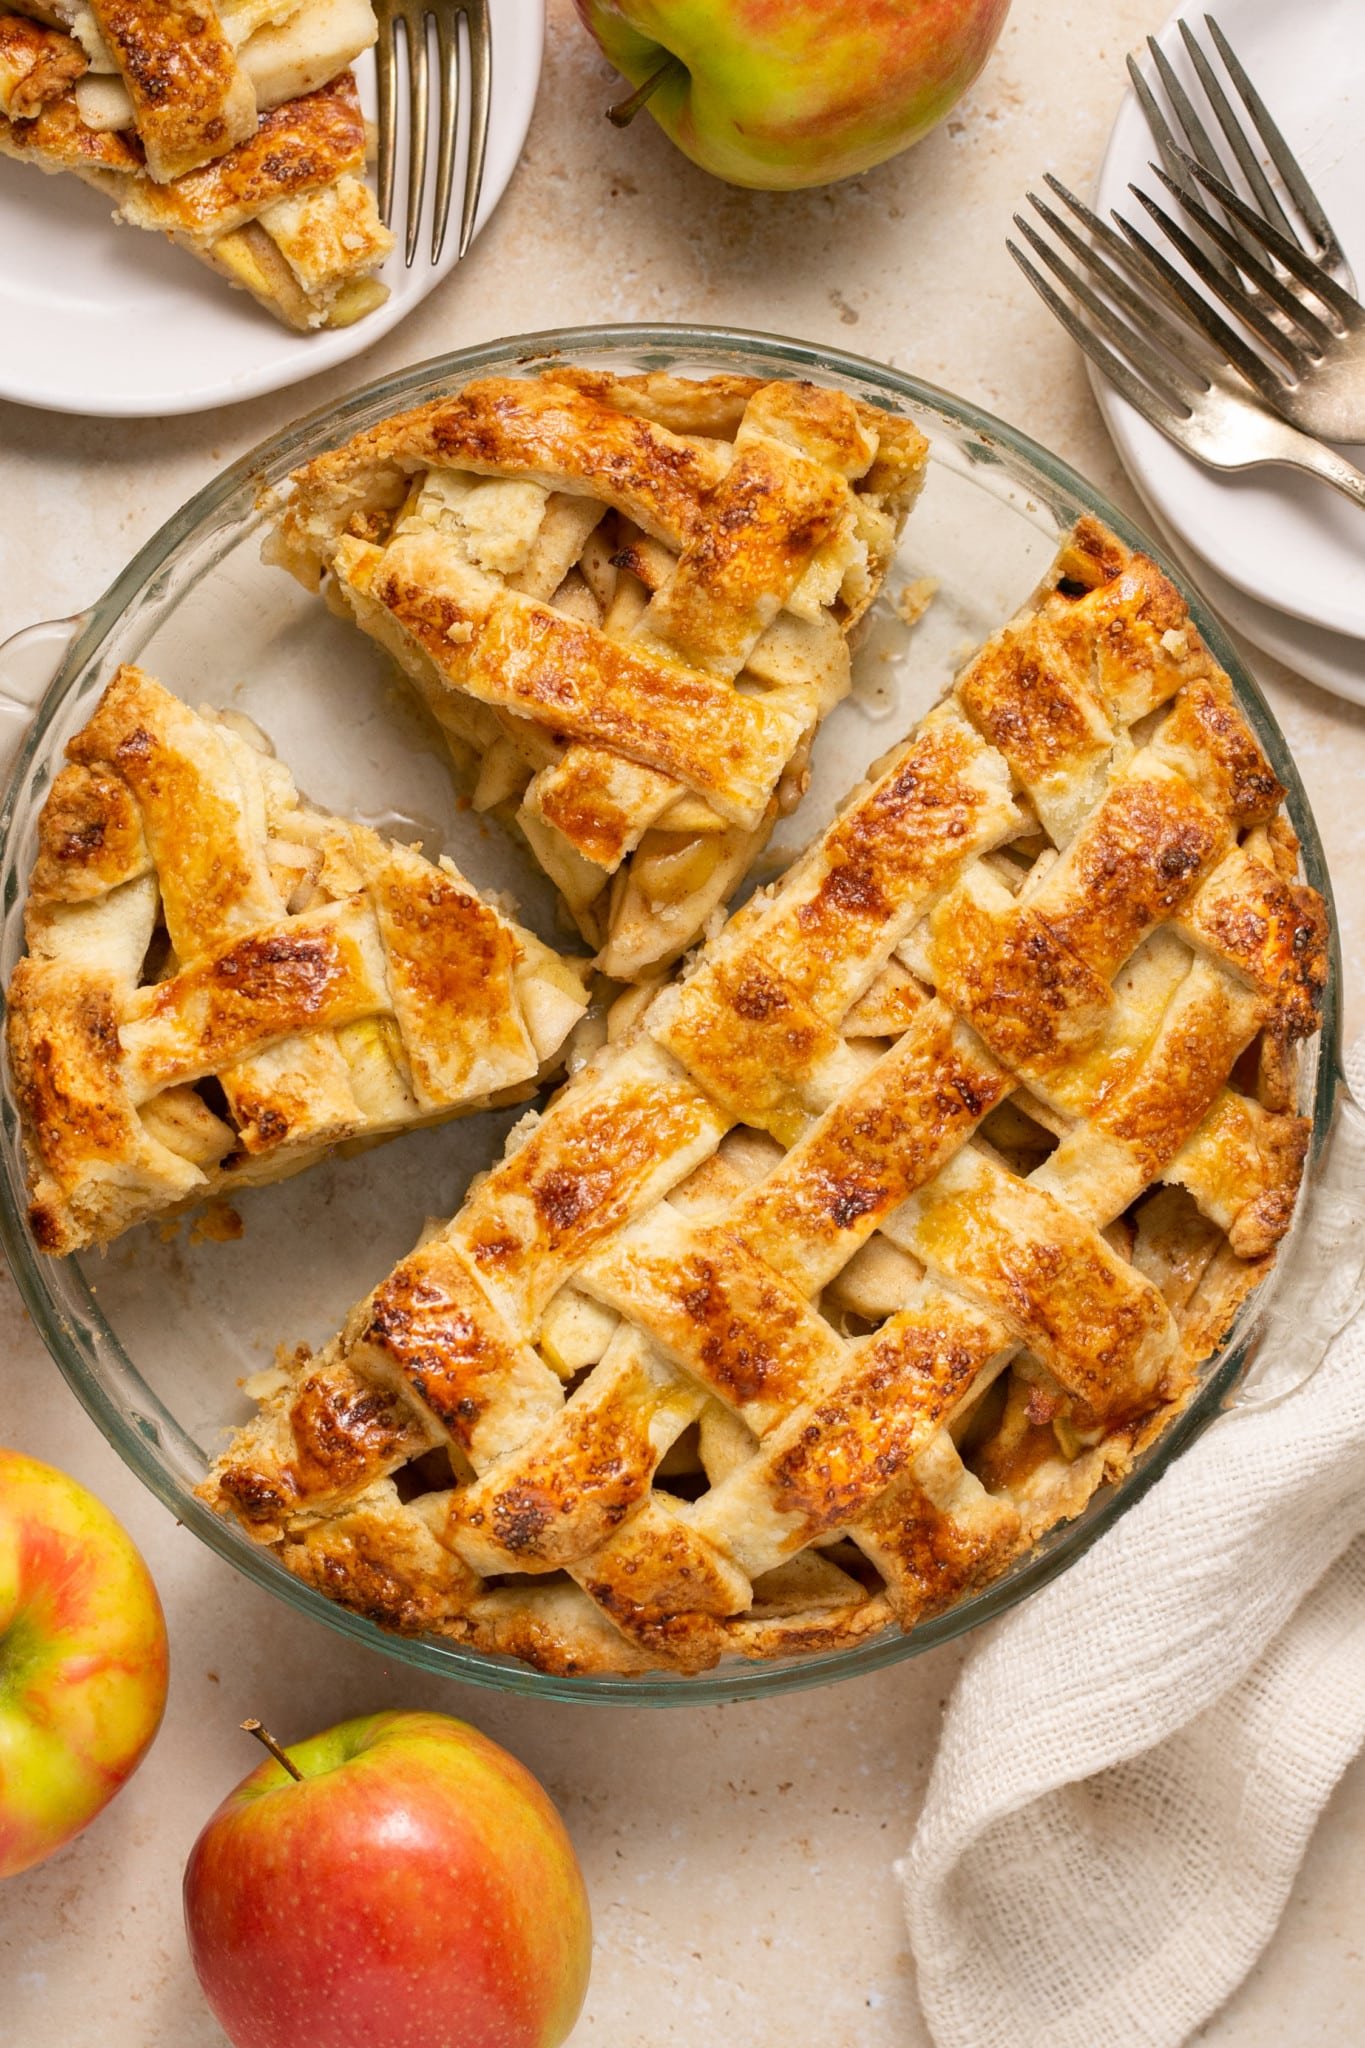
Lattice the pie crust
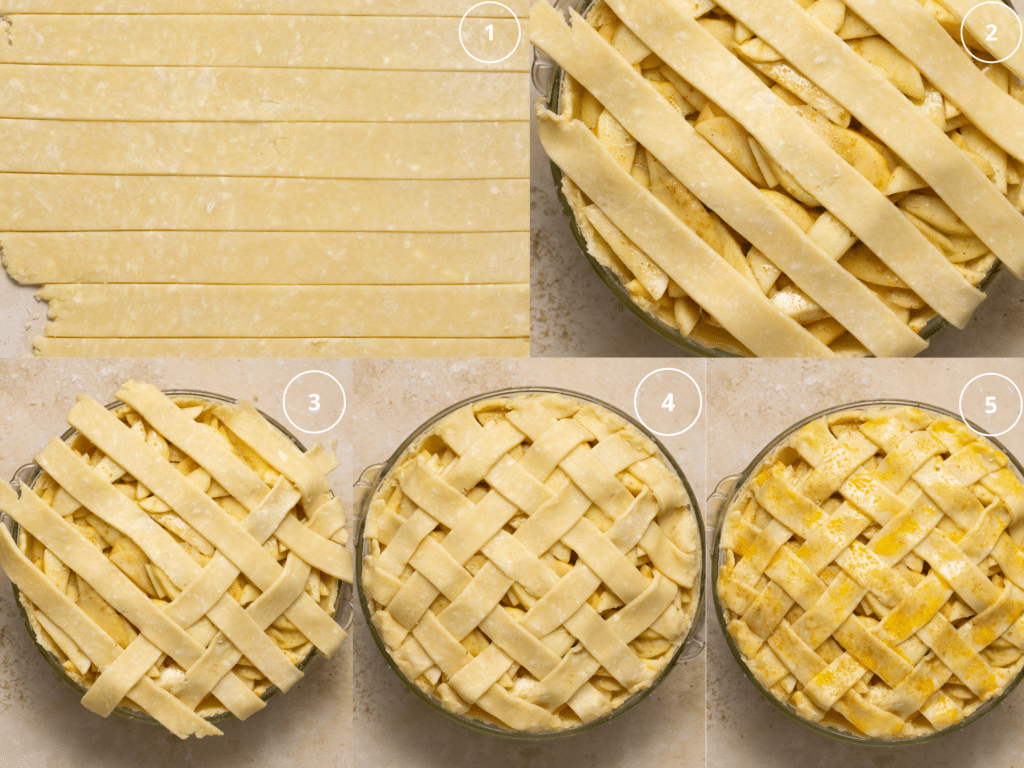
- Roll out the top crust on a lightly floured surface.
- Use a pizza cutter or fluted pastry wheel to slice strips of pie dough for the crust. About 1 inch strips are perfect.
- Lay 5-7 strips evenly spaced going one direction one top of the filled pie. Use longer strips for the middle of the pie and shorter strips as you work your way toward the edges.
- Fold back every other strip halfway.
- Add your longest strip of unused pie dough perpendicularly across the other parallel strips. Return the folded strips back to their original position.
- Fold back the alternate parallel strips over the perpendicular strip.
- Add another perpendicular strip across the initial parallel strips of dough, then return the folded strips back to their position. Continue on with this pattern, working your way from the middle out to the edge on both sides until you have used up all of the dough or covered the top of the pie with a woven lattice crust.
- When you’re done, the excess dough can be trimmed away with a knife for clean, smooth edges, fold the excess dough and pinch them with the bottom pie crust to seal, or smash with the tines of a fork to create a fringe.
- Lastly brush with egg wash and sprinkle with a little coarse sugar.
Tips and Variations
- Keep things cold! When working with the pie crust, it’s best to keep your ingredients cold to create a flaky, tender pie crust. This is why I recommend freezing the bottom layer of dough prior to partially blind baking and making sure your butter, shortening and water you add when making the crust are all cold. You can even chill your flour if you feel it has gotten too warm in your kitchen or pantry.
- Use a combination of apples for best flavor. I love using a mix of Granny Smith and Honey Crisp, Pink Lady, Braeburn or Northern Spy. Be sure to use a mix to get both the sweet and tart flavors.
- Seasonings: I love using a combination of cinnamon, allspice, ginger and cloves. You can use nutmeg or cardamom or switch them out for any of the other spices. Use as little or as much as you prefer, just be careful not to go overboard because then it steals the show from the apples!
- Par-cook your apples: Just 5 minutes on the stove is all you need. The apples will actually hold their shape better when you cook them for just a few minutes. It also makes a juicier more delicious pie in my opinion!
- Let the apple pie filling cool: Once you’ve cooked the apples, it’s important to now let them cool to room temperature before adding to the partially baked pie crust. I know, this process can feel like it’s taking forever! But trust me, it’s important let the pie filling cool so you can prevent the butter from melting in your crust, which would result in a cardboard like crust instead of buttery and flaky.
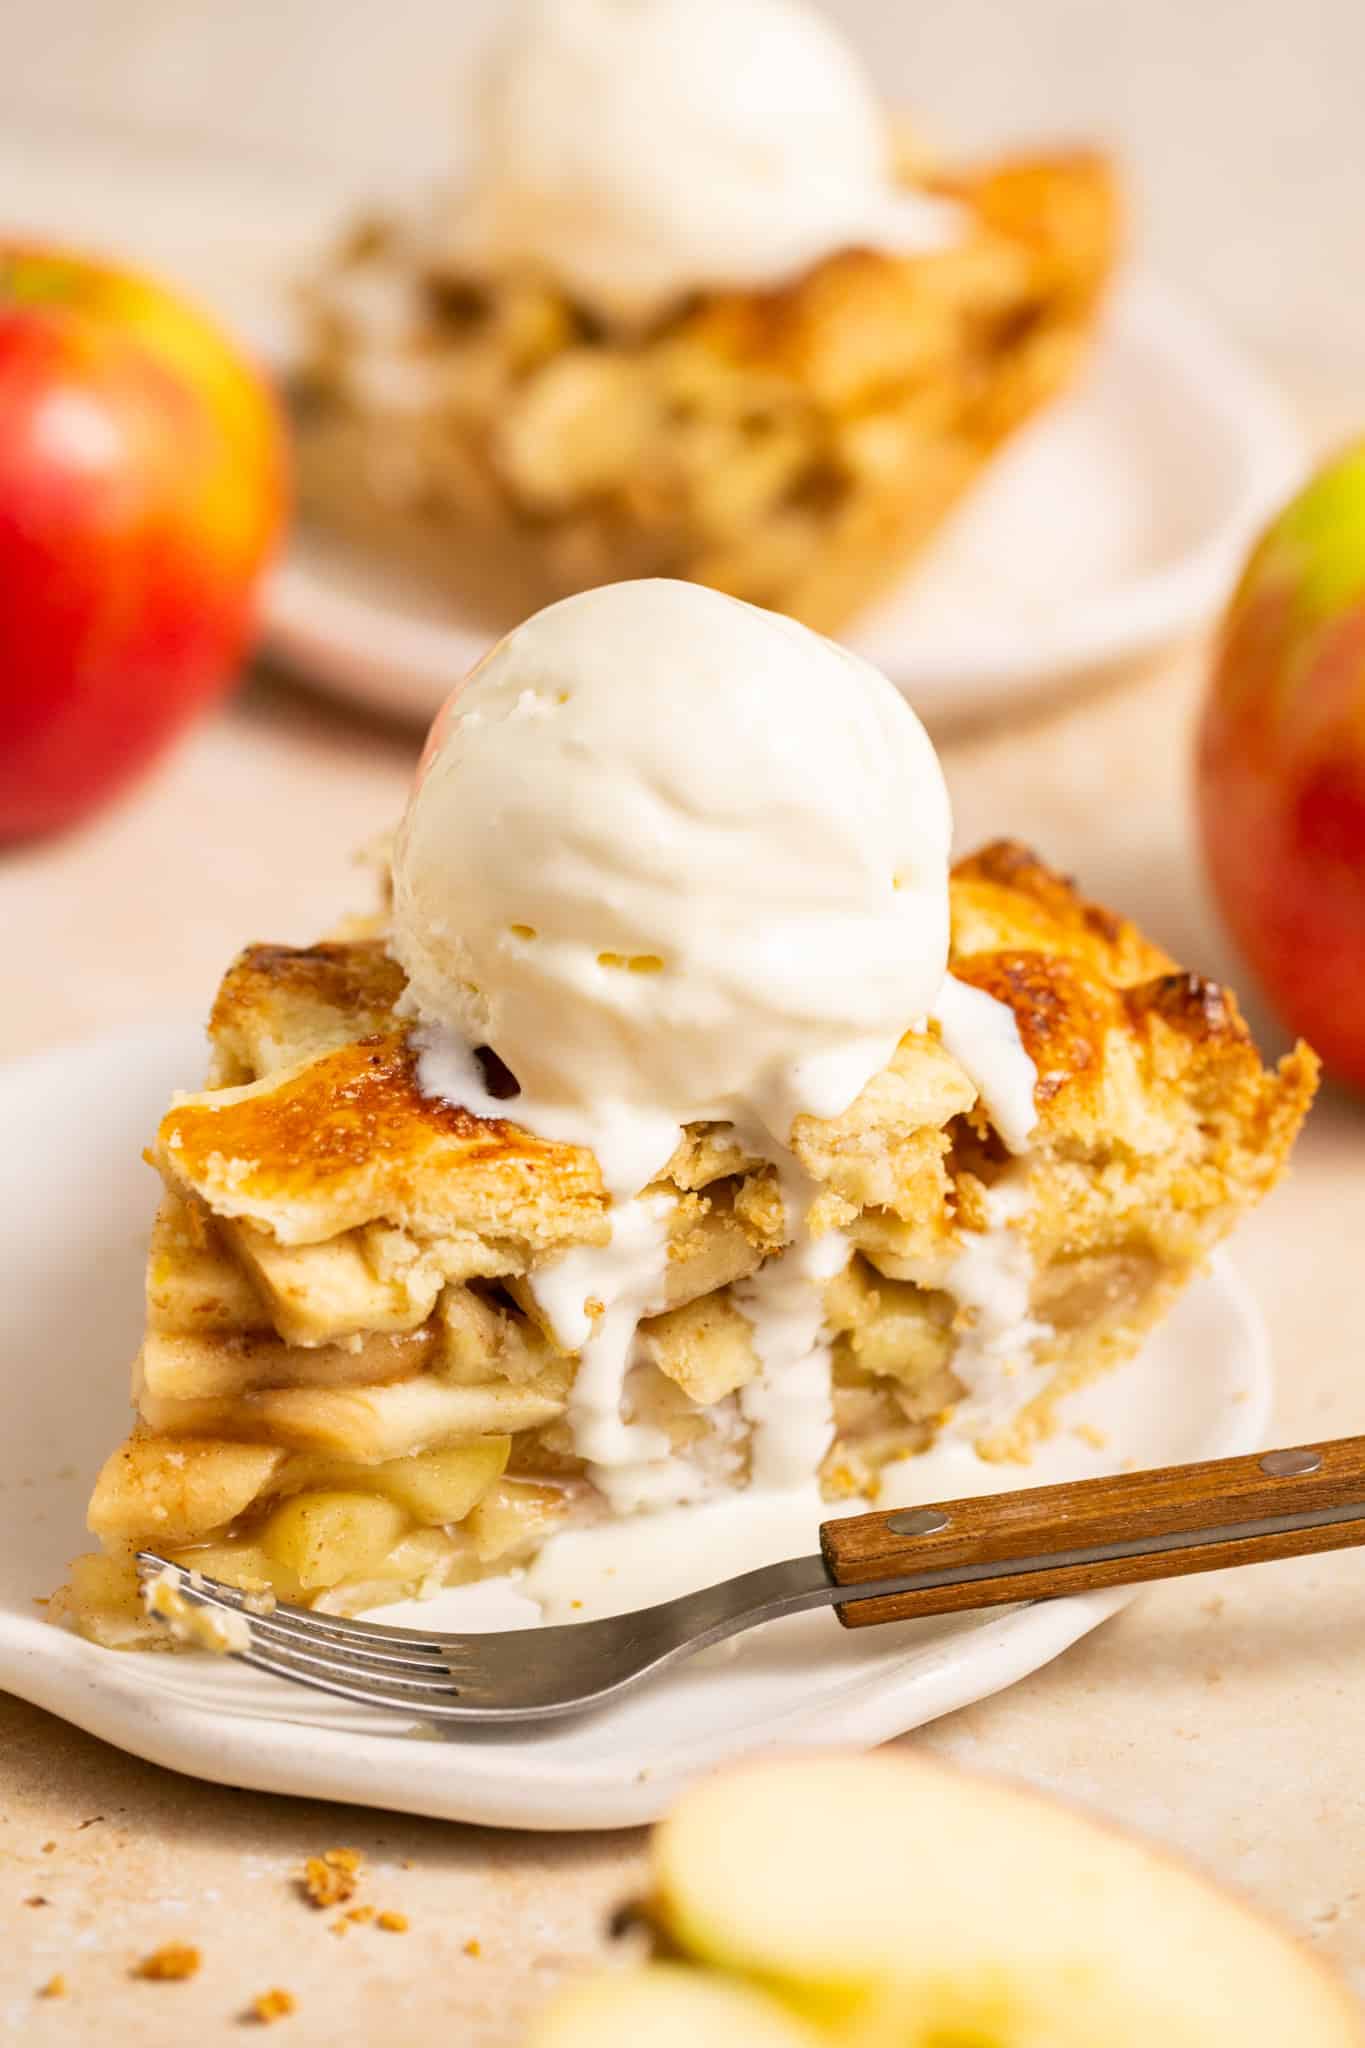
- Let the pie rest: There is nothing better than a warm slice of apple pie with cold vanilla ice cream on top, but letting the pie rest and come to room temperature before slicing is ideal. Slicing the pie when it’s too hot will result in a mess. I recommend waiting at least 3 hours before cutting into it.

FAQ
What is the best way to store apple pie?
Store tightly sealed in the fridge for up to 5 days.
Why is my apple pie watery?
You need to use a thickener in the apples (in this recipe we use flour, but you can use cornstarch too). The apples break down in the pie, which creates that liquid but having a thickener helps makes it into that ooey-gooey goodness. Don’t add in all of the juices from the apples when filling the pie. Leave some of the juice and liquid behind in the bowl. You might also need to let the pie sit for longer before cutting it to allow the filling time to set. I recommend at least 3 hours.
More Recipes with Apples:


Before You Begin! If you make this, please leave a review and rating letting us know how you liked this recipe! This helps our business thrive & continue providing free recipes.
Homemade Apple Pie
Ingredients
For the crust:
- 2 1/2 Cups flour
- 12 Tbsp. butter, cold, unsalted, cubed
- 1 tsp. salt
- 2 1/2 Tbsp. sugar
- 3 Tbsp. shortening
- 3 Tbsp. ice cold water
- splash of apple cider vinegar
- egg wash (1 egg whisked with 1 Tbsp. water to brush on dough)
For the apple pie filling:
- 3 lb. apples, ~6-7 total (use a variety for better flavor, such as Pink Lady, Granny Smith, Braeburn or Honey Crisp)
- 3/4 cup sugar
- 3 Tbsp. flour (or cornstarch)
- 1 lemon juice & zest
- 1 1/2 tsp. cinnamon, ground
- 1/2 tsp. ginger, ground
- 1/8 tsp. cloves, ground
- 1/8 tsp. allspice, ground
Last step! If you make this, please leave a review and rating letting us know how you liked this recipe! This helps our business thrive & continue providing free recipes.
Instructions
For the dough:
- Pulse the flour with salt and sugar in a food processor.2 1/2 Cups flour , 1 tsp. salt, 2 1/2 Tbsp. sugar
- Add the cold butter cubes and pulse a few more times until no large butter chunks remain. Then add in the shortening and pulse again.12 Tbsp. butter, cold, unsalted, cubed, 3 Tbsp. shortening
- Add a splash of apple cider vinegar to the water and slowly begin to stream in water about a tablespoon at a time. You need to add just enough to be able moisten the dough, it will look a little shaggy still.splash of apple cider vinegar, 3 Tbsp. ice cold water
- Turn out the dough onto a lightly floured surface, divide into 2 sections, and bring the dough together into oval disks, kneading just a bit to bring it all together. Wrap the dough in plastic wrap and chill in the fridge up at least 1 hour or up to 2 days.
For the apple filling:
- Peel, core and thinly slice 3 pounds of apples in uniform thickness, about 1/4 inch thick.3 lb. apples, ~6-7 total (use a variety for better flavor, such as Pink Lady, Granny Smith, Braeburn or Honey Crisp)
- Add sugar, flour, lemon zest, lemon juice, ground ginger, ground cinnamon, cloves and allspice to the apples. Pour the apple filling into a very large skillet, or dutch oven, and place over medium heat. Stir and cook for 5 minutes until the apples begin to soften. Remove from heat and set aside to cool.3/4 cup sugar, 3 Tbsp. flour (or cornstarch) , 1 lemon juice & zest, 1 1/2 tsp. cinnamon, ground, 1/2 tsp. ginger, ground, 1/8 tsp. cloves, ground, 1/8 tsp. allspice, ground
- Take one half of the dough from the fridge once it's chilled and roll the dough on a lightly floured surface into a circle that is about 12 inches in diameter using a rolling pin. If the edges are craggly or breaking, feel free to gently re-knead the dough just a little more, then roll out into a smooth circle.
- Transfer the dough to a 9 inch pie dish. Trim and seal the dough OR I like to also fold the over hang of dough underneath to create a thicker wall of dough at the edge. Tucking in the excess also helps to reinforce the walls of the pie. You can crimp the dough making a “v” with two fingers one hand on the outside of the pie crust and the index finger of the opposite hand to make an indent in the pie crust. Use scraps to repair dough if needed. Freeze the dough for 15-30 minutes to keep the dough nice and chilled, this will solidify the fat, which helps prevent shrinkage.
- Preheat the oven to 425°F. Place a piece of foil on the bottom crust and top with the pie weights. (Use dried beans, sugar or rice if you don't have pie weights). Bake the pie crust for 10-15 minutes just until edges are set and lightly brown. This is just to partially blind bake the crust. Reduce the oven temperature down to 350°F to bake the apple pie at this temperature.
- Once the crust has cooled to room temperature, fill with the cooled apple pie filling, leaving most of the liquid behind in the bowl. Some of the juices are OK to add but not all of it.
- Roll out the top layer of the crust in about a 12 inch circle.
- Place the top layer of crust over the apples and brush with the egg wash and a sprinkle of coarse sugar (optional). Cut a few slits on the top for ventilation. Or see recipe notes below on how to lattice the crust.egg wash (1 egg whisked with 1 Tbsp. water to brush on dough)
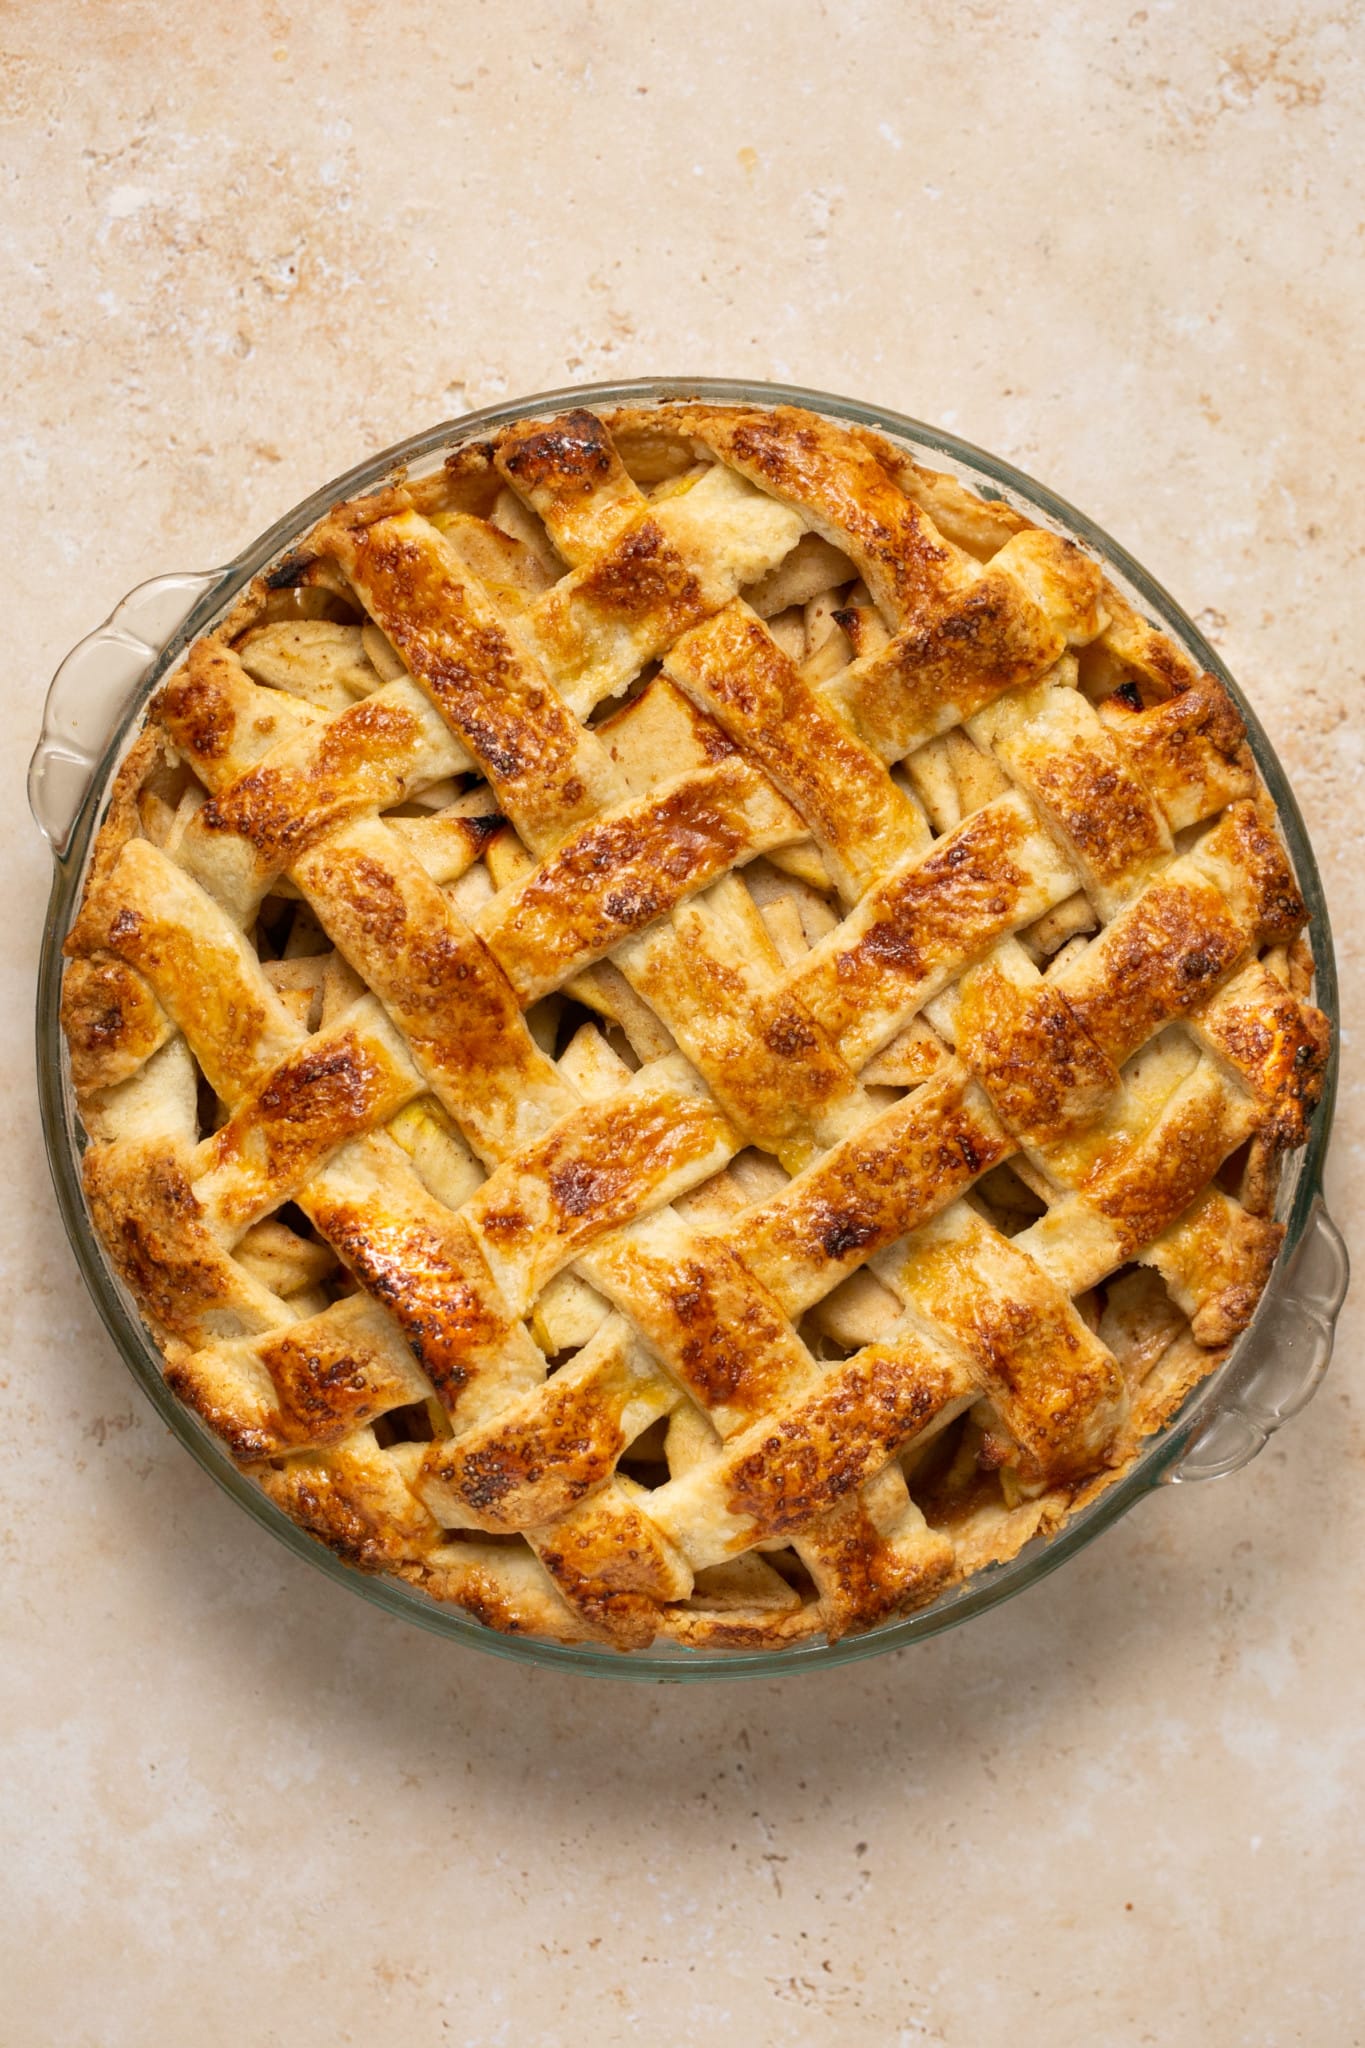
- Bake for ~45-55 minutes or until the crust is golden and the internal temperature reaches 175 °F. Be sure to check on the crust and place foil or a pie crust shield around the edges of the pie crust if they begin to brown or burn.
- Allow the pie completely cool, at least 3 hours, before slicing. Serve with ice cream and enjoy!
Notes
- Storage: Cover leftovers tightly and store in the refrigerator for up to 5 days.
- How to lattice:
- Roll out the top crust on a lightly floured surface.
- Use a pizza cutter or fluted pastry wheel to slice strips of pie dough for the crust. About 1 inch strips are perfect.
- Lay 5-7 strips evenly spaced going one direction one top of the filled pie. Use longer strips for the middle of the pie and shorter strips as you work your way toward the edges.
- Fold back every other strip halfway.
- Add your longest strip of unused pie dough perpendicularly across the other parallel strips. Return the folded strips back to their original position.
- Fold back the alternate parallel strips over the perpendicular strip.
- Add another perpendicular strip across the initial parallel strips of dough, then return the folded strips back to their position. Continue on with this pattern, working your way from the middle out to the edge on both sides until you have used up all of the dough or covered the top of the pie with a woven lattice crust.
- When you’re done, the excess dough can be trimmed away with a knife for clean, smooth edges, fold the excess dough and pinch them with the bottom pie crust to seal, or smash with the tines of a fork to create a fringe.
- Lastly brush with egg wash and sprinkle with a little coarse sugar.
Nutrition Information
Nutritional information is provided as a courtesy and is automatically calculated. It should only be construed as an estimate rather than a guarantee. Ingredients can vary and Kroll’s Korner can’t make any guarantees to the accuracy of this information.

Can I assemble the pie fully then either keep in the fridge or freezer until I’m ready to bake??
Hello! I wouldn’t recommend that. I would recommend baking the pie, allowing to cool completely, cover and freeze. (will be ok up to 3 months). Then you can thaw overnight in the refrigerator and allow to come to room temperature before serving. 🙂
Question: how could I combine some of the elements of your Puff Pastry Apple Tart into this pie? I’m thinking the tart crust will not work quiet the same but that I could add in some of the yummy apricot preserves. How much preserves should I add?
Hmmm good question! I am not too sure since I haven’t played around with this recipe like that. Maybe start with a few tbsp?
My four year old and I went apple picking and then she asked to make an apple pie. I have never made one but found this recipe and decided to give it a try. I ended up using store bought crust because we were short on time, BUT HOLY COW this was a FANTASTIC pie filling recipe! Even my husband, who doesn’t like apple pie, said the pie was delicious. This pie recipe will definitely be made again, but next time with the crust made from scratch 🥰
I’m soo happy you enjoyed it! Looks amazing. Thank you!!
Really great pie! It was a labor of love. I would make it again with a few tweaks.
Beautiful lattice! Thank you for making 🙂
hello! I was just wondering if you could make the apple pie filling a day ahead of time? thank you!
yes you totally can! great question 🙂
Hello! What temp does the whole pie need to be cooked at once filled?
Thanks!!
Hi! 350F 🙂
First of all, there are many more apples to use for an apple pie then Granny Smith. It’s probably because I live in Washington state that I have such a Variety of apples from which to choose. I never choose Granny Smith because they are flavorless and never seem to cook up. I Really like apple pie that is not crunchy. I really like earligold apples for the flavor but there are many others that will work well.
That being said, I am willing to bet that there are many people who love your apple pie. Just wanted you to know that there are so many more options.
Hi Jaqueline, I totally agree! Thank you for your comment, very helpful! Hope you have a a great day! xo, Tawnie
I am NOT a baker, and all your steps and tips totally got me through. Thank you so much for this thorough recipe!!!!
The perfect apple to crust ratio- SO good!!
The step by step photos were so helpful and the pie is amazing! Thanks for this recipe!
Hey Lauren, I am so glad they helped!! thank you!!