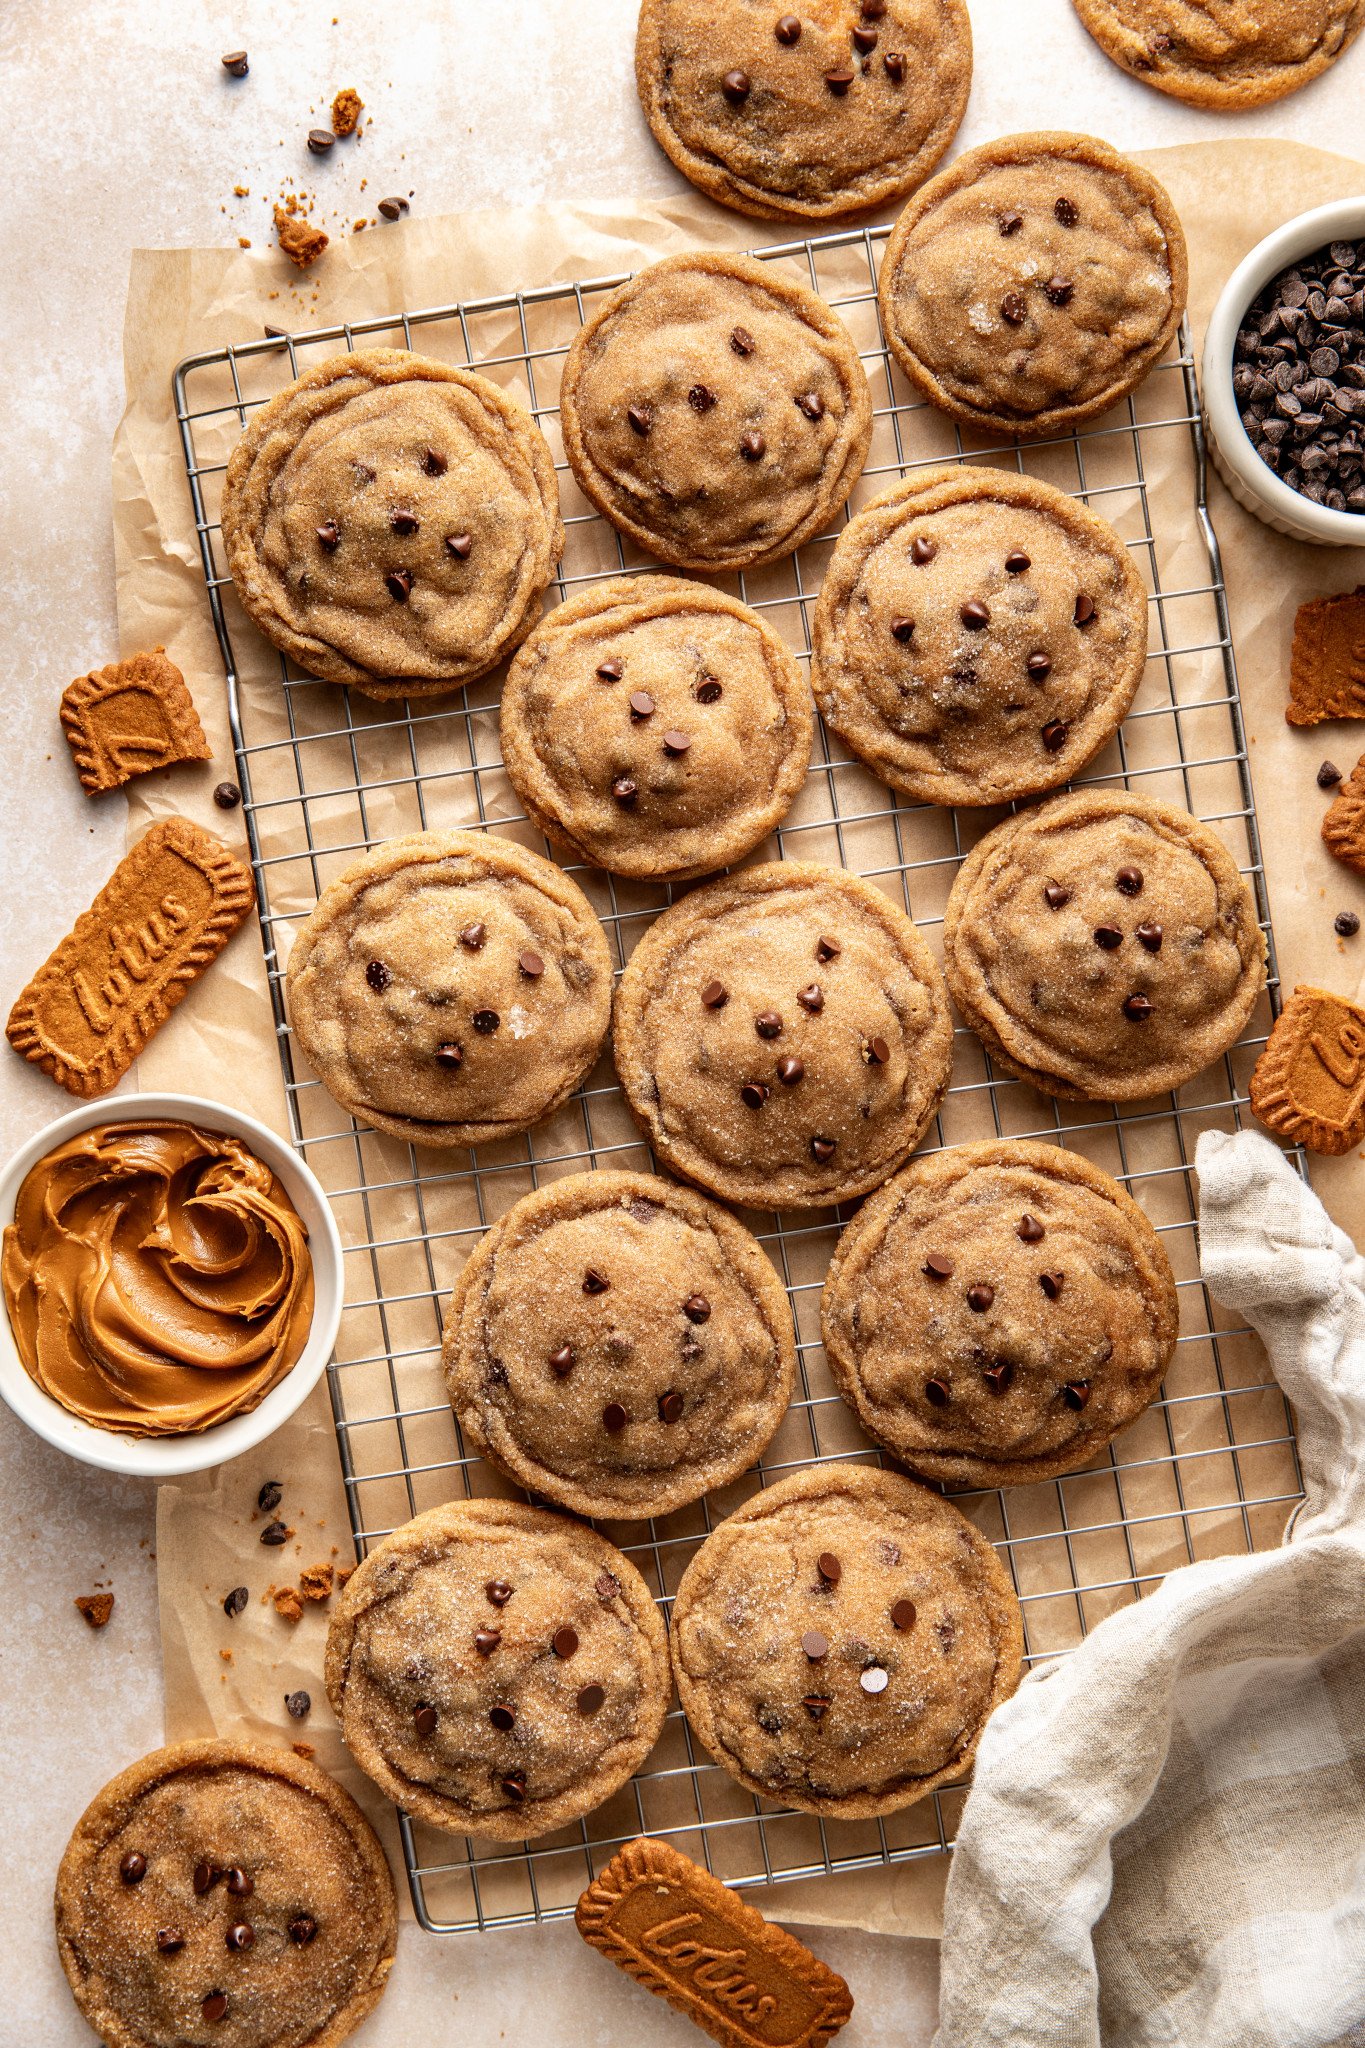
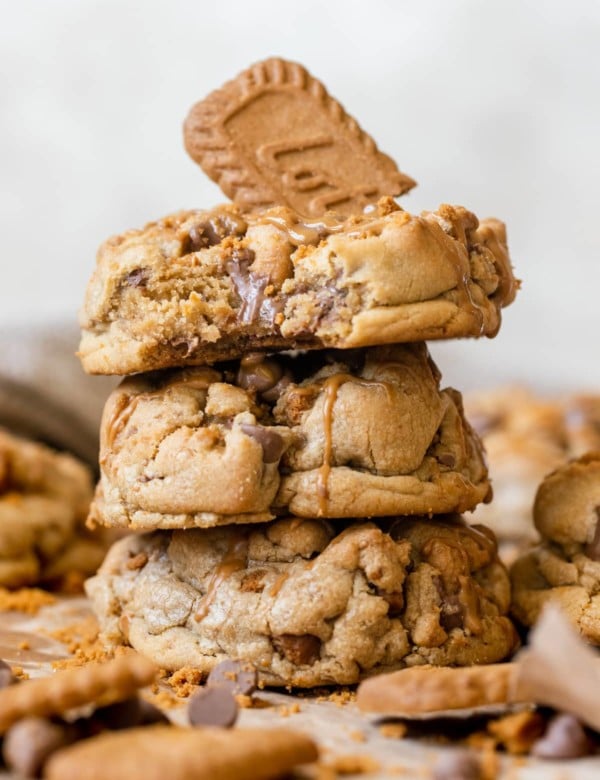
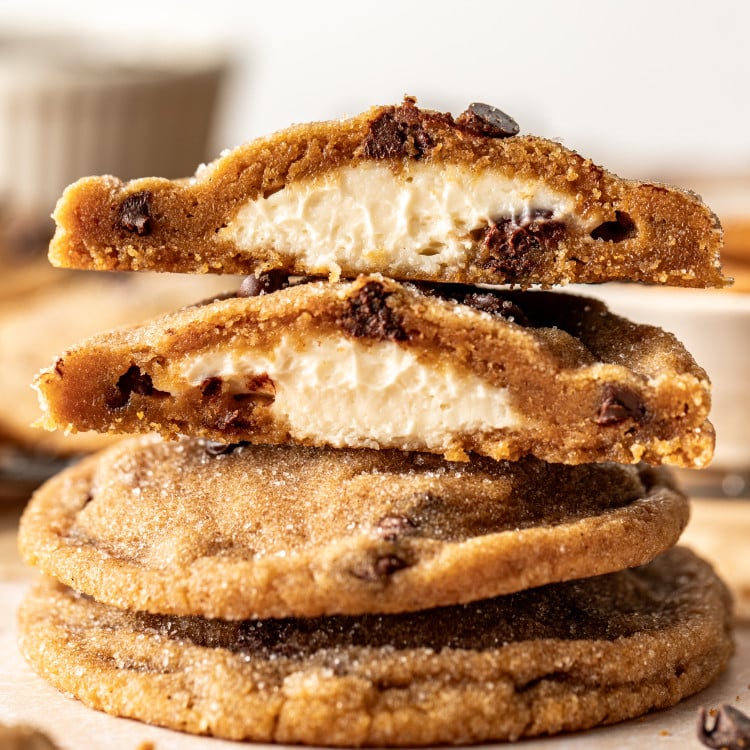
Cheesecake Biscoff Cookies
This post may contain affiliate links. Please read our disclosure policy.
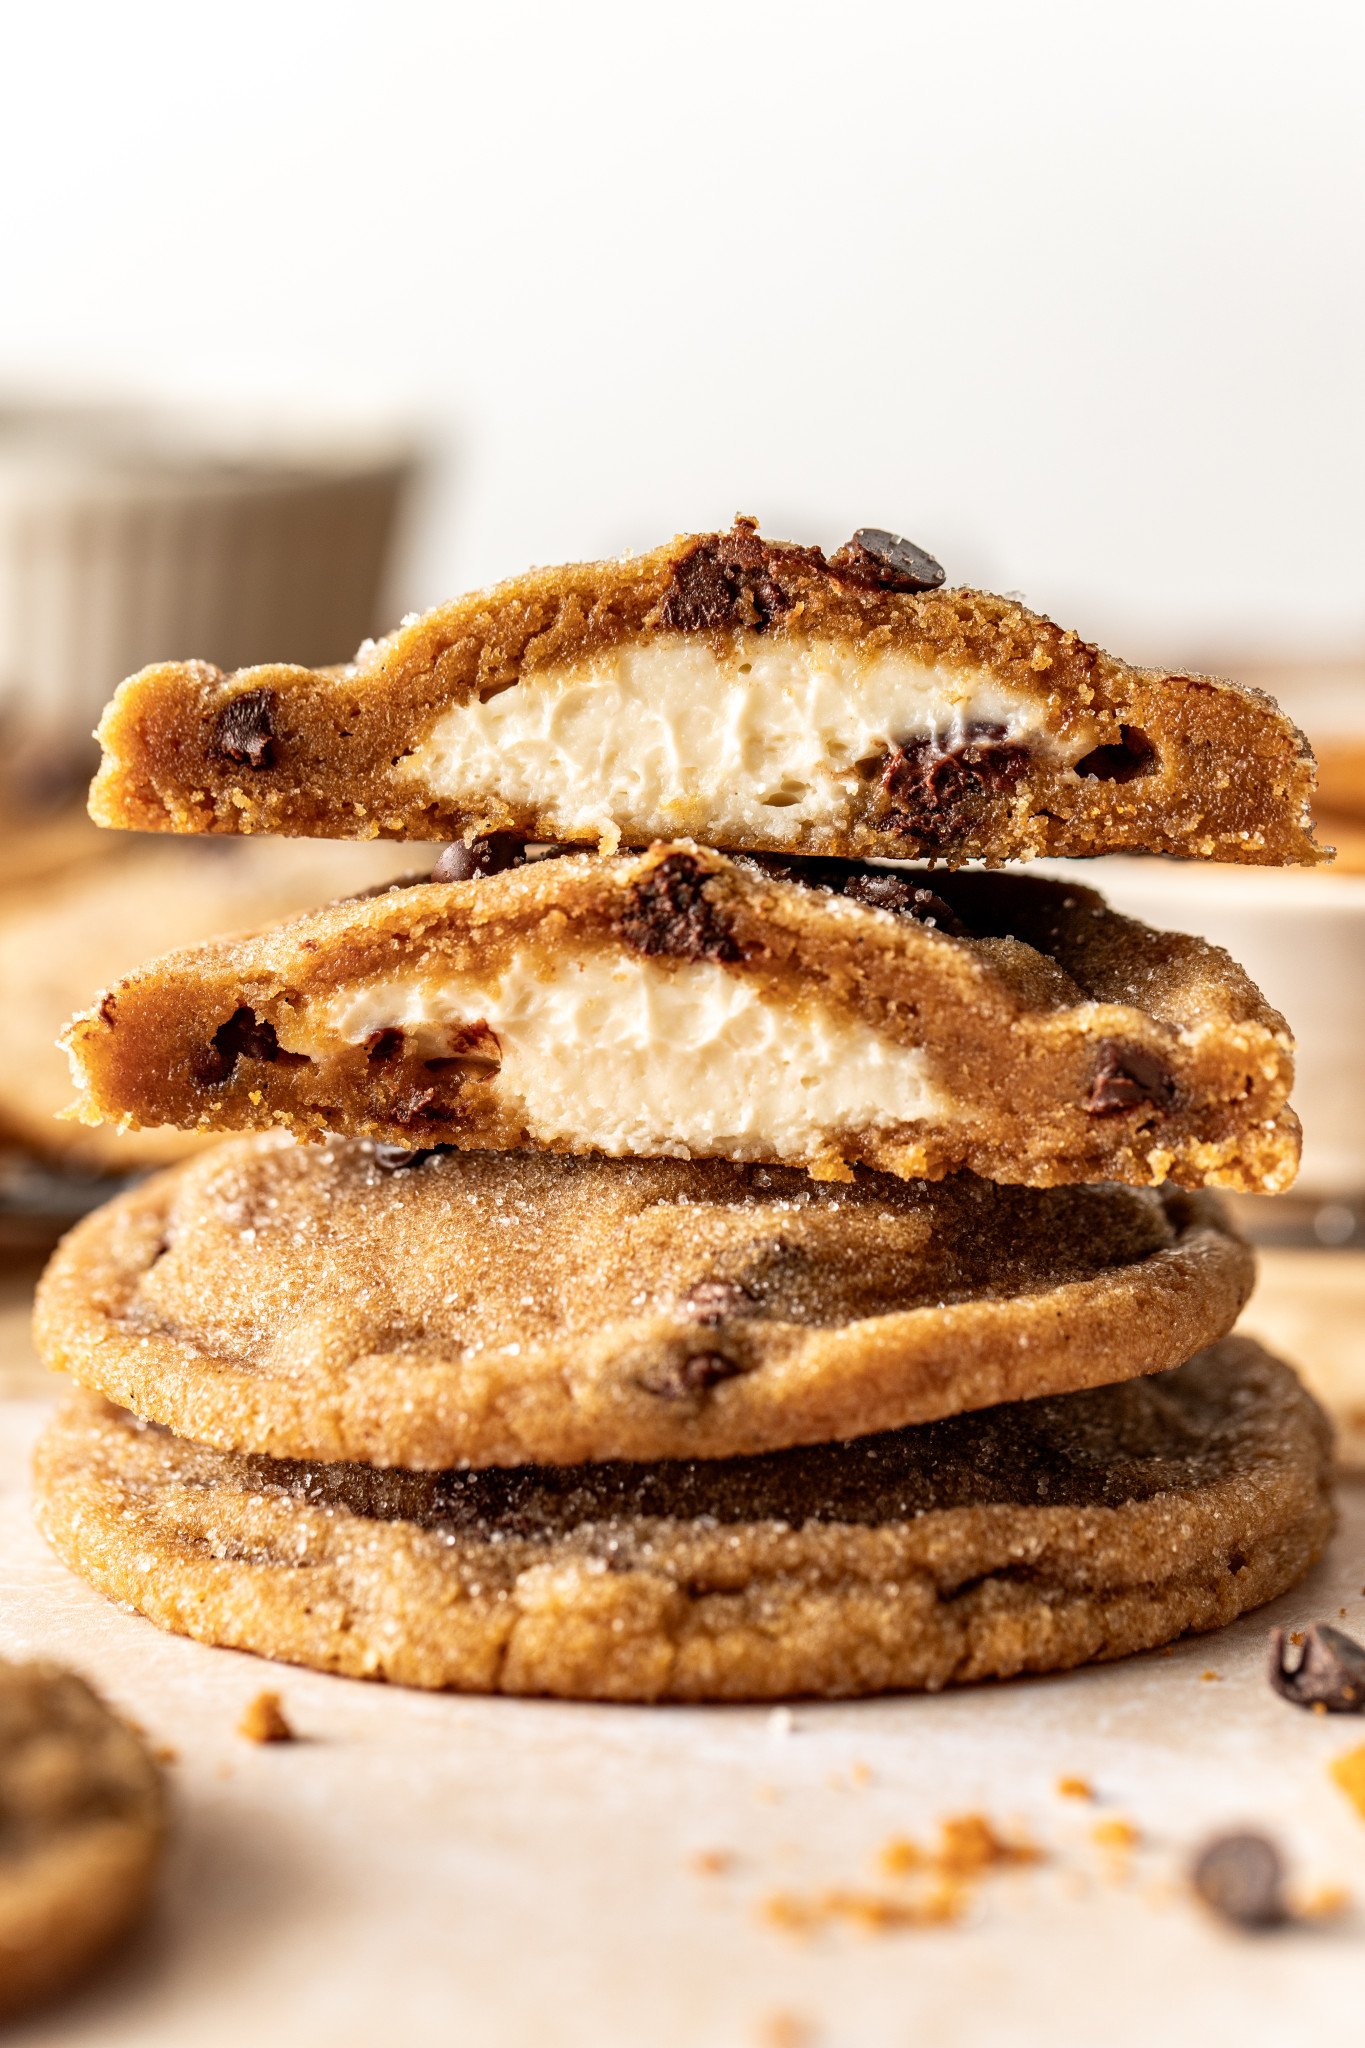
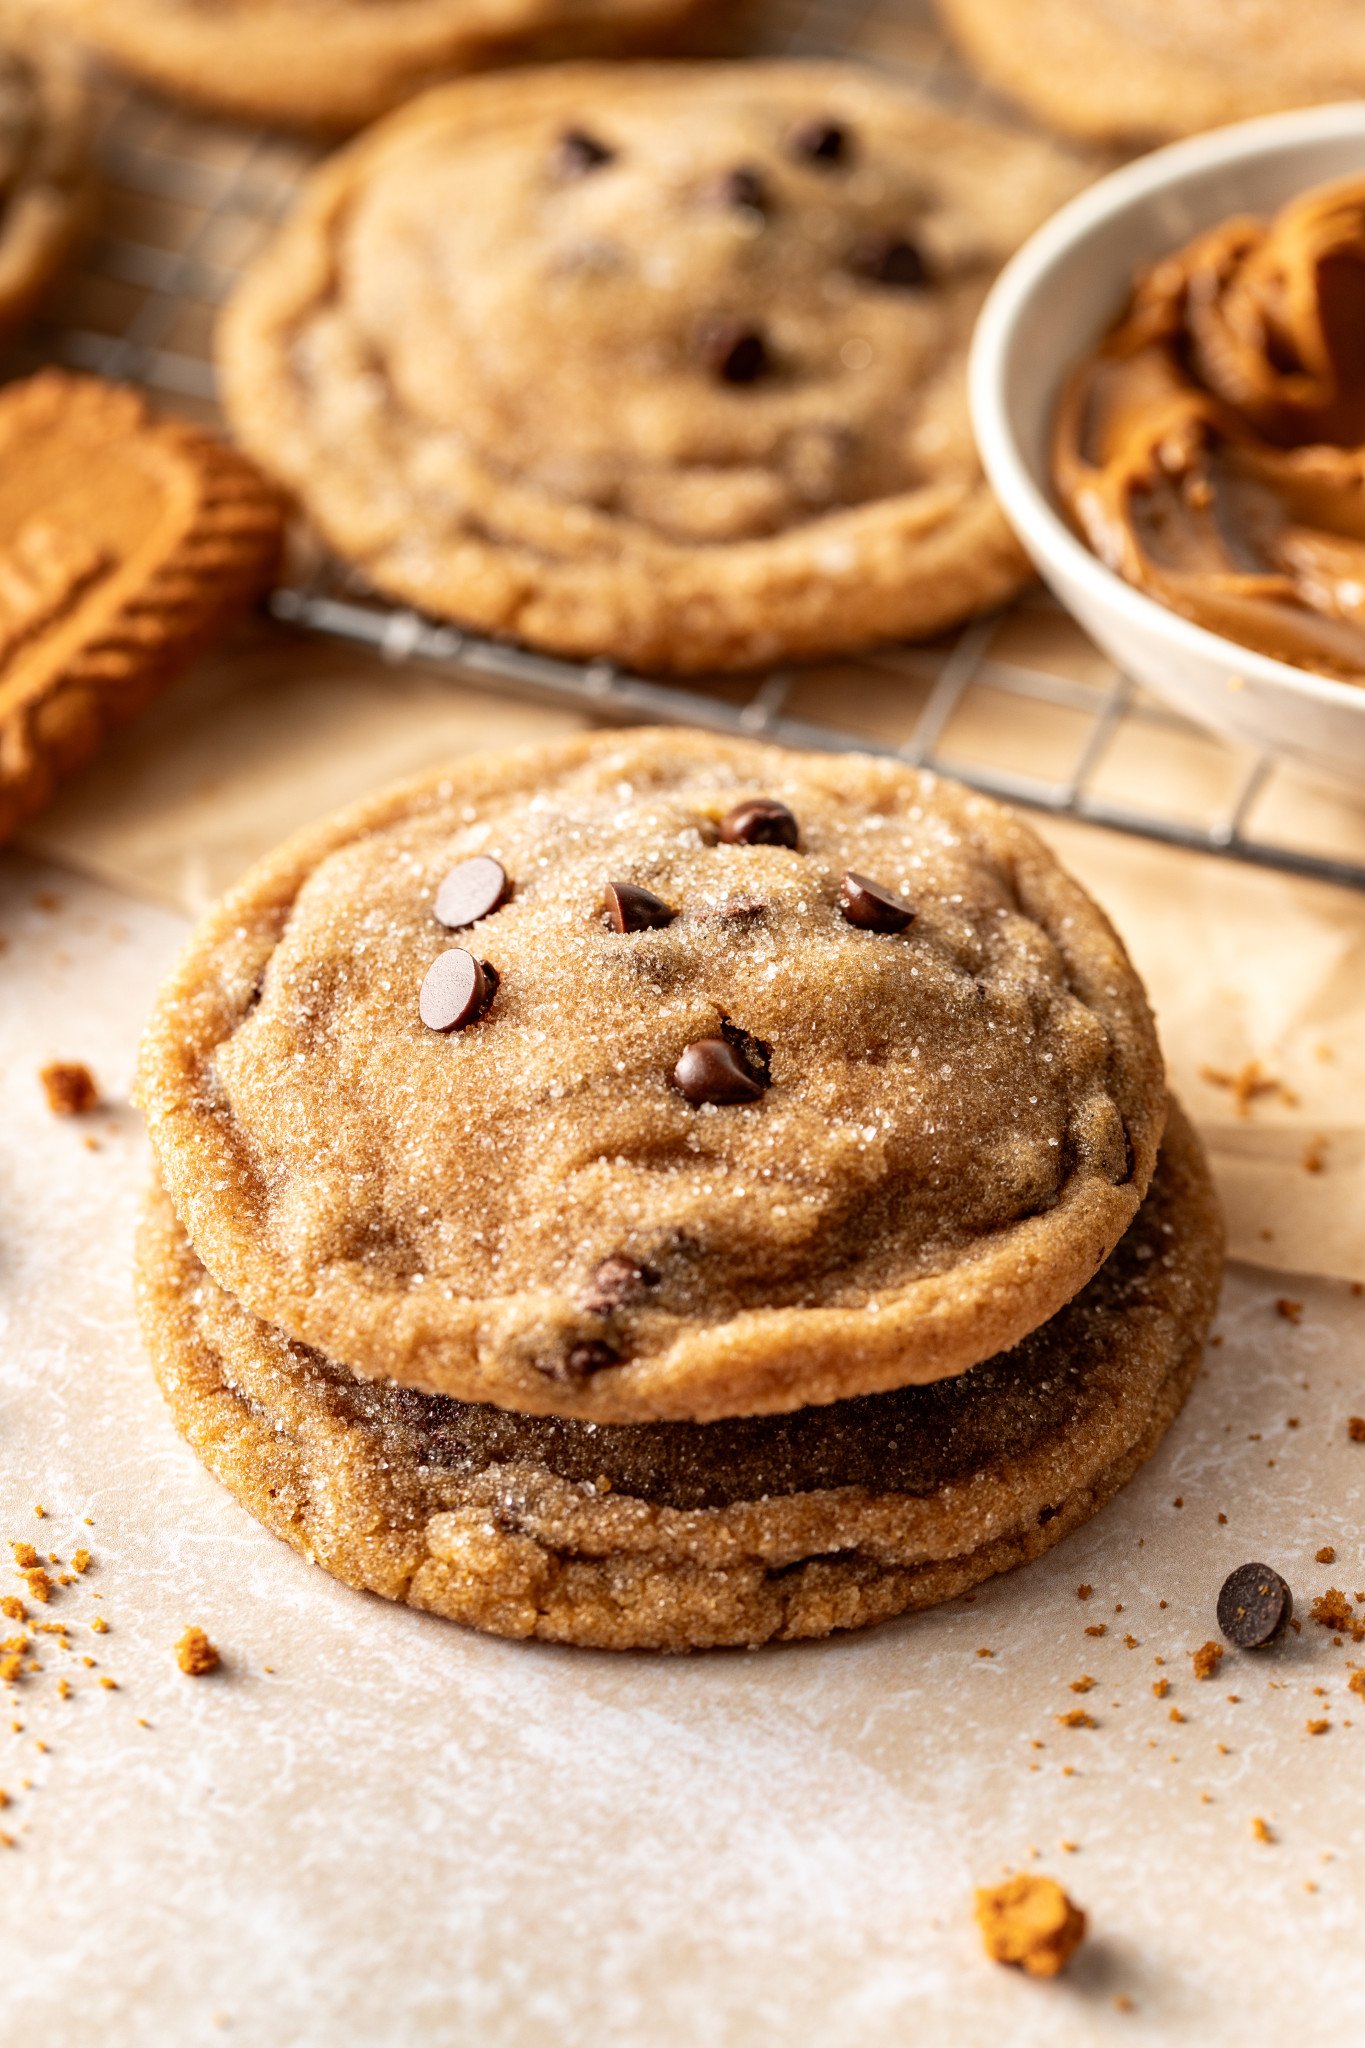
These Cheesecake Biscoff Cookies combine everything you love about creamy cheesecake and warm, spiced Biscoff cookies into one decadent dessert and are the perfect (warm-up) holiday cookie!
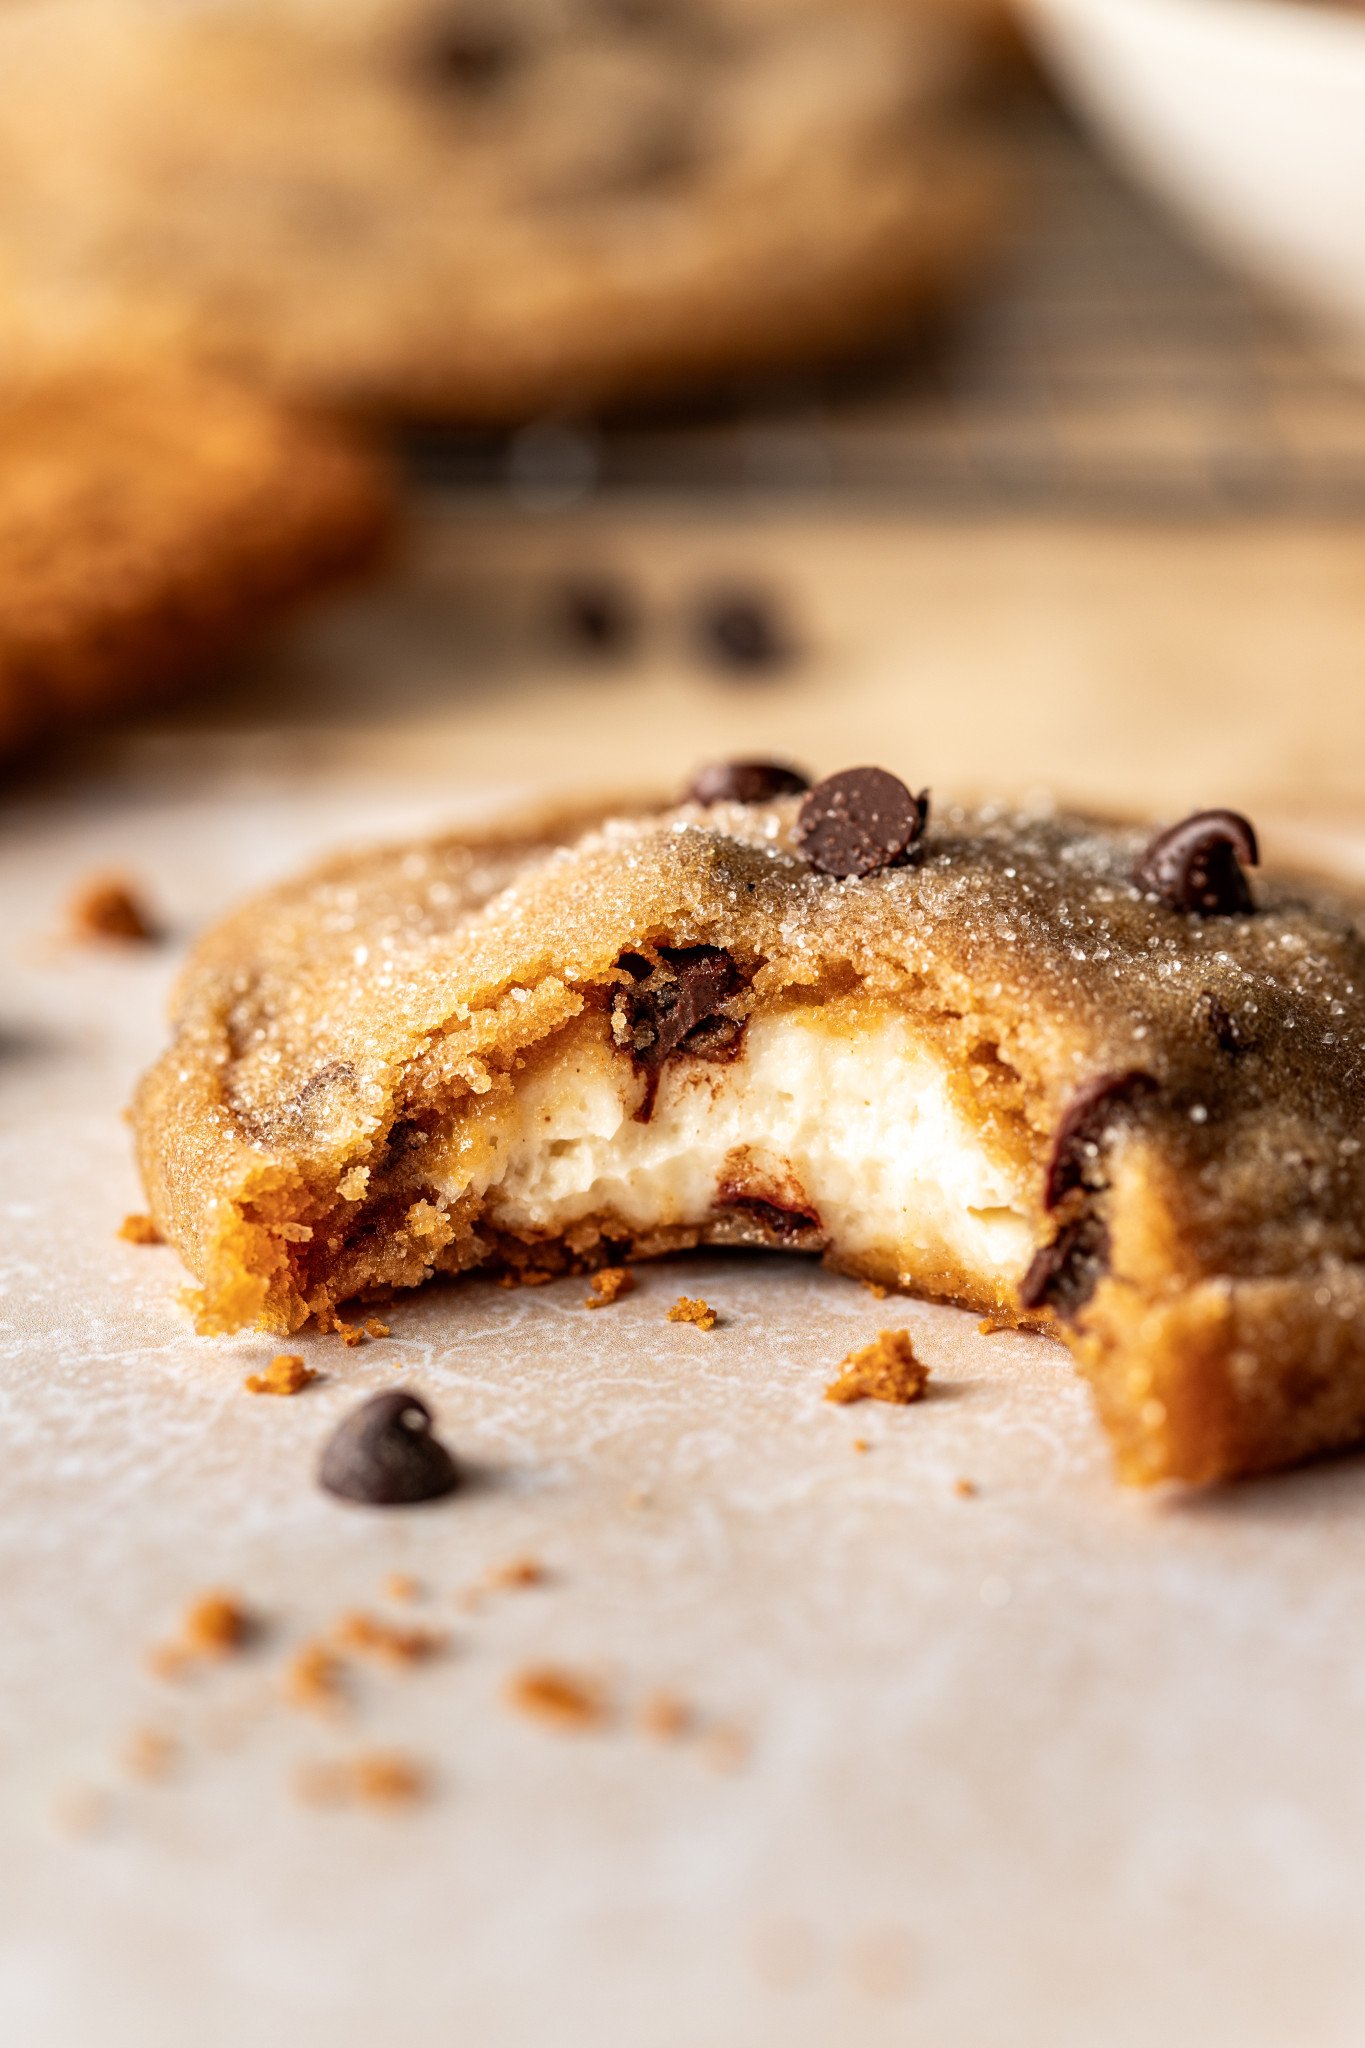
Each cookie is soft, buttery, and packed with melty chocolate chips and a creamy cheesecake filling inside. Oh, and I highly recommend adding an extra drizzle of melty cookie butter on top for good measure. These cookies are rich, flavorful, and guaranteed to impress anyone who takes a bite.
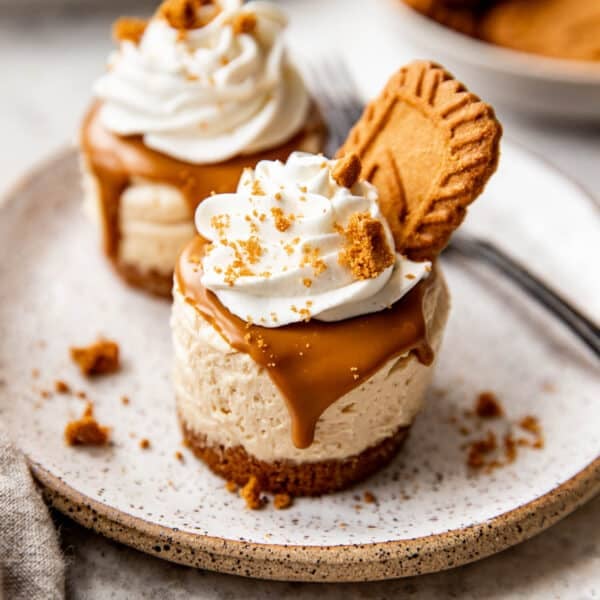
And if you love cookie butter, be sure to also try my giant, bakery-style Cookie Butter Cookies or Mini Biscoff Cheesecakes!
If you’re looking to go the more traditional cheesecake route, you also might want to check out my Classic Cheesecake, Mini Cheesecake Bites, or Basque Cheesecake Bars!
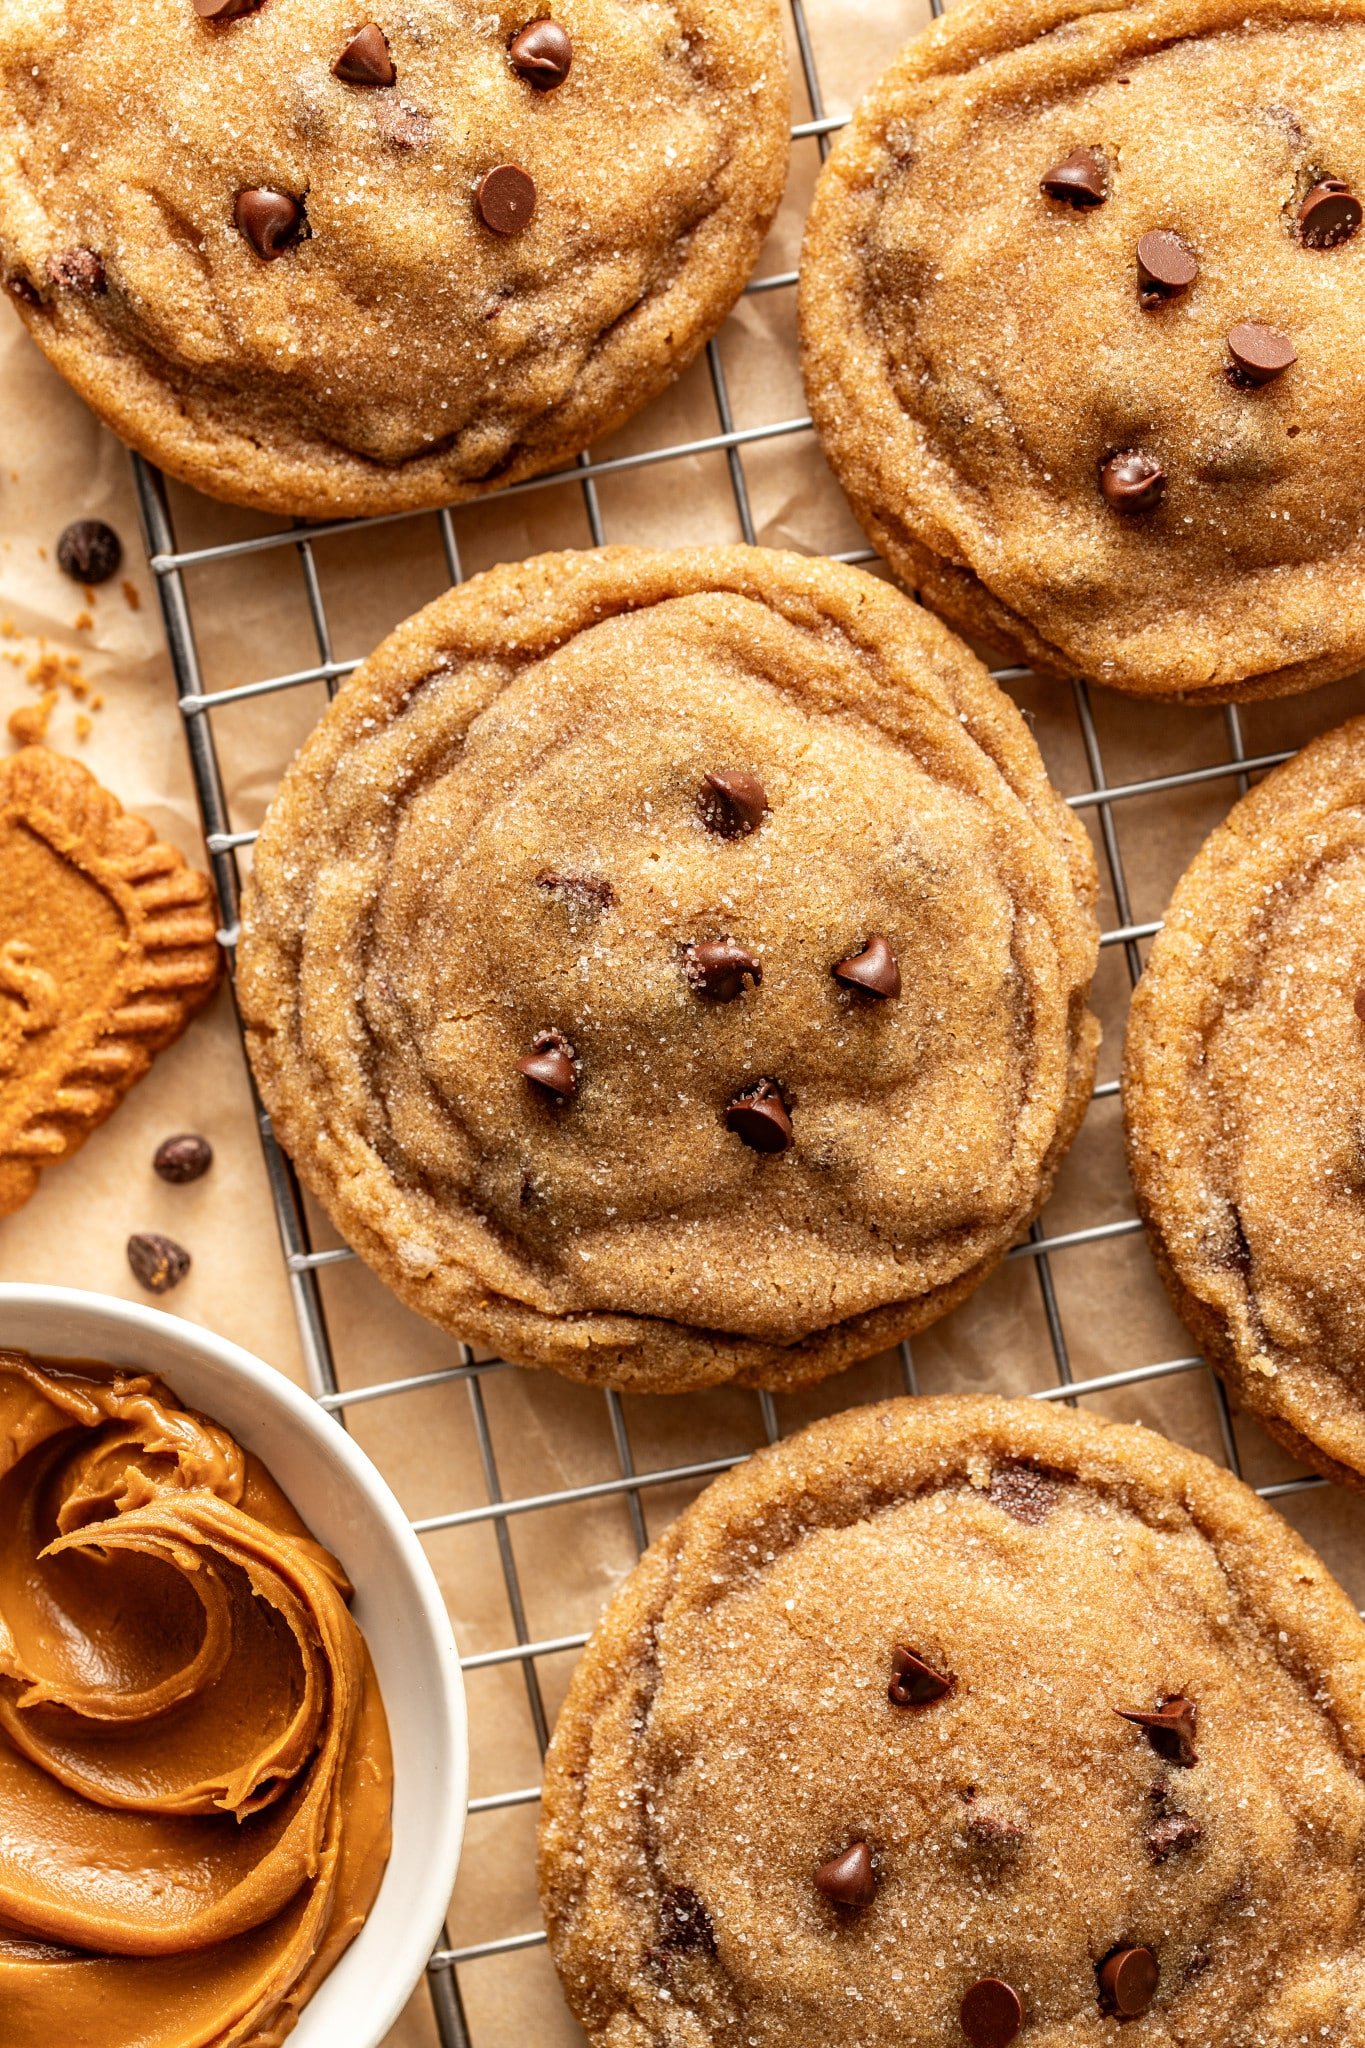

 Table Talk with Tawnie

When I started brainstorming recipes for my Pre-Holiday (Warm-Up) Cookie Series, these Cheesecake Biscoff Cookies were one of the first that came to mind! To me, both Biscoff cookie butter and cheesecake just feel like the holidays (warm, cozy, and a little indulgent) without being your typical holiday flavor.
I mean, cookie butter lattes are everywhere this time of year, and no holiday dessert table is complete without a cheesecake, right? So, I decided to combine the two into one sweet, spiced, and creamy cookie that’s perfect for any cookie exchange, or really, any time of year!
Think of this cookie series as a warm-up round before the gingerbread men, candy canes, and red & green sprinkles take over. These recipes will be sure to get you in the baking mood without diving headfirst into December just yet.
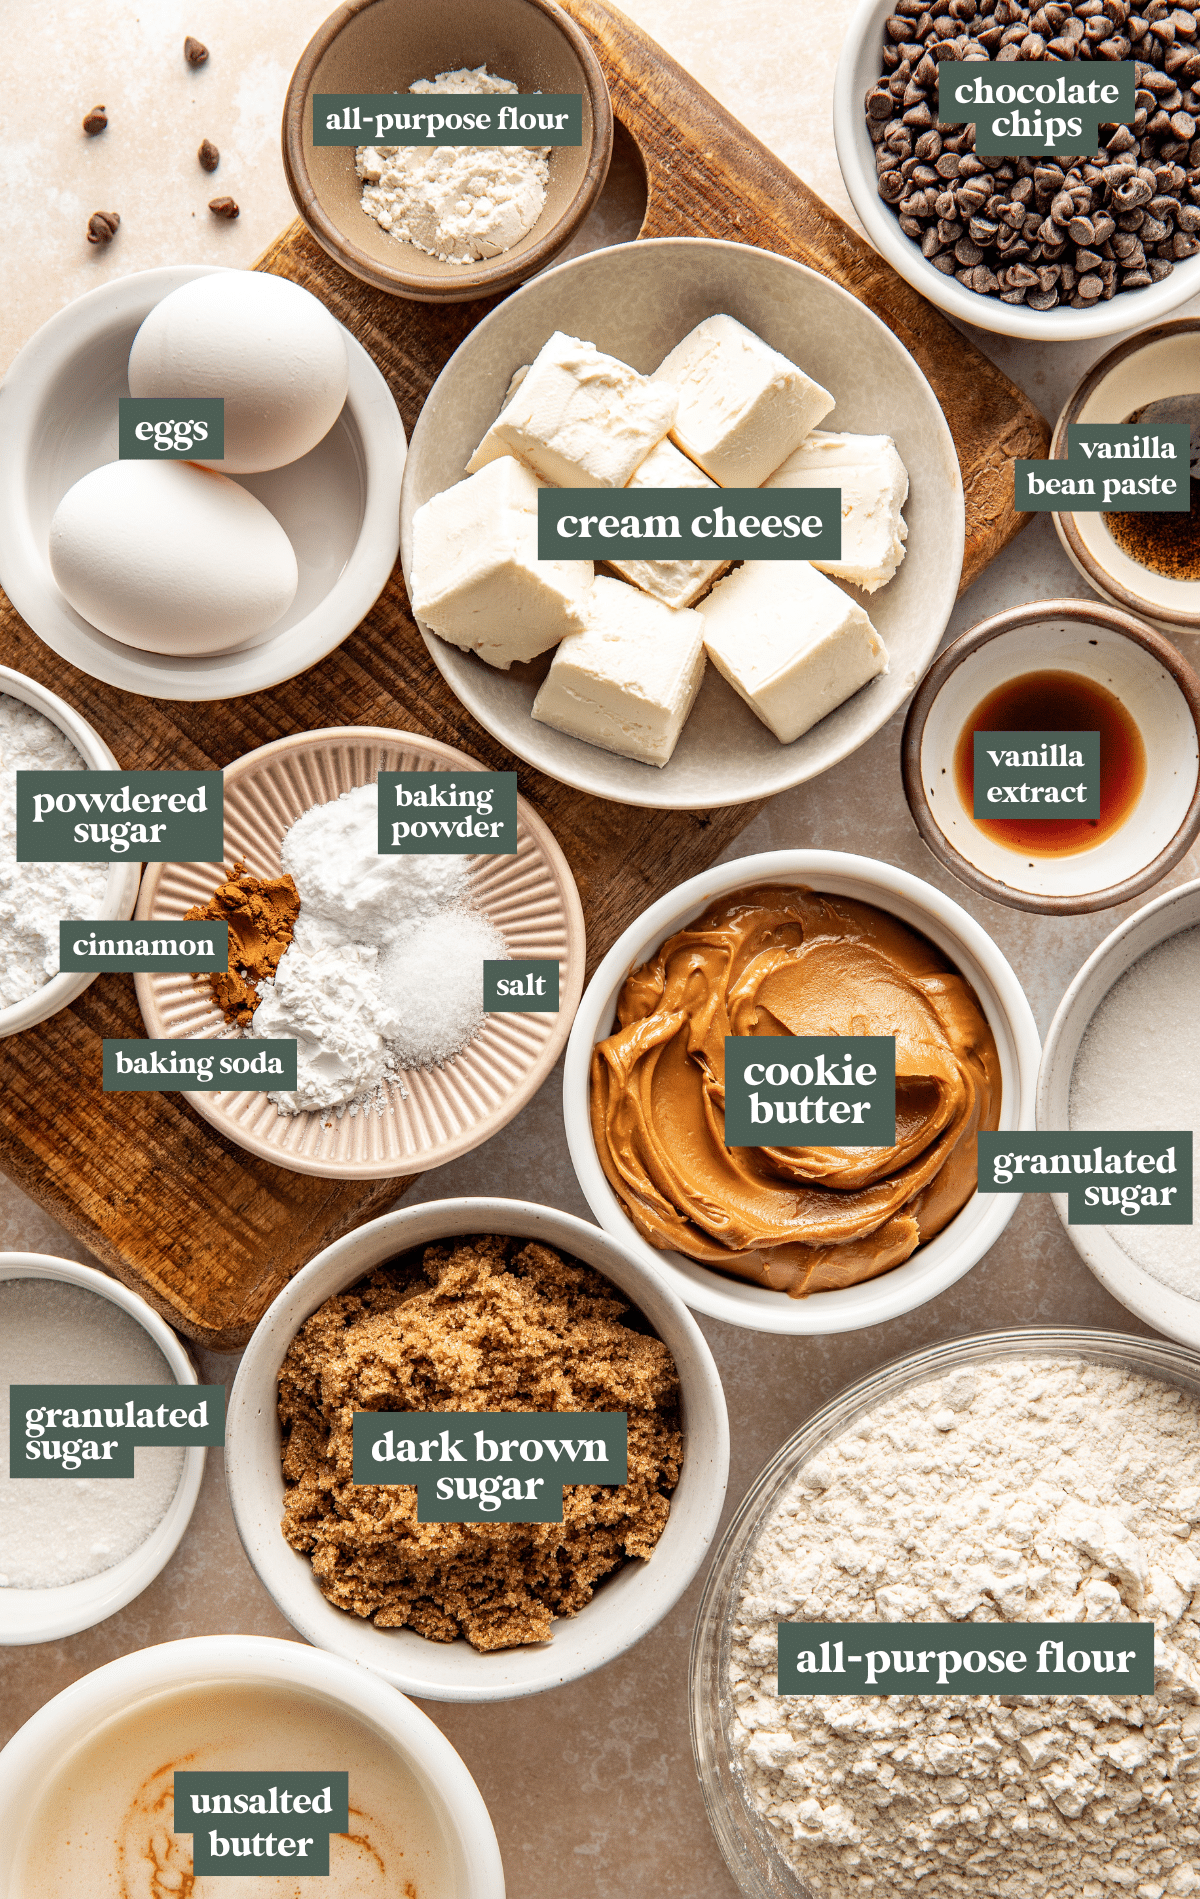
- Cream cheese: Make sure your cream cheese is softened to ensure even mixing for the cheesecake filling!
- Cookie butter: I love the Lotus Creamy Biscoff Cookie Butter. It has notes of cinnamon, ginger, allspice, and cloves, and it’s just really good!
- All-purpose flour: As always, it’s essential to make sure you’re using the spoon and level method to measure your flour when baking. Too much flour can result in drier, harder cookies. Use Bob’s Red Mill Gluten Free 1-to-1 Baking Flour for a gluten-free alternative.
- Vanilla bean paste: I’ve really enjoyed using vanilla bean paste lately for my cookies because it has a deeper, more complex flavor than regular vanilla extract. It also adds little flecks of real vanilla bean throughout the dough for extra flavor! If you don’t have vanilla bean paste, you can swap for equal amounts of vanilla extract.
- Chocolate chips: Feel free to use your favorite brand and type. I love using the mini chocolate chips for these cookies, but any kind works. You can use semi-sweet, milk chocolate, dark chocolate, you choose!
Step by Step Directions
(For the full recipe, scroll down to the recipe card below)
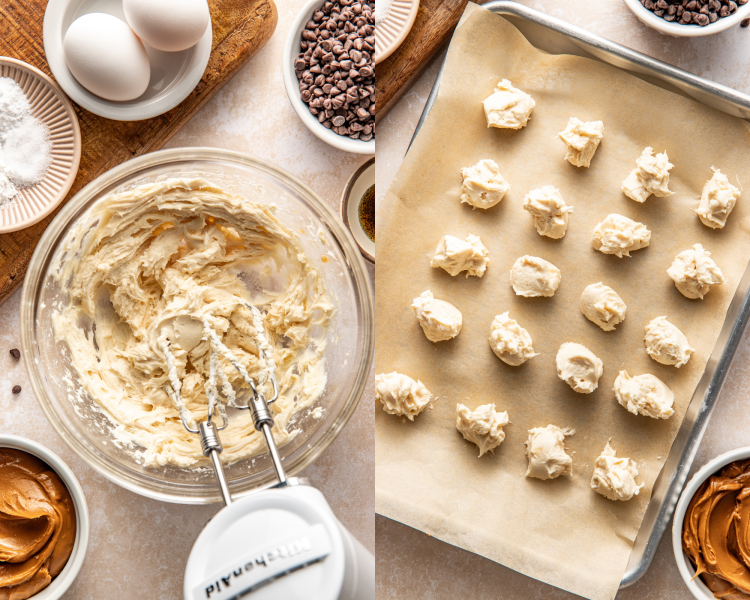
Make cheesecake filling
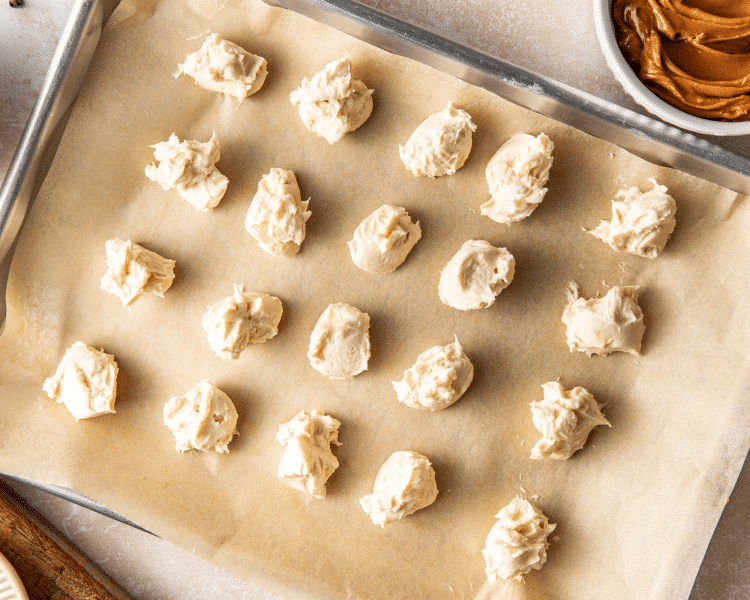
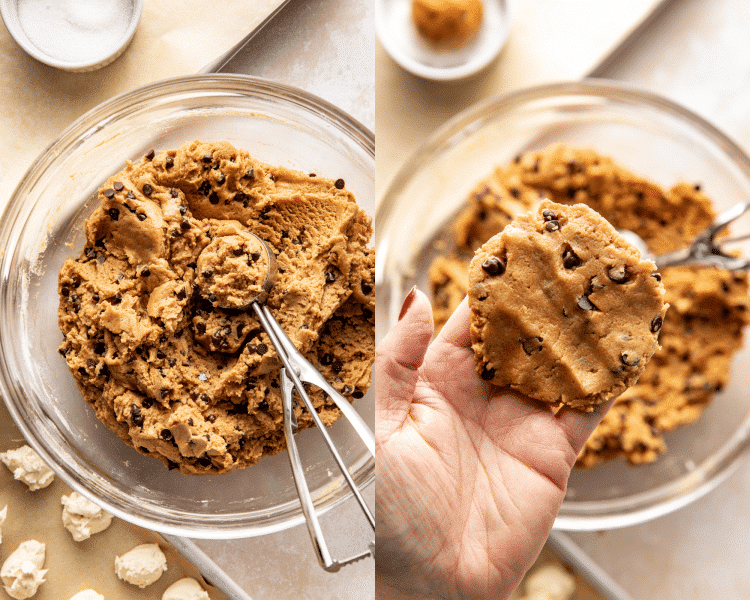
Use a hand mixer to beat the cheesecake filling ingredients until smooth and fluffy (about 2–3 minutes). Then drop teaspoon-sized mounds onto a parchment-lined baking sheet and freeze for at least an hour. The colder, the better, so it doesn’t ooze out of the cookies.

Mix wet ingredients
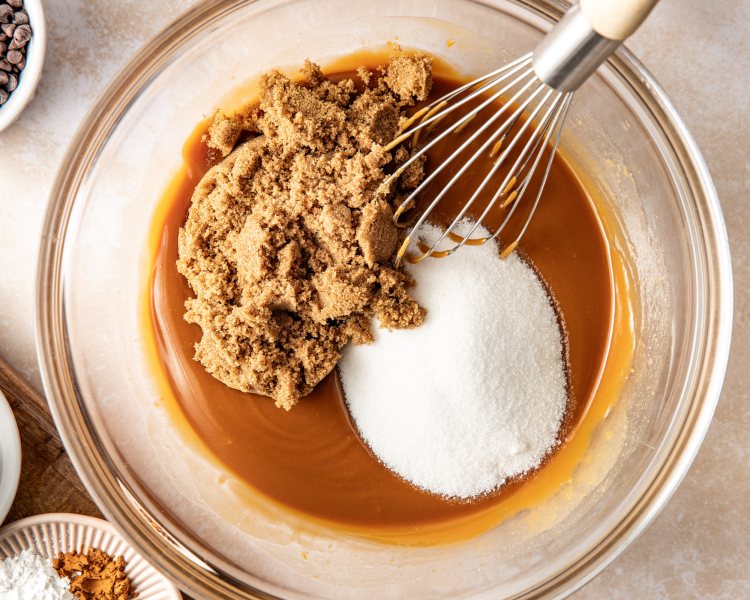
Whisk together the melted butter and Biscoff cookie butter. Then add the sugars and mix again. Lastly, whisk in the eggs and vanilla.
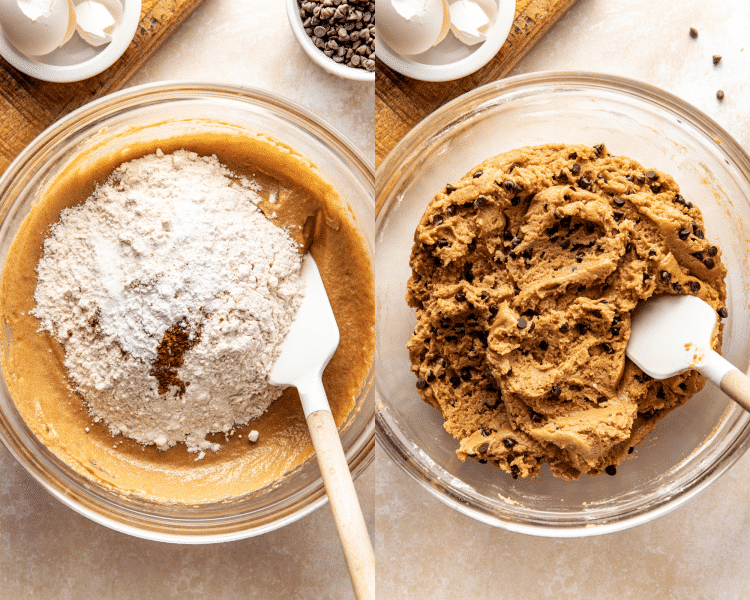
Add dry ingredients
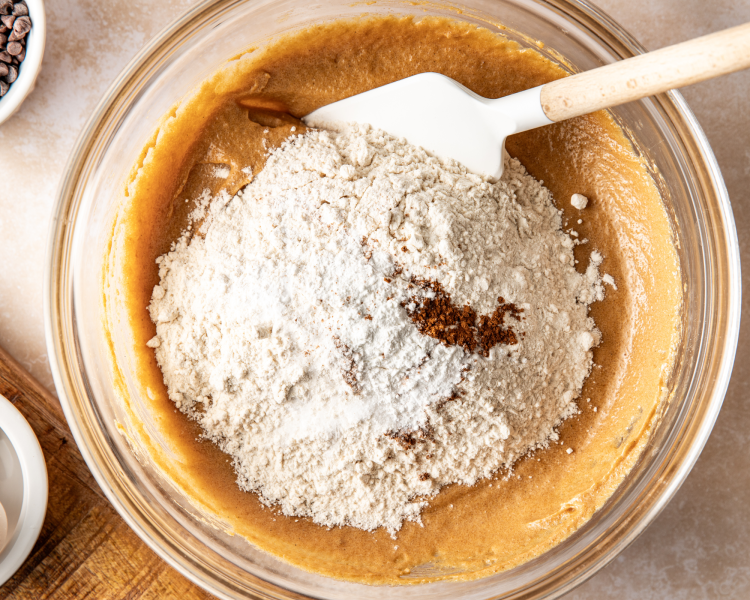
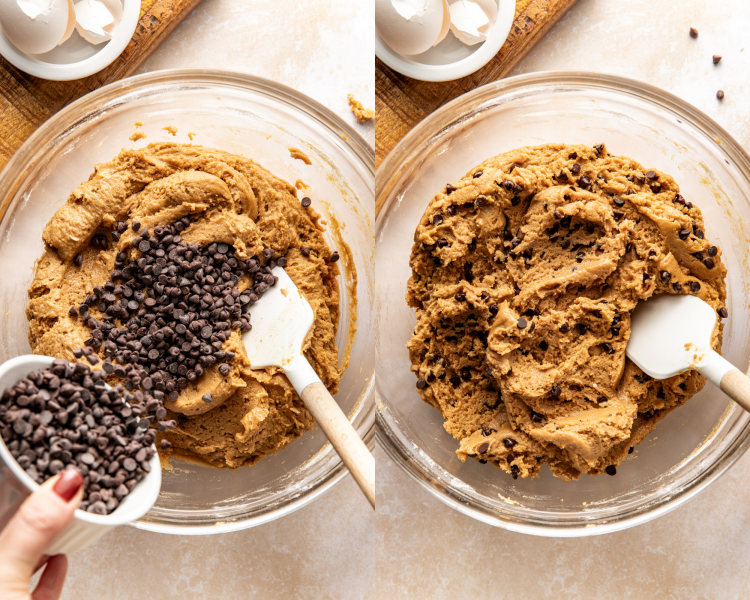
Add the dry ingredients and combine until the cookie dough forms. Then fold in the chocolate chips (be careful not to over-mix!). Cover and place the cookie dough in the refrigerator for just 10 minutes to make it easier to handle and shape.
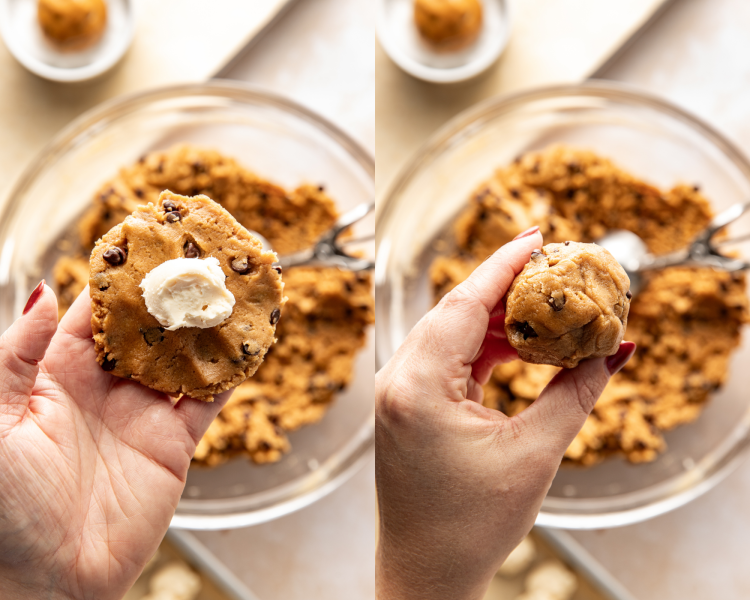
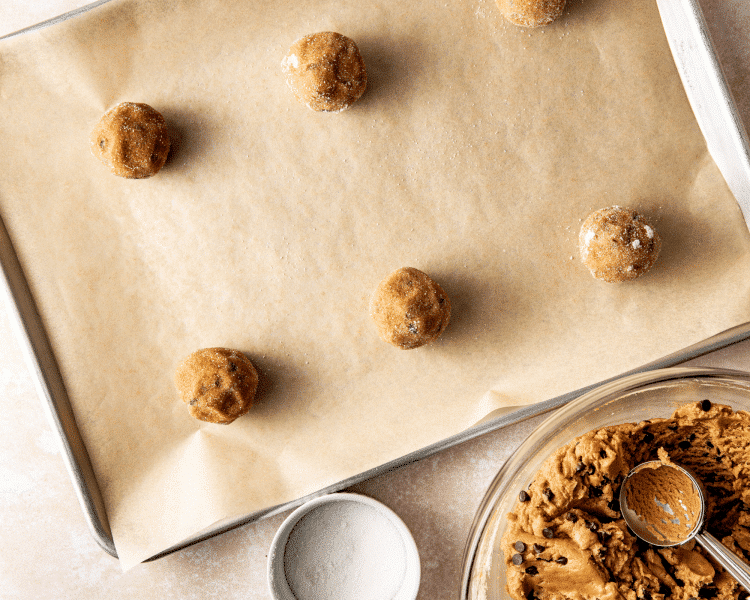
Scoop the dough and place a frozen cheesecake ball in the center. Wrap the dough around the filling, then roll the dough ball in granulated sugar and place on the prepared cookie sheet.
Bake & enjoy!
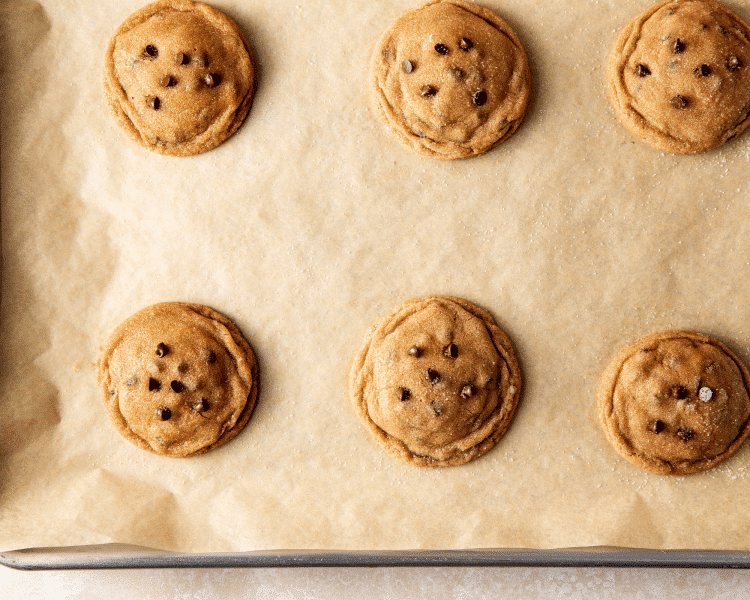
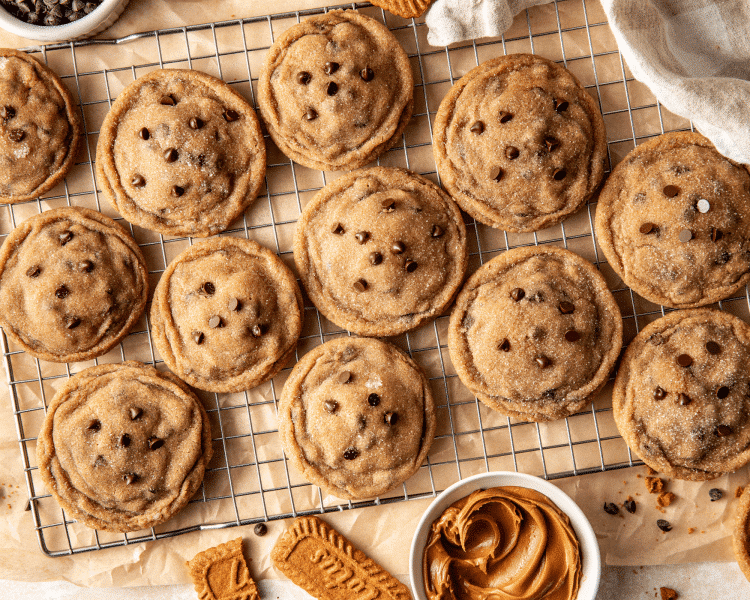
Bake for ~8-10 minutes. Once done, use a cookie cutter to “cookie scoot” each cookie and then let the cookies cool. Garnish with more chocolate chips or even a drizzle of melty Biscoff cookie butter and ENJOY!!
Expert Tips
- Make the cheesecake filling in advance: Making the cheesecake filling in advance helps to ensure the filling is very cold, which prevents the filling from oozing during baking. It will also make baking the cookies more streamlined and easier to bring together. You could freeze the cheesecake filling for up to 3 days.
- Spoon and level flour: Spoon the flour into your measuring cup and be sure it’s leveled. Do not scoop the flour out of the container/bag with your measuring cup because you could end up with 50% more than you need. Spoon and level by using a spoon to scoop the flour into the measuring cup and use the back of a knife to level off the top of it. You can also use a kitchen scale for accurate measurements.
- Don’t overfill the cookies: Be careful not to add too much cheesecake filling. 1-2 teaspoons is plenty. Too much filling can cause the cookies to crack or split during baking.
- Don’t over-bake: Make sure to pull these cookies out of the oven when the edges are just set and the tops look slightly underbaked. Don’t worry, the cookies will continue to cook on the hot baking sheet once you pull them out of the oven.
- Extra cookie butter: For an extra indulgent touch, drizzle melted Biscoff cookie butter over the cooled cookies before serving.
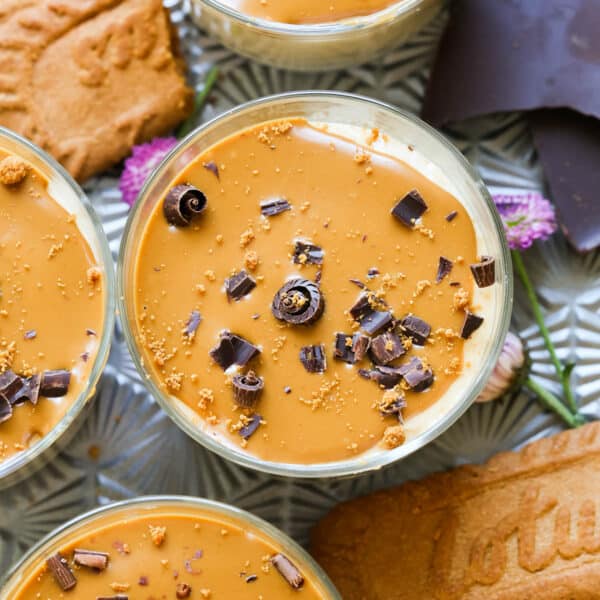
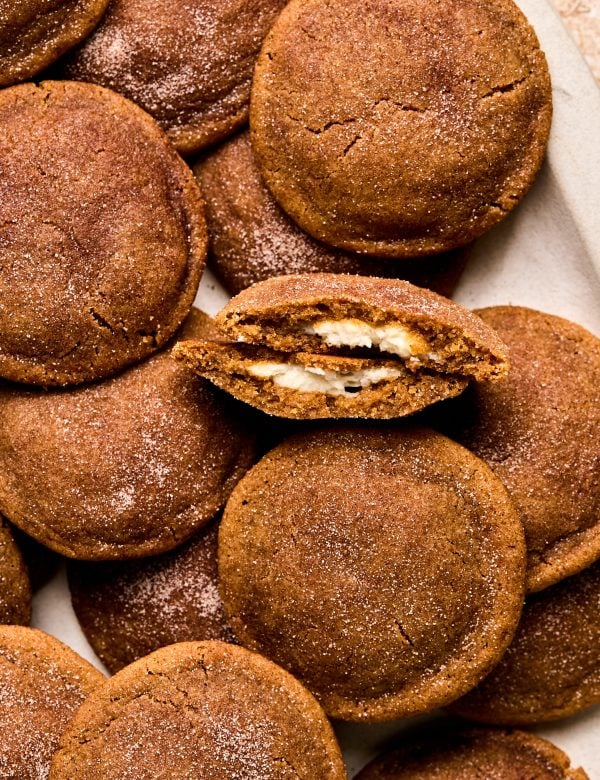
Need more Biscoff in your life? Try one of these!
Storage / Freezing
- Store: Place cookies in an airtight container in the fridge for up to 5 days. The cookies need to be refrigerated due to the cheesecake filling.
- Freeze baked cookies: Let cookies cool completely. Then freeze in an airtight container for up to 2 months.
- Freeze cookie dough: Place stuffed cookie dough balls in a single layer in an airtight container for up to 2 months. You can bake the frozen cookie dough from frozen, just add an extra minute or so to your bake time.
shop this post
 Buy Now →
  Buy Now →
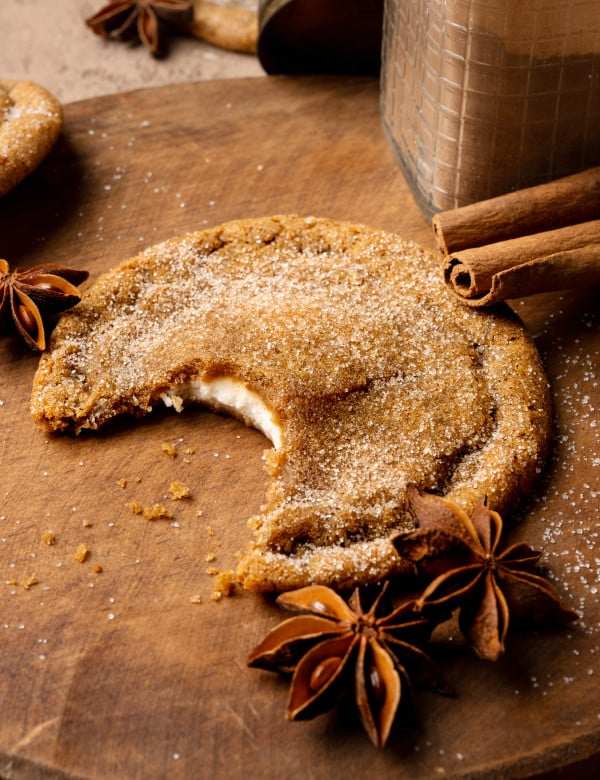
Before You Begin! If you make this, please leave a review and rating letting us know how you liked this recipe! This helps our business thrive & continue providing free recipes.
Ingredients
For the Cheesecake Filling:
- 6 oz. full-fat cream cheese (softened)
- 1/3 cup powdered sugar
- 2 tsp. all-purpose flour
- 1 tsp. vanilla extract
- Pinch of salt
- 1 cup unsalted butter (melted and slightly cooled)
- 1 cup creamy Biscoff cookie butter
- 3/4 cup packed dark brown sugar
- 3/4 cup granulated sugar
- 2 large eggs (room temperature)
- 2 tsp. vanilla bean paste (or vanilla extract)
- 3 cups all-purpose flour (spooned & leveled)
- 1 tsp. baking soda
- 1 tsp. baking powder
- 1/2 tsp. salt
- 1/4 tsp. ground cinnamon
- 1 cup mini chocolate chips
For Rolling:
- 1/4 cup granulated sugar
Last step! If you make this, please leave a review and rating letting us know how you liked this recipe! This helps our business thrive & continue providing free recipes.
Instructions
- Note: The cheesecake filling does need about an hour to chill before you place it in the center of the cookie dough, so you can plan for that time needed 🙂
- Make the cheesecake filling: In a medium bowl, use a hand mixer to beat the cream cheese, powdered sugar, flour, vanilla, and salt together until smooth and fluffy, about 2–3 minutes.6 oz. full-fat cream cheese, 1/3 cup powdered sugar, 2 tsp. all-purpose flour, 1 tsp. vanilla extract, Pinch of salt

- Freeze the filling: Drop ~teaspoon-sized mounds of the cheesecake mixture onto a parchment-lined plate or baking sheet that fits in your freezer. Freeze for at least 1 hour (or up to 3 days). The colder, the better! It prevents the filling from oozing during baking. You should get at least 24 cheesecake mounds.
- Combine butters: In a large bowl, whisk together the melted butter and Biscoff cookie butter.1 cup unsalted butter, 1 cup creamy Biscoff cookie butter
- Add sugars: Once combined, add the brown sugar and granulated sugar until smooth and glossy.3/4 cup packed dark brown sugar, 3/4 cup granulated sugar
- Whisk remaining wet ingredients: Whisk in the eggs and vanilla bean paste until fully incorporated.2 large eggs, 2 tsp. vanilla bean paste
- Add dry ingredients: Using a rubber spatula, fold in the flour, baking soda, baking powder, cinnamon, and salt until the cookie dough forms.3 cups all-purpose flour, 1 tsp. baking soda, 1 tsp. baking powder, 1/2 tsp. salt, 1/4 tsp. ground cinnamon
- Fold in chocolate chips: Stir in the mini chocolate chips, careful not to overmix.1 cup mini chocolate chips
- Chill the dough: Cover and chill the dough in the refrigerator for just 10 minutes to make it easier to handle and shape.
- Assemble the cookies: Scoop about 2 ½-3 tablespoons of dough (using a large cookie scoop), flatten it slightly in your palm.
- Add cheesecake filling: Place a frozen cheesecake ball in the center. Wrap the dough around the filling to completely enclose it and roll it into a ball. Repeat with the remaining dough and cheesecake centers.
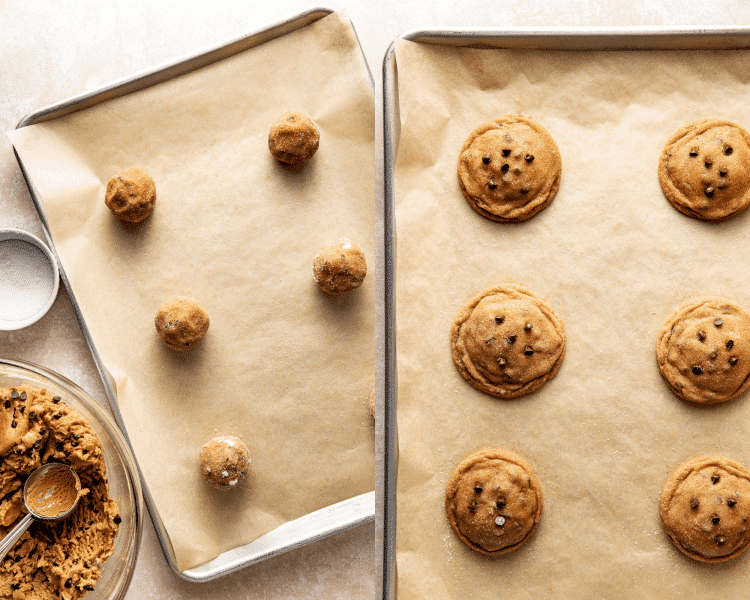
- Coat in sugar: Roll each dough ball in the 1/4 cup granulated sugar and arrange on a parchment-lined baking sheet, spacing them about 2 inches apart.1/4 cup granulated sugar
- Bake: Bake at 350°F for ~8-10 minutes or until edges are set and the tops look slightly underbaked. Do not over-bake; they’ll continue to set as they cool. Start Timer
- Cool & cookie scoot: Immediately after removing from the oven, use a round cookie cutter or the back of a spoon to “cookie scoot”—gently swirl each cookie into a perfect circle while it’s still warm. Let cookies cool on the baking sheet for ~5 minutes before transferring to a wire rack. The cheesecake centers will firm up as they cool. I like them best completely cooled so they have plenty of time to set up.
- Garnish: You can garnish the tops with more mini chocolate chips, a sprinkle of granulated sugar, or even a drizzle of melty Biscoff cookie butter.


Notes
- 🧊Make sure the cheesecake filling is completely frozen before baking. This helps keep that creamy center intact.
- 🍪Store cookies in an airtight container in the refrigerator for up to 5 days, or freeze for up to 2 months.
- ✨For an extra indulgent touch, drizzle melted Biscoff cookie butter over the cooled cookies before serving.
Nutrition Information
Nutritional information is provided as a courtesy and is automatically calculated. It should only be construed as an estimate rather than a guarantee. Ingredients can vary and Kroll’s Korner can’t make any guarantees to the accuracy of this information.
📸 Photos by Megan McKeehan of The Broke Girl Table

Hi- I’ve literally never left a review for a recipe of any kind before, but I just wanted to let you know that these are hands down the best cookies I’ve ever made. I made them exactly like the recipe says to and they came out perfect. My husband says this is the best thing (dessert or otherwise!) that I’ve ever made. These came out very reminiscent of the indulgent cookies that they sell at those popular cookie chain stores popping up everywhere. This is absolutely going in the rotation! Thanks for the recipe!
Oh wow – this just made my morning! So happy you enjoyed these and thank you for the really kind review! 🙂
These cookies are amazing. I’ve made many of your other cookie recipes. These are my favorite! Thank you for sharing
So pretty! Thank you Donna! 🙂
Hi, if I don’t want to bake them all at once can I freezer the cookies at step 12?
Hi Sarah! Yes good question 🙂 So the unbaked cookie dough balls with cream cheese inside (step 12) will freeze well for up to 3 months. I would allow them to sit at room temperature for 30 minutes, pre-heat the oven, then roll in remaining 1/2 cup granulated sugar, you don’t need to roll them in the granulated sugar prior to freezing 🙂
Just delishious! Can you please make a cookie/desserts recipe book? I love all your recipes so much and would a nice cookbook to have on the counter with all of them included!
Awww thank you! Hopefully one day I will! 🙂
These cookies were phenomenal! My husband said he wants these added to the rotation of cookies I bake (all your recipes), and I agree. They’re full of flavor, soft, and the cheesecake center is the cherry on top. 10/10!
Aw I am so glad!! Always love finding husband approved recipes hehe thank you!!
My boyfriend asked me to make these and I’m still waiting to try them.
For 1. Had to bake for 10 minutes + 4 because each cookie was 38gms of dough + 7gms cheesecake filling. Not sure if that half scoop is the same.
Secondly did you add chocolate chips ontop before baking. Because I folded through the dough as mentioned and honestly after baking, they dont look like the photos.
I’m an experienced baker and weighed everything without changing any of the recipe processes. Kinda disappointed that they didn’t turn out like the photo.
Could you share insight into how you get this spread look? Mine are domed. And you can’t see any of the chips like in your photos. Did you leave out instructions on putting chips ontop?
Hello – in step 15 I mention garnishing the tops with more mini chocolate chips if desired. As far as the spread, it looks like you used a dark colored baking sheet and that can prevent them from spreading. Thanks for making 🙂
Delicious and decadent! Make sure to let them cool before you eat! Hard to resist a hot cookie!
Sooo pretty! Thank you!
These cookies were excellent. I would give it 10 stars if I could. I also like the cookie butter cookies. I do have one question. Do you think if I added Biscoff cookie pieces it would change the texture too much? Would I have to change the bake time? Just a thought thank you for your excellent recipe recipes.
Thank you sooo so much!! I am not sure. I bet it would be ok 🙂
These are excellent!!! I would give 10 stars if I could. I also love the cookie butter cookies!
I haven’t made the cookies yet, but was wondering if we could use the “Cheesecake No Bake” cream cheese? It comes in a tub like Cool Whip.
Thoughts?
Hi Michelle! I haven’t worked with that product before so I can’t say for sure. If you do, you still will probably need to freeze it in mounds in the freezer until solid. If you try, let me know how it goes! 🙂