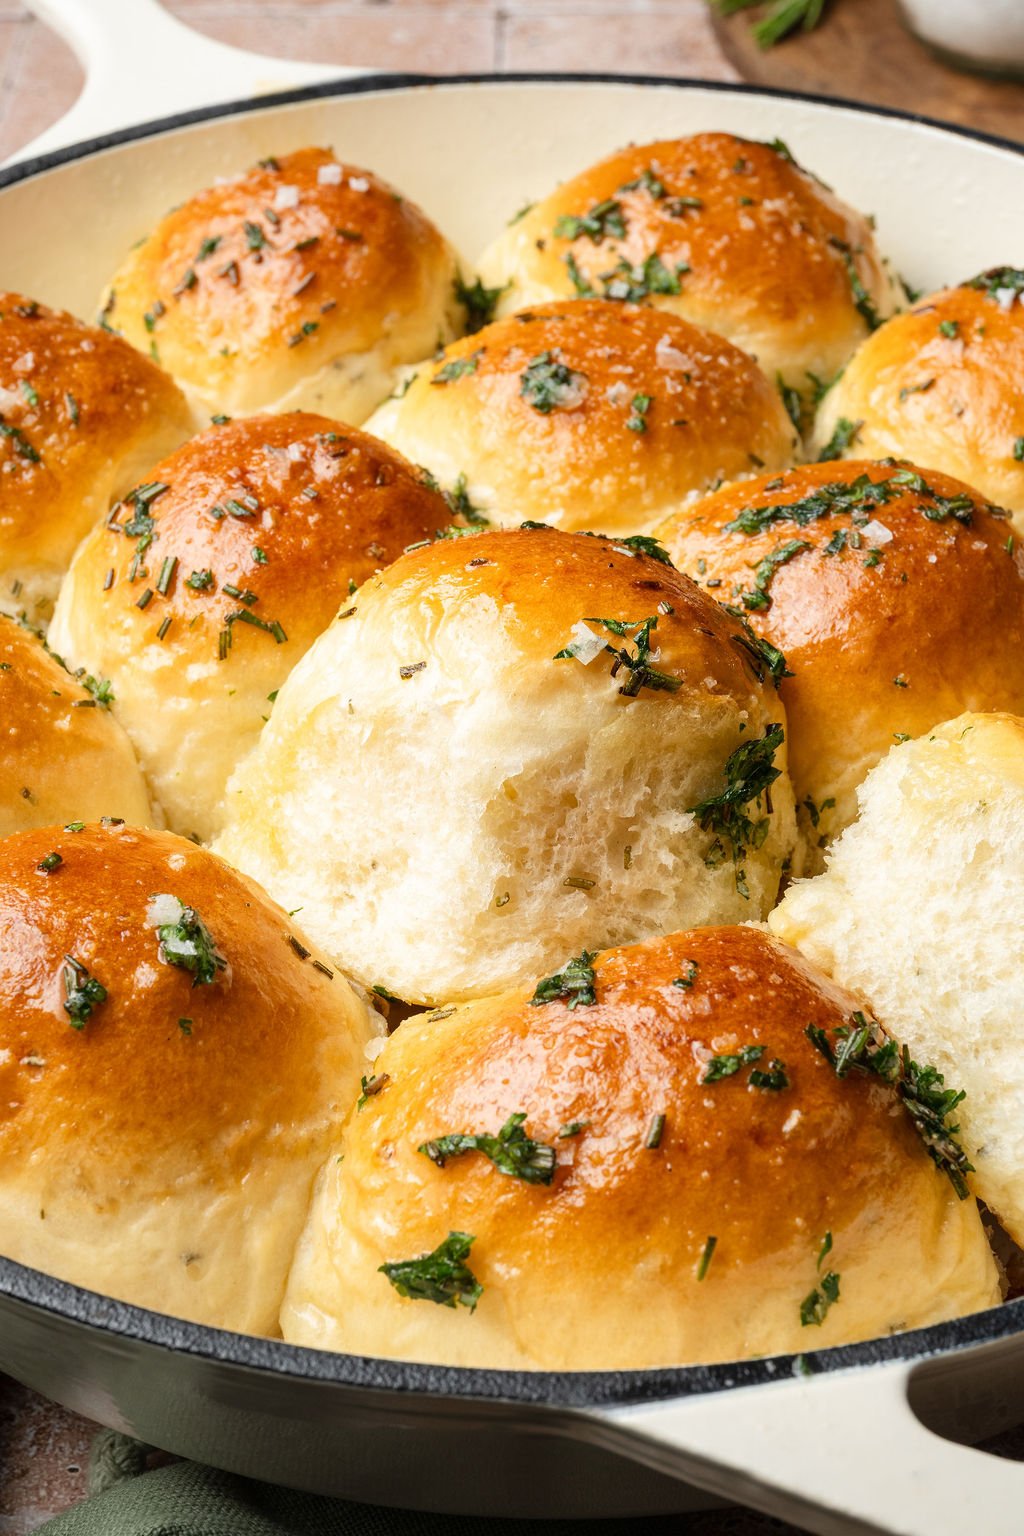
Rosemary Garlic Pull Apart Rolls
This post may contain affiliate links. Please read our disclosure policy.
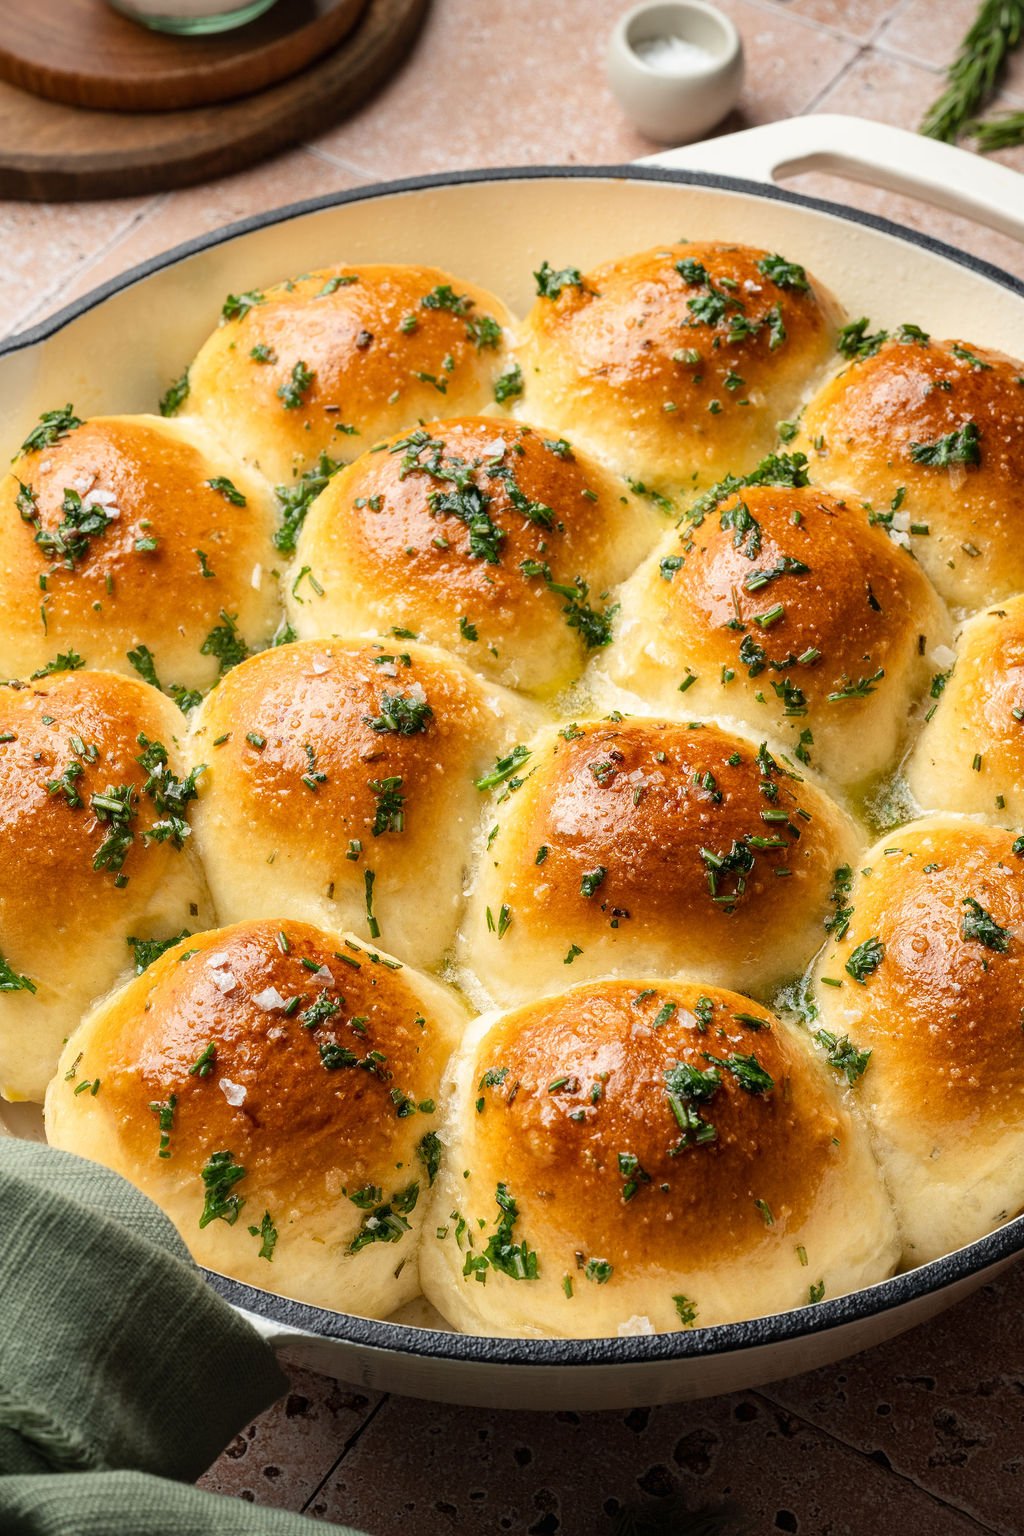
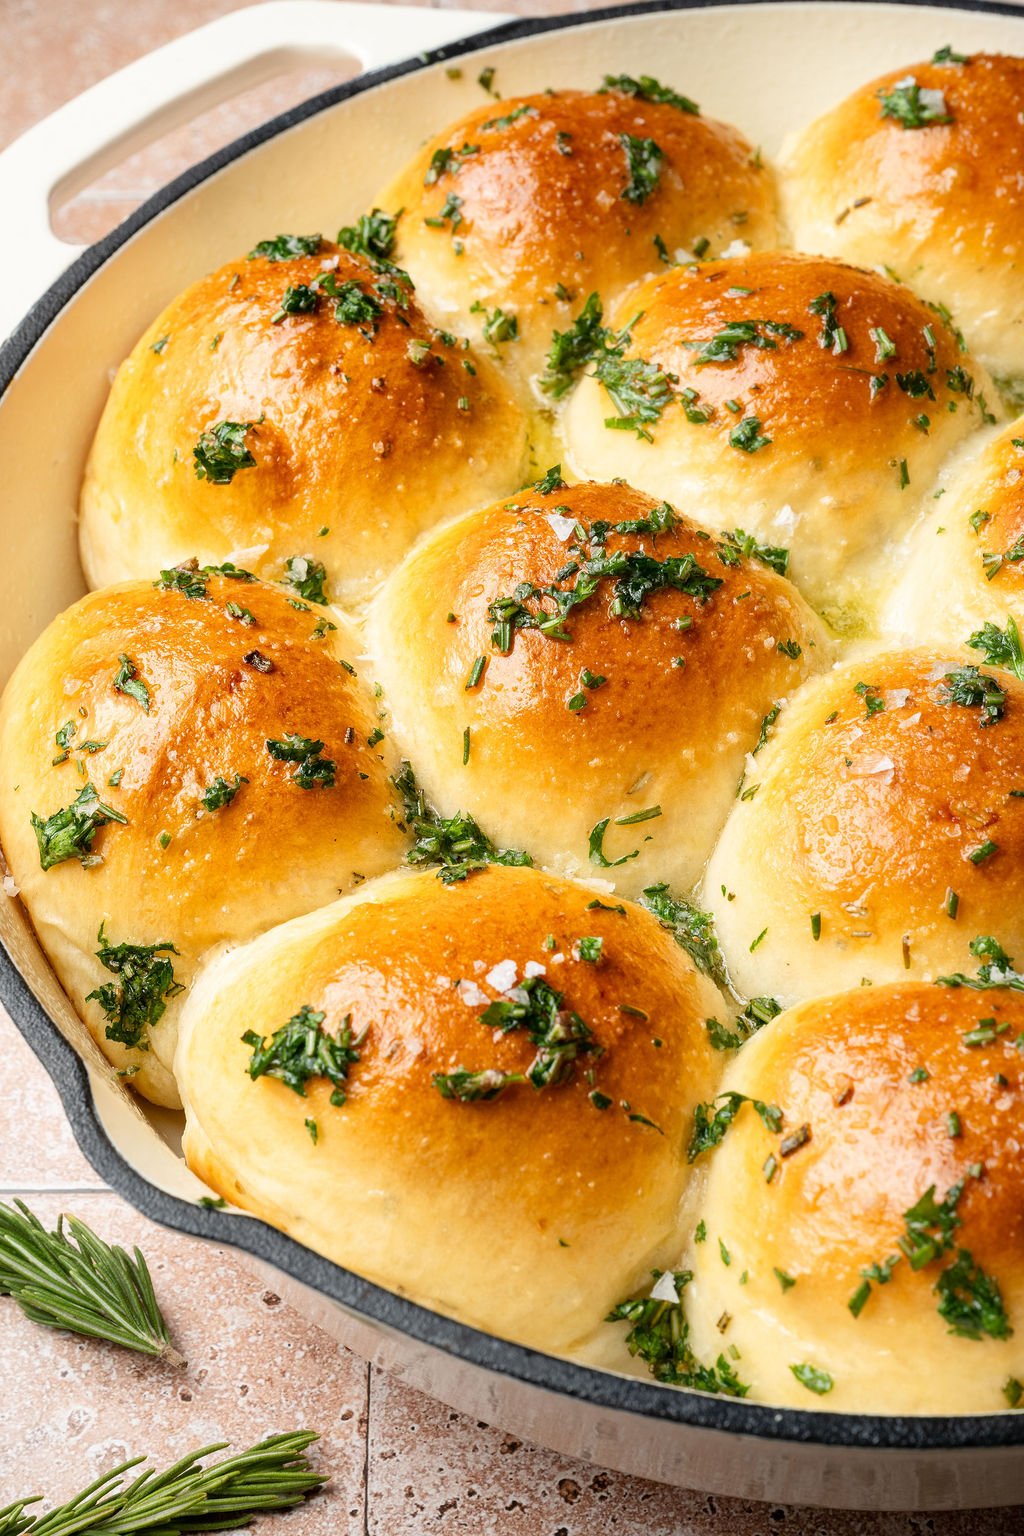
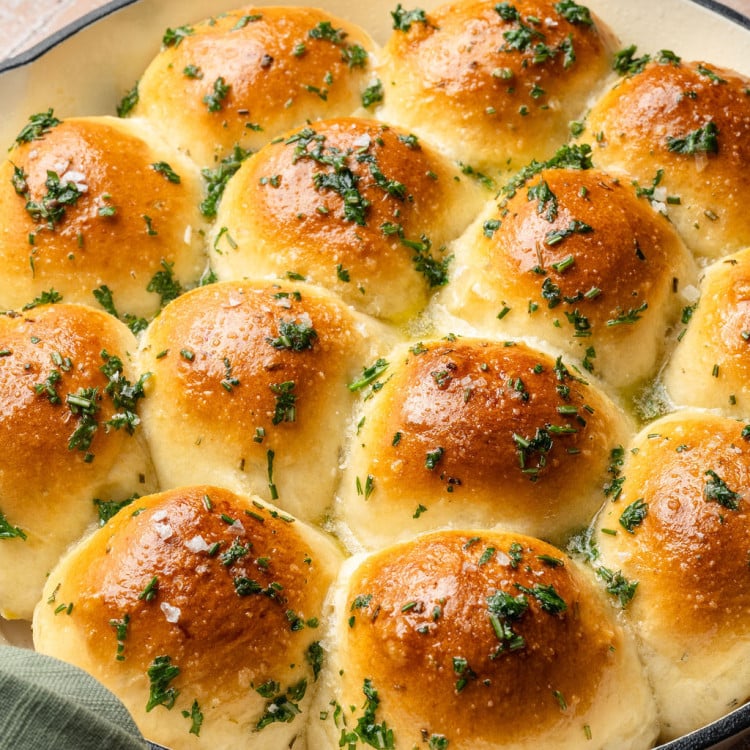
Sorry not sorry that you’ll probably never go back to store-bought dinner rolls after you try this recipe. These Rosemary Garlic Pull Apart Rolls are my new faves.
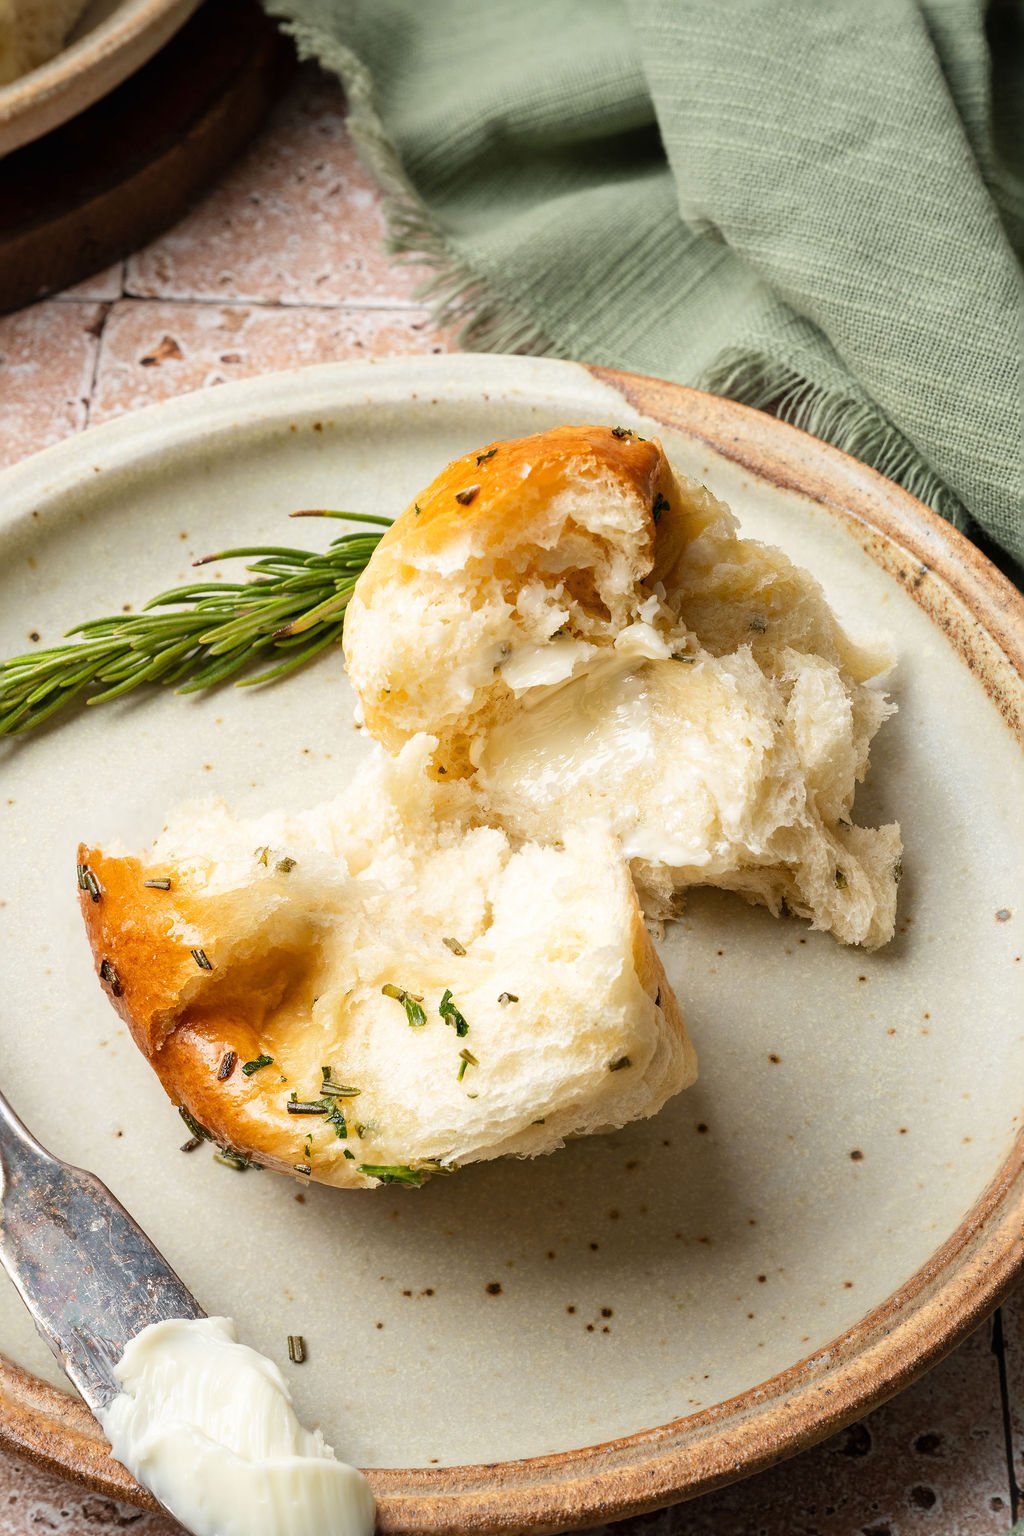
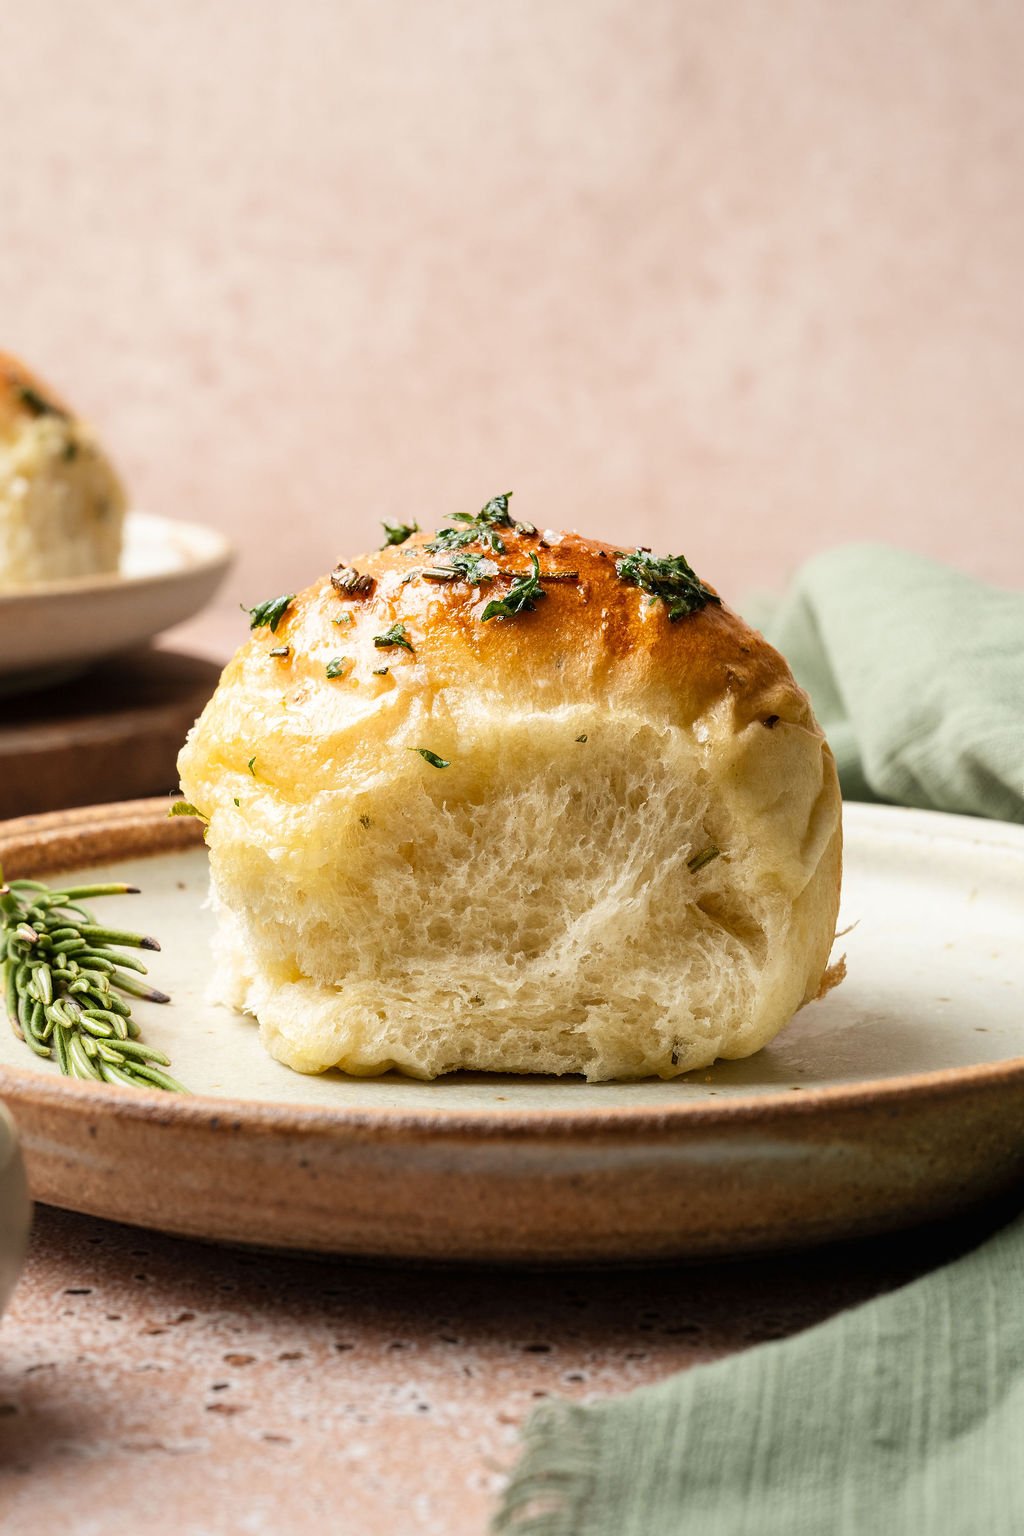
They are really easy to whip up a batch and enjoy fresh, warm, buttery rolls with your dinner. I am obsessed with the texture of these rolls. They are soft, chewy, and pillowy and finished with a beautiful golden brown top.
These Pull Apart Rolls have just the right amount of both rosemary and garlic to give you those delicious flavors without being overpowering.
If baking bread at home is a bit intimidating to you, this is a great recipe to start with! (Or check out my 1-Hour Dinner Rolls for another one of my faves.) Make sure to read through the whole post for all my tips and tricks!
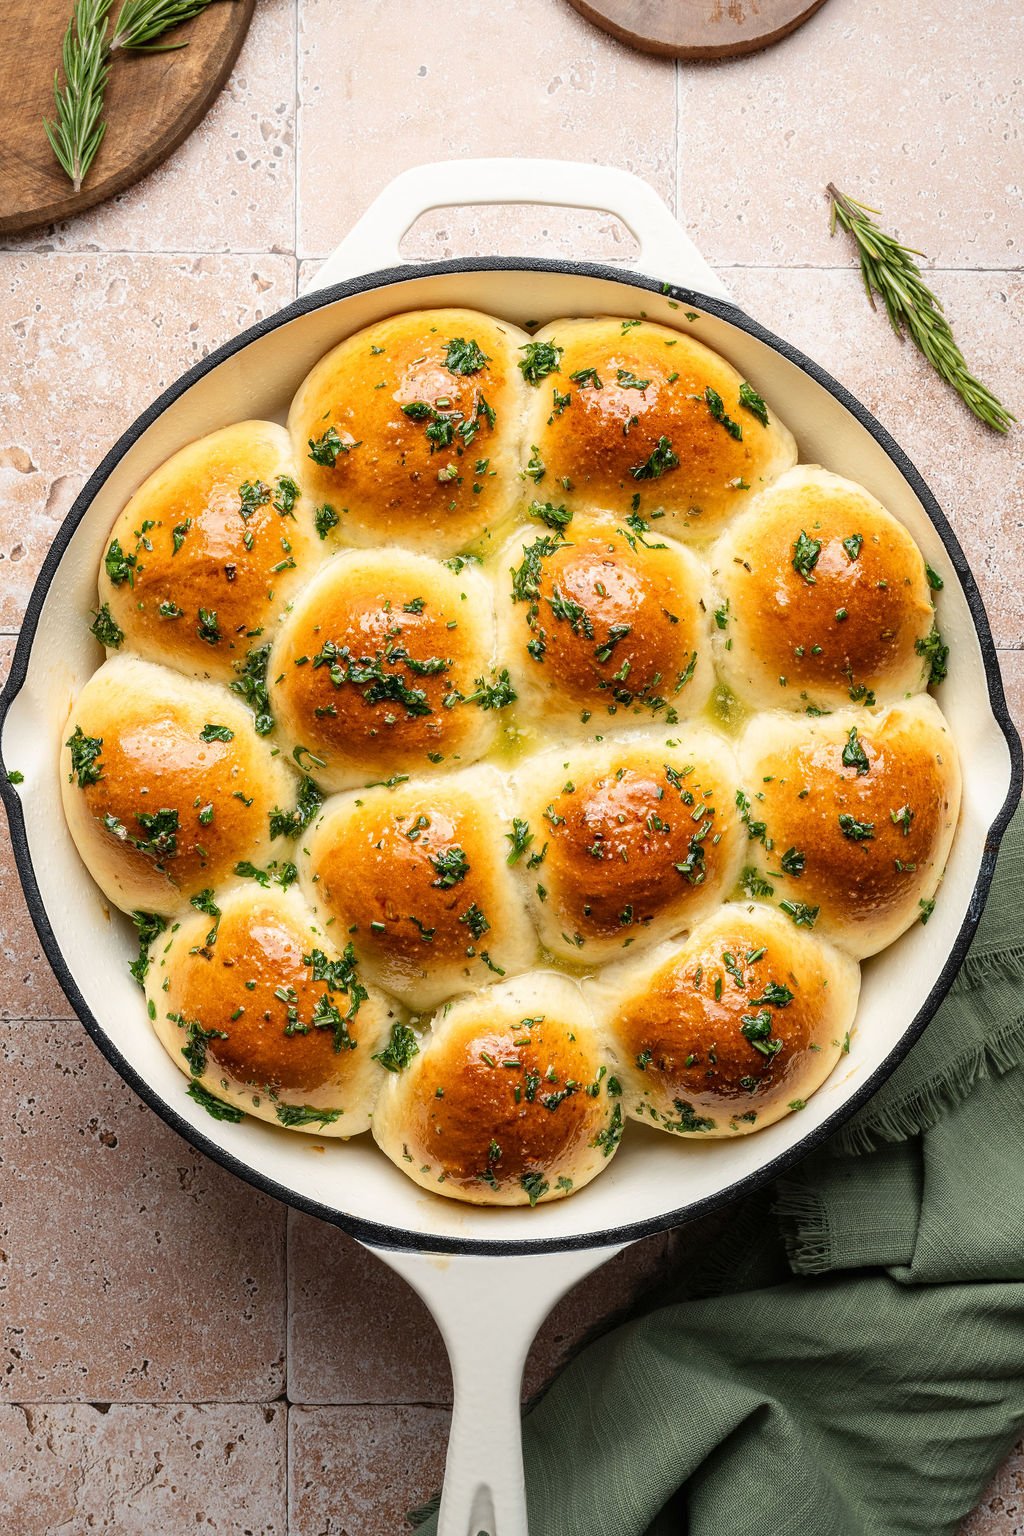

 Table Talk with Tawnie

There’s just something so satisfying about making rolls from scratch. These Rosemary Garlic Pull Apart Rolls are: 1) Getting me excited for holiday comfort food and 2) Really easy to prepare!! I love my 1-Hour Dinner Rolls recipe so much, but these rolls take on a whole new flavor profile that I know you’ll love too! Aren’t they so pretty baked up in the cast iron too!? I just adore them. Excited to hear what you think! Leave a comment and photo for me in the comment section below!! ❤️
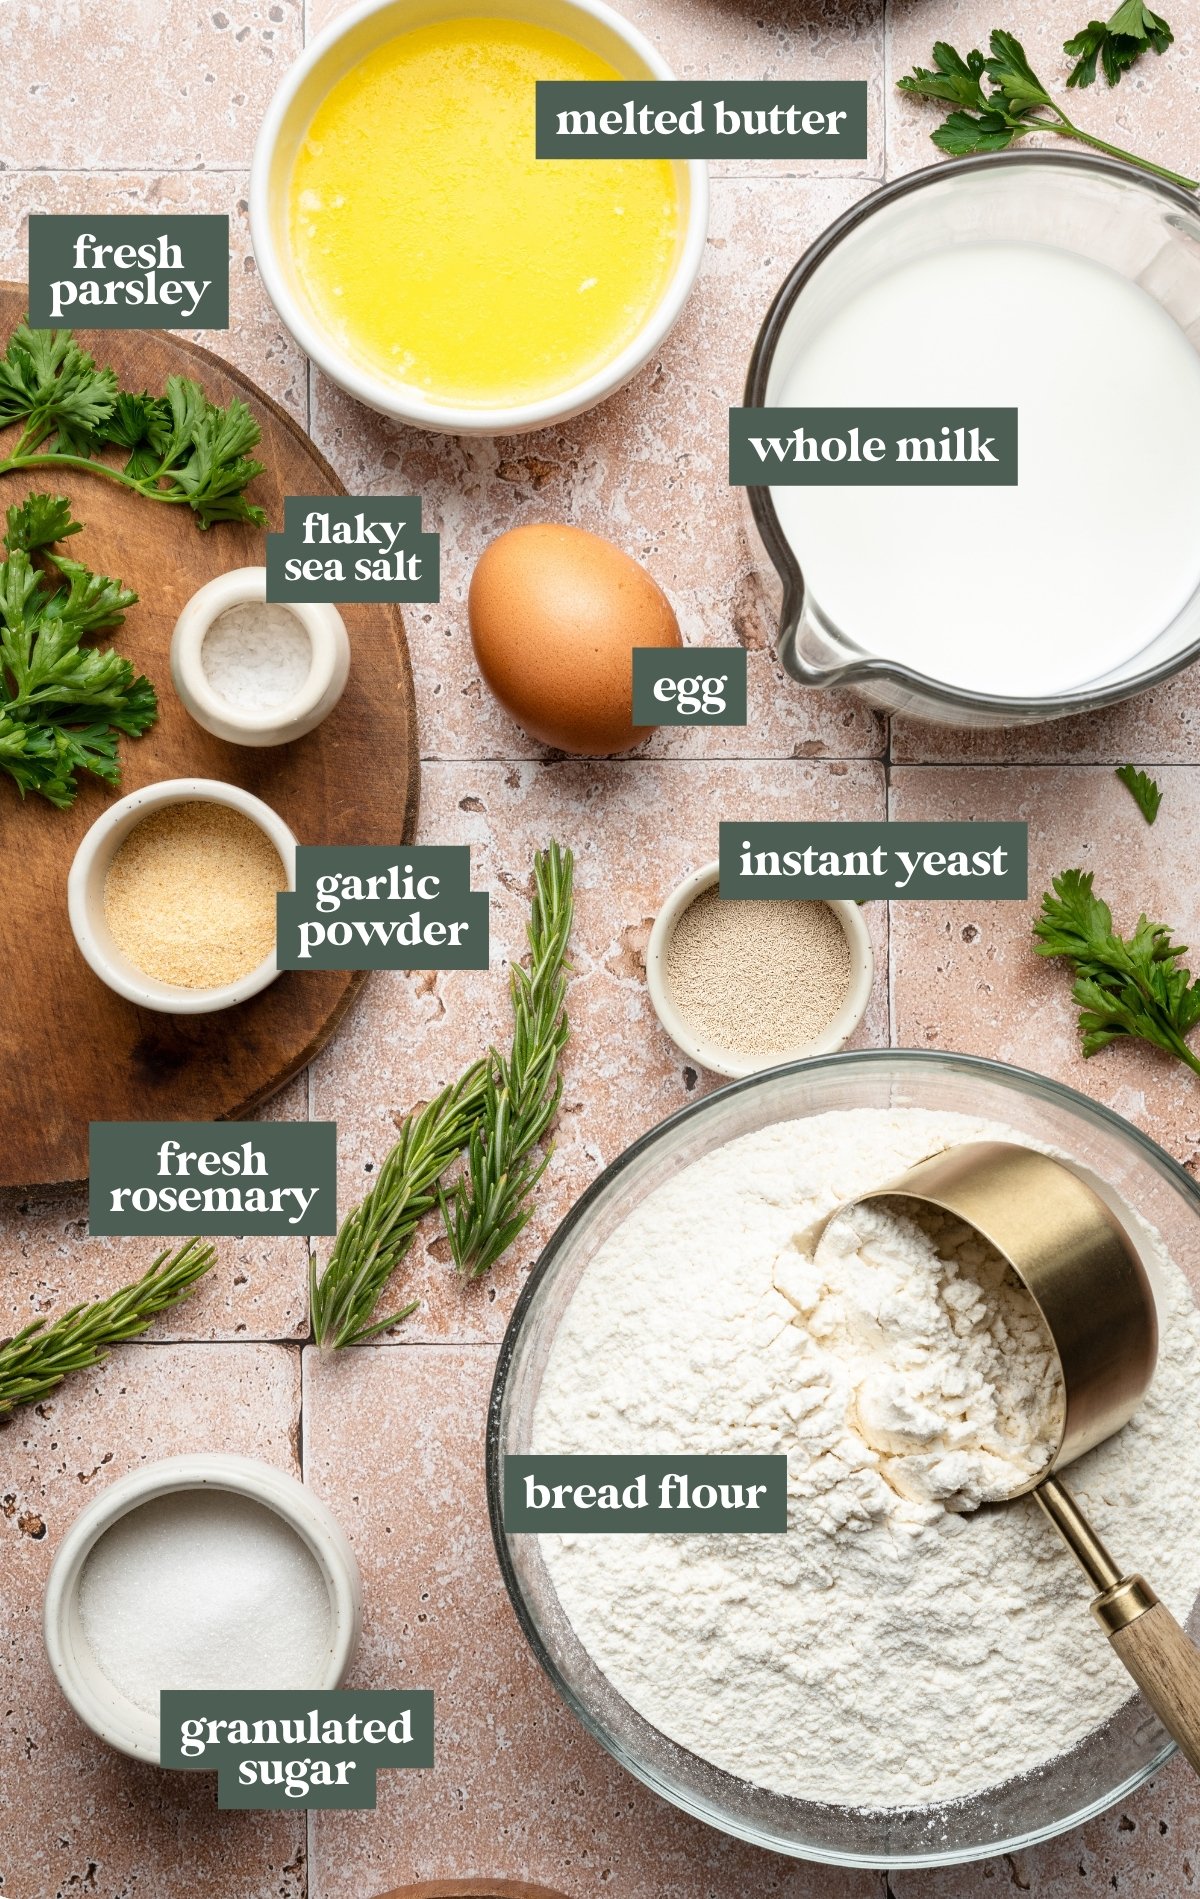
- Bread Flour: Bread flour has a little more protein than regular all-purpose flour, which helps the dough stretch and hold its shape. This helps make the rolls extra fluffy on the inside while still being sturdy enough to pull apart without falling apart.
- Instant Yeast: This is the leavening agent in these rolls. Unlike active dry yeast, instant yeast works quickly which helps the dough rise faster and more reliably.
- Granulated Sugar: The sugar “feeds” the yeast, meaning it helps it activate and rise. While these rolls are not sweet, the small amount of sugar does balance the savory garlic and rosemary to enhance the overall flavor.
- Whole Milk: Adds richness and makes the rolls super soft and tender. It also helps the tops bake up golden brown. Using milk instead of water just gives these rolls that extra cozy, bakery-style vibe that I’m just obsessed with!
- Fresh Rosemary: Fresh rosemary is the star ingredient here. It adds a fragrant, herby taste that pairs *so well* with the buttery garlic finish. Using fresh instead of dried makes the rolls taste brighter and more flavorful.
- Other Ingredients Needed: unsalted butter, large eggs, salt, garlic powder, fresh parsley, flaky sea salt
Step by Step Directions
(For the full recipe, scroll down to the recipe card below)
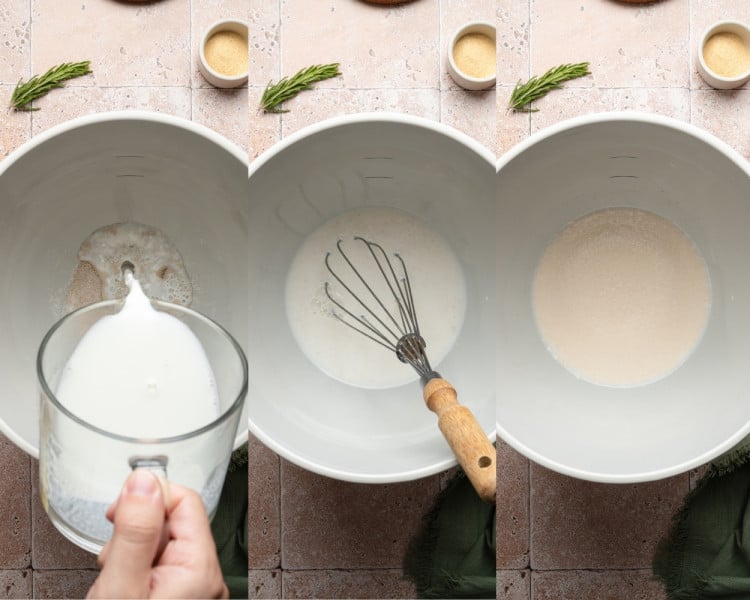
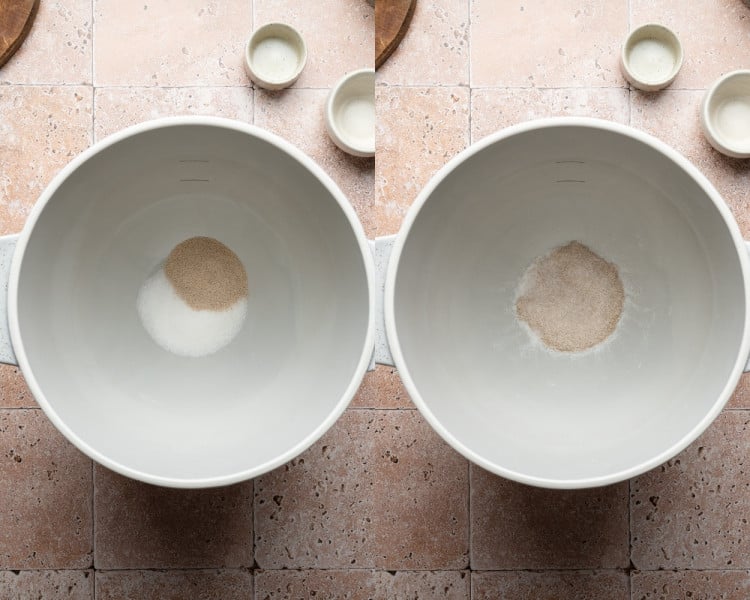
Prepare & activate the yeast.
Pour warm milk (115–120°F / 46–49°C) over the yeast and sugar. Whisk gently to combine, then cover loosely with a clean kitchen towel. Allow to sit for 5-10 minutes or until the mixture is frothy.
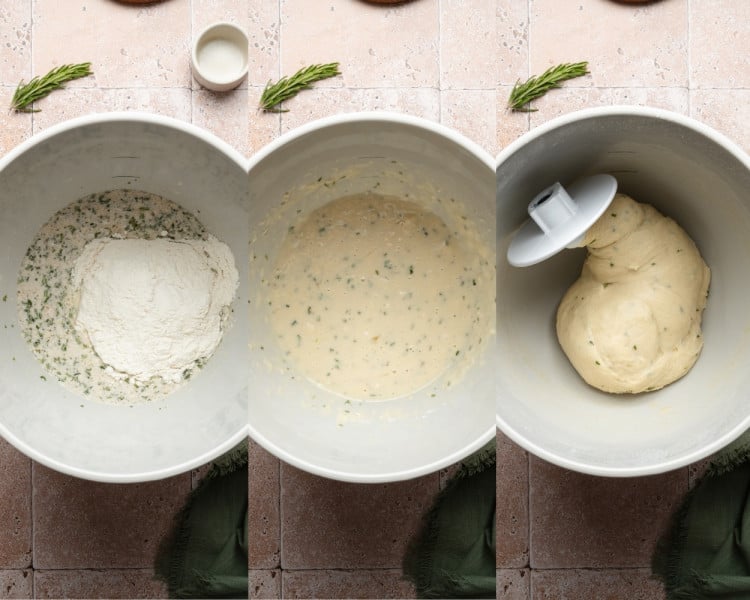
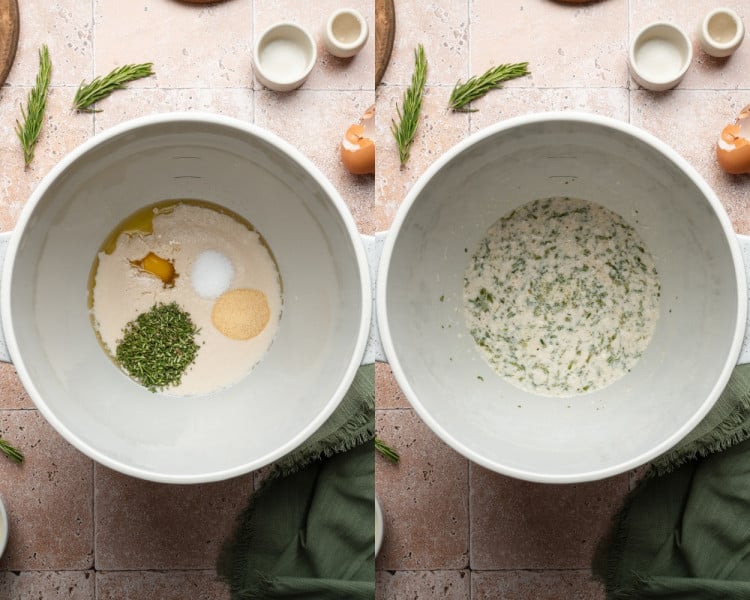
Prepare the dough.
Add the melted butter, egg, salt, garlic powder, and rosemary to the yeast mixture. Then add the bread flour 1 cup at a time and mix on low speed. Gradually add the remaining flour, then increase to medium-low speed and knead for ~6 minutes, until the dough is smooth. The dough should be slightly tacky but not overly sticky; if needed, add extra flour 1 tablespoon at a time.
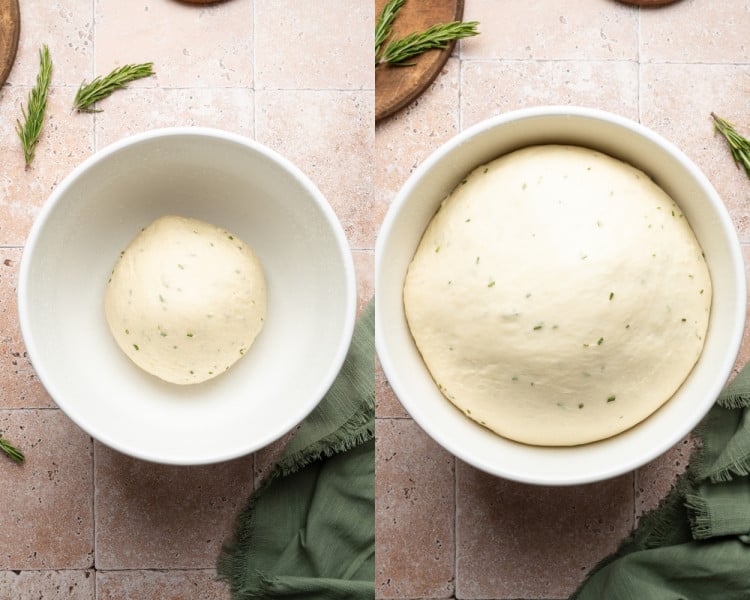
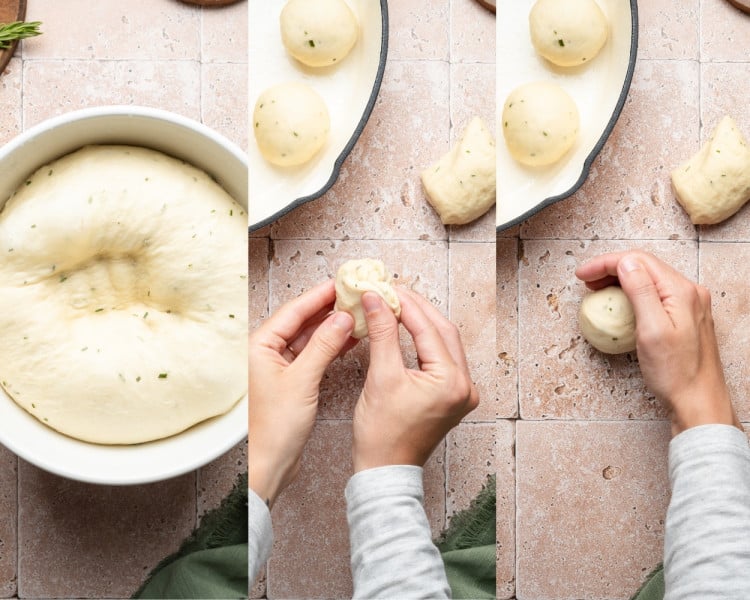
Allow the dough to rise.
Transfer the dough to a lightly greased bowl (nonstick spray works well). Cover with plastic wrap or aluminum foil and let rise in a warm, draft-free space until doubled in size, about 60-90 minutes.
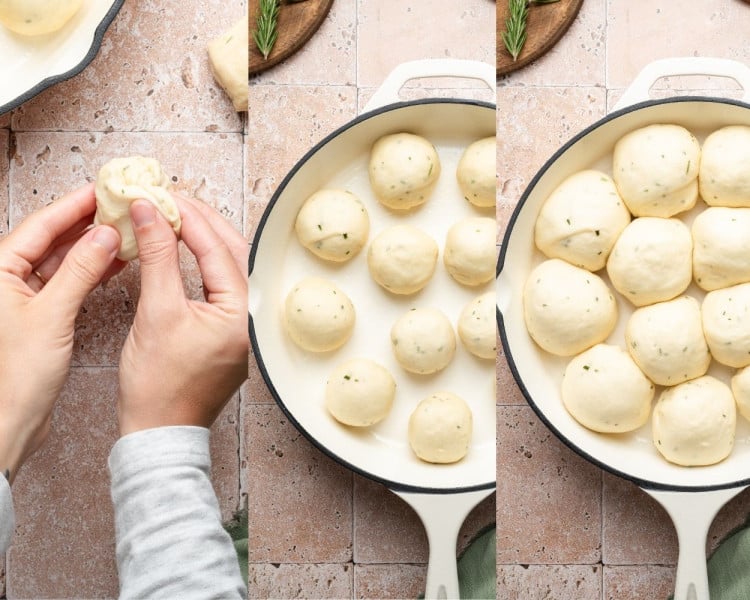
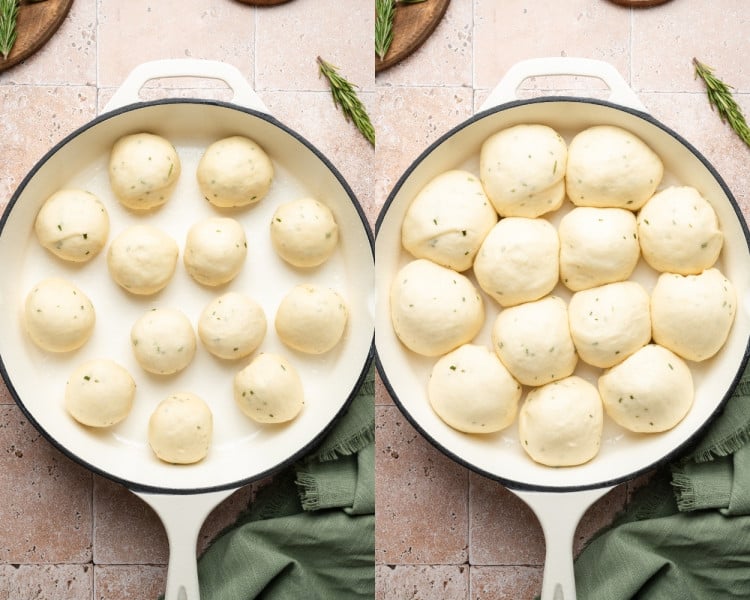
Shape the rolls & let the dough rise again.
Punch down the dough to release air. Divide into 14 equal portions for large rolls (or ~22 portions for smaller rolls). Shape and arrange rolls evenly in the cast iron (or pan of choice) then cover with plastic wrap or foil and let rise in a warm environment until puffy, 30-45 minutes.
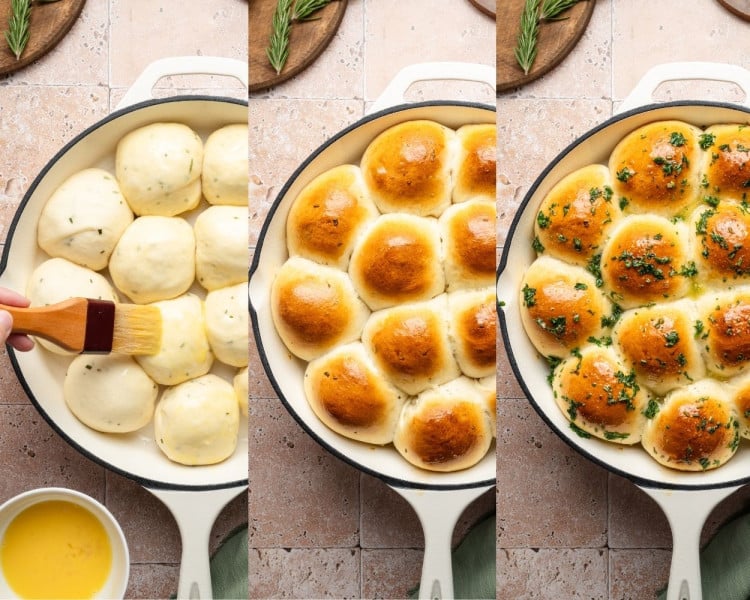
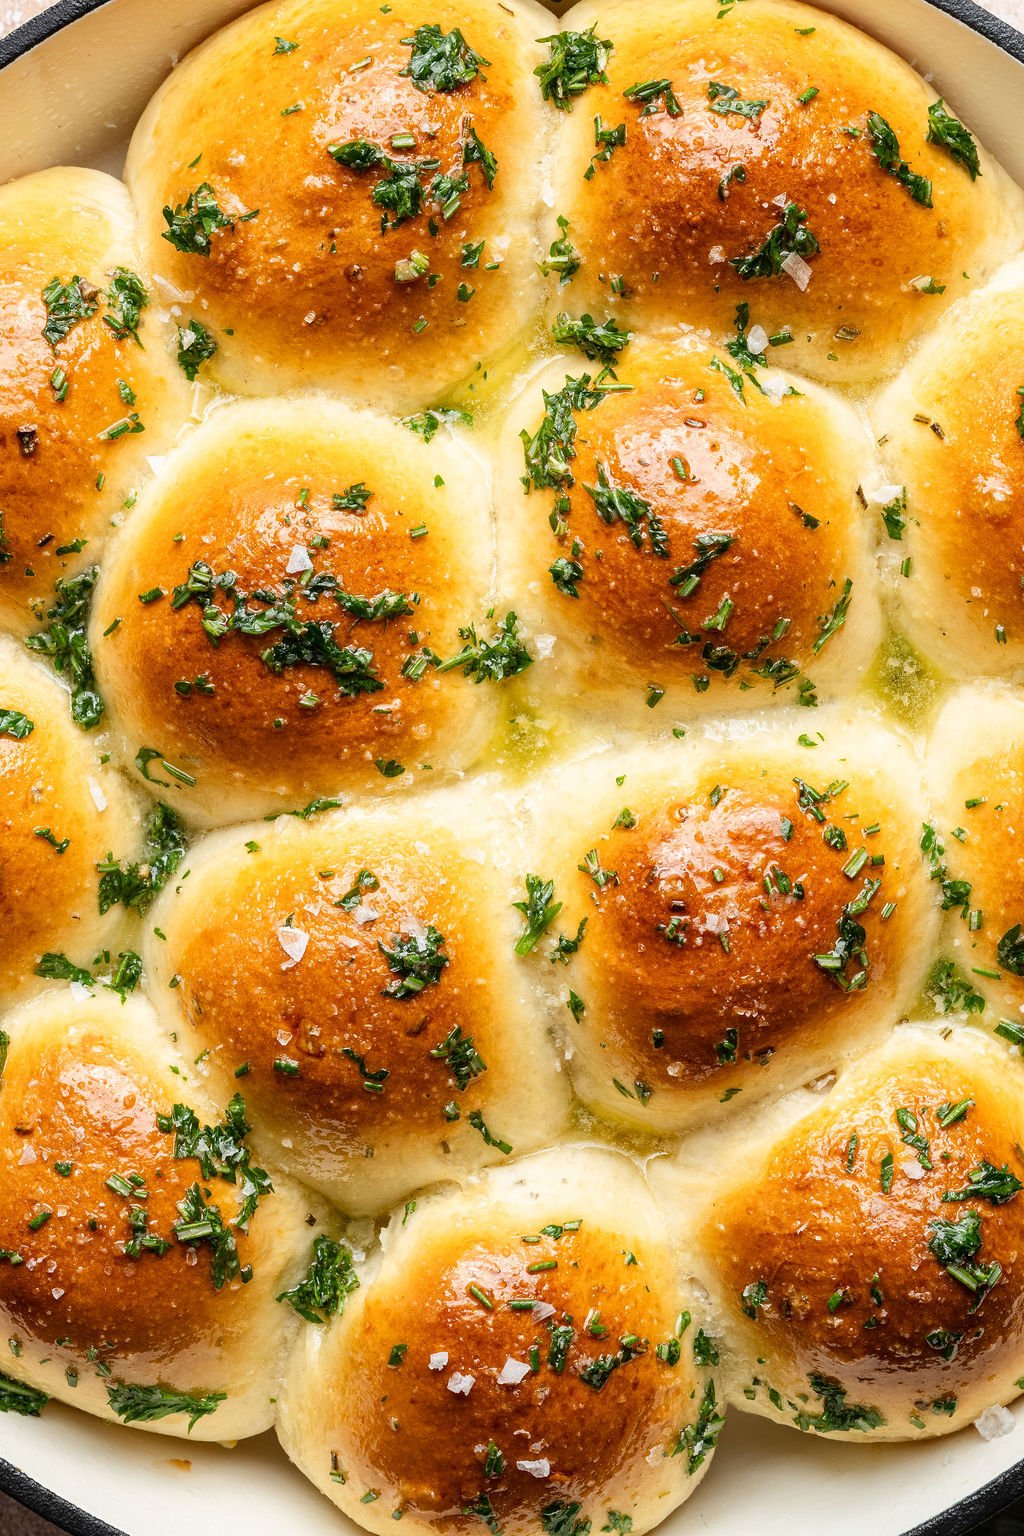
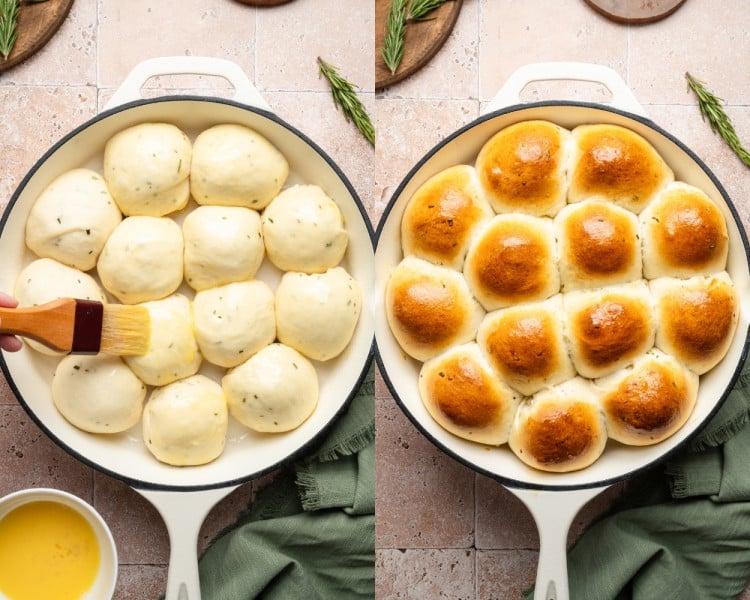
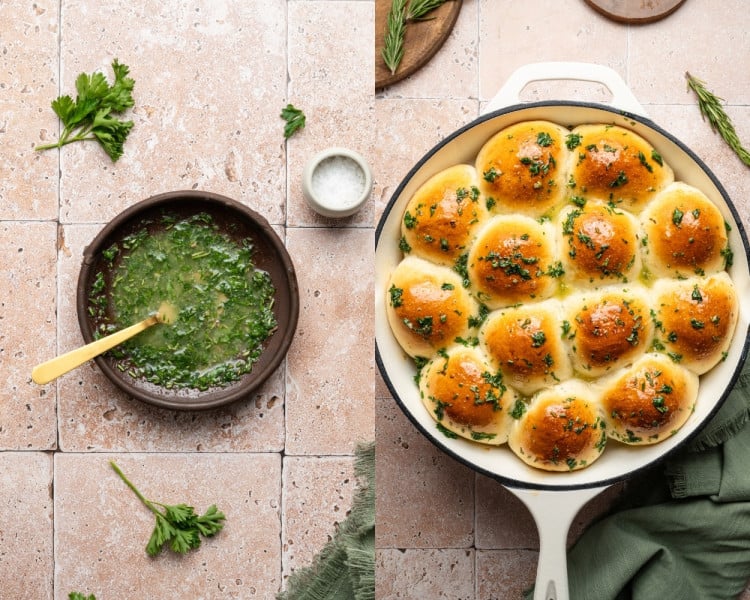
Bake. Brush with herb butter. Enjoy!
Brush the rolls with the egg wash and bake at 350°F for 20-25 minutes, or until golden brown and cooked through. Melt the butter and combine with the rosemary, parsley, and garlic powder. Immediately brush the hot rolls with the melted butter and herb mixture, then sprinkle with flaky sea salt. Serve warm and enjoy!
Expert Tips
- Make sure your yeast is alive: When you mix the yeast with the sugar and milk, if the mixture doesn’t foam, the yeast is dead and you’ll need new yeast before continuing.
- Don’t add too much flour: The dough should feel slightly tacky but not sticky. Adding too much flour will make the rolls dense instead of soft and fluffy. And you want those delicious soft and fluffy rolls!
- Help your dough rise: Yeast loves a warm, draft-free spot. If your kitchen is chilly, you can put the covered dough in the oven with just the light on, or near a warm stovetop to rise.
- Shape evenly: Use a kitchen scale to portion the dough so all the rolls are the same size and bake evenly.
- Cast iron: A cast iron skillet gives the rolls a beautifully golden crust while keeping the inside soft and tender. You don’t need to grease the cast iron if it is already seasoned.
- Egg wash for shine: Brushing with egg wash before baking gives your pull apart rolls that golden, glossy bakery-style finish.
- Butter while hot: Brush the melted herb butter on as soon as the rolls come out of the oven so it soaks into the bread.
Variations / Substitutions
- Herbs: You can try swapping the rosemary for thyme, sage, or Italian seasoning. Dried herbs also work in place of fresh (you will just want to use about ⅓ the amount).
- Garlic: Fresh minced garlic can be mixed into the butter topping for extra garlicky flavor, or roasted garlic can be mashed into the dough for a fun twist.
- Cheese Lovers: Sprinkle shredded parmesan, mozzarella, or cheddar over the rolls during the last 5 minutes of baking for a cheesy crust.
- Stuffed Rolls: Stuff each roll with a cube of mozzarella before baking for a gooey surprise and then finish the baked rolls with everything bagel seasoning.
How to Store Pull Apart Rolls
- Room Temperature: Store cooled rolls in an airtight container or ziploc bag at room temperature for up to 2–3 days. They’ll stay soft if you keep them tightly covered.
- Reheating: Warm in the microwave for about 10–15 seconds or wrap in foil and reheat in a 300°F oven for 8–10 minutes until soft and warm again.
Freezing
- Freezing Unbaked Rolls:
- Shape the dough into rolls, then place them on a parchment-lined baking sheet.
- Freeze until solid, then transfer to a freezer bag or airtight container.
- The unbaked rolls can be frozen for up to 2 months.
- When you’re ready to bake, arrange the frozen rolls in your pan, cover loosely, and let them thaw and rise at room temperature for a few hours until puffy.
- Then bake as directed and finish with melted herb butter.
- Freezing Baked Rolls:
- Let baked rolls cool completely, then store in a freezer-safe bag for up to 2 months.
- Thaw at room temperature and refresh in a 300°F oven for about 10 minutes.
- Brush with melted herb butter after warming for that fresh-from-the-oven taste.
FAQs
Can I use a pan other than a cast iron skillet to bake these rolls?
Yes! Make sure to grease these pans, and you can use a 9 inch square pan, 9 inch springform pan, or 9×13 baking pan!
Can I use Active Dry Yeast instead of Instant Yeast in this recipe?
Yes! Instead of mixing the sugar and yeast in step one then pouring warm milk over that mixture, you will warm the milk, stir in the sugar, then sprinkle the active dry yeast on top. Whisk gently, then let sit for 5-10 minutes, or until foamy and bubbly. From there, you can follow the rest of the instructions as written. Expect each rise to take 10-15 minutes longer too.
Can I make these pull apart rolls without a stand mixer?
Yes! You can knead the dough by hand. After mixing the ingredients, turn the dough out onto a lightly floured surface and knead for about 8–10 minutes until smooth and elastic. It takes a little extra effort, but the results are just as delicious.
Can I make the dough ahead of time?
Yes! After shaping the rolls, cover and refrigerate overnight (up to 12 hours). Let them sit at room temperature for about 45 minutes before baking (they should puff up like they do in the photo for the “second rise” step).
Can I use all-purpose flour instead of bread flour?
You can, but in my testing I found that bread flour really gets the best texture for these rolls. Using all-purpose flour, the rolls will be a little softer and less chewy. Bread flour gives the best fluffy texture.
Can I make these pull apart rolls dairy-free?
Yes! Substitute plant-based milk (like oat or almond) and vegan butter. The rolls will still bake up soft and fluffy.

Monthly Baking Challenge
This recipe was featured as the Kroll’s Korner Monthly Baking Challenge recipe in September 2025. For information on the current Monthly Baking Challenge recipe, click below!
shop this post
 Buy Now →
  Buy Now →
 More Bread Recipes You’ll Love
Before You Begin! If you make this, please leave a review and rating letting us know how you liked this recipe! This helps our business thrive & continue providing free recipes.
Rosemary Garlic Pull Apart Rolls
Ingredients
For the Dough:
- 3 – 3 ½ cups bread flour (spooned and leveled)
- 2 tsp. instant yeast (*see notes for using active dry yeast)
- 2 Tbsp. granulated sugar
- 1 cup whole milk
- 4 Tbsp. unsalted butter (melted)
- 1 large egg (room temperature)
- 1 tsp. salt
- 1 tsp. garlic powder
- 1 ½ Tbsp. fresh rosemary (finely chopped (or 2 tsp. dried rosemary))
For the Egg Wash:
- 1 large egg (lightly beaten with 1 tsp. water)
For Finishing:
- 2 Tbsp. unsalted butter (melted)
- 2 tsp. fresh rosemary (finely chopped)
- 2 tsp. fresh parsley (finely chopped)
- pinch garlic powder
- flaky sea salt (for garnish)
Last step! If you make this, please leave a review and rating letting us know how you liked this recipe! This helps our business thrive & continue providing free recipes.
Instructions
- Prepare the Yeast Mixture: In the bowl of a stand mixer fitted, combine the yeast and sugar.2 tsp. instant yeast, 2 Tbsp. granulated sugar

- Warm the Milk: In a microwave-safe bowl or measuring cup, heat the milk for about 1 minute, or until warm (115–120°F / 46–49°C). Use a thermometer to avoid overheating.1 cup whole milk
- Activate the Yeast: Pour the warm milk over the yeast and sugar. Whisk gently to combine, then cover loosely with a clean kitchen towel. Allow to sit for 5-10 minutes or until the mixture is frothy.
- Add Remaining Ingredients: Add the melted butter, egg, salt, garlic powder, and rosemary to the yeast mixture.4 Tbsp. unsalted butter, 1 large egg, 1 tsp. salt, 1 tsp. garlic powder, 1 ½ Tbsp. fresh rosemary
- Mix and Knead the Dough: Add 1 cup of bread flour and mix on low speed. Gradually add the remaining flour, then increase to medium-low speed and knead for ~6 minutes, until the dough is smooth. The dough should be slightly tacky but not overly sticky; if needed, add extra flour 1 tablespoon at a time.3 – 3 ½ cups bread flour
- First Rise: Transfer the dough to a lightly greased bowl (nonstick spray works well). Cover with plastic wrap or aluminum foil and let rise in a warm, draft-free space until doubled in size, about 60-90 minutes.
- Shape the Rolls: Punch down the dough to release air. Divide into 14 equal portions for large rolls or ~22 portions for smaller rolls. To shape, pinch the dough at the bottom and gently roll under your palm on a clean surface until smooth.
- Second Rise: Arrange rolls evenly in the cast iron (or pan of choice – see notes section below for other options). Cover the pan with plastic wrap or foil and let rise in a warm environment until puffy, 30-45 minutes.
- Bake the Rolls: Preheat the oven to 350°F (177°C). Brush the rolls with the egg wash and bake for 20-25 minutes, or until golden brown and cooked through.1 large egg
- Finish and Serve: Melt the butter and combine with the rosemary, parsley, and garlic powder. Immediately brush the hot rolls with the melted butter and herb mixture, then sprinkle with flaky sea salt. Serve warm.2 Tbsp. unsalted butter, 2 tsp. fresh rosemary, 2 tsp. fresh parsley, pinch garlic powder, flaky sea salt

Notes
- Active Dry Yeast: If using active dry yeast instead of instant, dissolve it in the warm milk with the sugar first and let it sit 5–10 minutes until foamy. Continue with the recipe as written, but allow an extra 10–15 minutes for each rise.
- Pan Options:
- 10 inch oven safe cast iron (no need to grease if already seasoned)
- 9 inch square pan (make sure to grease)
- 9 inch springform pan (make sure to grease)
- 9×13 baking pan (make sure to grease)
- Make-Ahead Tips:
- Rolls can be shaped and refrigerated (covered) for up to 12 hours before baking.
- Let sit at room temperature for 45 minutes before proceeding with egg wash and baking.
Nutrition Information
Nutritional information is provided as a courtesy and is automatically calculated. It should only be construed as an estimate rather than a guarantee. Ingredients can vary and Kroll’s Korner can’t make any guarantees to the accuracy of this information.
📸 Photography by Creating Kaitlin

These rolls are soft and delicious, as promised. I have made them twice in just one week, and will be adding them to my rotation.
I am so glad they turned out well Marilyn 🙂 thank you!
I’ve made these rolls twice now, most recently for Thanksgiving dinner. They are so good & so pretty! The rosemary & garlic combo is amazing and the butter and flaky salt finish them off nicely. My family couldn’t stop raving about them. The first time I made these rolls I found I needed a 12-inch skillet for 14 rolls rather than a 10 inch. Second time I made a double batch and used a 10 inch skillet (seen in the photo) and 9×9 inch baking pan for 24 rolls.
They look picture perfect Deanna! So happy they were a success with everyone. Thank you for making & leaving a review 🙂
Made these as a special addition to a birthday dinner and they did not disappoint. So easy and so delicious! The dough was extremely easy to shape into rolls. (I did weigh the balls to make sure they were the same size.) Can hardly wait to make again and try one of the suggested variations. Thank you for your recipes!
Aw I am sooo so glad!! Thank you for making them 🙂
This was an easy and delicious recipe. I think it will be great for the holidays or for soup season. I want to try it with a bunch of basil as well!
Yummm! Your rolls look so fluffy and delicious, Elyanna!! So glad you enjoyed this recipe! 🥰
These dinner rolls were easy to make and tasted great! They were soft and had a lot of flavor. I used dried herbs and the rolls were gone in less than 24 hours! Thanks for the recipe!!
Wahoooo!!! So happy to hear these were a hit for you, Katie!! Thanks so much for leaving a review 🥰
So easy to make. I ate 2 right out of the oven. I did quarter of the recipe!
Yummmm those look perfect, Susan!! So glad you enjoyed them! 🥰
I made these rolls for the September Baking Challenge. They were really tasty! I thought they might be tough because they didn’t rise very much, but still ended up soft and tasty. The only thing I would change next time would be to add parchment on the bottom of my baking dish. My greased 9×13 was a mess from the egg wash and it took a long time to scrub.
Oh no, I’m sorry to hear that!! I haven’t experienced that myself, but I usually use my cast iron skillet. Your rolls look delicious though!!! Glad you enjoyed them, minus the extra scrubbing anyway! 🥰
Quick and delicious!
i looks great Dawn! Thank you!!
Absolutely love the way you write out each step ~ so helpful especially when I’m trying something I’m not so confident in (breads with yeast). That being said, these were so delicious and now I’ll definitely have to perfect them because I’m not sure how we’ll have frozen garlic bread with pasta ever again, haha. Amazing!!
I’m so glad the instructions are helpful for you, Meagan!! I try hard to write my recipes as clearly as possible, so I’m always happy to hear when it works well for someone. Also, so happy you loved these rolls!! 🥰
These little rolls pack a flavor punch and are so good! They are easy to make and delicious!
So happy you enjoyed them! Thank you for making && leaving a review! 🙂