Sheet Pan Chocolate Chip Cookies
This post may contain affiliate links. Please read our disclosure policy.
Where have these Sheet Pan Chocolate Chip Cookies been all my life?! I can’t stop making them, and eating them, and thinking about them. 😂 I am obsessed with the ease of preparation, how chewy and soft they are, and how efficient the baking process is. Oh, and most of all I am obsessed with how dang good they are! You’ll also love my 4-in-1 Sheet Pan Cookies and my Sheet Pan Brownies!
They offer a convenient and delicious solution for making a large quantity of cookies with minimal effort and cleanup, making them a favorite for busy bakers and cookie lovers alike.
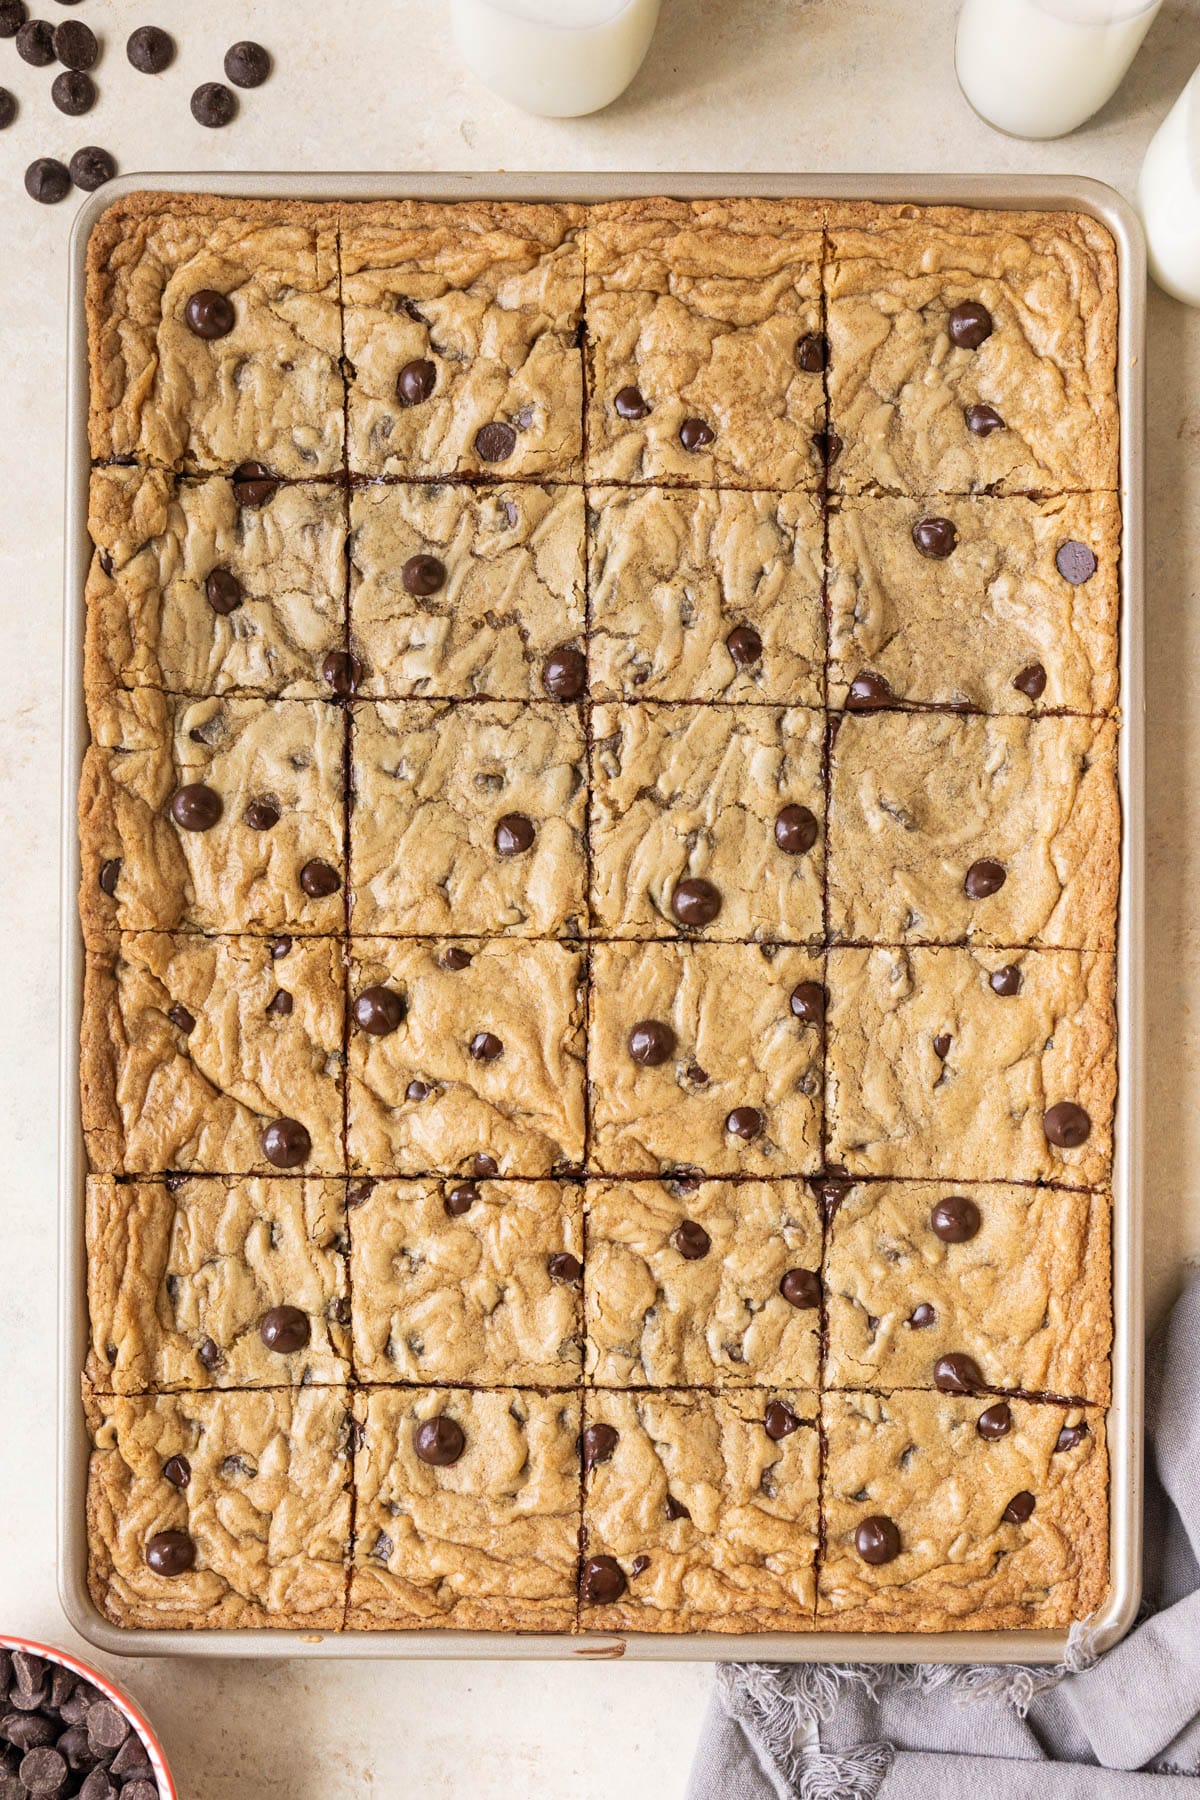
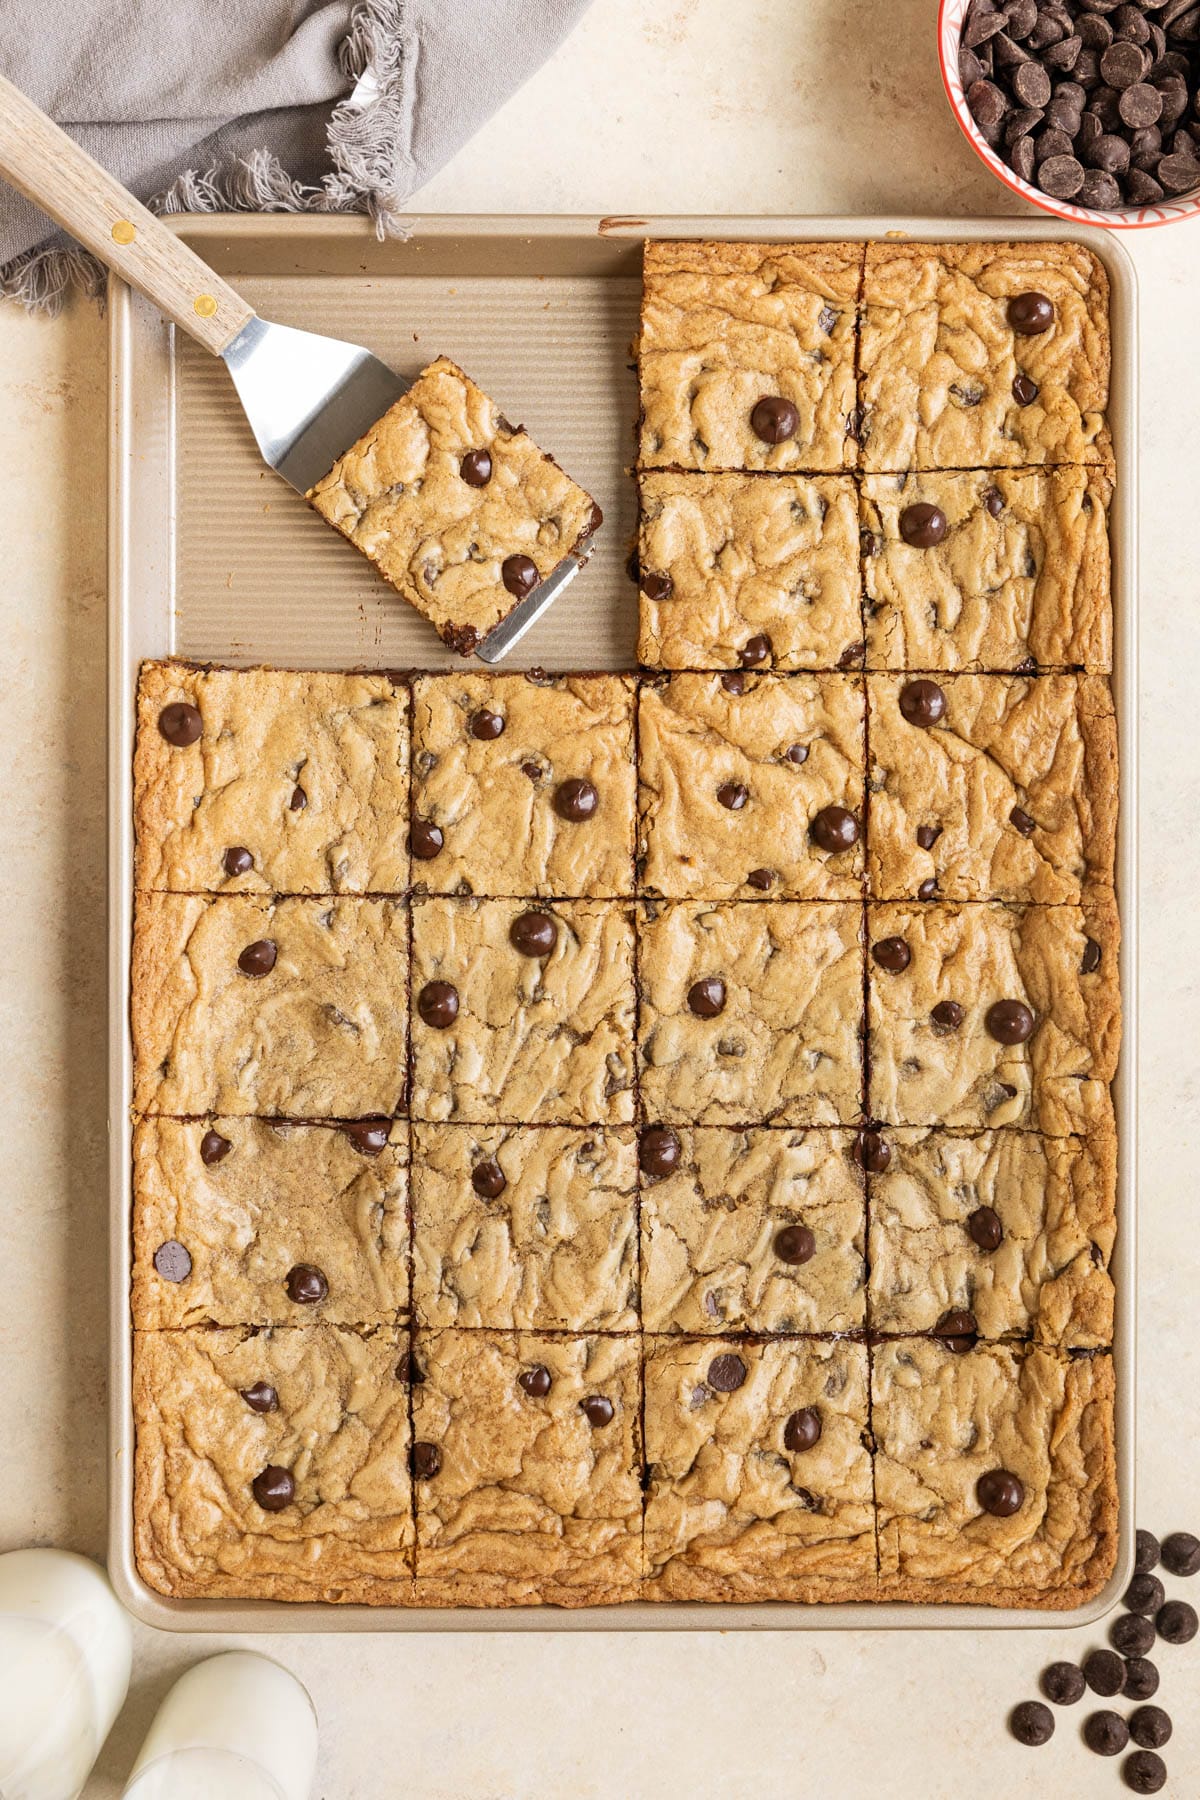
I love making classic chocolate chip cookies, but there is something so fun and special about making them on a sheet pan in one giant dreamy chocolate chip cookie slab! 😍
It’s the perfect recipe for feeding a crowd if you’re having a party of friends over; you can cut it up into portions and serve it right from the tray. Everyone can snag their own slice, whether they like the middle pieces or the edges!
Why this recipe works
- This recipe is so convenient! Instead of scooping and portioning out individual cookies and baking them in batches, you can spread the dough in one even layer on a sheet pan. This saves time and effort, making it easier to whip up a large batch of cookies in one go.
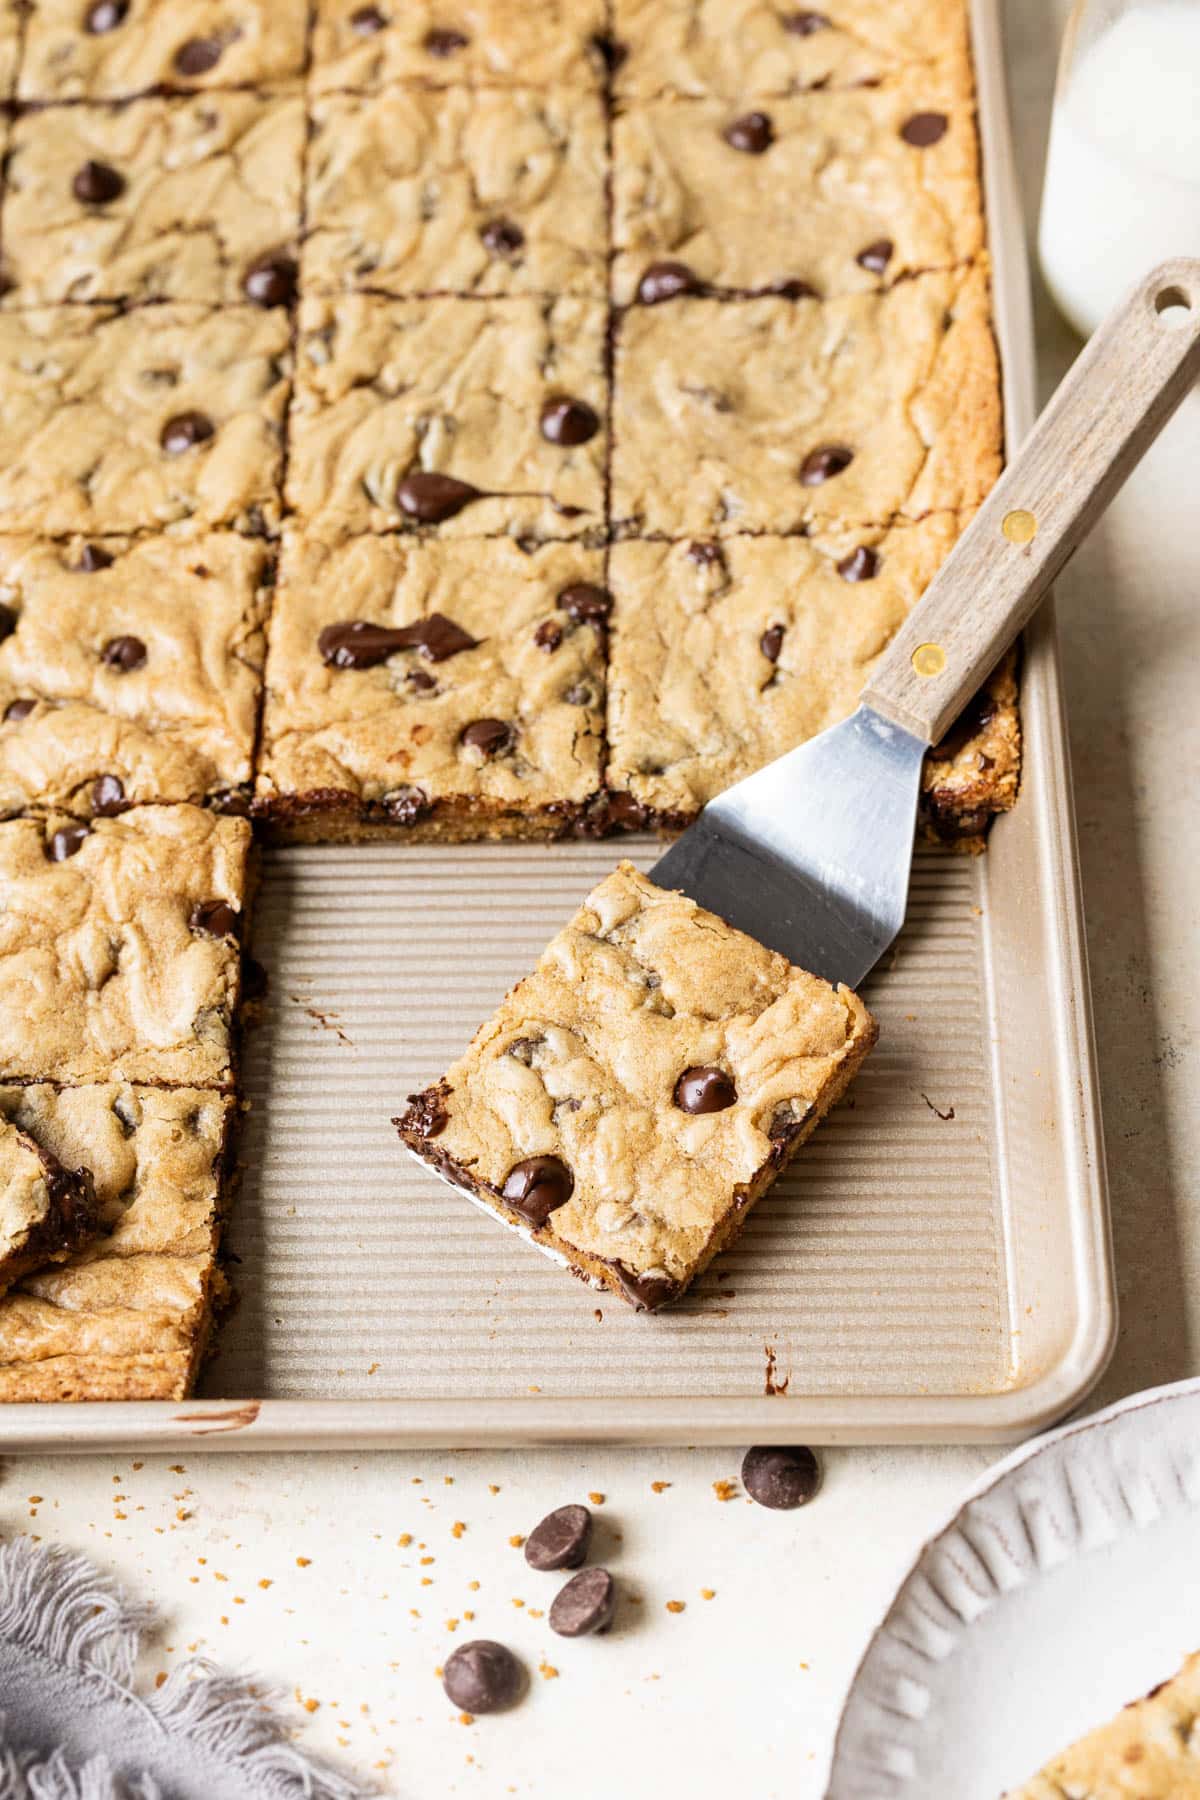
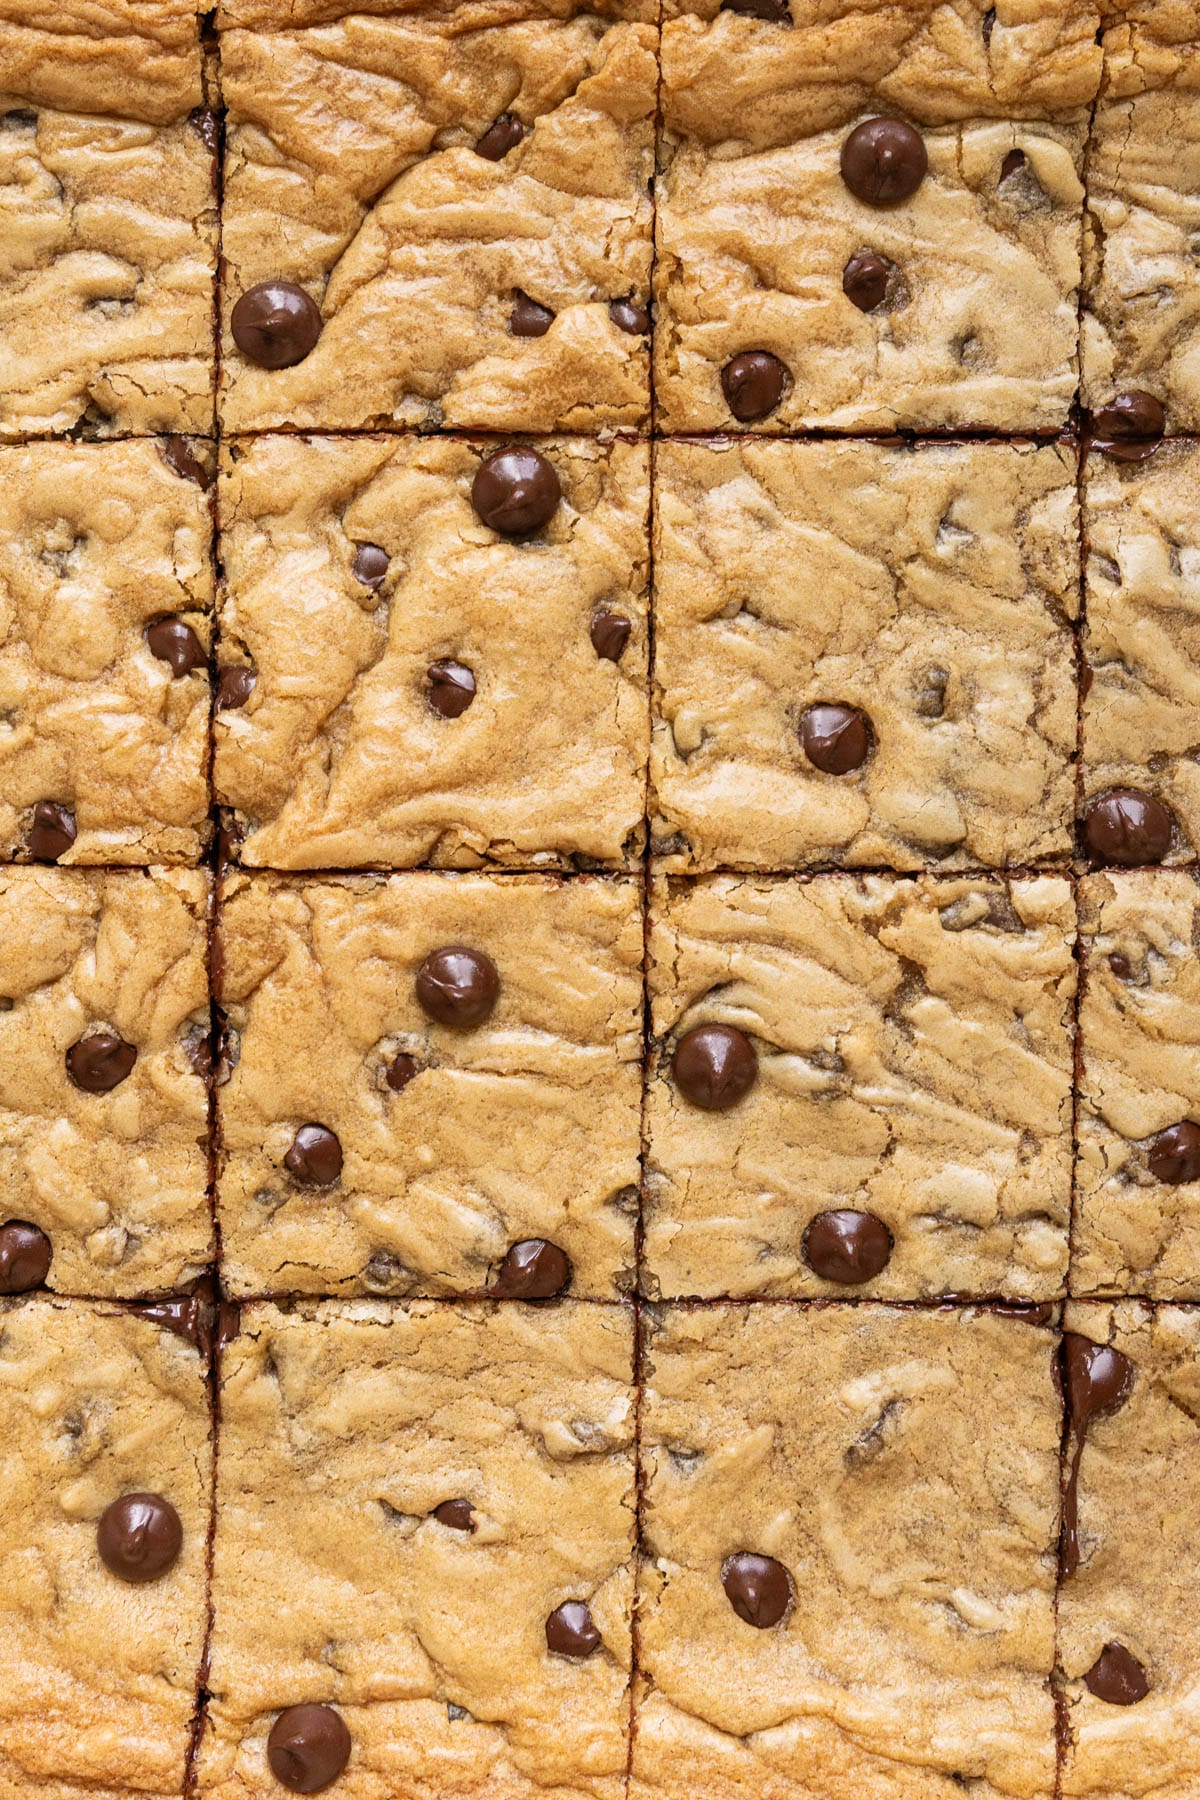
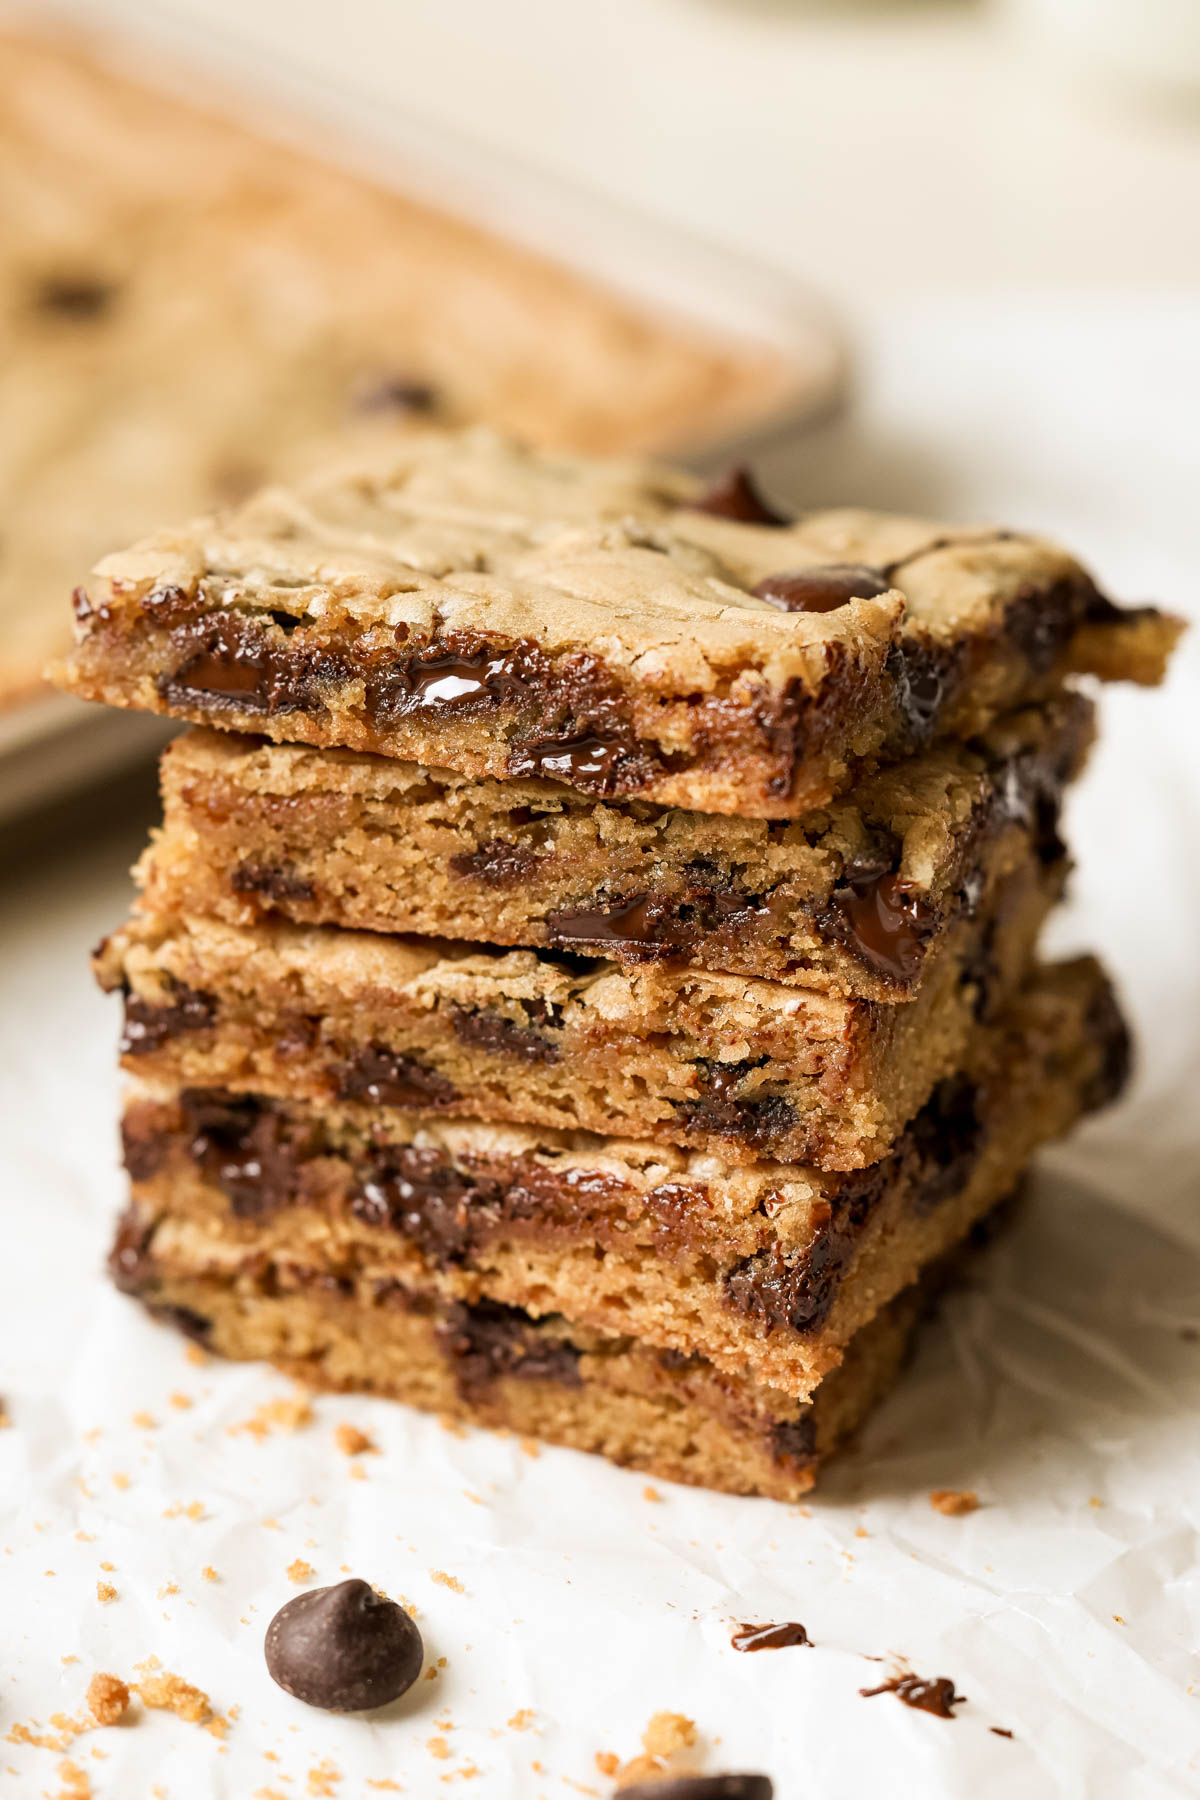
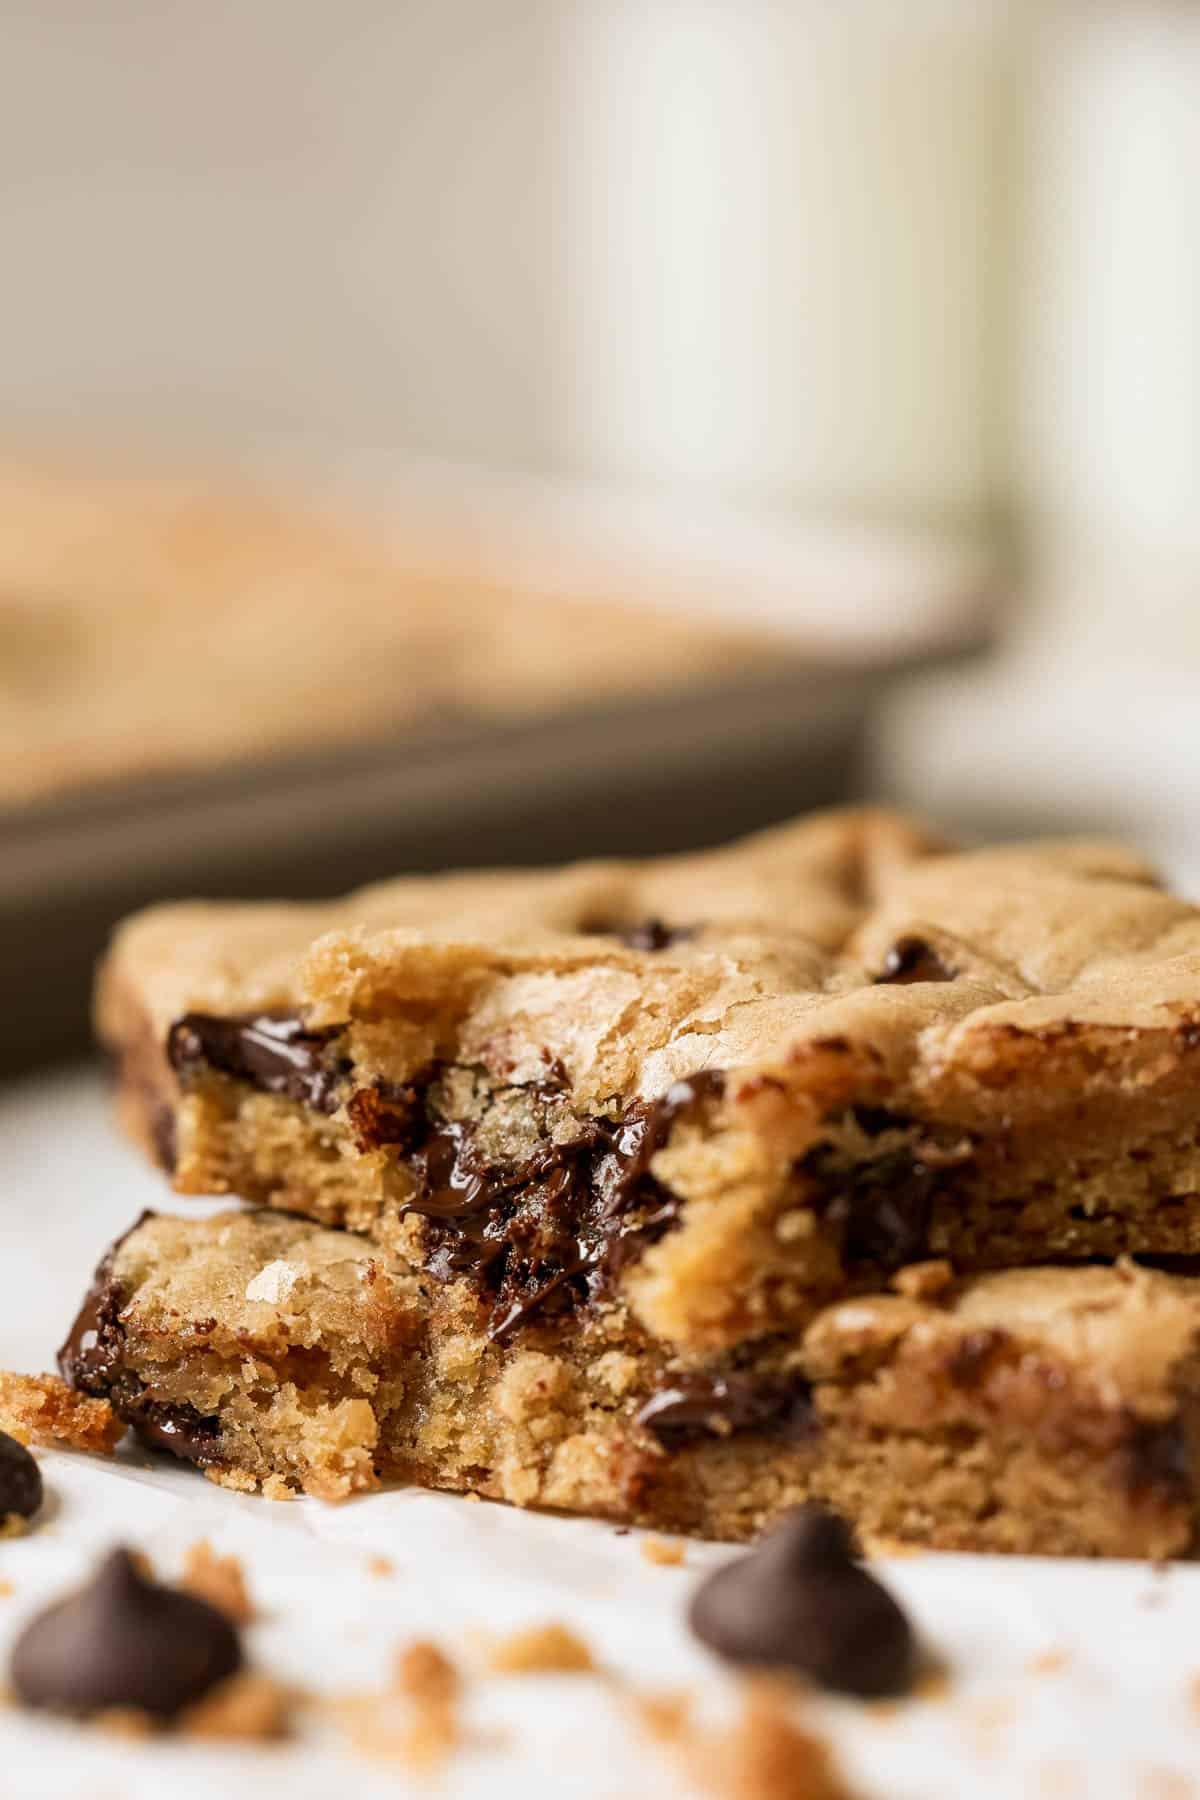
- My Sheet pan cookies have an ultra chewy texture, thanks to their uniform thickness and the way they bake on the sheet pan. The edges become slightly crisp while the center remains soft and chewy, creating a perfect balance of textures in every bite.
- They are easy to serve and share with friends, family, or guests. Whether you prefer squares, rectangles, or irregular pieces, sheet pan cookies are simple to portion out and enjoy.
- No mixer required and you only need one bowl and one sheet pan. Using a single sheet pan means there are fewer dishes to clean up afterward, making sheet pan cookies a hassle-free baking option. This makes them ideal for busy home bakers or occasions where you want to minimize cleanup time.
What size sheet pan do I need?
- This recipe uses a standard half sheet pan, 18×13.
- I have not tested this recipe using another other sized pans.
Check Out My Favorite OXO Sheet Pan!
High quality sheet pan, easy to clean, consistent pan for baking, and does not warp! Can’t recommend it enough.
Ingredient Notes
For the ingredient measurements and entire recipe, be sure to scroll down to the bottom of the blog post where the recipe card is located.
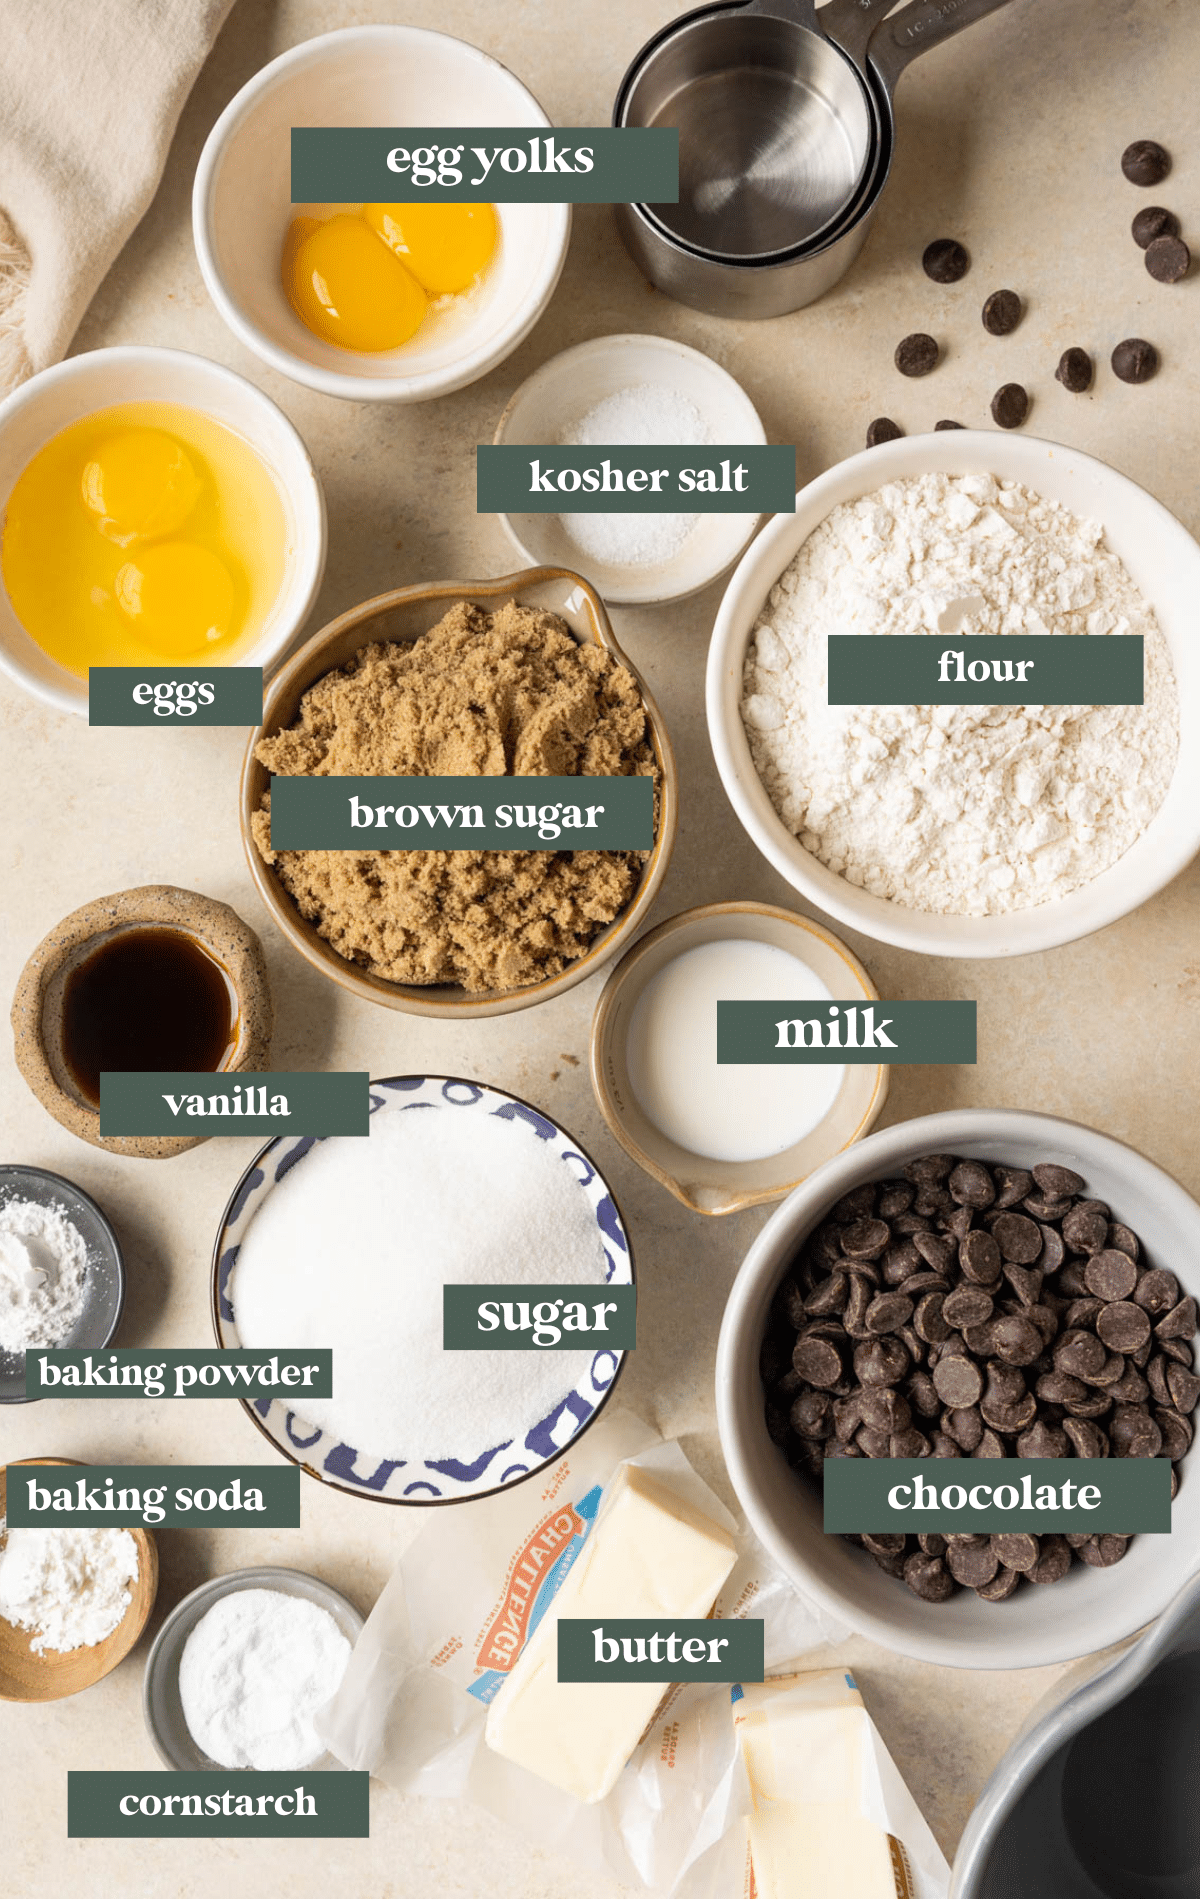
- Butter: Using unsalted butter allows you to control the amount of salt in the recipe. For this recipe, you’ll need melted butter. Yay for not waiting around for butter to soften!
- Sugars: A combination of granulated sugar and brown sugar adds sweetness and moisture to the cookies. Brown sugar also contributes to the chewy texture, which is why I chose to use more brown sugar than white in this recipe.
- Flour: I used all purpose flour for this particular recipe. I have not experimented yet with other types of flours. Be mindful not to over mix the dough once the flour is added to avoid developing too much gluten, which can result in a tougher cookie.
- Cornstarch: I found adding a bit of cornstarch into this recipe helps create an even more soft and chewy sheet pan chocolate chip cookie!
- Eggs: Eggs act as a binder and provide structure to the cookie dough. I like to add the additional egg yolks for added richness and moisture.
- Milk: just a touch of milk in the cookie dough batter helps keep these cookies moist and hydrates the starches in the flour.
- Vanilla: Vanilla extract will enhance the flavor of the cookies. Use pure vanilla extract for the best flavor, and adjust the amount according to your taste preference. I love adding an entire 1 1/2 Tbsp. in this recipe!
- Baking Soda and Baking Powder: for optional leavening, make sure your soda and powder are not expired.
- Chocolate chips: you can use semi sweet, milk chocolate (my husbands favorite), dark chocolate, or even chunks of chocolate bars!
Step by Step Directions
For the full recipe instructions, scroll down to the bottom of the blog post to the recipe card.
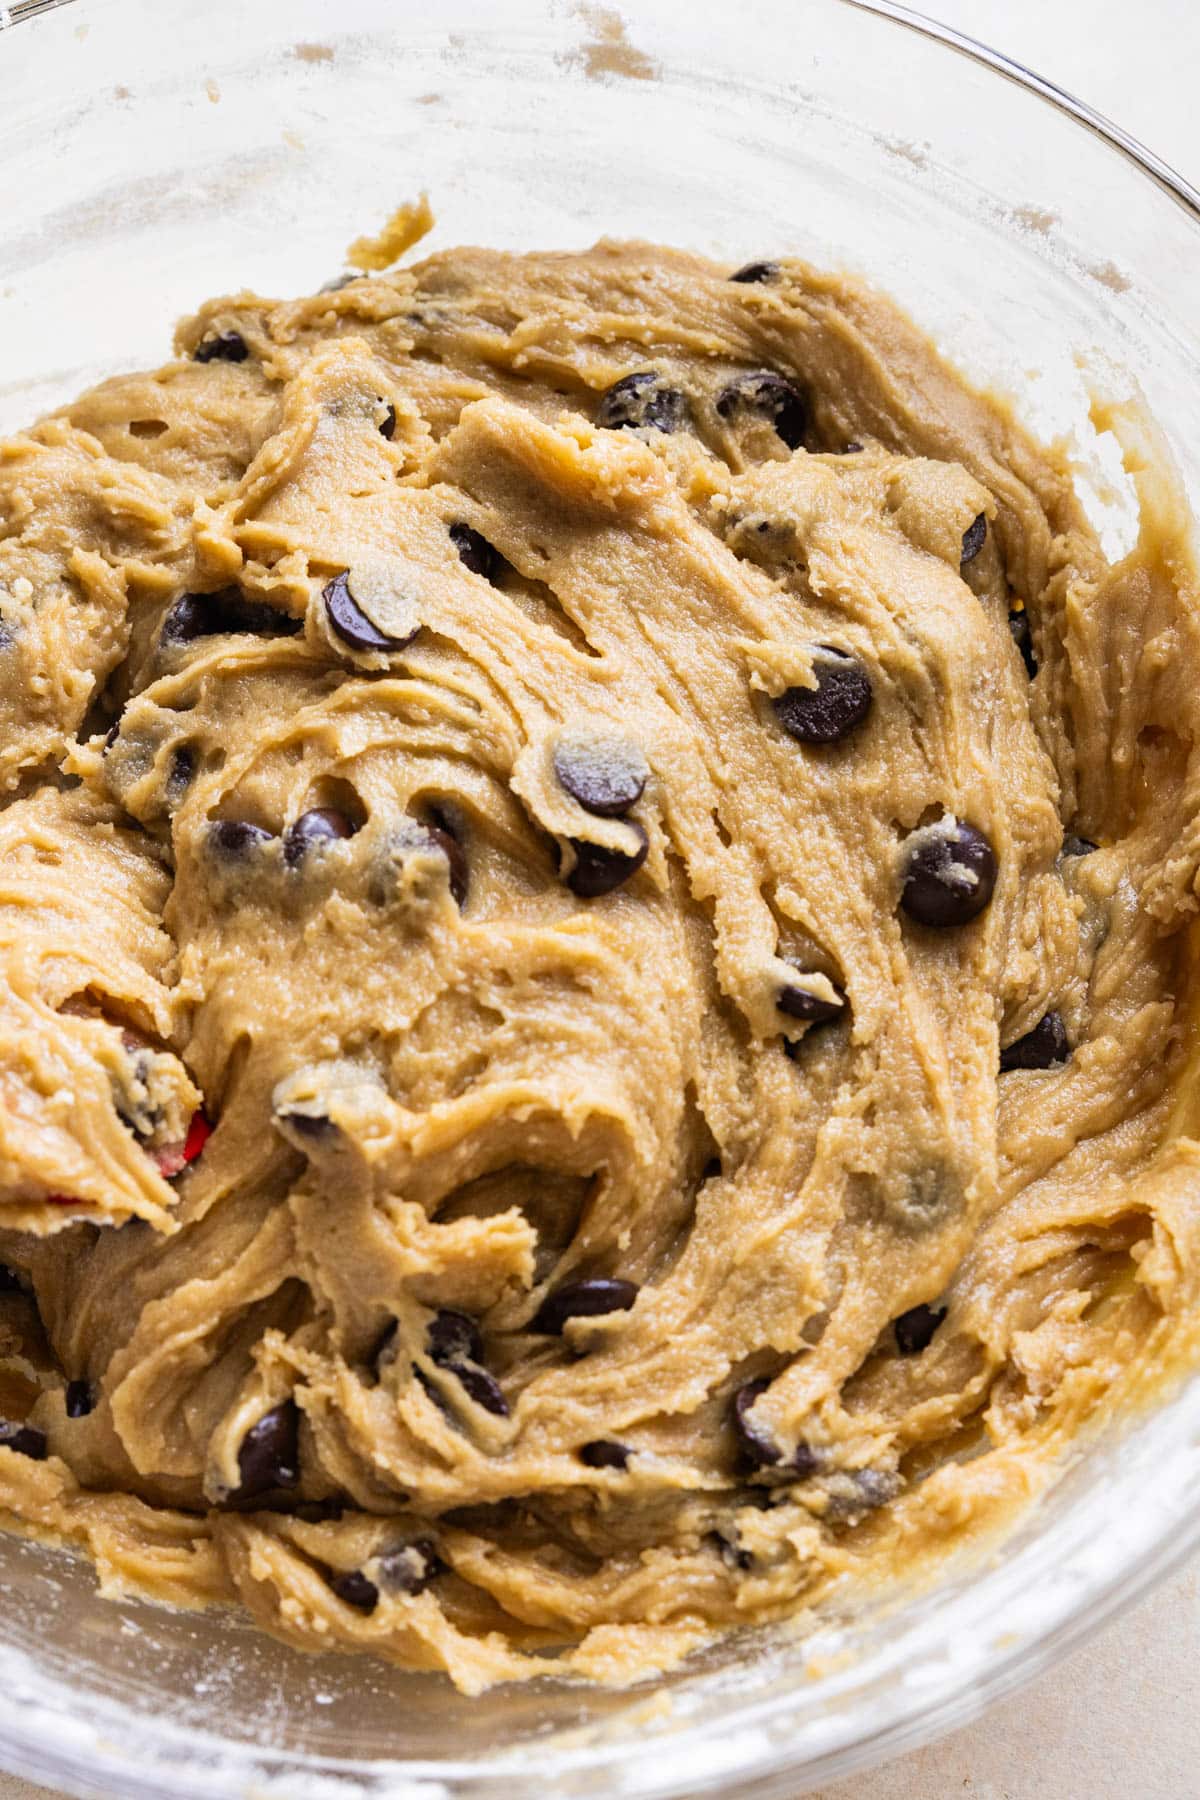
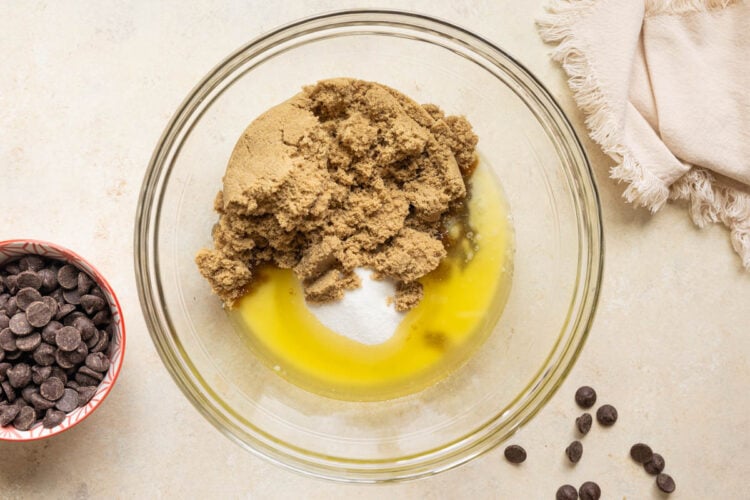
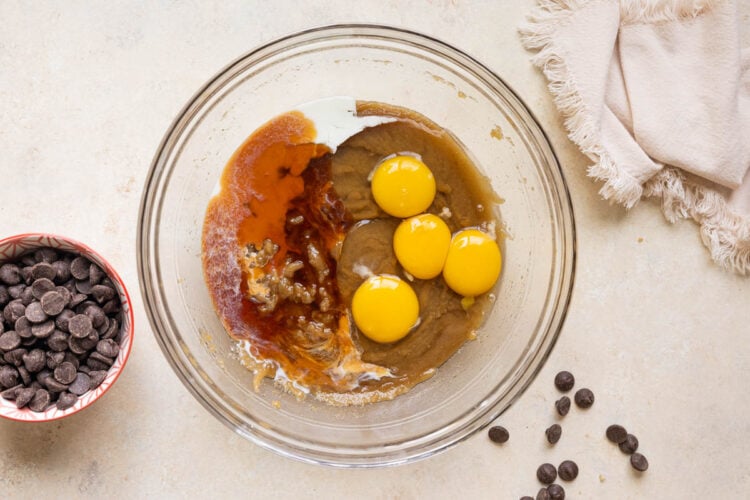
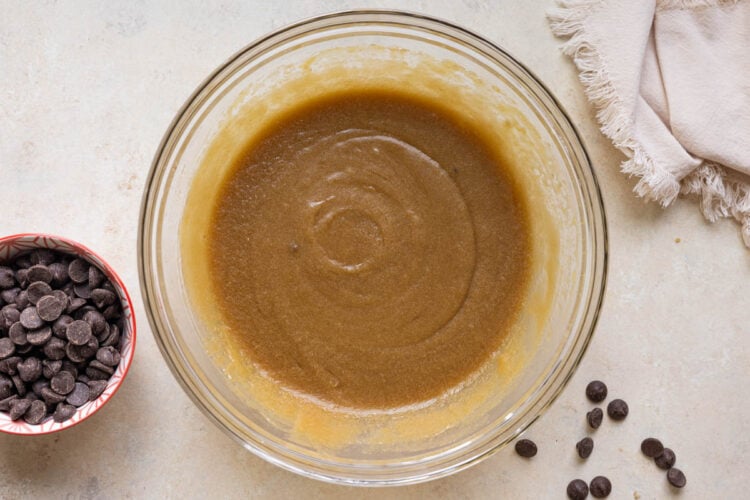
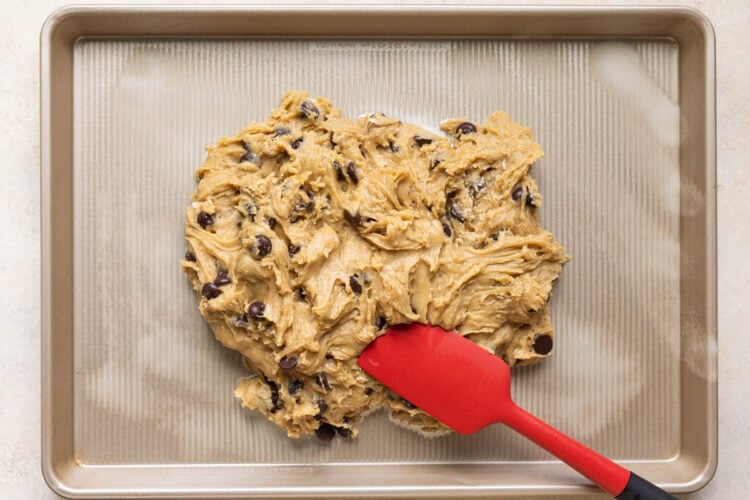
- Whisk melted butter and sugars together.
- Add the eggs, milk and vanilla.
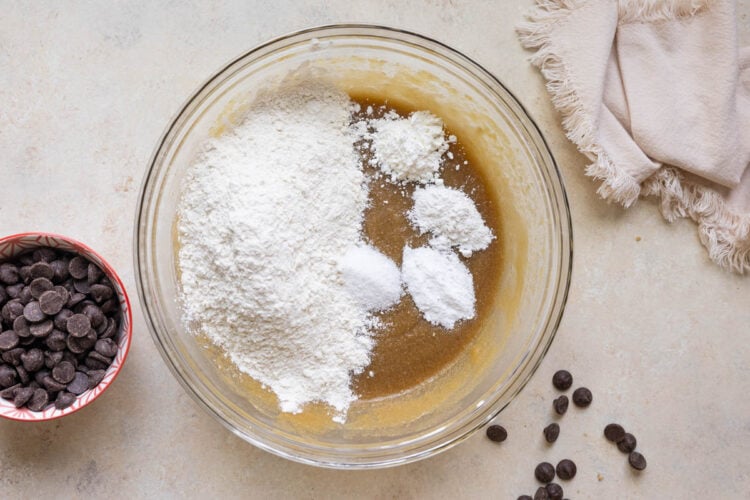
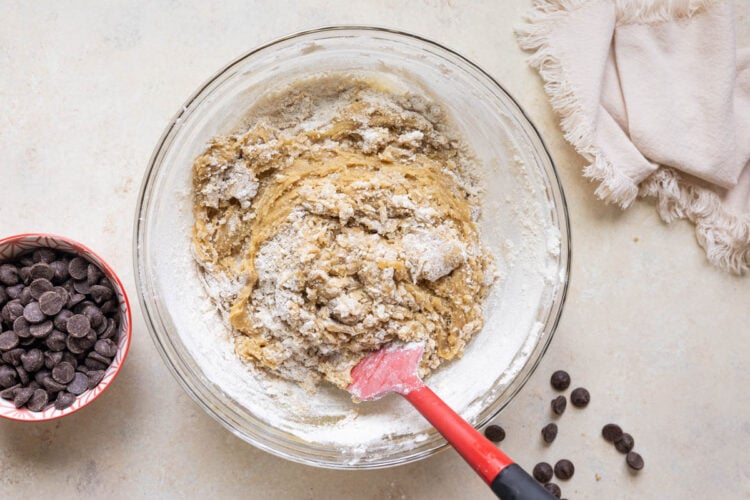
- Fold in dry ingredients, then chocolate chips.
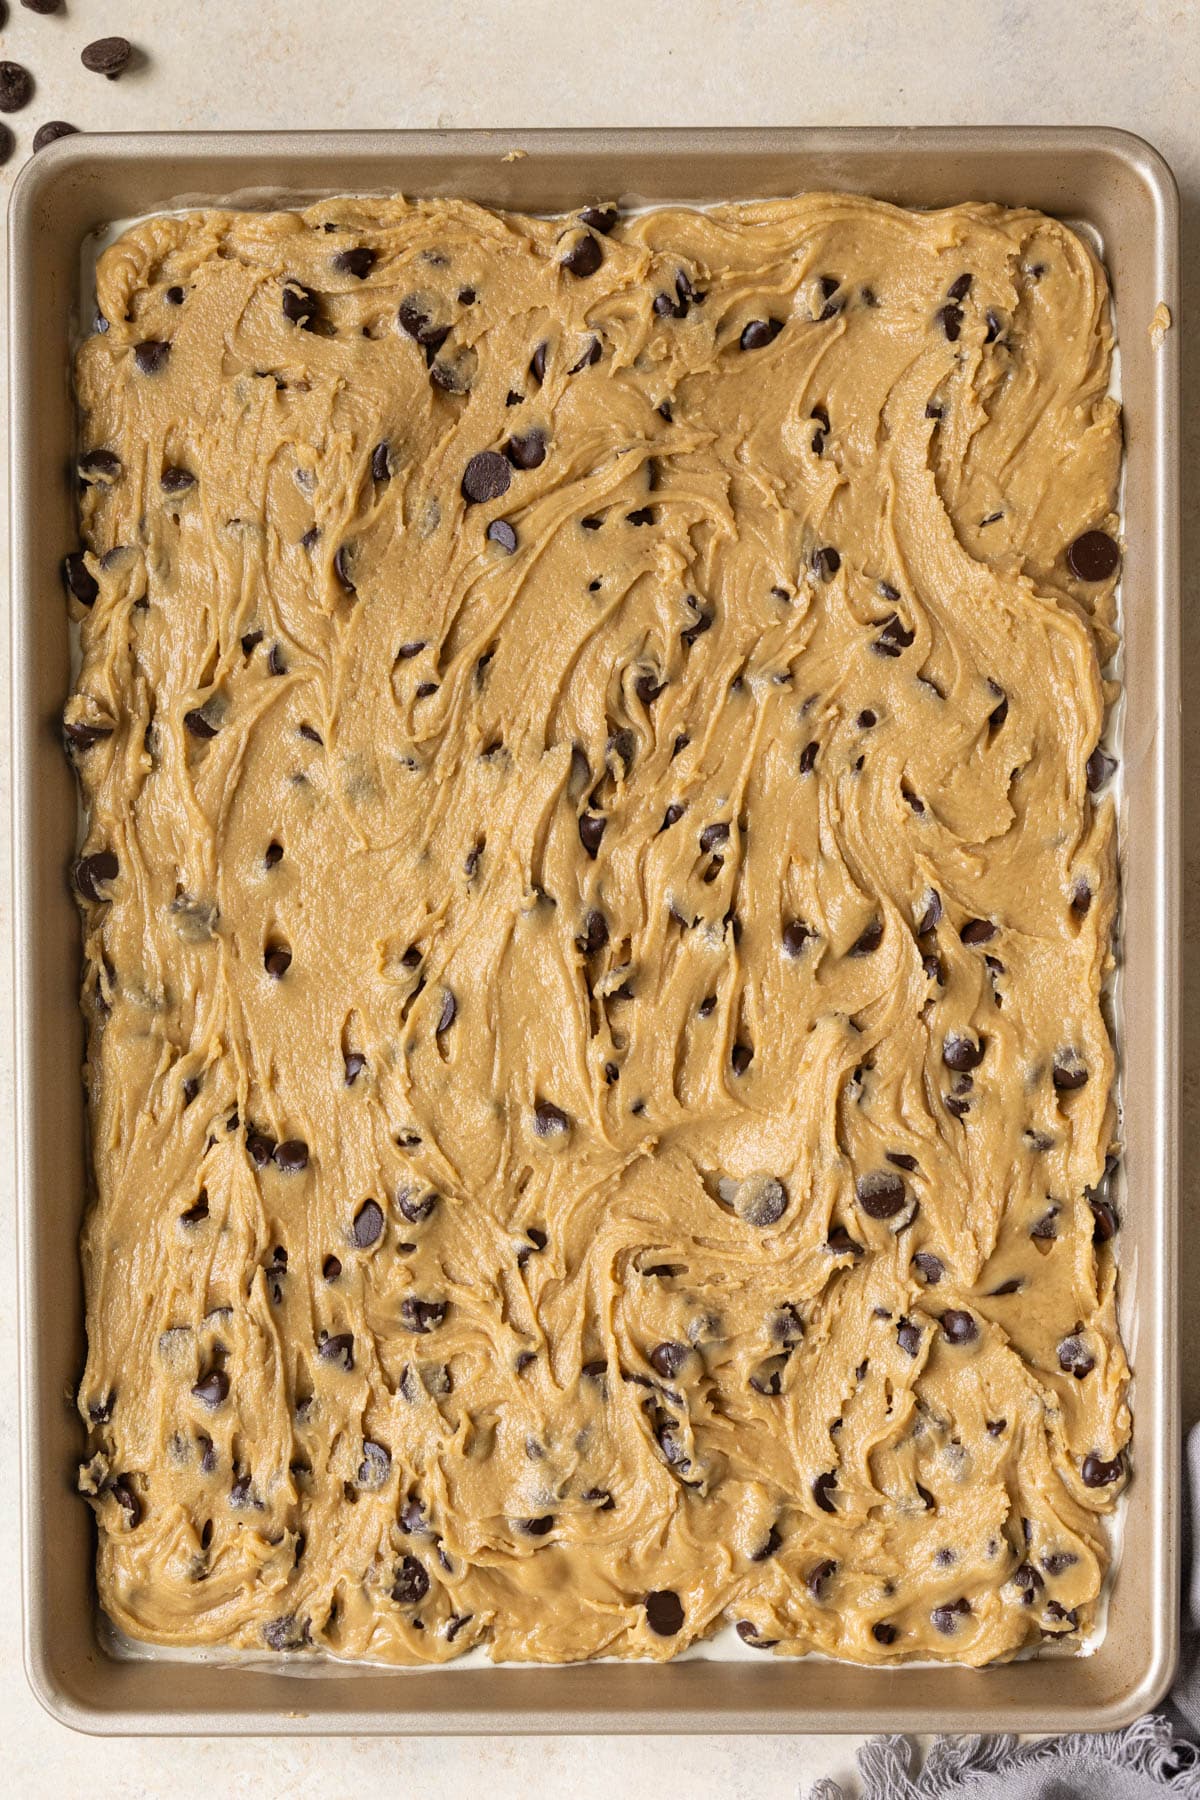
- Spread evenly on baking sheet & bake!
Expert Tips
- Even if you have a nonstick sheet pan, I still recommend spraying with some nonstick spray. This makes it easy to clean up and really ensures the cookies won’t stick!
- Underbake them a bit! Since these cookies cool directly on the sheet pan and we aren’t moving any cookies over to a cooling rack like a normal batch of cookies, I recommend to under bake them just a tad so as they cool, they won’t become dry.
- Keep a close eye on them while they’re in the oven. Baking times can vary depending on your oven, start checking for doneness a couple minutes before the recommended time.
Variations
There are so many variations you can make of this recipe, have fun with different flavors and your favorite cookie mix-ins! Here are a few ideas:
- Fruit and Nut Cookie Bars: Add dried fruits like cranberries, raisins, chopped apricots, or cherries, along with nuts such as walnuts, almonds, or pecans, to the cookie dough for a delicious fruity and nutty twist.
- Oatmeal Cookie Bars: Add some oatmeal to the cookie dough! You can add raisins, chopped nuts, or even chocolate chips for added flavor and texture.
- Peanut Butter Chocolate Swirl Bars: Create a marbled effect by swirling peanut butter and chocolate cookie dough together in the sheet pan. Use a knife to create swirls before baking.
- White Chocolate Macadamia Nut Bars: Swap out the semisweet chocolate chips for white chocolate chips and add chopped macadamia nuts to your cookie dough for a luxurious and nutty twist.
- Trail Mix Bars: Mix together a variety of nuts, seeds, dried fruits, and chocolate chips to create a trail mix-inspired cookie bar that’s perfect for snacking on the go.
Storage
- Store at room temperature in an air tight container for up to 5 days, if they last that long!
- Freeze in a freezer safe bag or air tight container for up for 3 months.
More Desserts
shop this post

OXO Non-Stick Half Sheet 13 x 18 Inch
Buy Now → Buy Now →
 Before You Begin! If you make this, please leave a review and rating letting us know how you liked this recipe! This helps our business thrive & continue providing free recipes.
Ingredients
- 1 cup unsalted butter, melted and slightly cooled
- 1 1/2 cups dark brown sugar, packed
- 1 cup white sugar
- 2 large eggs, room temperature
- 2 large egg yolks, room temperature
- 2 Tbsp. whole milk
- 1 1/2 Tbsp. pure vanilla extract
- 3 1/2 cups all purpose flour, spooned and leveled
- 2 tsp. cornstarch
- 1 tsp. baking soda
- 1 tsp. baking powder
- 1 1/2 tsp. kosher salt
- 2 cups chocolate chips, plus more to sprinkle on top (semi sweet, milk chocolate, dark, etc. )
Last step! If you make this, please leave a review and rating letting us know how you liked this recipe! This helps our business thrive & continue providing free recipes.
Instructions
- Preheat the oven to 325°F. Spray a standard half sheet pan with nonstick spray (13×18) and set aside.
- Add the melted butter and sugars together in a large mixing bowl and whisk together until smooth. Be sure to break up any clumps of brown sugar.1 cup unsalted butter, melted and slightly cooled, 1 1/2 cups dark brown sugar, packed, 1 cup white sugar

- Add the eggs, milk and vanilla.2 large eggs, room temperature, 2 large egg yolks, room temperature, 2 Tbsp. whole milk, 1 1/2 Tbsp. pure vanilla extract
- Whisk until smooth.
- Add the dry ingredients.3 1/2 cups all purpose flour, spooned and leveled, 2 tsp. cornstarch, 1 tsp. baking soda, 1 tsp. baking powder, 1 1/2 tsp. kosher salt
- Fold until mostly combined.
- Add the chocolate chips in and fold just until combined.2 cups chocolate chips, plus more to sprinkle on top
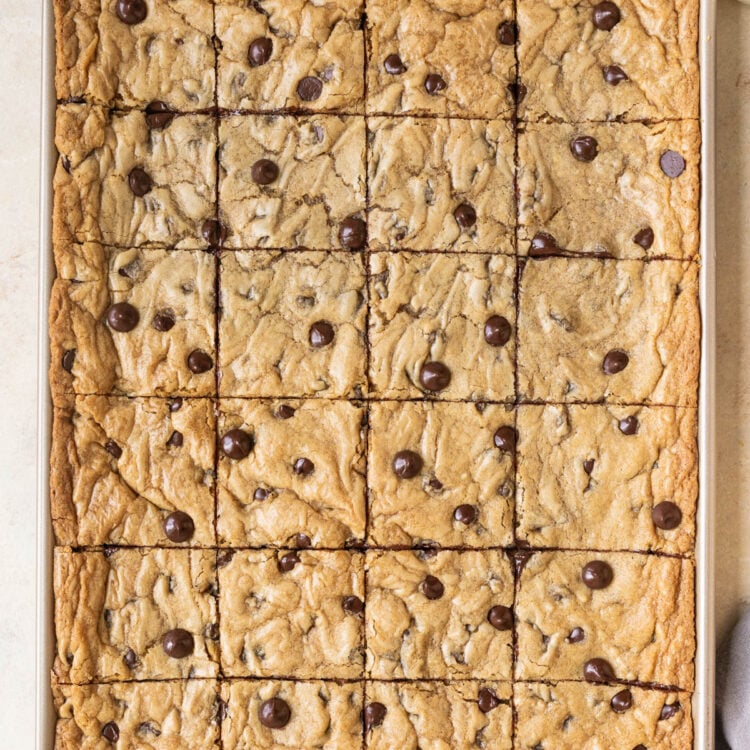
- Turn the batter out onto the prepared baking sheet.
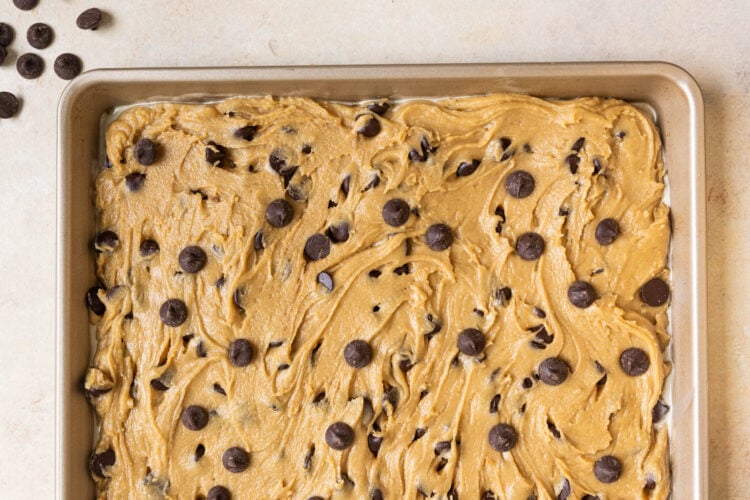
- Spread evenly until smooth. Trust the process, it will all spread out and fit on the pan 🤗 Top with more chocolate chips if desired, or you can sprinkle a few on top AFTER it bakes so they get melty on the tops post baking.
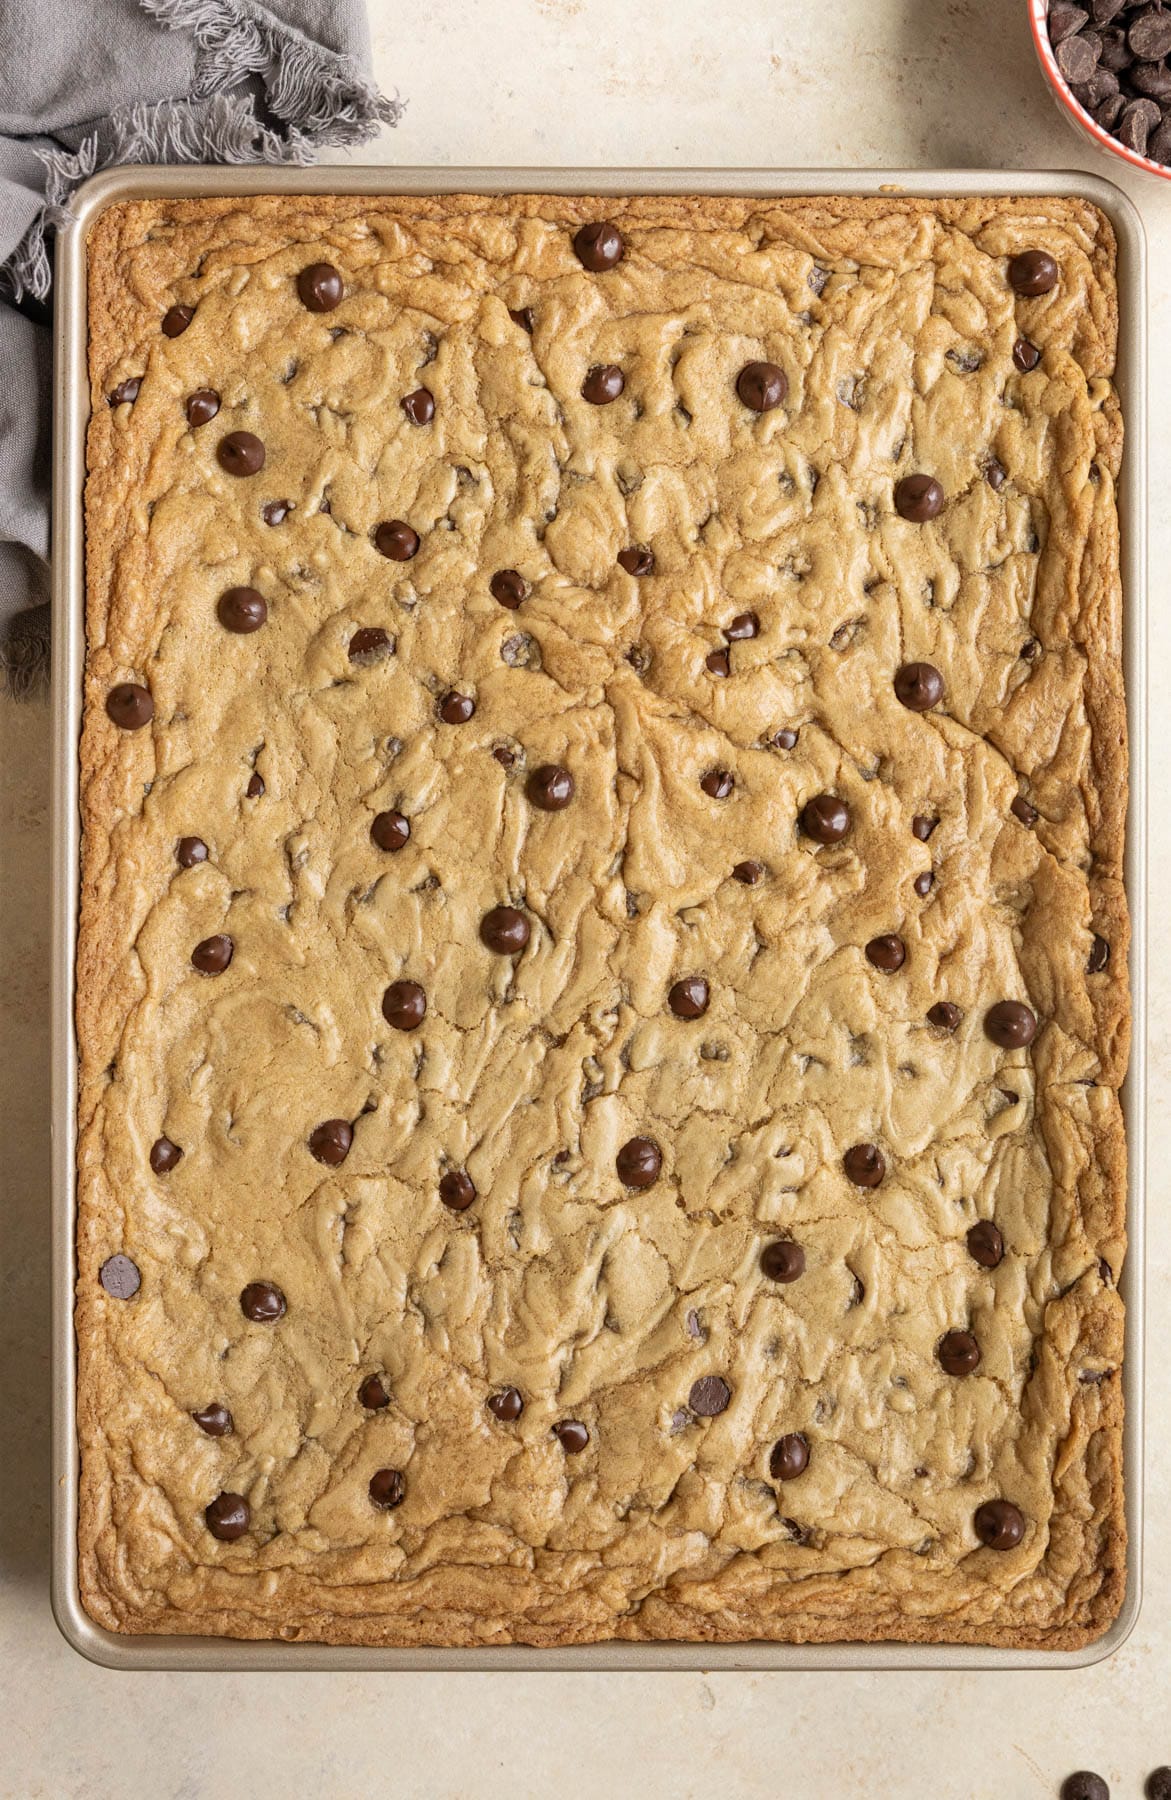
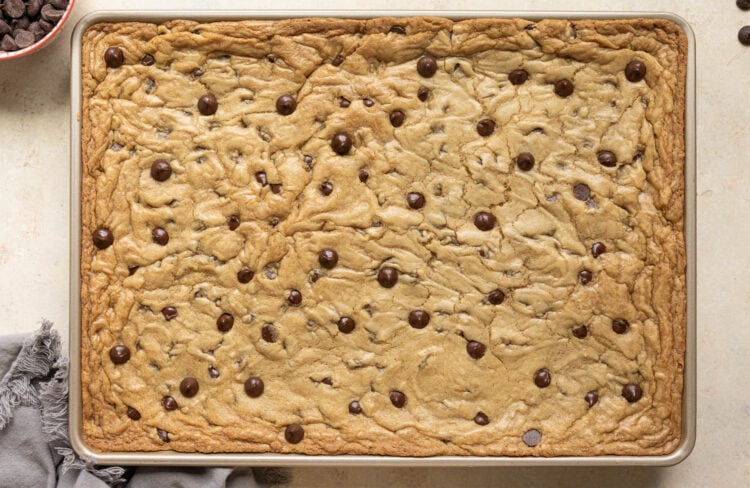
- Bake for ~22 minutes. Slightly underbake because there will be carry over cooking as it cools on sheet pan. It will look puffy at first, but settles as it cools. You can gently tap it on the counter if it’s really fluffy so it settles, if needed.

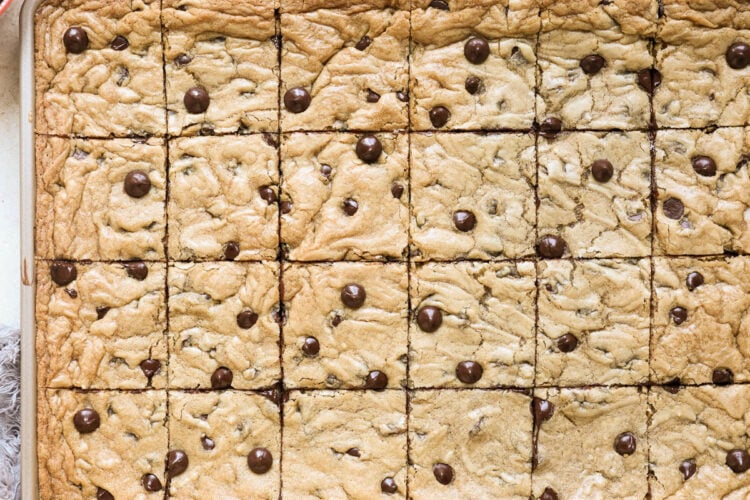
- Cool completely. Cut into portions (you can use a plastic knife so you don't scratch the sheet pan) and enjoy!

Notes
-
- Store at room temperature in an air tight container for up to 5 days, if they last that long!
-
- Freeze in a freezer safe bag or air tight container for up for 3 months.
Nutrition Information
Nutritional information is provided as a courtesy and is automatically calculated. It should only be construed as an estimate rather than a guarantee. Ingredients can vary and Kroll’s Korner can’t make any guarantees to the accuracy of this information.

I just made these. Haven’t cut them up yet. I live at a higher altitude so I kept them in the oven for a little bit over 22 minutes just in case and I think they came out looking good. They definitely smell good and look good.
They look delish, Cate! So happy you knew how to adjust the cook time for the higher altitude!
Can I make this using M&Ms?
totally yes! 🙂
Hello.
If I use half the recipe do I still cook for 22 minutes?
Thank you.
I can’t wait to bake this tonight 🥰
I would keep an eye on it, maybe start checking around 18 minutes 🙂 lmk how it goes!
This one is a keeper! Almost every time I have made these, someone asks for the recipe, so I send them to the link, as I have made these at least 15 times. I always make at least two batches at at time since we are feeding between 25-70 people. I live out of the USA, and the brown sugar here is too dry. So, I make my own brown sugar by mixing molasses to white sugar. I think it takes these up another notch! I’ll be using this recipe “with the grandkids”!
Amazing – I am so glad to hear that! Thank you!
i did the recipe i put it in a glass pan and baked for 22 minutes just like the recipe says, i sticked a knife thru it and it looked raw i left it in for couple more minutes i took it out to cool down and lets see what happens!
Hi Julie! Oh no! What size glass pan? I have only tested this recipe in a 18×13 sheet pan. I hope it turned out ok for you!
I just made these and they turned out really good. I did top with miniature peanut butter cups for added goodness. I rate thus as a keeper
yummm! thank you! 🙂
Love this recipe! Thanks for sharing. I’ve made it several times, and it’s always a hit. When I’m feeling extra fancy I’ll decorate the top with some buttercream frosting around the edges. For one party I also had an extra piping bag with a sign that said “decorate your own”. This is my go-to dessert for a crowd.
I love that!! 🙂 thank you!
STOP LOOKING FOR A SHEET PAN CHOCOLATE CHIP COOKIE RECIPE!!
u’ve found THE ONE.
i’ve made this twice now and it cannot.go.wrong. if u follow the instructions. even if u waiver a bit it’s very forgiving.
honestly, the only thing u can do that could possibly make this NOT turn out perfect is OVERBAKING IT. don’t do that.
for my latest batch, i added chopped hershey bars and reese’s pb cups along with the chocolate chips. it was divine!!
this recipe is SO simple, SO easy, and SO delicious. do urself a favor and NEVER BUY A STORE-BOUGHT COOKIE or COOKIE CAKE AGAIN!
What a kind review! thank you soo much! 🙂
Delicious recipe! I did 1.5 times the original recipe because my sheet pans are 2/3 size sheet pans (16×22 inches). It did overflow a bit, but it works great in a larger size pan as well. I will use this recipe again when I need a large dessert tray of cookies, but will use something to catch any drips!
Shoot! Sorry about the sizing issue. But glad you enjoyed it 🙂
There’s just two of us and I’d like to only make half. I can divide the ingredients easily but any idea on what pan size and cook time suggestions?
Good question! You can try a 9×13 pan 🙂 this is also a good recipe for a 9×13: https://krollskorner.com/recipes/desserts/bars-brownies/chocolate-chip-blondies/