Maple Scones with Pecans
This post may contain affiliate links. Please read our disclosure policy.

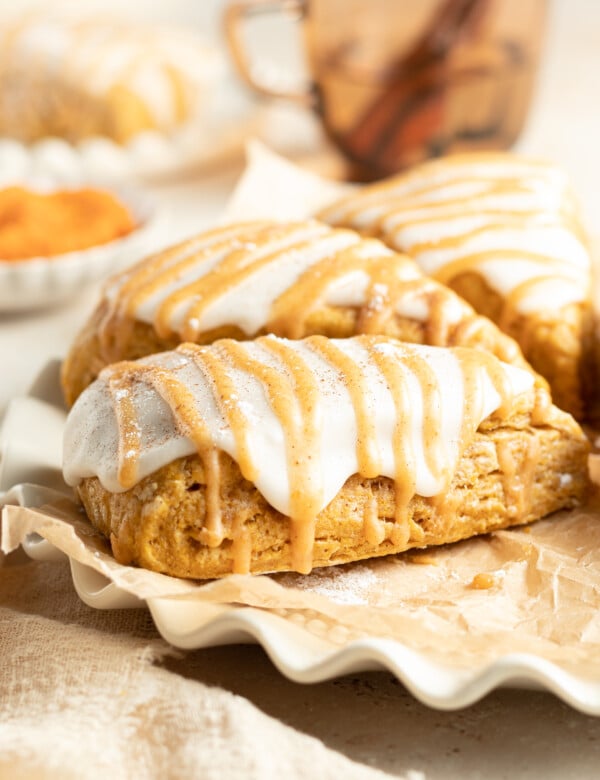
Well, HELLO Maple Scones with Pecans!
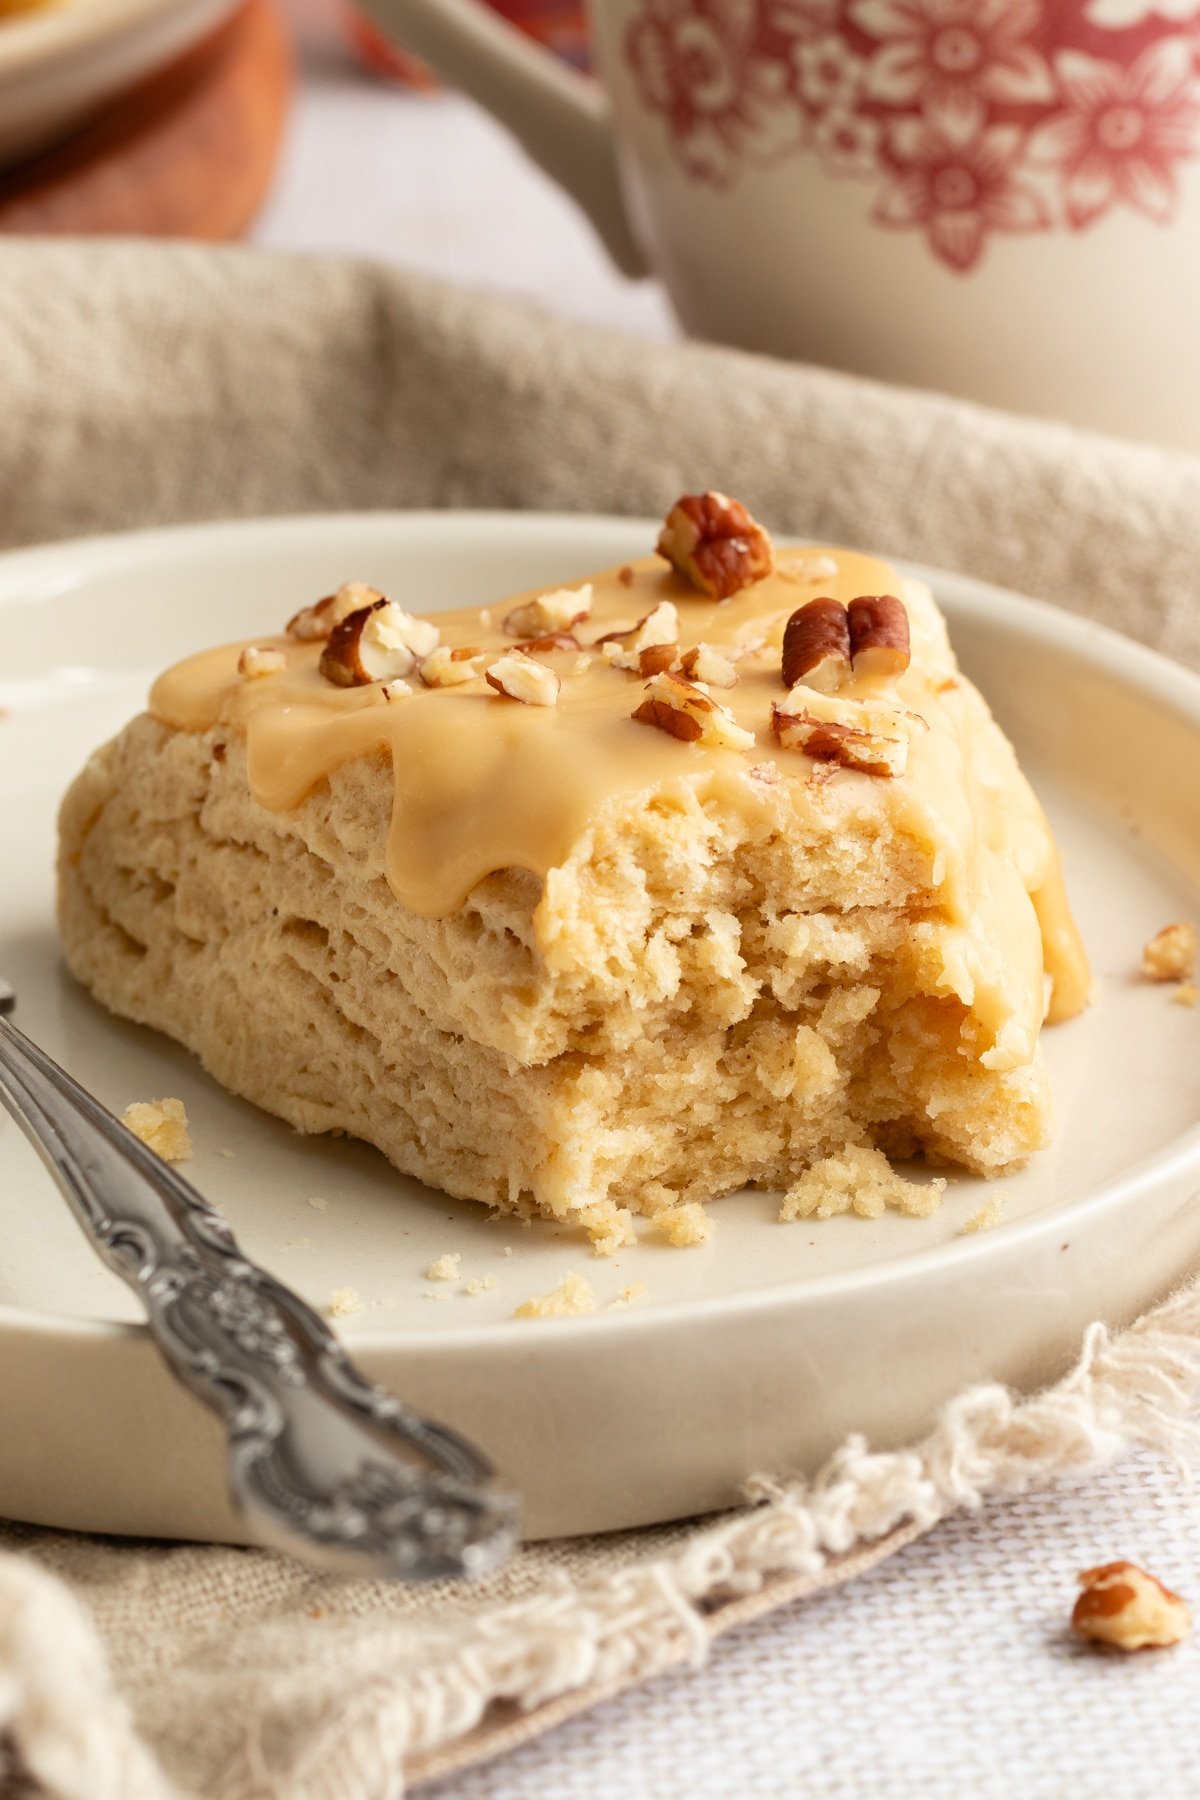
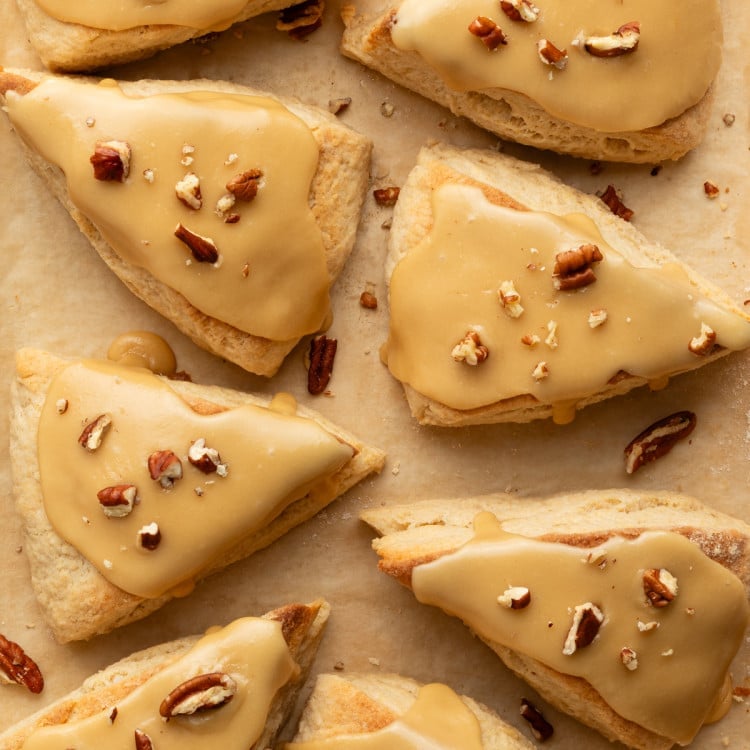
These scones are a fall delight: light and fluffy and finished with a sweet maple glaze on top.
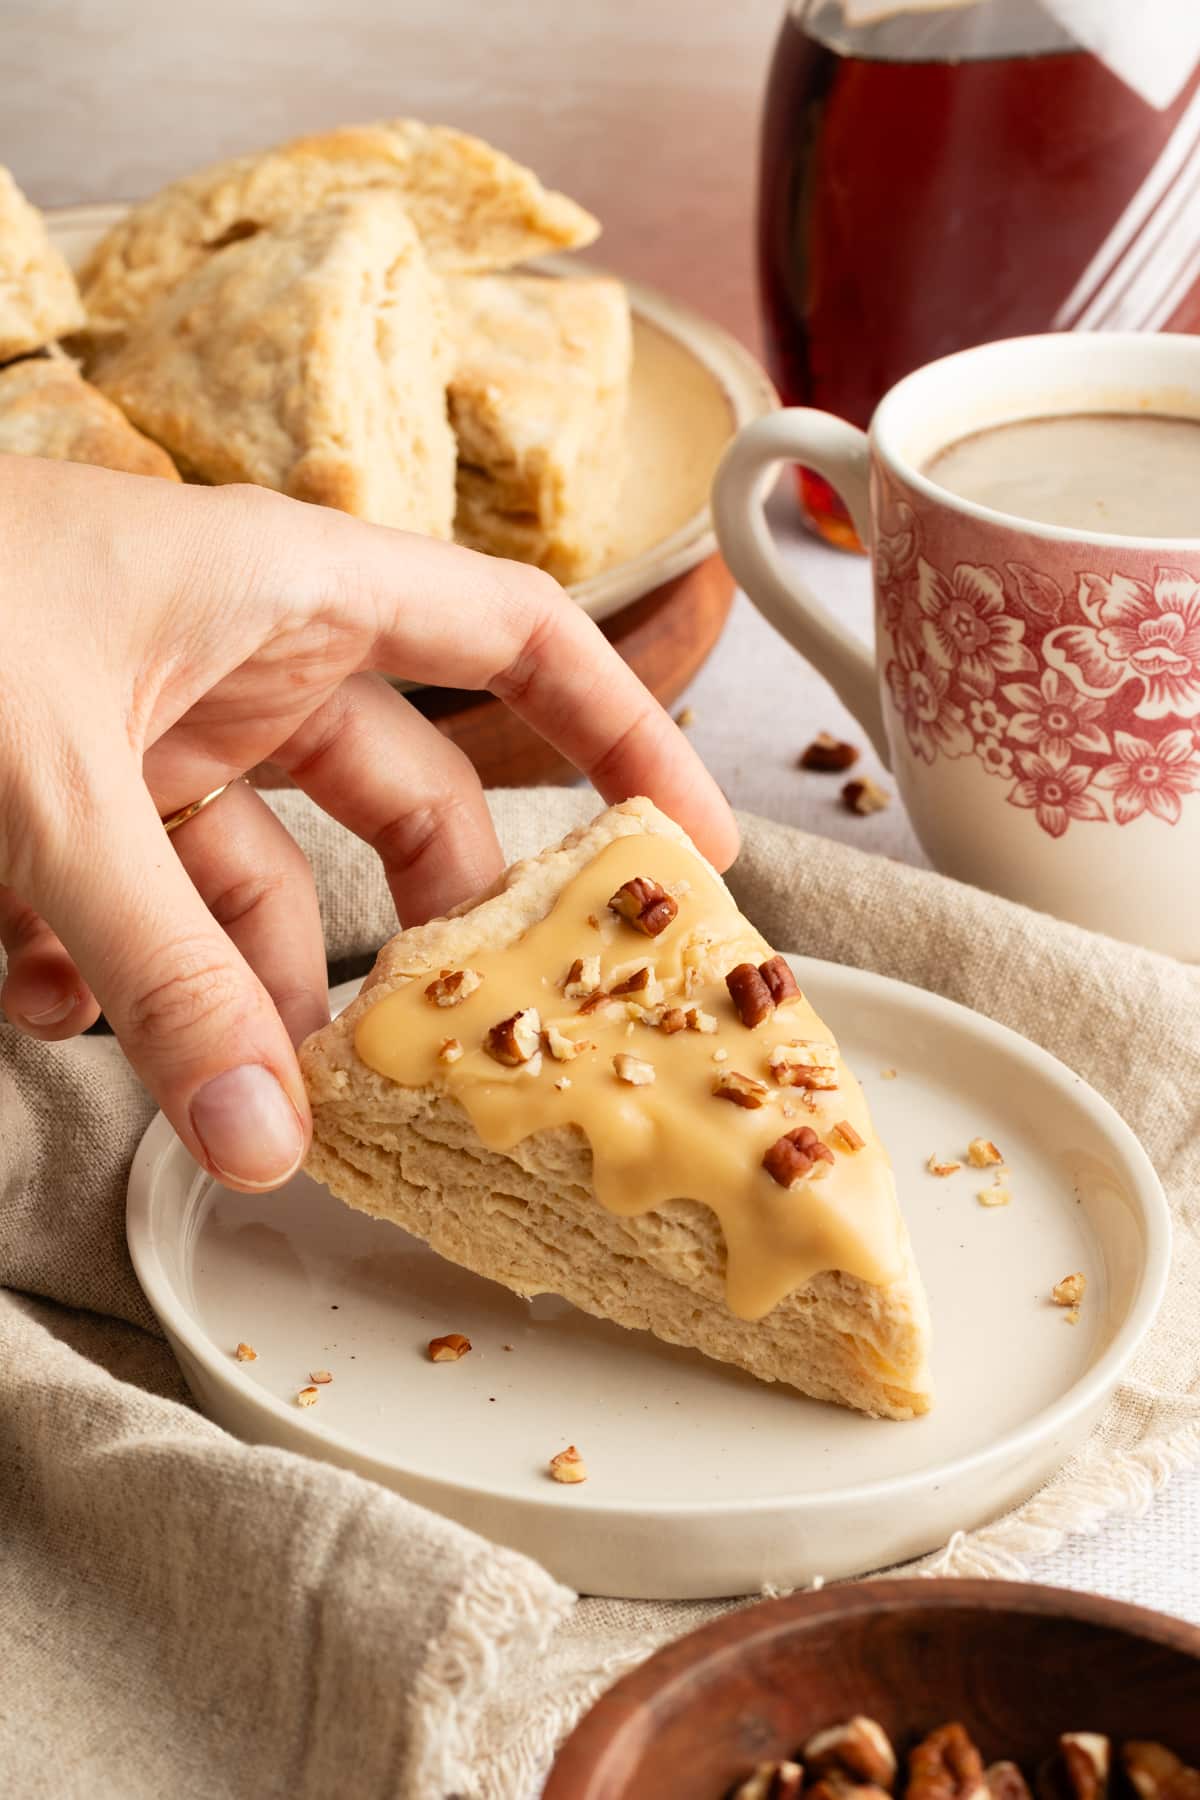

 Table Talk with Tawnie

There are so many reasons to 🍂fall🍂 in love with these Maple Scones. First, it’s a really simple scone recipe, and you probably have most (if not all) of the ingredients in your pantry already! These scones taste like fall and are moist and soft on the inside. They are buttery and flaky, with crumbly, golden edges. Perfect for chilly mornings or evenings with your favorite warm beverage. I know you’re gonna love these as much as I do! PS. Looking for even more non-pumpkin fall bakes? You’ll probably also like these Maple Cookies, this Apple Spice Cake, and these Maple Snickerdoodle Muffins! 🧡 Enjoy!

Ingredient Notes
(For the full recipe, scroll down to the recipe card below)
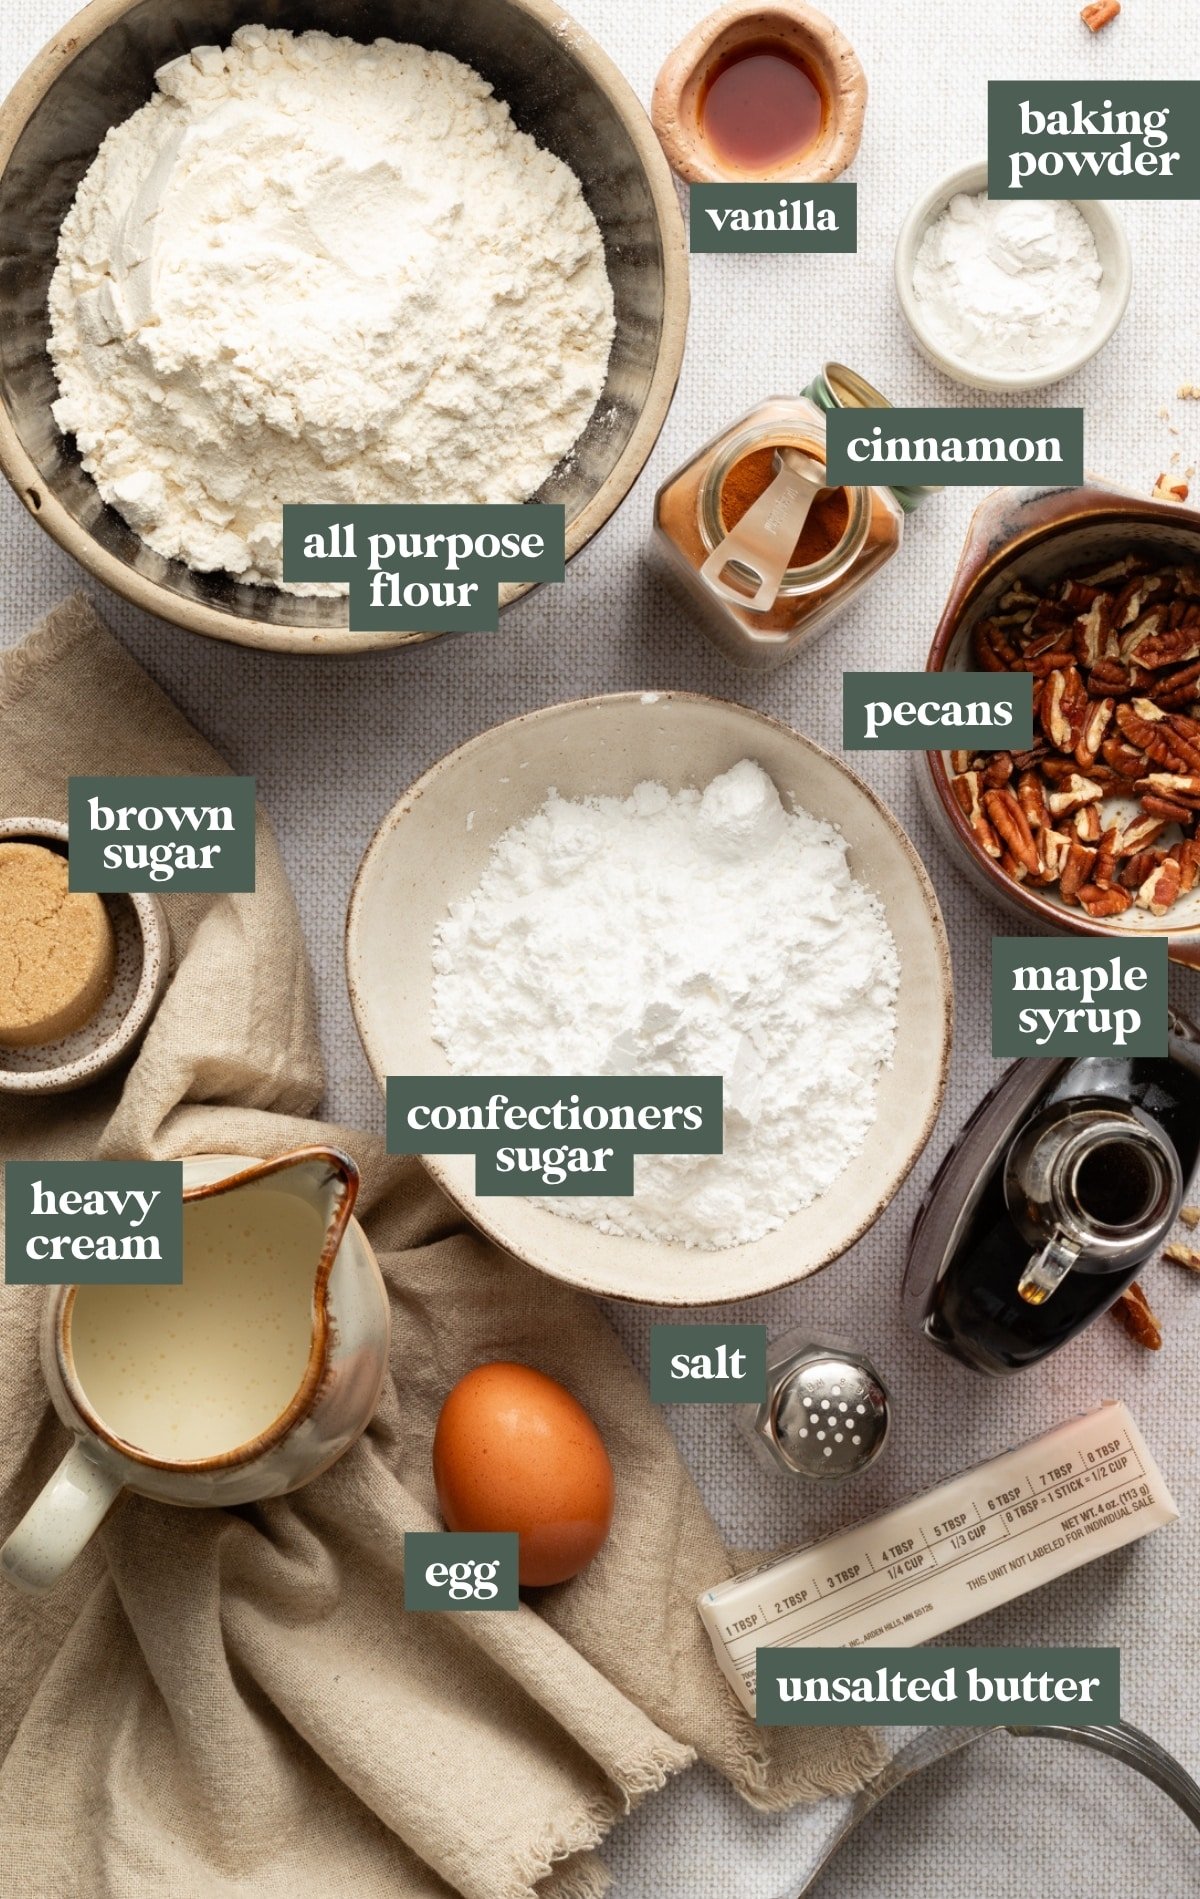
For the scones:
- All-Purpose Flour: As the name suggests, all-purpose flour is suitable for all types of baked goods such as bread, pizza, cookies, etc. It provides the structure in baked goods.. so it’s really important!
- Baking Powder: I love adding baking powder to most of my baked goods because it adds volume. It gives them a little lift towards the sky.
- Salt: Adding salt adds flavor to the scones.
- Cinnamon: Because cinnamon and Fall are a must!
- Butter: Butter is important when making scones because it is responsible for the flakiness and crisp edges.
- Heavy Cream: Heavy cream is a thick liquid, which is important to prevent the scones from coming out dry and flat. Sticking to heavy cream will ensure the scones taste better and look better rather than using another liquid, like milk.
- Brown Sugar: Brown sugar will a touch of extra sweetness and flavor.
- Egg: Will add flavor, structure, and lift to the scones.
- Vanilla Extract: Adds flavor and sweetness. Also an essential for yummy baked goods!
Pro Tip!
If you can get your hands on maple extract, I recommend using it in place of vanilla extract.
For the Maple Glaze:
- Powdered sugar: Works beautifully to make icings and frostings because it dissolves so easily.
- Butter: Just a touch is needed for the glaze
- Maple Syrup: Essential for making the maple glaze! The maple syrup will add the actual maple flavor, which we need, want and love.
- Vanilla extract: Adding vanilla extract will provide added sweetness and flavor.
- Pecans: Garnishing with the pecans will add protein, flavor, and a crunchy texture.
Step by Step Directions
(For the full recipe, scroll down to the recipe card below)
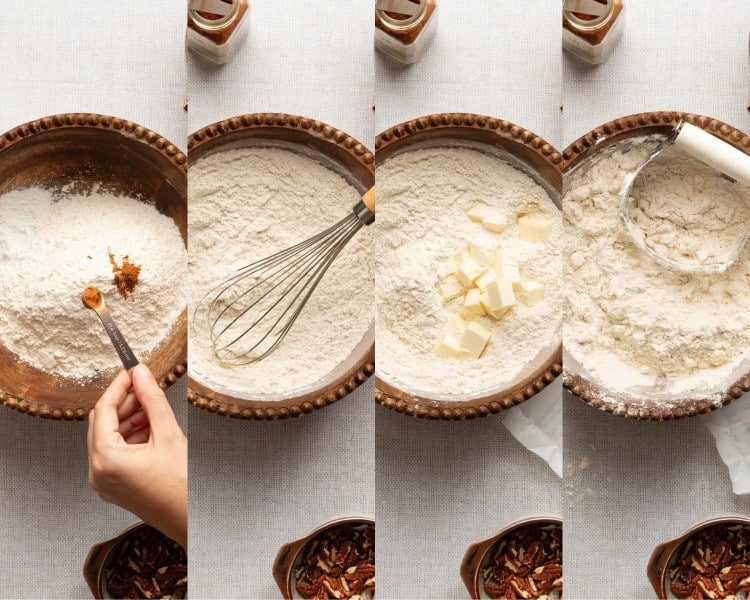
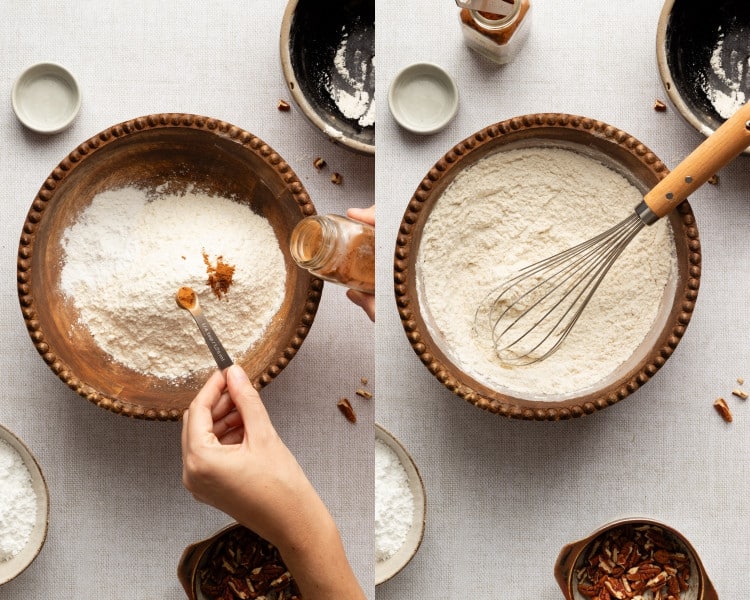
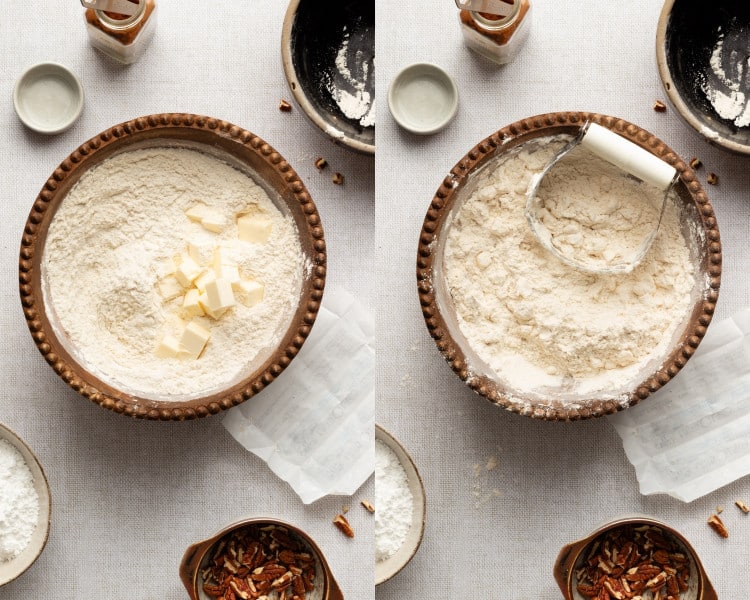
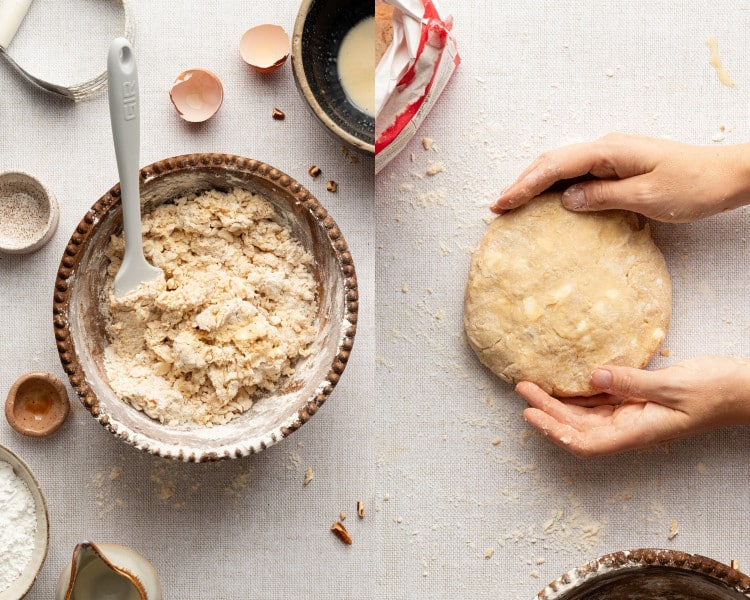
Mix dry ingredients + cut in cold butter.
Mix the dry ingredients together in a mixing bowl then cut the cold butter in using a pastry blender.
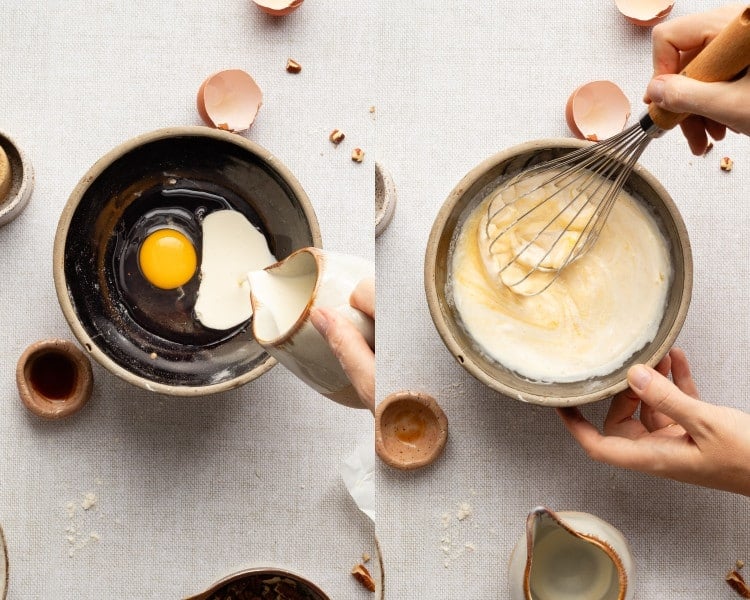
Mix wet ingredients.
In medium sized bowl, whisk together the brown sugar, heavy cream, egg and vanilla.
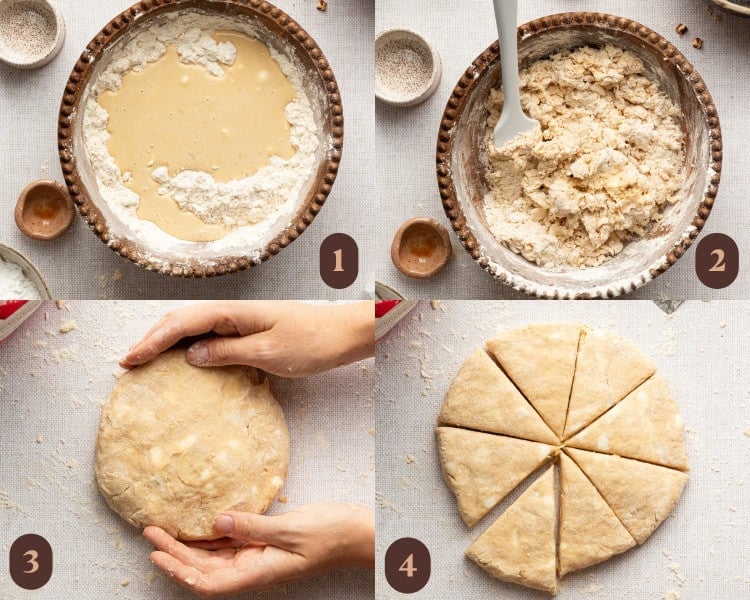
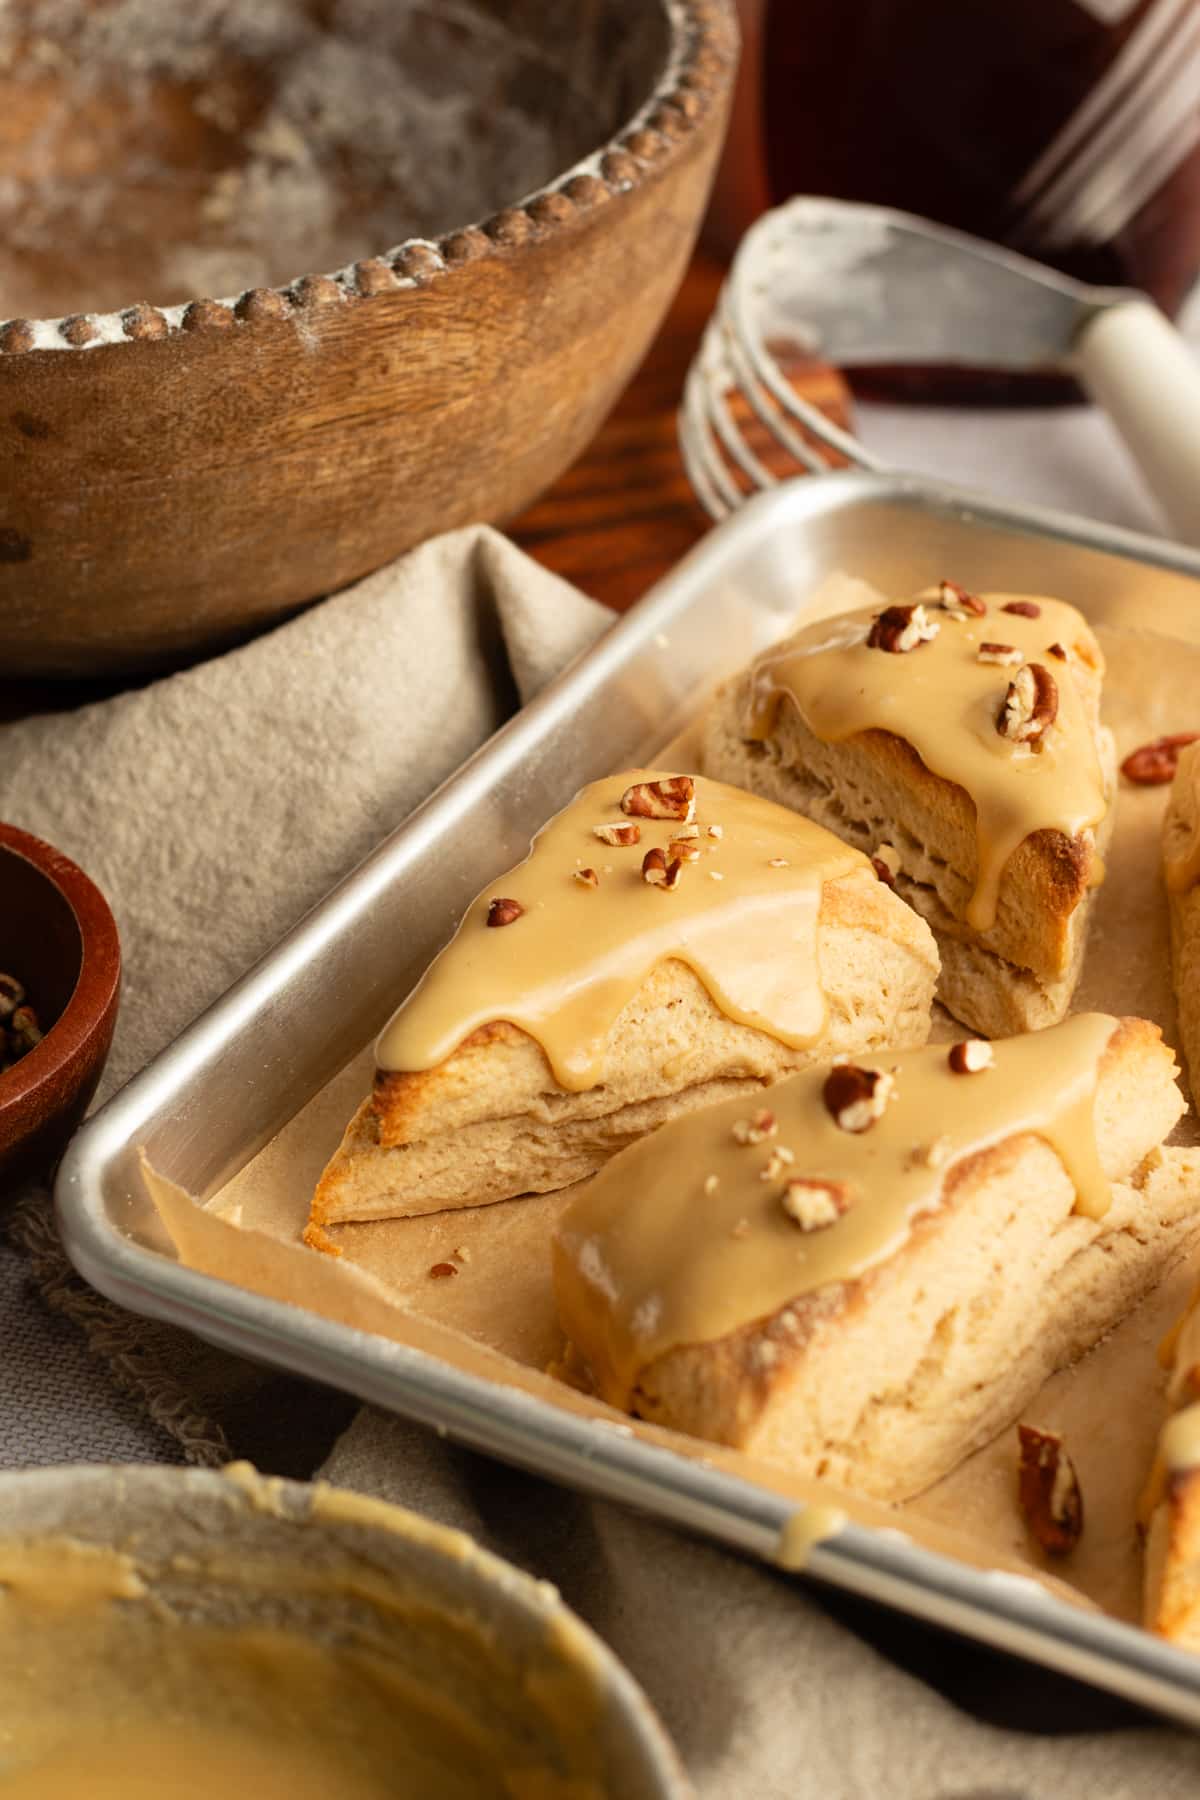
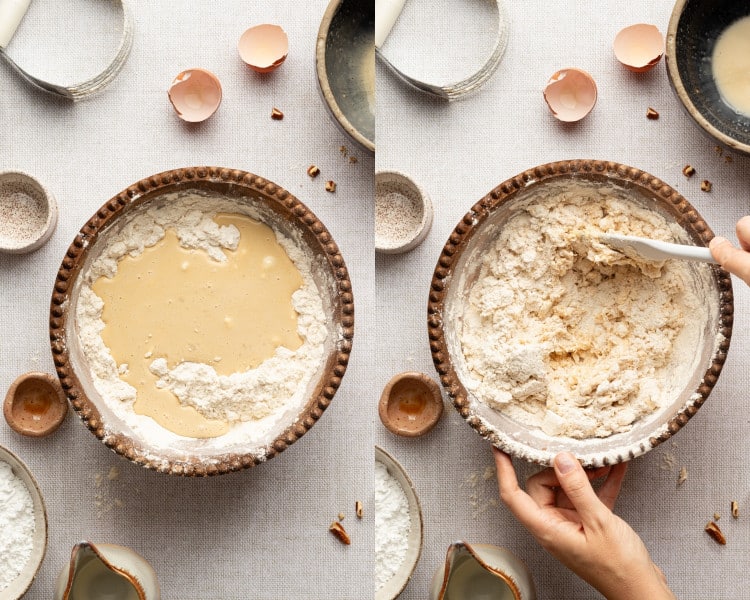
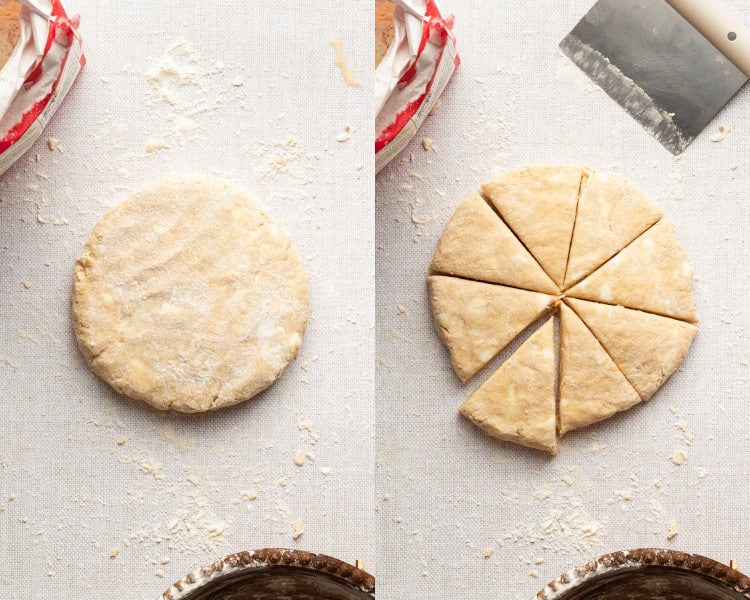
Combine, shape, & cut the dough.
Add the wet ingredients into the dry. Combine using a wooden spoon or rubber spatula until slightly incorporated. Turn out dough onto a lightly floured surface and fold just until combined in a ball then flatten out and form into a circle. Use a bench scraper to cut into 8 triangles
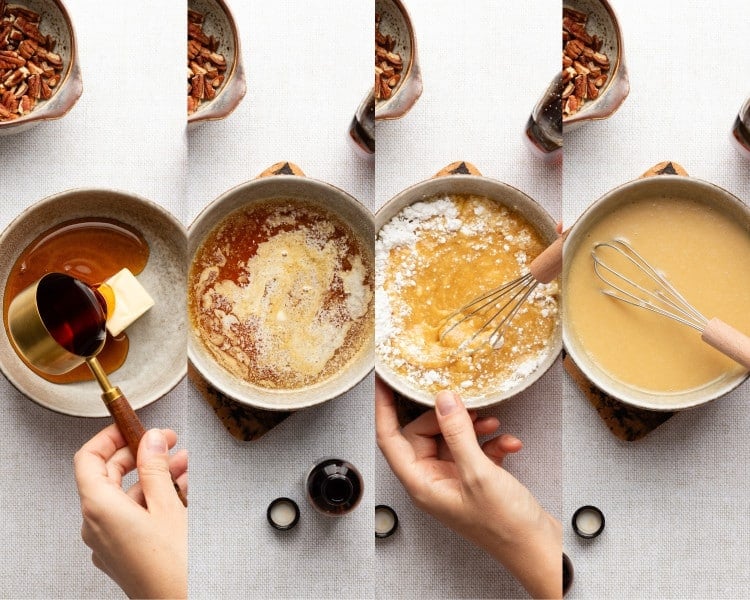
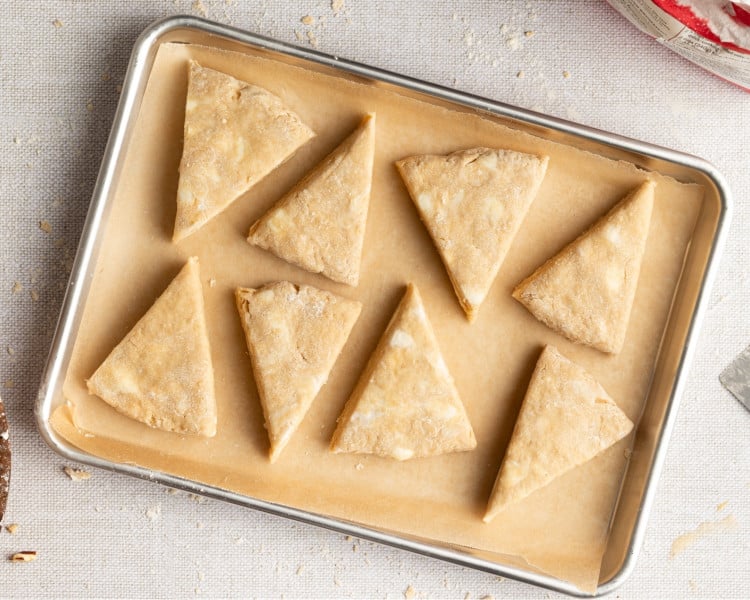
Bake the scones & prepare the glaze.
Bake scones at 400°F for 15-16 minutes or until lightly browned on top. While they bake, melt the butter in the maple syrup, then add in the powdered sugar and vanilla extract, and mix until smooth.
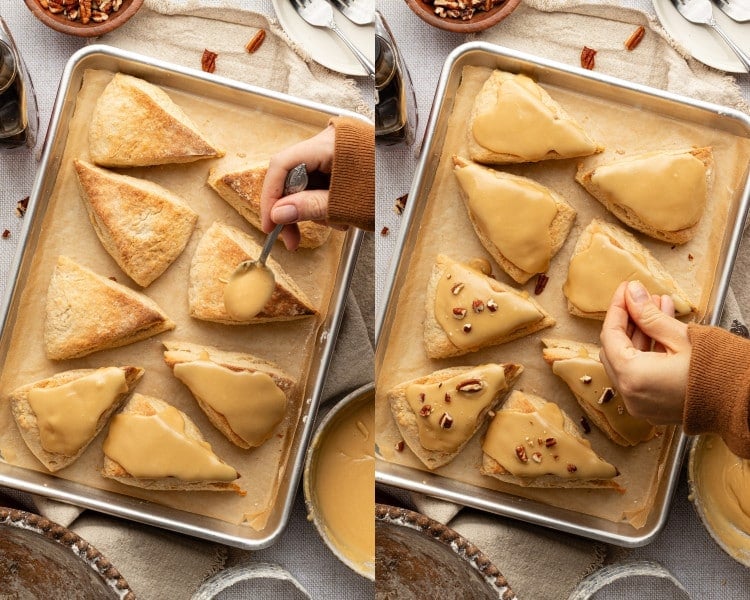
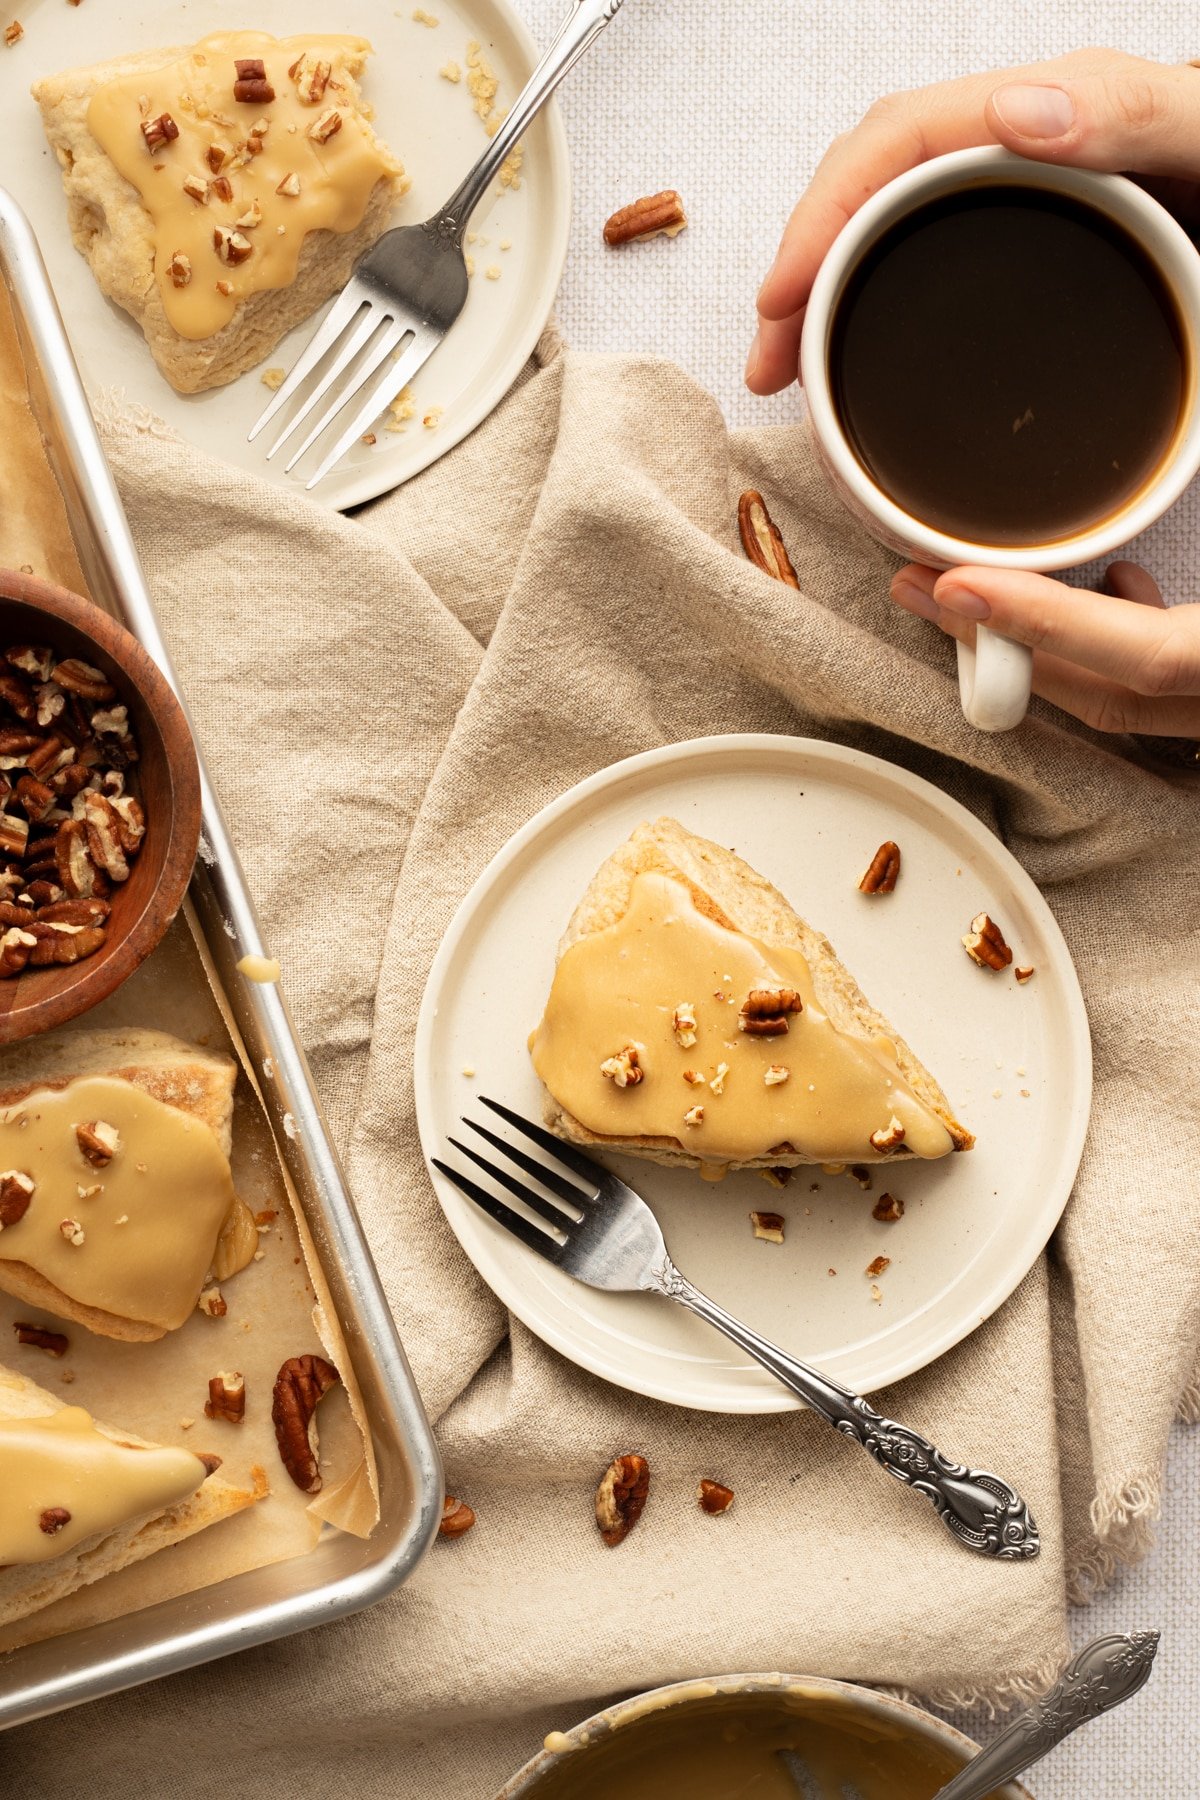
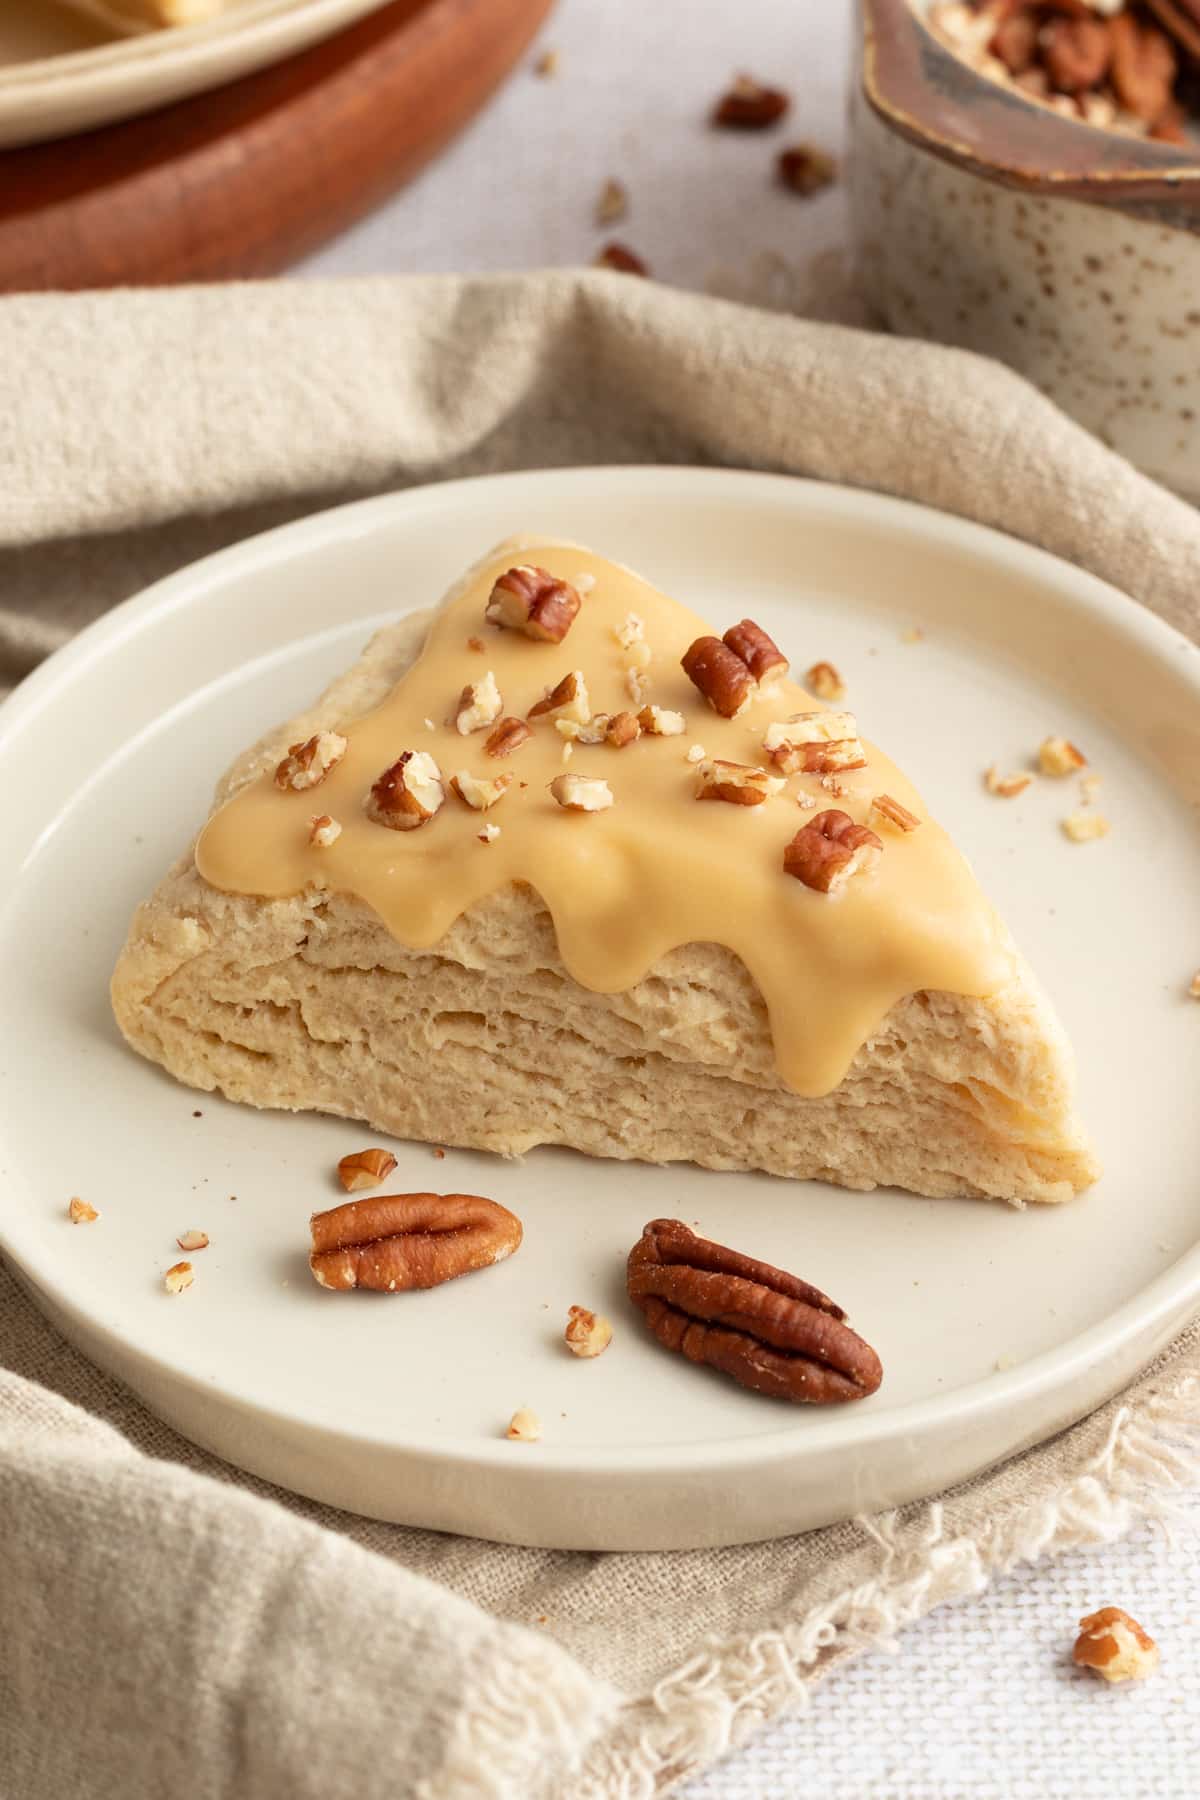
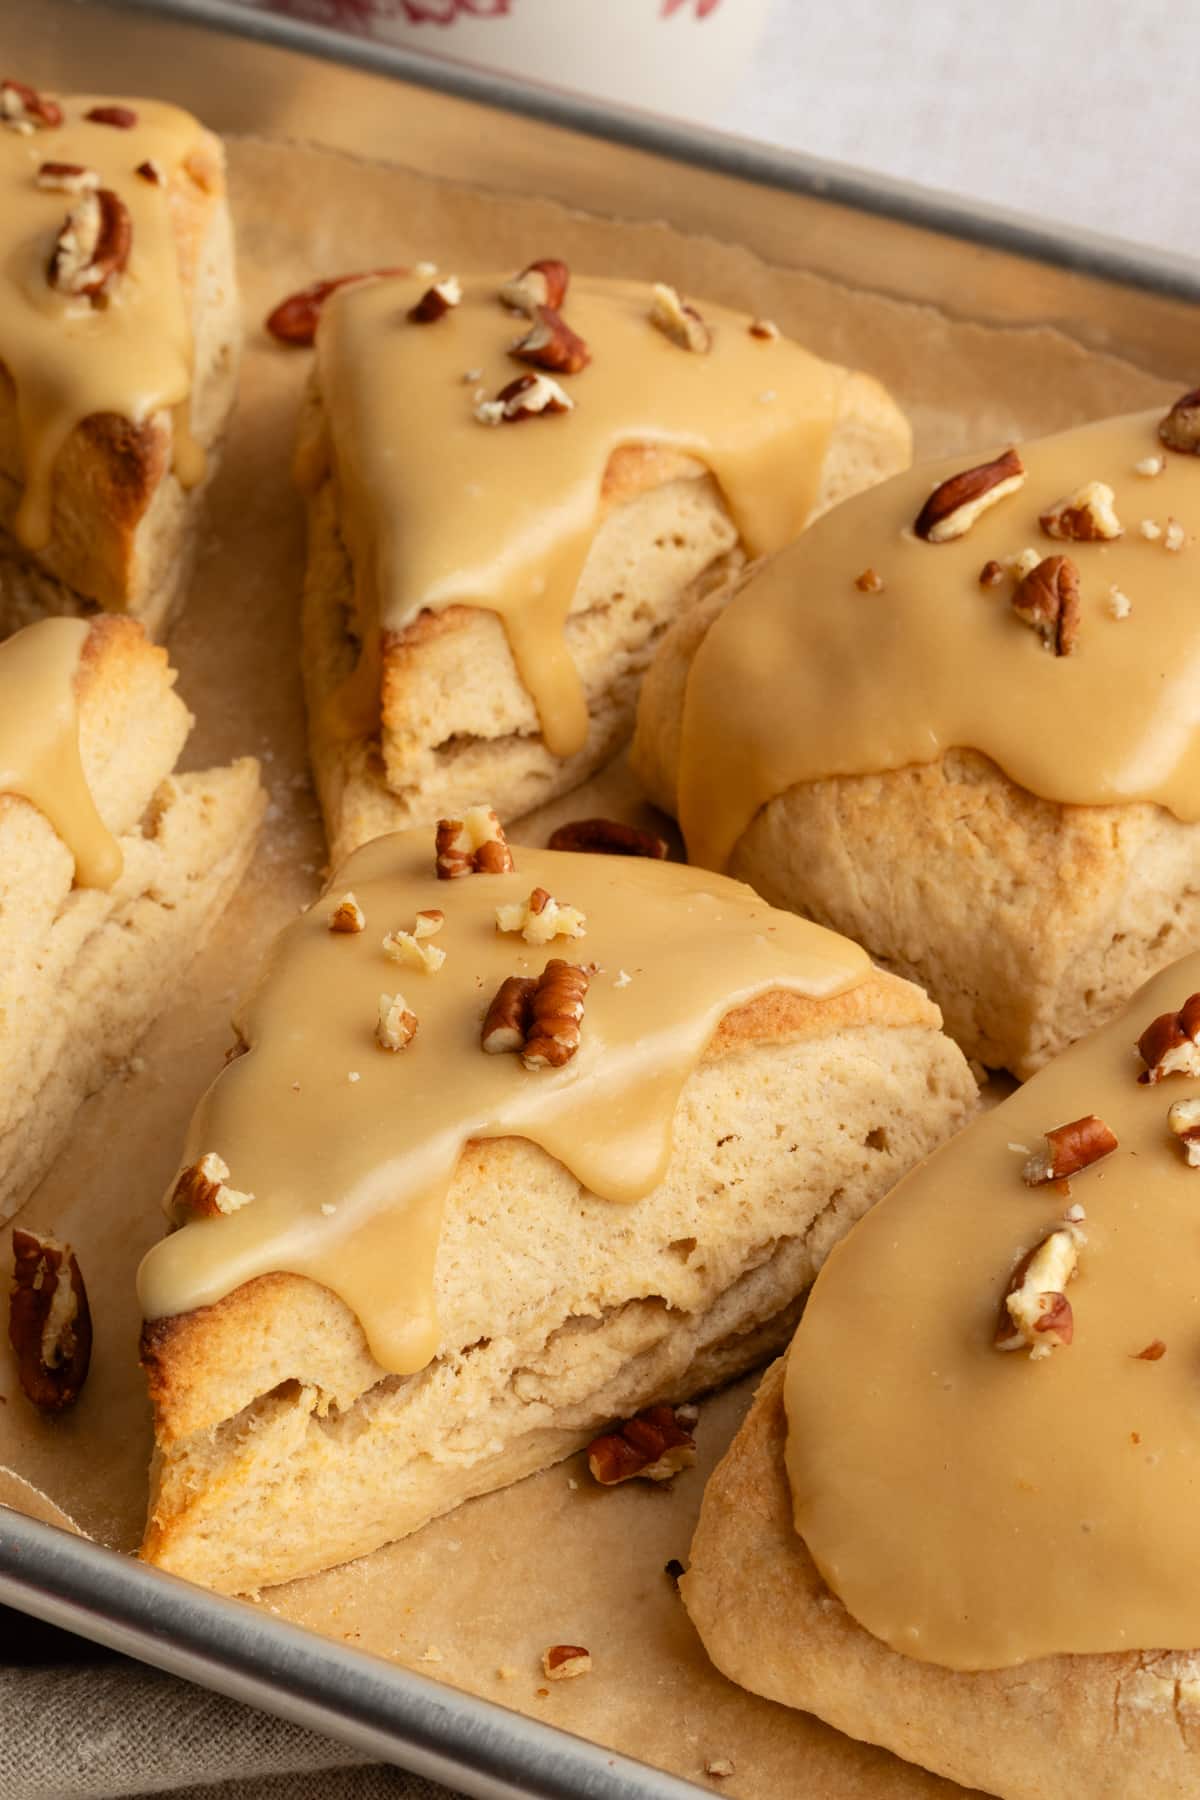
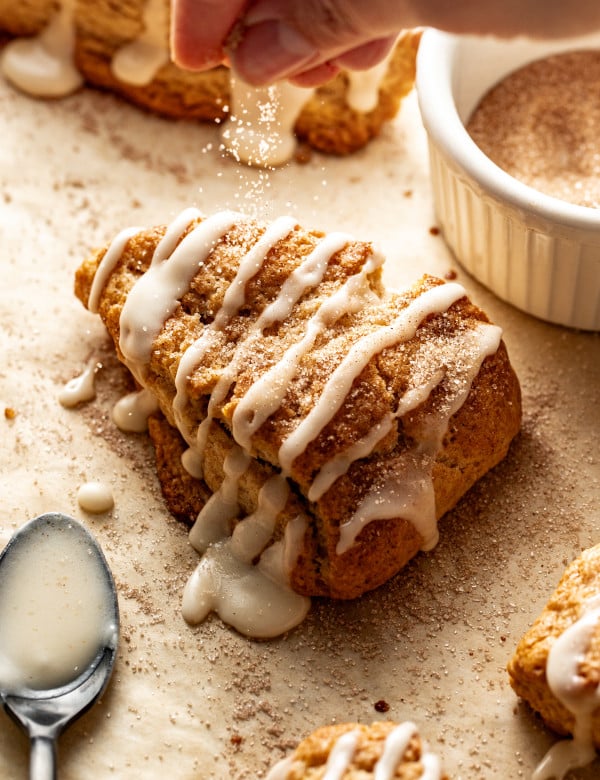
Glaze. Garnish. Enjoy!
Spread glaze on top of cooled scones. Garnish with pecan pieces. Enjoy!
Scone Baking Tips
- Use cold butter – or even frozen butter for a better rise. The colder the better.
- When it comes to mixing, don’t over do it. Mix just until the dough comes together.
- Using heavy cream or buttermilk (thick liquids) prevents the scones from coming out flat and flavorless.
- Work fairly quickly with the dough so the cold ingredients stay cold.
- Be sure to work on a lightly floured surface and you can add a little bit of flour to help form into a ball, but do not add too much.
- Cut the butter into the scones using a pastry blender.
- Cut the scones into squares using a bench scraper for clean cuts.
Storage / Freezing
- Storage: Once baked and cooled, store them in the fridge for 2-3 days in an airtight container.
- Freezing: Let scones cool at room temperature and place in a resealable bag or airtight container to protect from freezer burn. Enjoy them within 3 months.
FAQs
What if I don’t have heavy cream, what can I use instead?
Replace with buttermilk or sour cream.
How to make scones in advance:
Freezing scones before baking: Freeze the scone wedges on a plate or baking sheet for 1 hour.Then layer them in a freezer-friendly bag or container. Bake from frozen, adding a few minutes to the bake time or thaw overnight in the fridge and bake as directed.
Can I make these gluten free?
While I have never personally tested this recipe using gluten free flour, you can try a 1-1 gluten free flour or an oat flour.
Can I use frozen butter?
Yes. Working with very cold butter when making scones is a crucial step so using frozen butter can be done. When the scones are baked the butter melts in the oven and creates an ultra-flaky, tender, soft maple scone.
shop this post
 Buy Now →
  Buy Now →
 More Fall Baking Recipes You Will Love
Before You Begin! If you make this, please leave a review and rating letting us know how you liked this recipe! This helps our business thrive & continue providing free recipes.
Maple Scones with Pecans
Ingredients
- 2 cups all-purpose flour
- 2 1/2 tsp. baking powder
- 1/2 tsp. salt
- 1/4 tsp. cinnamon
- 8 Tbsp. unsalted butter (cold)
- 1/2 cup heavy cream (cold)
- 1/4 cup brown sugar (packed)
- 1 large egg
- 1 tsp. vanilla extract
For the glaze
- 1/3 cup pure maple syrup
- 2 Tbsp. butter
- 1 1/4 cup confectioners sugar
- 1 tsp. vanilla
- 1/3 cup chopped pecans (for garnish on top of glaze)
Last step! If you make this, please leave a review and rating letting us know how you liked this recipe! This helps our business thrive & continue providing free recipes.
Instructions
- Preheat and prep: preheat the oven to 400°F. Line a baking sheet with parchment paper or a Silicone baking mat (like a Silpat)
- Mix dry ingredients: In a large bowl, whisk together the flour, baking powder, salt and cinnamon.2 cups all-purpose flour, 2 1/2 tsp. baking powder, 1/2 tsp. salt, 1/4 tsp. cinnamon

- Cut in cold butter: Add the cubed, cold butter into the dry ingredients. Using a pastry cutter, cut butter into the flour until pea-sized coarse crumbs form.8 Tbsp. unsalted butter
- Mix wet ingredients: In a medium-sized bowl, whisk together the brown sugar, heavy cream, egg and vanilla.1/2 cup heavy cream, 1/4 cup brown sugar, 1 large egg, 1 tsp. vanilla extract
- Combine: Add the wet ingredients into the dry ingredients.
- Shape dough: Combine using a wooden spoon or rubber spatula until slightly incorporated. Turn out dough onto a lightly floured surface and fold just until combined in a ball and flatten out and form into a circle. Dough may appear dry, but will form together. If dough is sticky, use flour as needed (but not too much!)
- Cut into 8 scones: Shape the scones by cutting them into 8 triangles using a bench scraper.
- Optional but recommended: freeze the scones for 15-30 minutes, especially if you feel the dough got warm while you were working with it. Cold dough = best scones.
- Bake: Place the scones on the prepared baking sheet and bake for 15-16 minutes or until lightly browned on top.
- Make the glaze: melt the butter in the maple syrup, either in the microwave or on the stove in a small saucepan. Add in the powdered sugar and vanilla extract, mix until smooth.1/3 cup pure maple syrup, 2 Tbsp. butter, 1 1/4 cup confectioners sugar , 1 tsp. vanilla
- Garnish: Spread glaze on top of cooled scones and garnish with chopped pecans.1/3 cup chopped pecans
- Scones are best the day of, or store in the fridge for 2-3 days. Enjoy!
Equipment
Notes
- If you don’t have a pastry cutter to cut the butter into the flour, you can use 2 knives to literally cut the butter into the flour.
- You can freeze the butter and use a box cheese grater to grate the butter into the flour.
- You can use the food processor to combine the butter into the flour, be sure to stop when there are still pea-size bits of butter visible in the bowl.
Nutrition Information
Nutritional information is provided as a courtesy and is automatically calculated. It should only be construed as an estimate rather than a guarantee. Ingredients can vary and Kroll’s Korner can’t make any guarantees to the accuracy of this information.
This recipe was originally published in September 2020. It was updated with new photos and additional tips and tricks in October 2025.
📸 Photography by Marie Dubé

These are divine- I had been planning to try these for months. Now I have a new favorite! The recipe was easy, easy to follow, and having the ingredients with amounts repeated with each step reduced phone scrolling! Thank you!
Thank you!! So happy you got around to baking them and enjoyed the recipe & format 🙂 means a lot to me!
I was glad to find your recipe. The texture was good. The flavor was great. The glaze is super. I like to use a brand of maple syrup called Crown maple syrup from Costco. It’s great in my opinion for maple syrup. Thanks again and I’m glad I dropped by and discovered a new maple pecan syrup scone.
They look gorgeous!! Thank you!!
I love these scones. I swap out the vanilla for maple extract in both the scone and the frosting. Everyone I make them for loves them. I also add the maple syrup after melting the butter so it doesn’t cook the syrup.
So happy you enjoy these! Thank you! 🙂
What can I say…I think my family would have enjoyed these, but they didn’t get a chance because, well, I might have eaten them all🙃
I made these for Thanksgiving and they were a big hit! Everyone loved them! I’m not a big maple bar fan but these have just the right amount of sweetness!
Thank you soo much Lauren 🙂 happy they were enjoyed!!
I don’t normally leave reviews on recipes but these were the best scones I have ever made! So perfectly buttery, flaky, and just so delicious! I used the tip of freezing them before baking and I think that’s why the texture was absolute perfection. I put pecan pieces in the dough, and didn’t put any on top. I liked them that way and would probably do it again.
wow thank you sooo so much! i love that you added the pecans in the dough, I will do that next time 🙂
I have been looking for a recipe which actually has maple syrup on the dough, but in the few I found, there was too much flour. So, I used your recipe with 1/4 of cream and 1/4 of maple syrup, no cinnamon, and 1/2 of vanilla. Wow! My kids loved it! The glaze was a lot, though, even though I used only one cup of sugar. I’ll make half of the glaze recipe next time. Thank you!
So happy you enjoyed them!! Thank you! 🙂
Very easy and delicious! I had never made a Scone before and found the directions straightforward and easy to follow. The maple frosting along with the pecans were a fantastic combination! Will definitely be making these again!
Thank you so much Becca! 🙂 so happy you enjoyed it!
Easy! Delish! Realized after I started that I didn’t have pecans, but still yummy! I’ve always been intimidated by scones, but they’re easy if I use your recipe! Next time I want to use the vanilla paste like you used…even the same amount! Lol
Hahaah measure with your heart!! Thank you for making them im so glad it was an easy process!
My boyfriend has requested scones and I’ve never made them before. I was slightly imitated, but I decided to try this recipe and I nailed it. So proud of myself. They were easy, so flaky and delicious.
Make these NOW.
Okay stoppppp. Those look SO PERFECT, Mindy!!! Oh my gosh, I’m so excited you decided to make these. What did your boyfriend think?! What other scones are you trying next, now that you’re a scone master?! 😉 Hint: https://krollskorner.com/recipes/breakfast/cinnamon-sugar-scones/