Homemade Pie Crust
This post may contain affiliate links. Please read our disclosure policy.

A homemade pie is undeniably comforting, and the foundation of every great pie is the homemade pie crust. A good pie crust can make all the difference and really make or break the pie recipe.
It’s really a simple process, not as daunting as it may seem, and far more rewarding than using store-bought crusts.
In this post, I share my success and troubleshooting tips so you can make the perfect pie crust every time!
So, without further ado, here’s how I make a flaky, buttery homemade pie crust, and I am excited to show you so you can elevate your pies to the next level.
Be sure to follow these 3 tips
Above all else, following these three steps will get you on your way to a perfect crust.
- Keep it cold: Keep it all cold: the butter, shortening, pie pan, ice-cold water, and even cold flour, sugar, and salt. This creates a cold dough, which will, in turn, give you a beautiful flaky pie crust.
- Keep it moving: When rolling out the dough, continue to turn, rotate, and even flip it to help prevent it from sticking or tearing. Use flour on the work surface, a rolling pin, and your hands to help easily transfer the dough to the pie plate.
- Keep a light touch. Try not to overwork the dough. Kneading too much can lead to a tough crust and cause the dough to shrink during baking.
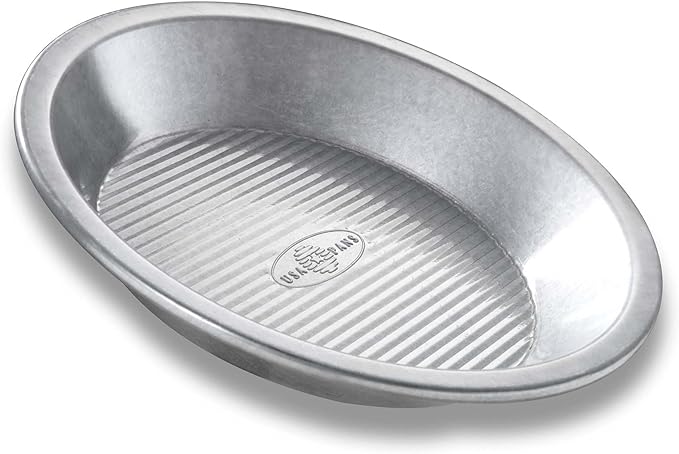
9-Inch Pie Pan
From ceramic, glass, metal, disposable, and aluminized steel pie pan, there are so many options to choose from. I like this pan and my ceramic pie pan the best.
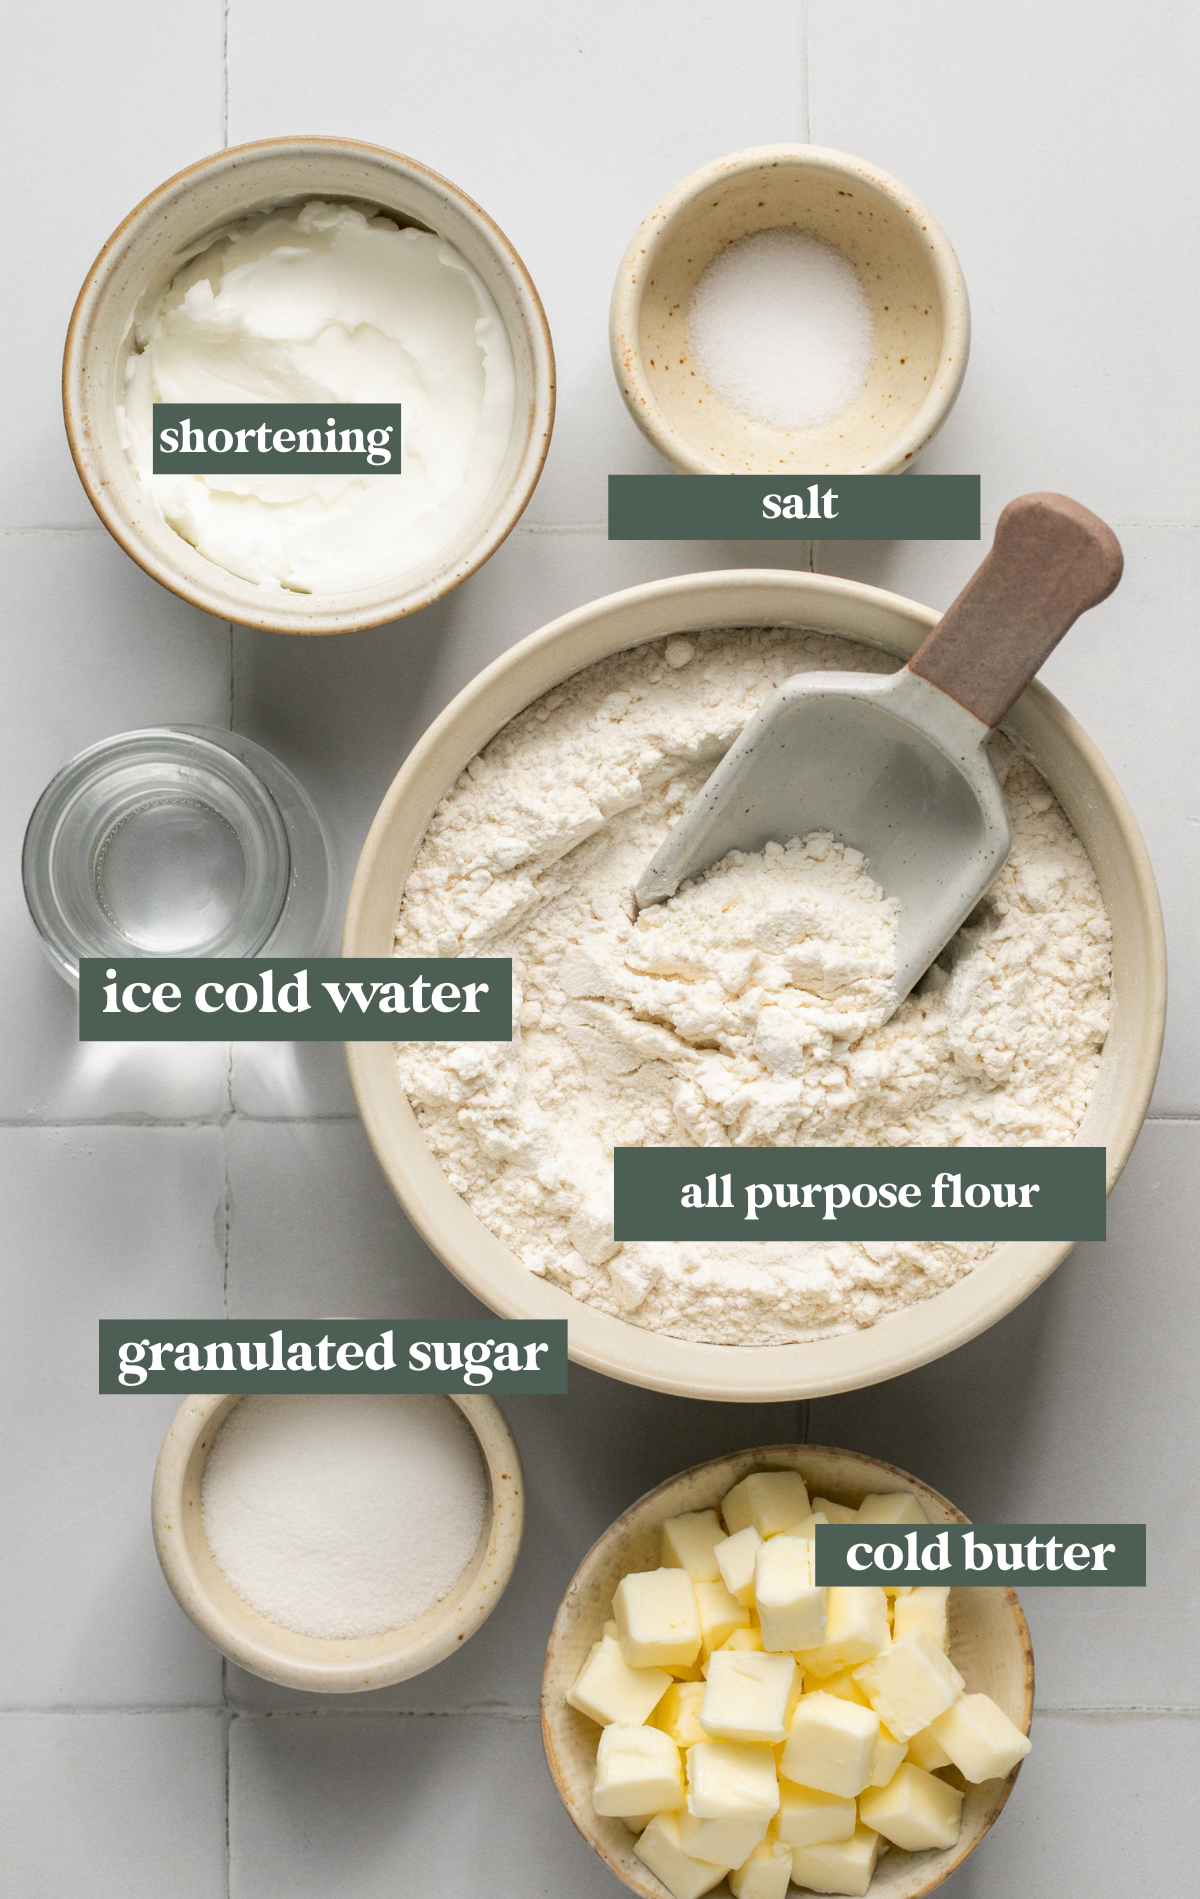
Ingredients
You don’t need many ingredients to make a delicious pie dough come to life. Woo!
Scroll down to the recipe card for the complete list of ingredients and measurements.
- All-purpose flour: the base of the pie dough, providing the structure and shape of the dough.
- Butter and shortening: I like to use a combination of both in my recipe. The butter helps give the pie dough a rich, flaky texture, and the shortening helps the crust hold its shape while giving it a tender texture.
- Sugar: I like to add a little sugar to my pie crust because it helps it brown and, of course, adds some flavor. You can leave it out, though, if you prefer.
- Salt: to make the crust a little interesting and yummy!
- Ice-cold water: Sticking with the trend of “keep it cold,” we need a little ice-cold water for the dough. Less is more when it comes to adding water. It can be tempting to add a lot, but too much water can lead to a sticky dough and a tough crust. You want enough water for the dough to come together, and even if it feels a little dry when the dough rests in the fridge, the flour will continue to hydrate, and it will be perfect.
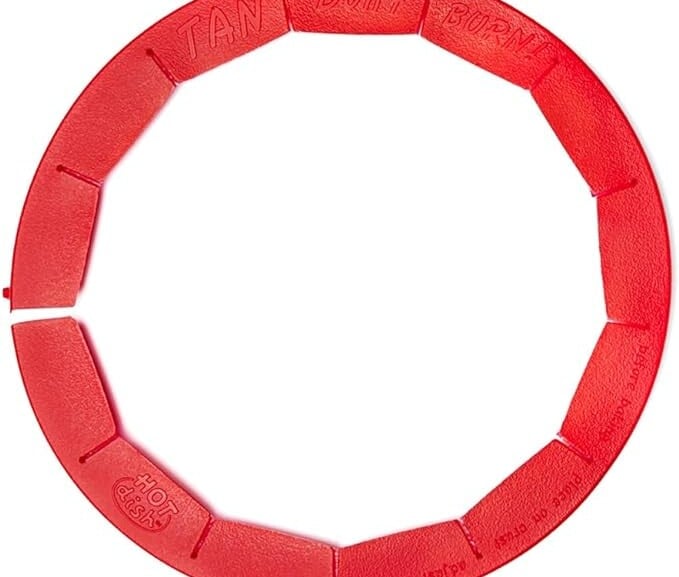
Pie Crust Shield
I LOVE using this pie crust shield so I don’t have to fuss with folding foil pieces over the crust. It still ensures the crust stays a beautiful golden brown, but prevents them from burning.
Step by Step Directions
Be sure to scroll down to the recipe card for the full recipe instructions.
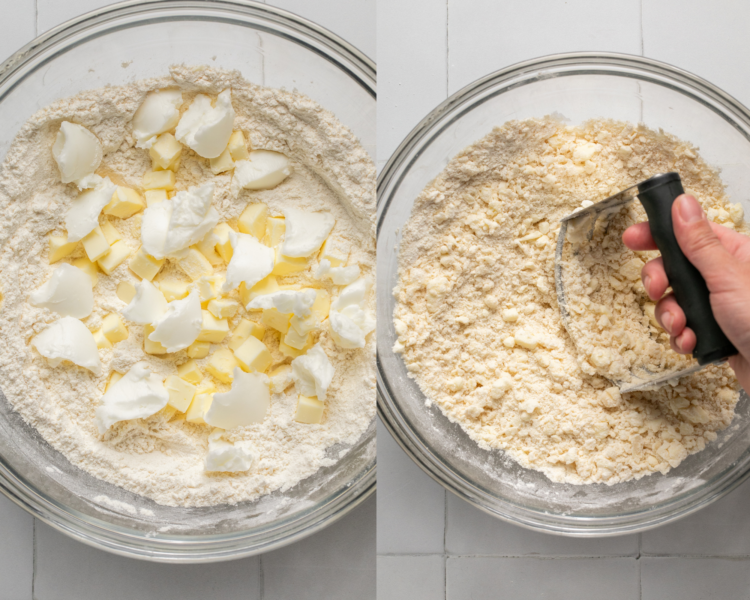
Cut fats into dry ingredients
Using a pastry blender, cut the cold butter and cold shortening into the drying ingredients.
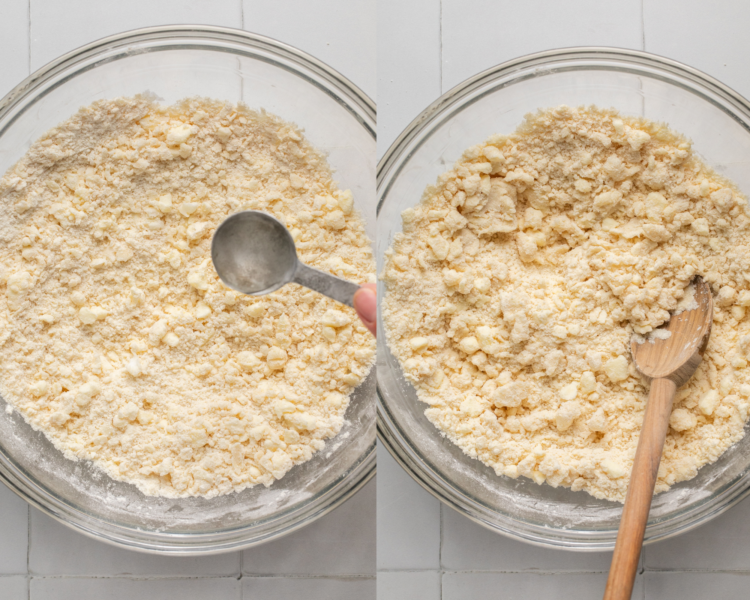
Ice ice baby
Slowly add ice cold water into the dry ingredients. Do not add too much. The dough will be shaggy, and that’s good!

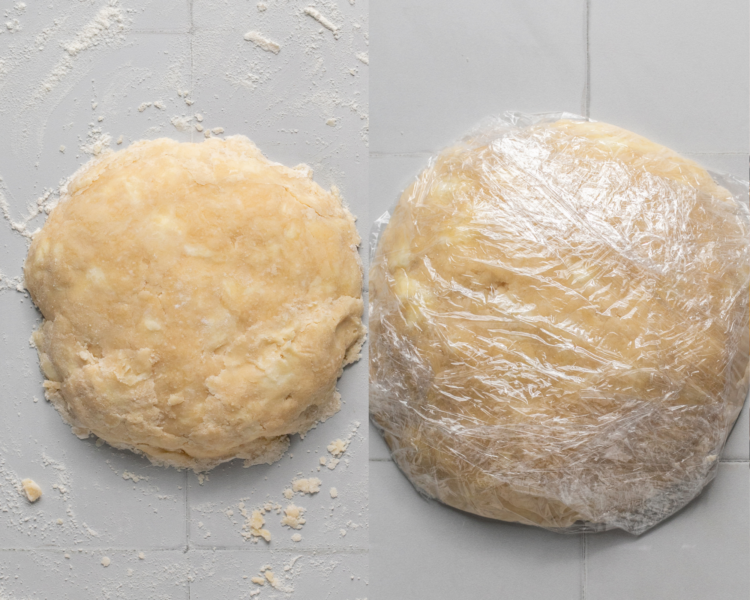
Bring it all togther & chill
Turn the dough out onto a lightly floured surface and bring the dough together. Only add a little more water if needed. Wrap it up in plastic wrap, and chill for at least 1 hour.
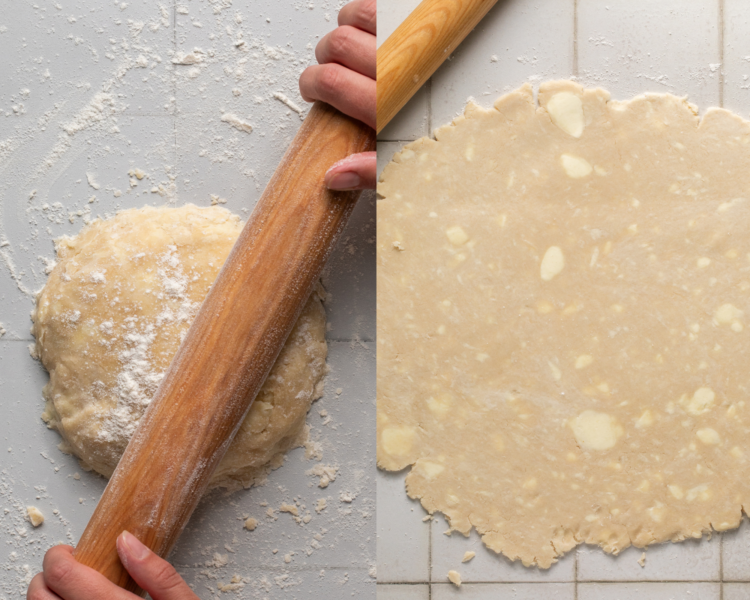
Roll it out
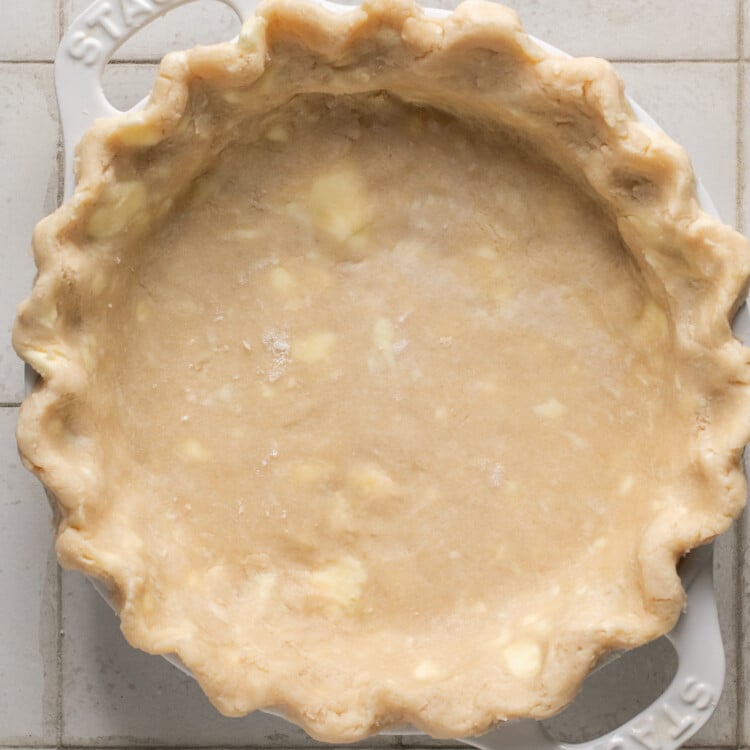
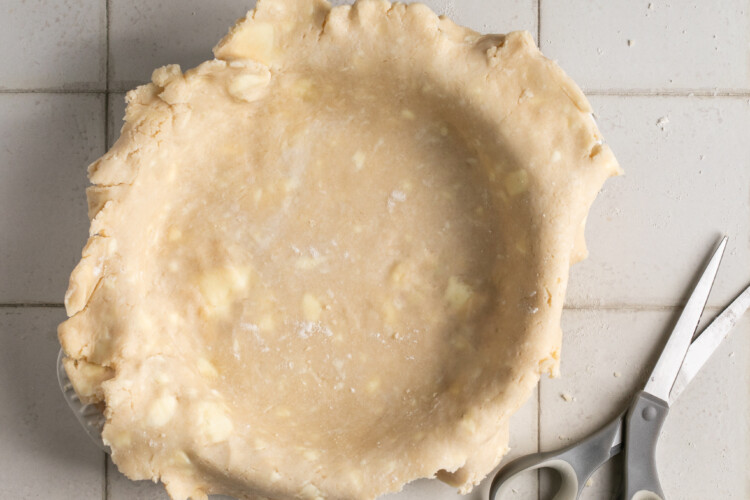
Using a rolling pin, roll out on a lightly floured surface, turning the dough and keeping it moving so it doesn’t stick. Transfer to a 9-inch pie plate.
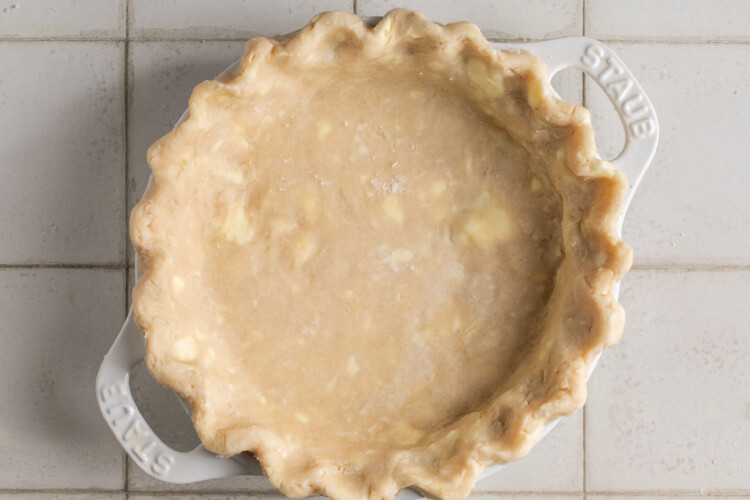
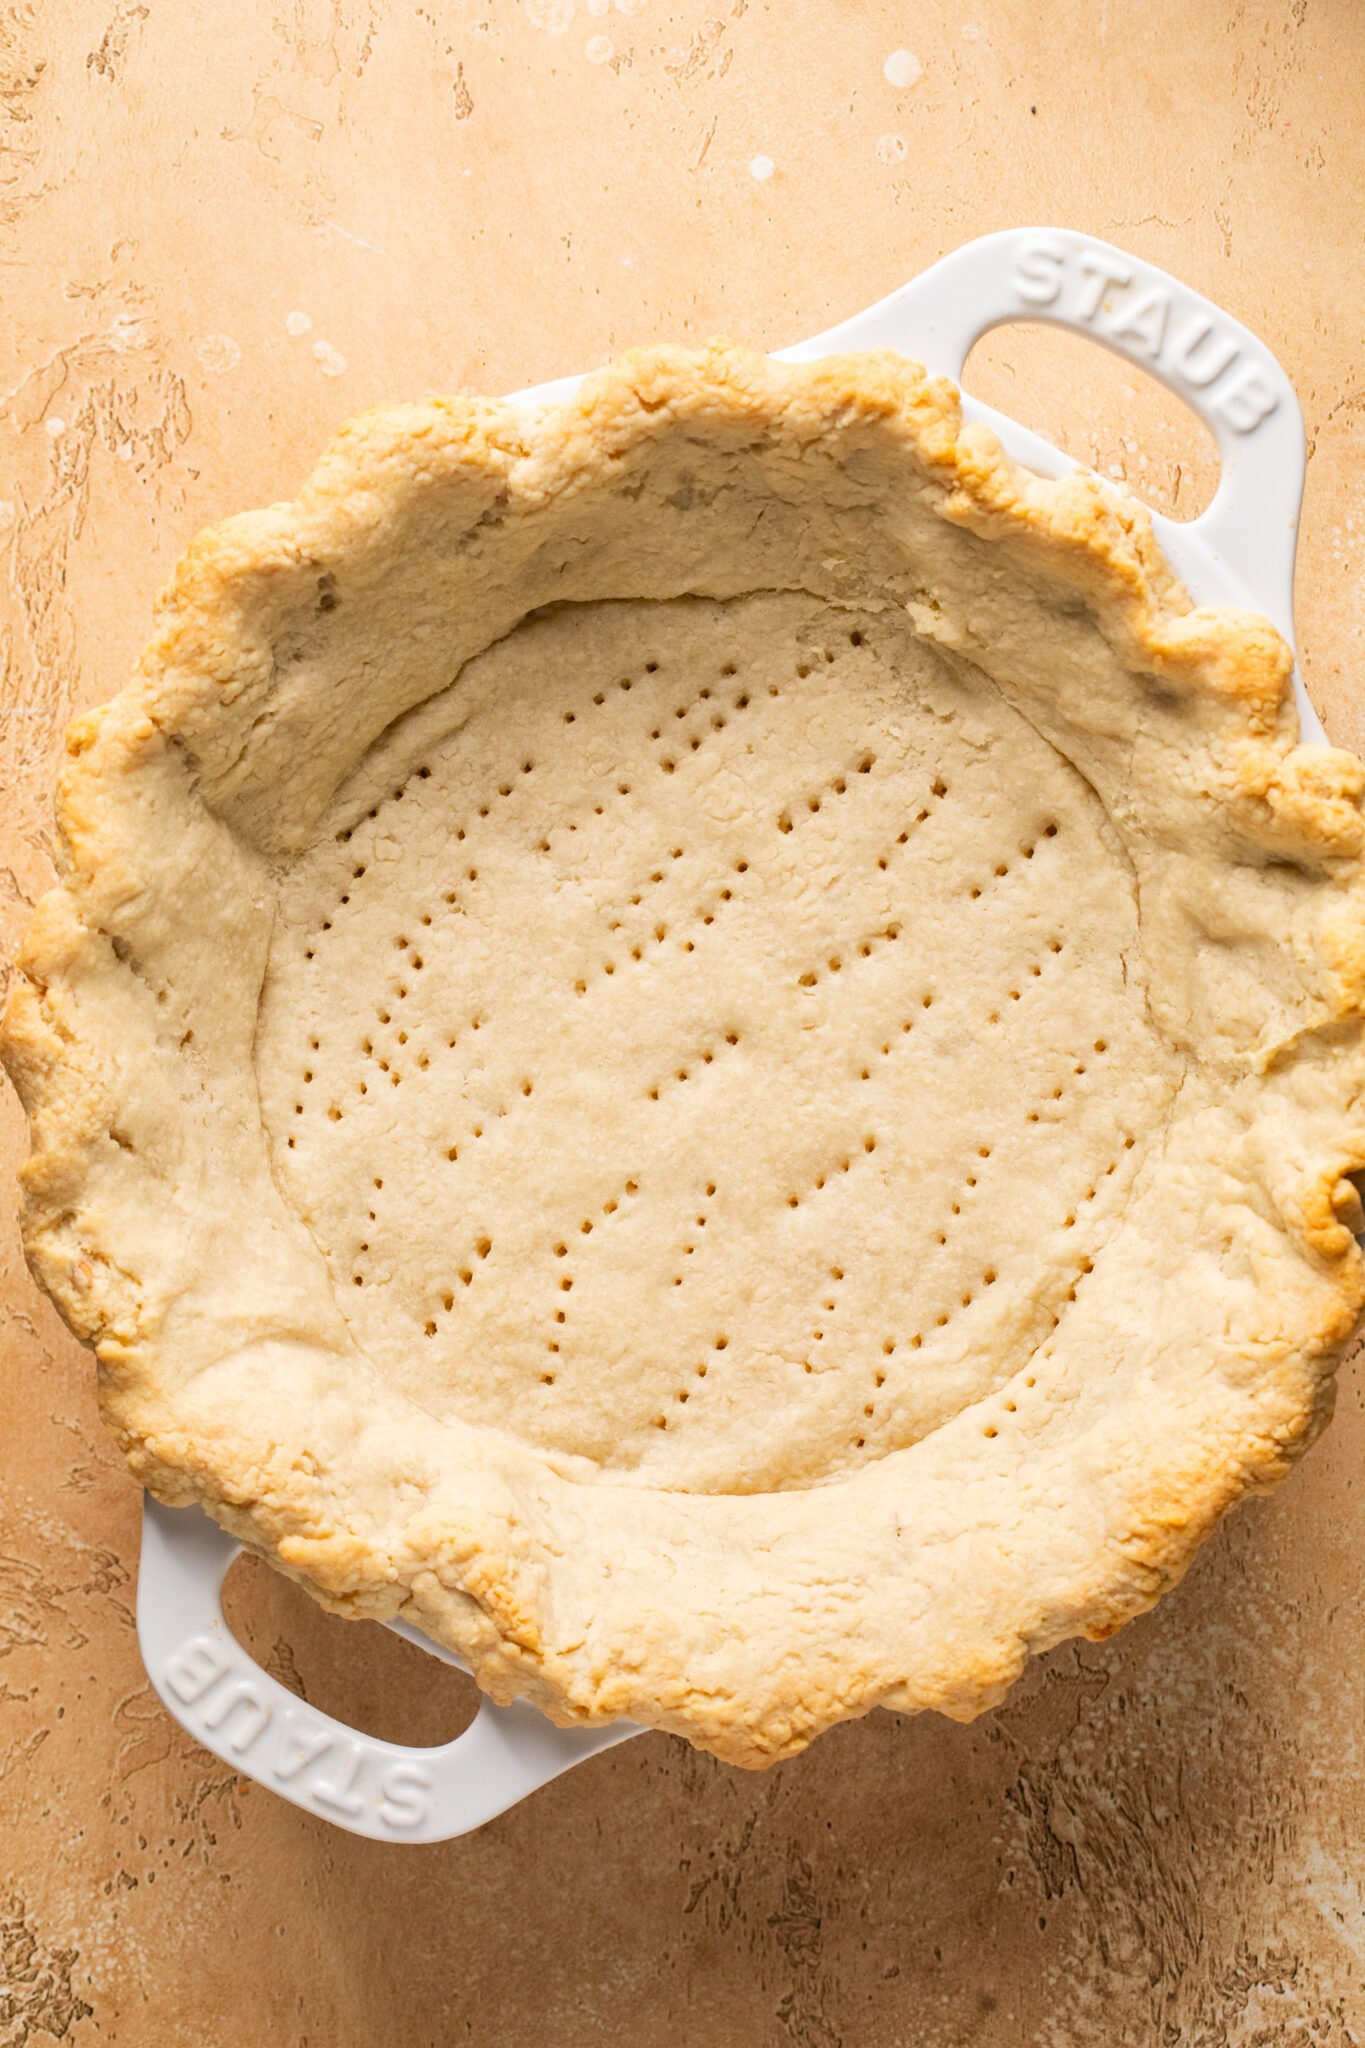
Crimp the edges
Crimp the edges! I like to do this using both forefingers and the thumb of one hand (see the video for more guidance). Place it back in the freezer to chill & then use as directed in your recipe! 🤗
Success Tips
I’ve failed at making pie dough many times and, through those failures, found the best tricks to make sure you succeed on your first try. Here are some of my best tips for you:
- Add the water slowly: don’t add all the ice-cold water in at once. Drizzle in 1 tablespoon at a time in the center, and push the dough towards it to incorporate.
- After you add the water, don’t knead it too much: Kneading the dough too much will ruin its chance of being flaky and delicious. Also, keep those chunks of butter you see. These will melt when baked into the dough to create gorgeous, flaky layers!
- Chill time: Once you form the dough into a disk, chill it for at least 1-2 hours or up to 3 days. This chill time hardens the butter and shortening to help the crust maintain its shape, and the rest time relaxes the gluten, making it easier to roll out and prevent shrinking when baking.
- Handle the dough as little as possible: Of course, we need to handle it some for it to come together, but the key is to work with the dough as little as possible and add water gradually, just until the dough comes together to keep it flaky instead of tough.
- Be mindful when rolling: Roll the dough from the center outwards, rotating it frequently to maintain an even thickness. Dust the surface and rolling pin lightly with flour to prevent sticking.
- Chill again: After you place the dough in the pie pan and crimp or flute the edges, this second chill before baking is key to help the fat stay solid until it hits the oven, ensuring a flakier crust.
pie crust tools
 Buy Now →
  Buy Now →
  Buy Now →
 FAQ
What is the purpose of blind baking pie dough?
Ideally, it’s simply to set the structure of the pie crust. This technique makes sure the crust is fully cooked, prevents it from becoming soggy or shrinking, and helps the crust hold its shape.
Can I make this recipe with all butter?
Yes, use a total of 14 Tbsp. butter for this recipe if you don’t want to use a combination of shortening and butter.
What can I use if I don’t have pie weights?
Dried beans, uncooked rice, or even sugar are all good options.
Can I use a food processor to make the dough?
You can, and I have before. But the flakiest and most tender pie crust is made with your hands and the pastry cutter.
Why is my dough crumbly and falling apart when I try to roll it out?
This could be for several reasons, but we can fix it! 1. The dough might need more moisture. Add a little more ice water, knead it into the dough, and then rest it in the fridge for a little longer. 2. Refrigeration rest time wasn’t long enough. The chill time allows the flour to hydrate fully and the gluten to relax, making the dough easier to roll out. If the dough hasn’t rested long enough, it may be more prone to crumbling. Make sure to chill the dough for at least an hour before rolling it out. 3. Your dough is too cold. I know it’s confusing; we want it cold but not super cold when rolling it out. If it’s too cold, it can become brittle and hard to roll out without cracking. I like to let it sit at room temperature for ~5-10 minutes to soften slightly before rolling.
What’s the best way to transfer the rolled-out dough to the pie dish?
A common method is to gently fold the dough in half or into quarters, transfer it to the pie dish, and then unfold it. Alternatively, you can roll the dough around your rolling pin and then unroll it over the dish.
Can I make pie dough ahead of time?
Yes, homemade pie dough can be made ahead of time. You can store it in the refrigerator for up to 3 days or freeze it for up to 3 months. Just be sure to wrap it tightly in plastic wrap before refrigerating or freezing.
Why is my pie dough sticky?
Sticky pie dough usually results from too much water or warm butter. To fix this, add a little more flour, a tablespoon at a time until the dough is manageable. Also, make sure to keep the ingredients cold to prevent the butter from melting too quickly.
Does my pie crust have to cool before I put the filling in it?
Generally yes. It will help the crust stay crisp, and the filling will bake evenly.
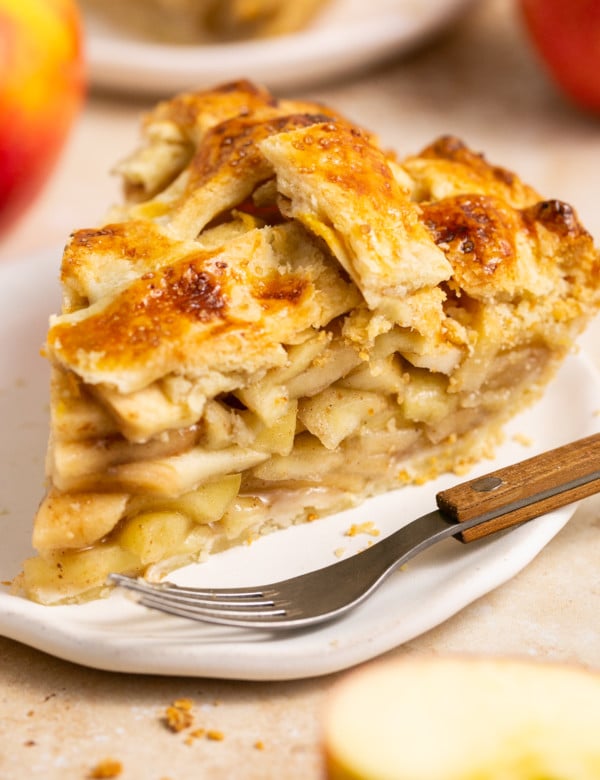
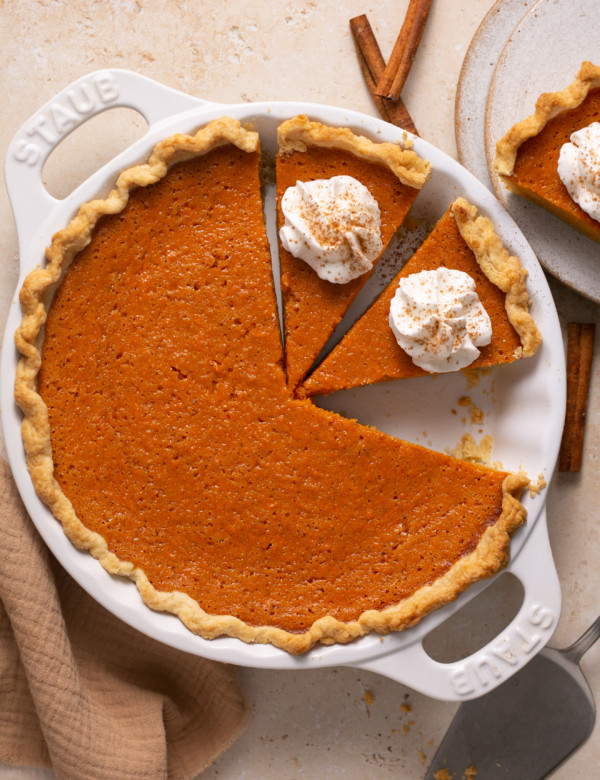
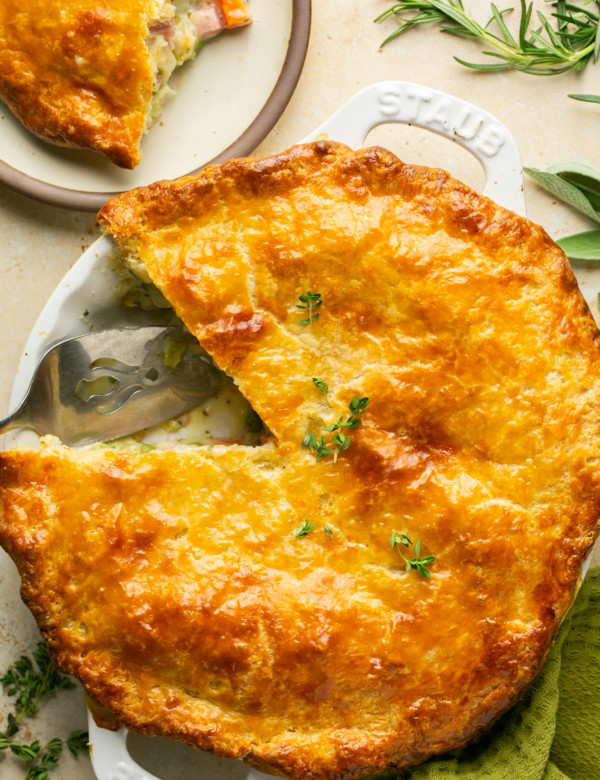
Pie Recipes To Make
Before You Begin! If you make this, please leave a review and rating letting us know how you liked this recipe! This helps our business thrive & continue providing free recipes.
Homemade Pie Dough
Ingredients
Single Pie Crust
- 1 2/3 cups all-purpose flour, spooned and leveled
- 1 Tbsp. granulated sugar (optional)
- 3/4 tsp. salt
- 6 Tbsp. vegetable shortening, cold, cut into pieces
- 6 Tbsp. unsalted butter, cold, cut into pieces
- 1/3 cup ice cold water, you may not need all of it
Double Pie Crust
- 3 cups all-purpose flour, spooned and leveled
- 2 Tbsp. granulated sugar (optional)
- 1 1/2 tsp. salt
- 8 Tbsp. vegetable shortening, cold, cut into pieces
- 8 Tbsp. unsalted butter, cold, cut into pieces
- 2/3 cup ice cold water, you may not need all of it
Last step! If you make this, please leave a review and rating letting us know how you liked this recipe! This helps our business thrive & continue providing free recipes.
Instructions
- Note: this recipe can make one single crust, or you can make a double crust if you need a top crust or for a lattice. Keep in mind when you divide the dough into 2 disks in Step 7, the bottom crust should be a little larger than the top crust. This is because the top crust only needs to cover the surface of the filling. But the bottom crust needs to hold all the filling. OR you can just divide it into 2 equal portion if you want 2 single pie crusts. 🤗
- Add a few ice cubes into a measuring cup and fill it with just about ⅓ cup of water. You won’t use all the water, about 1/4 cup is necessary. Set aside.
- Combine the flour, sugar (if using), and salt in a large mixing bowl.1 2/3 cups all-purpose flour, spooned and leveled, 1 Tbsp. granulated sugar (optional), 3/4 tsp. salt

- Add the small pieces of shortening and small pieces of butter into the flour. Cut in with a pastry blender until you get pea-sized bits and almond-sized bits of flour throughout the mixture.6 Tbsp. vegetable shortening, cold, cut into pieces, 6 Tbsp. unsalted butter, cold, cut into pieces
- Drizzle in 1 Tbsp. of the ice-cold water at a time, mixing and adding another tablespoon of water at a time to moisten everything. It will still be a bit crumbly and shaggy. You don’t want to add too much water because it will take away the crisp crust factor. You'll know you've added enough water when you can squeeze it together with your fingers.1/3 cup ice cold water, you may not need all of it
- Turn the crumbly dough out onto a lightly floured surface. Gather it into a ball and start to press it together. Fold the dough over itself a few times to create those buttery layers, being careful not to overwork the dough. We’re not kneading it here, more of a folding motion to bring it into a ball. Pro tip: if you've already added all the water but it still feels dry, add a little water into a spray bottle to spritz the dough with water if there are dry spots to help you control how much water you add to the dough.
- Press it into a 1-inch disk (or even a little less than 1 inch) with smooth edges and tightly wrap it in plastic wrap. (Here is where you can divide it into 2 disks if making the double crust). Chill in the fridge for at least 1 hour or up to 3 days.
- Remove the dough from the fridge and place it on the counter for 5-10 minutes to slightly warm up before rolling it out. If you roll it out straight from the fridge, the edges may crack.
- Lightly flour a clean work surface and a rolling pin. Lightly flour both sides of the dough and gently press it into a large circle, starting at the center and working out. Keep the dough moving, lifting, turning, rotating, and flipping so it doesn’t stick. Re-flour the rolling pin as needed and roll it into about a 12-inch circle.
- Transfer the dough by carefully rolling it around your rolling pin, using a bench scraper to help lift it off the work surface if needed. Unroll it over a 9-inch pie plate, gently easing it into the pan to settle it down, rather than pressing it down.

- You can trim any really long bits of pie dough that may be hanging over, and fold the other hanging parts of pie dough under itself to strengthen the crust into a thick, sturdy crust.
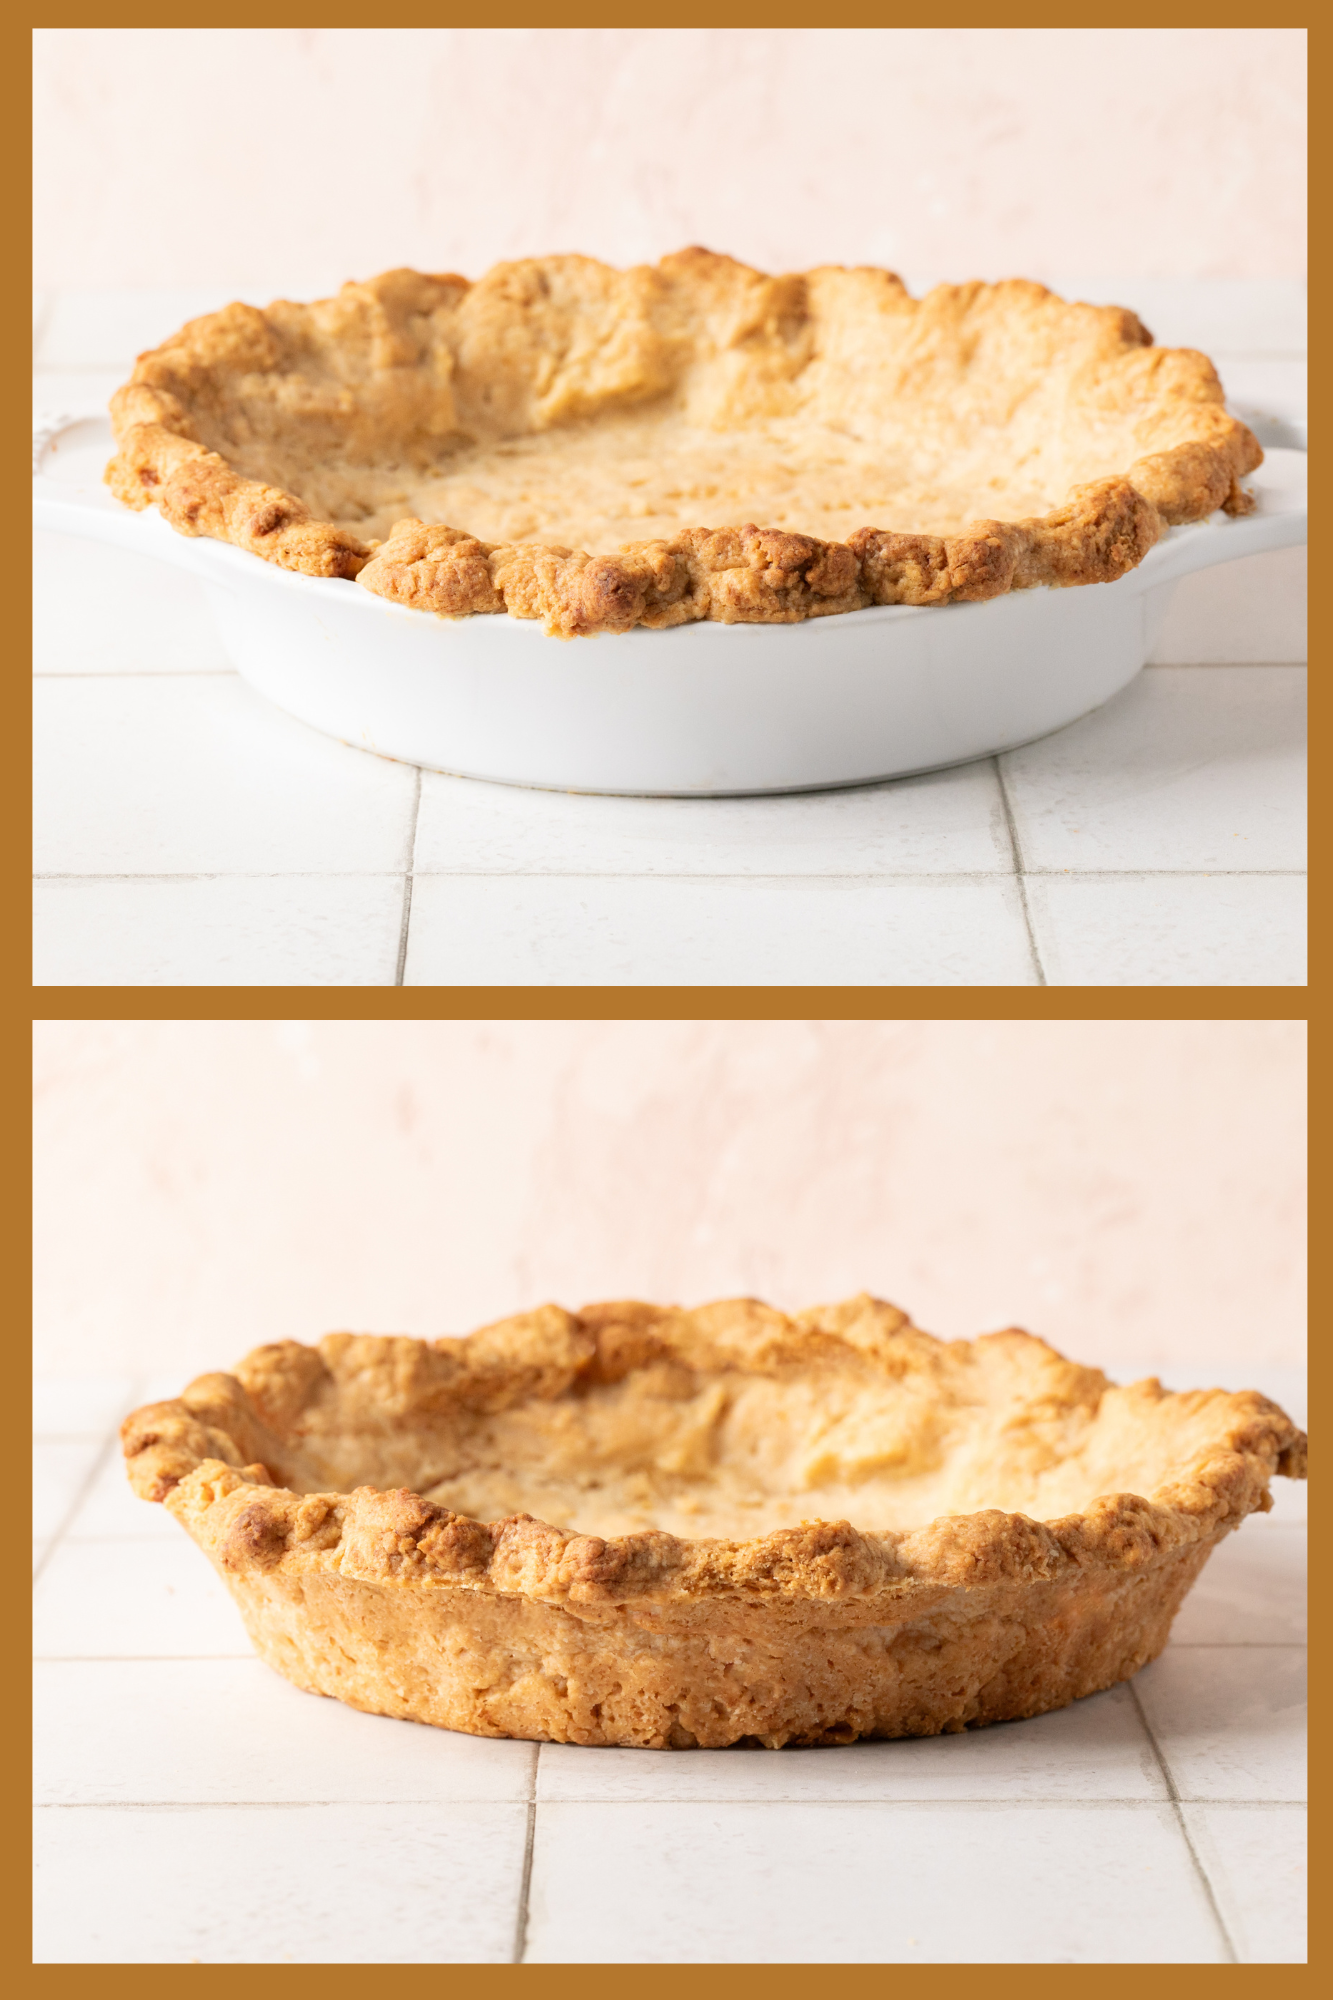
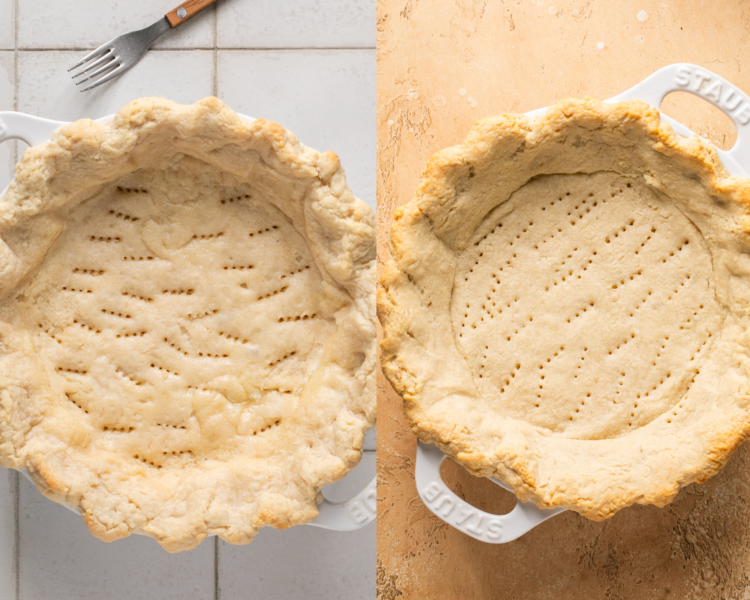
- Flute/crimp the edges of the dough: you can use the forefinger of one hand and the thumb and forefingers of your other hand or I also like to use both forefingers and the thumb of one hand (see video).
- Place back in the freezer for at least 30 minutes to chill again. This last chill seals in the crimp pattern and really ensures the dough is cold. From here you can fill with desired pie filling or follow next steps if you need a baked pie shell.

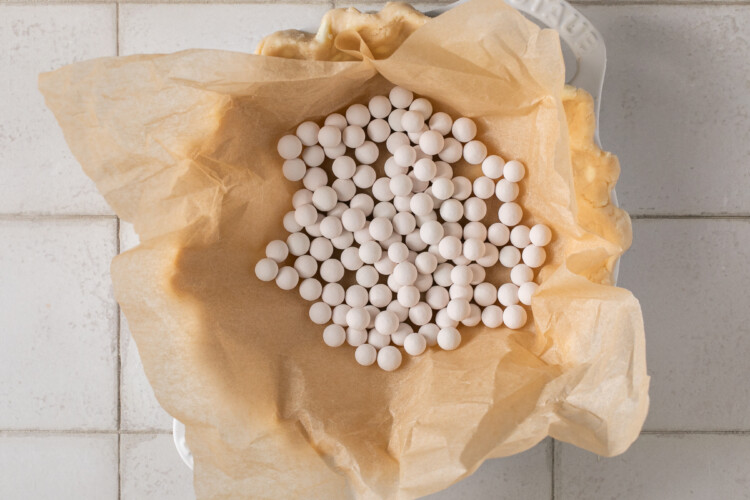
Blind Bake/Par-Bake Instructions:
- Preheat the oven to 375°F. Crunch up a piece of parchment paper or piece of foil and open it back up. Place it onto the unbaked pie crust. Pour pie weights (or dried beans) on top of the parchment paper and push the pie weights all along the center and sides. You’ll need enough pie weights to fill it, I usually use 2 packs. Place on a rimmed baking sheet. (This just makes it easier to take in and out of the oven so the oven mitts don’t touch the crust).
- Partially baked pie crust: Bake for 10-15 minutes or until the edges get golden. Remove from the oven and carefully lift the parchment/foil and pie weights, and set aside. Using a fork, poke holes all over the bottom of the pastry dough. Shield the edges of the pie dough with a pie shield or foil and place bake in the oven for 7-8 more minutes or until crust appears dry. The crust will be partially baked at this point.
- Fully baked pie crust: If you need a fully baked pie crust, bake for 10-15 minutes more or until the crust is golden brown.
Notes
- Make ahead: the pie dough may be prepared, wrapped tightly in plastic wrap, and refrigerated for up to 3 days. When you’re ready to roll out, be sure to allow it to sit at room temperature for 10ish minutes before rolling so the edges don’t crack.
- To freeze the dough: you can make the recipe all the way to step 6. Tightly wrap the disk in plastic wrap and place in a freezer safe baggie. When ready to use the dough, thaw overnight in the fridge.
- Food processor: to make this in a food processor, blitz the dry ingredients together. Then pulse in the shortening and butter. Slowly drizzle in the cold water until the dough starts to stick together, but it will still look a bit shaggy. Turn the dough out onto a clean work surface, and repeat the same steps starting at Step 6.
Nutritional information is provided as a courtesy and is automatically calculated. It should only be construed as an estimate rather than a guarantee. Ingredients can vary and Kroll’s Korner can’t make any guarantees to the accuracy of this information.

This pie crust is my new favorite. Easy to work with and so flaky. I made an apple pie with crumb topping and a pumpkin pie with the double crust recipe. No problem with them shrinking or rolling them out large enough to fit in my 9.5″ glass dish. I did not blind bake them and they were golden and flaky
So glad it worked out even without the blind baking 🙂 thank you so much!