Homemade Crunchwrap Supreme
This post may contain affiliate links. Please read our disclosure policy.
If you’re craving the crispy, cheesy, and beefy deliciousness of a Taco Bell Crunchwrap Supreme, you can now make it better with my Homemade Crunchwrap Supreme recipe! Seriously, the homemade version is unbelievable!
Thanks to my Copycat Series, you can make many of your favorite restaurant or store-bought recipes better at home. I made a copycat Taco Bell Mexican Pizza when they took it off their menu in 2020, but sometime in 2022 they returned it to their menu. Nonetheless, my homemade Mexican pizza is SO delicious and really easy to make. And recently, they introduced the Steak and Queso Crunchwrap Sliders in honor of the 20th anniversary of the Crunchwrap Supremes. I’ve been wanting to try them and make a copycat recipe for those too…stay tuned!
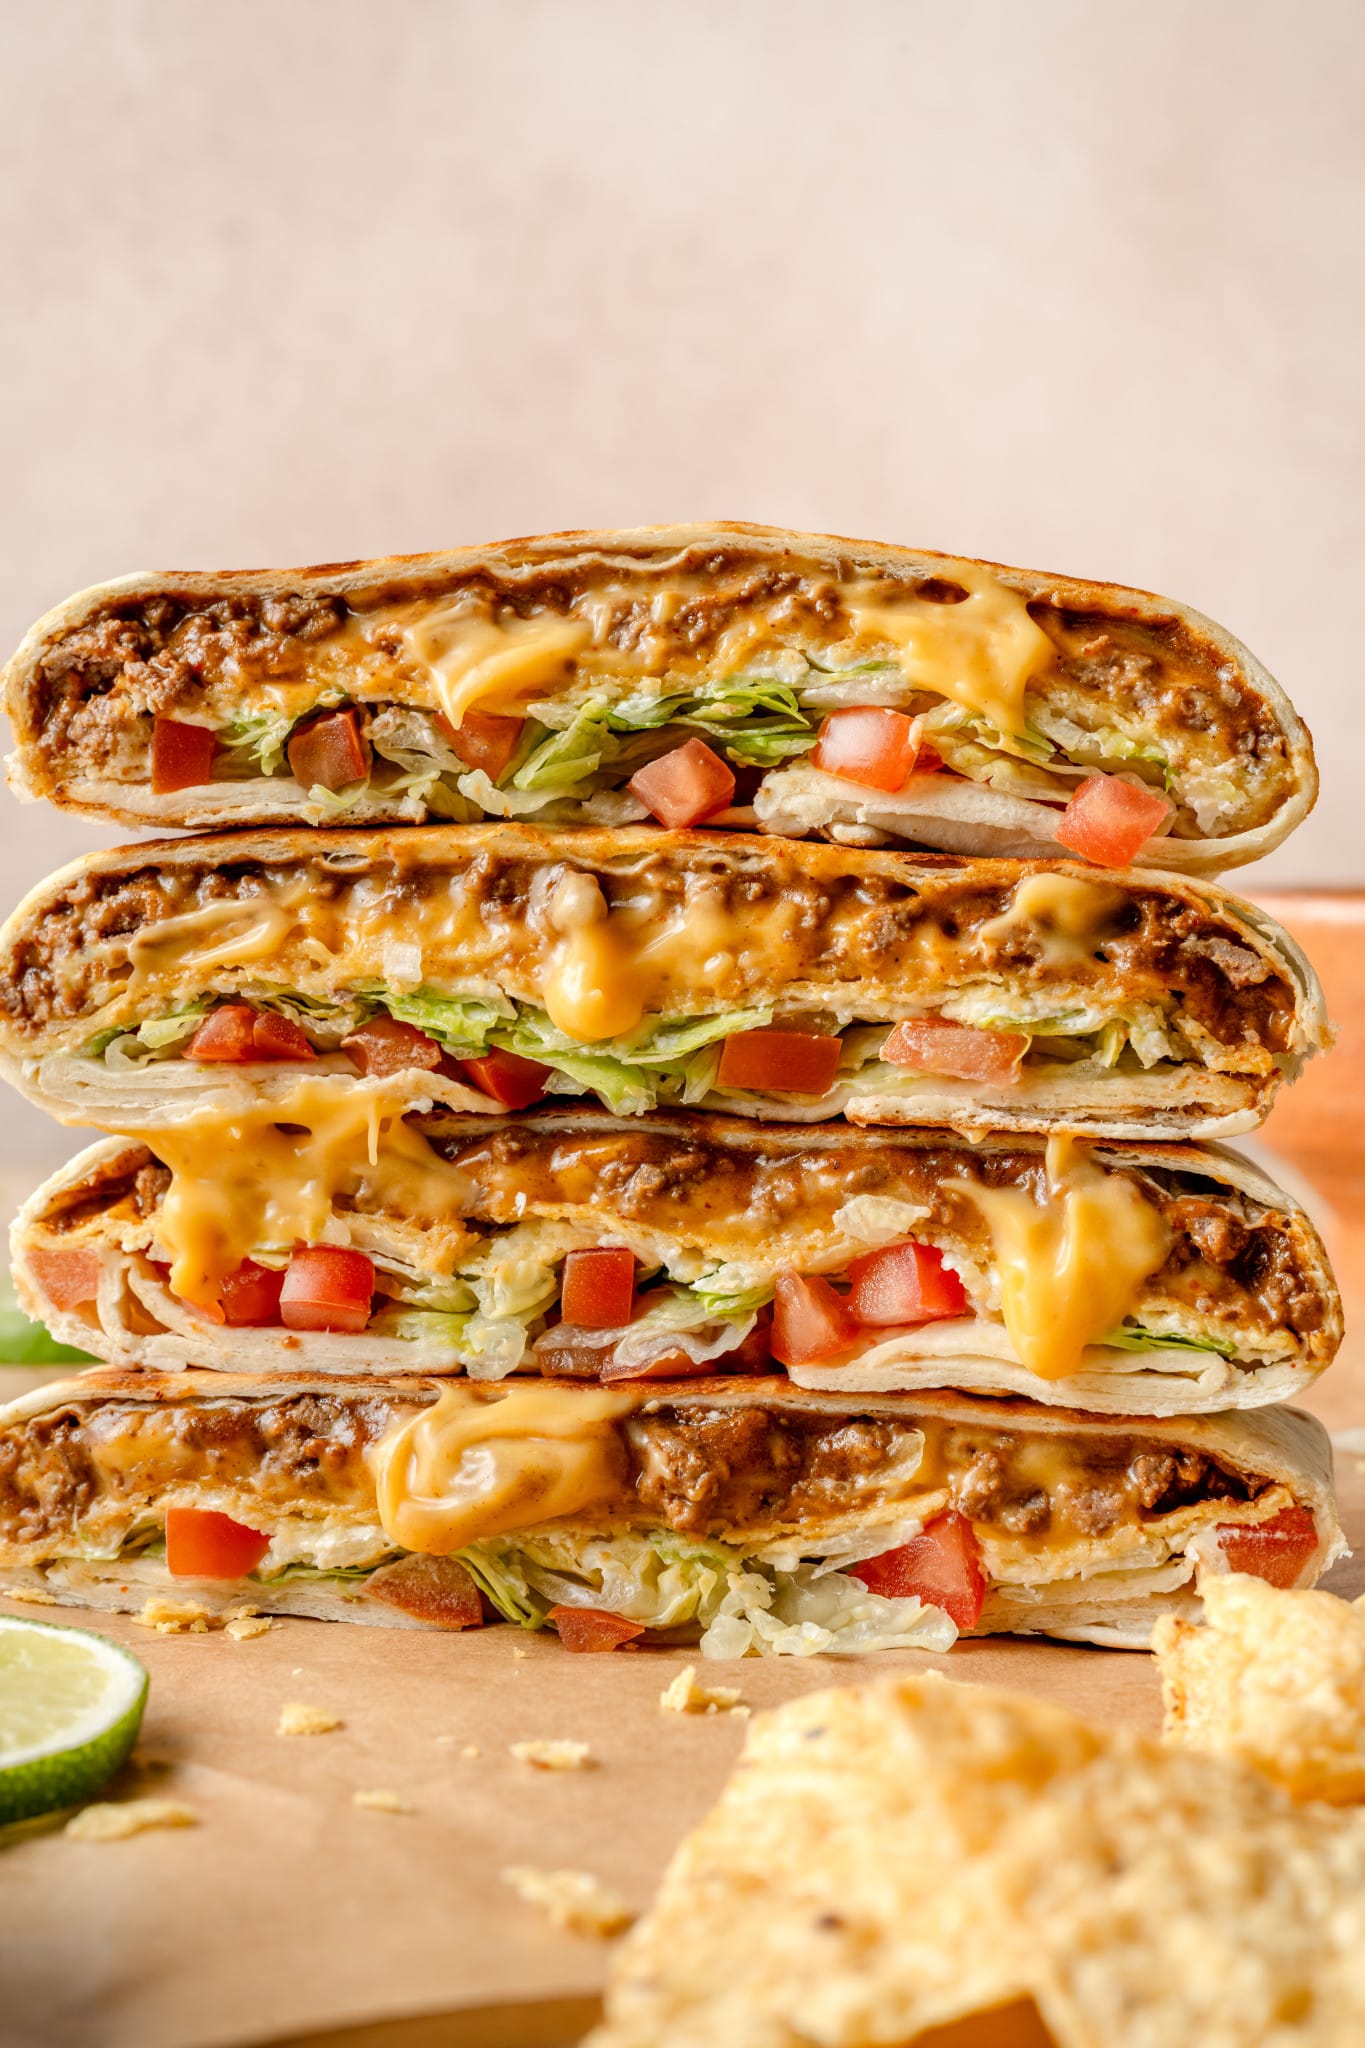
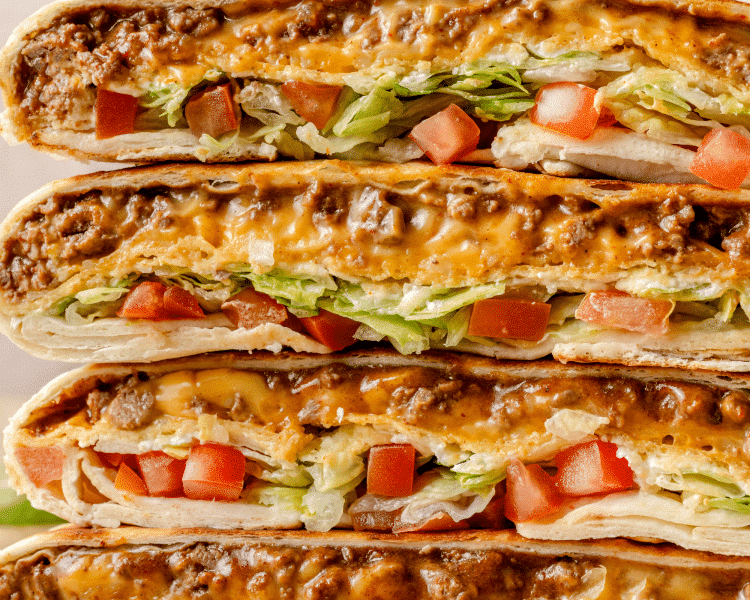
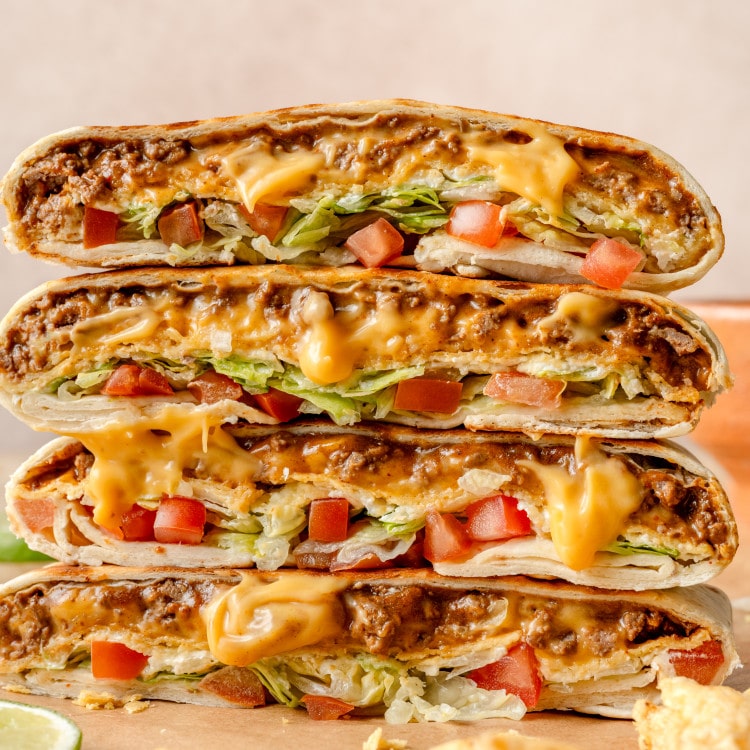
But back to the topic of discussion. This Homemade Crunchwrap Supreme has all the same flavors you love, but it’s fresh, more customizable, and just as satisfying. It’s layered to perfection to give you balanced flavors in each bite, and the crispy, golden brown exterior is just so good. I like to add more beef and cheese to mine because I feel like the original version has barely any in it, dontcha agree?!
It’s fun for dinner, or you can meal prep a few for the week! Be sure to check out my storage and reheating tips below.
Try my Panda Express Chow Mein, Olive Garden Breadsticks, or Panera’s Broccoli Cheddar soup for more savory copycat recipe ideas! And for more easy Mexican inspired recipes, try my Baked Chicken Tacos or Baked Beef Tacos!
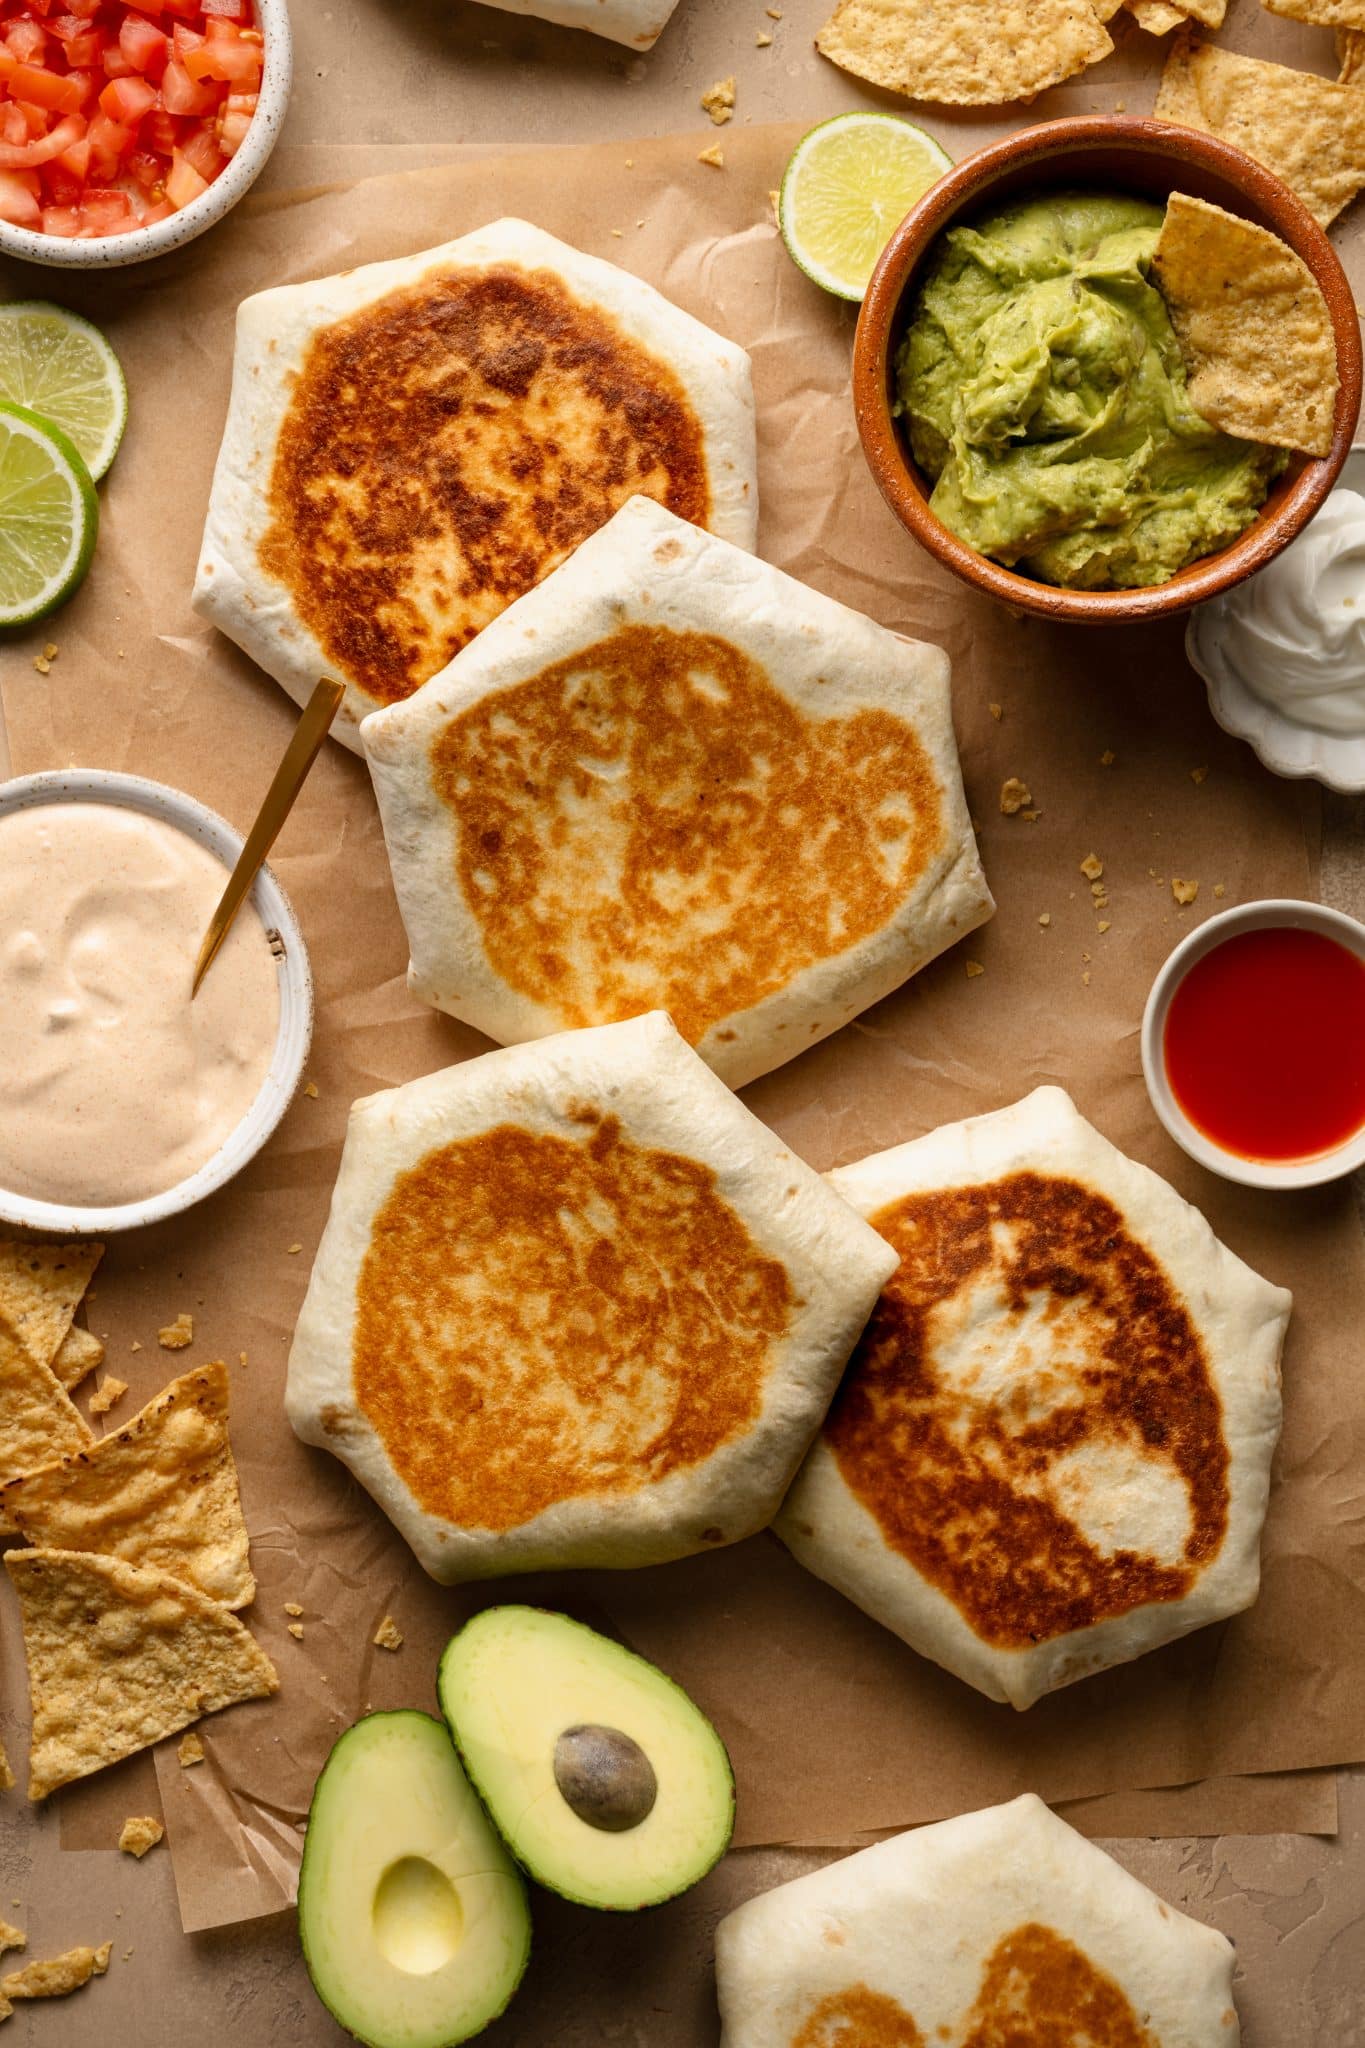

 Table Talk with Tawnie

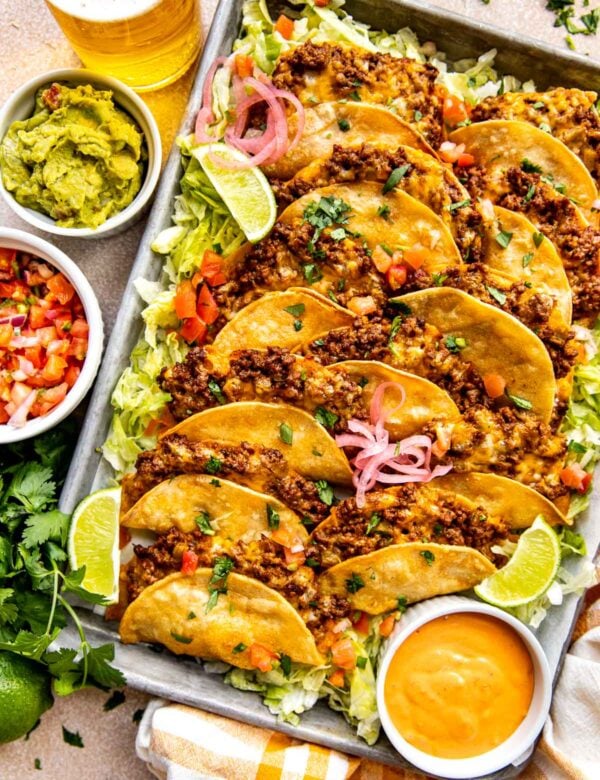
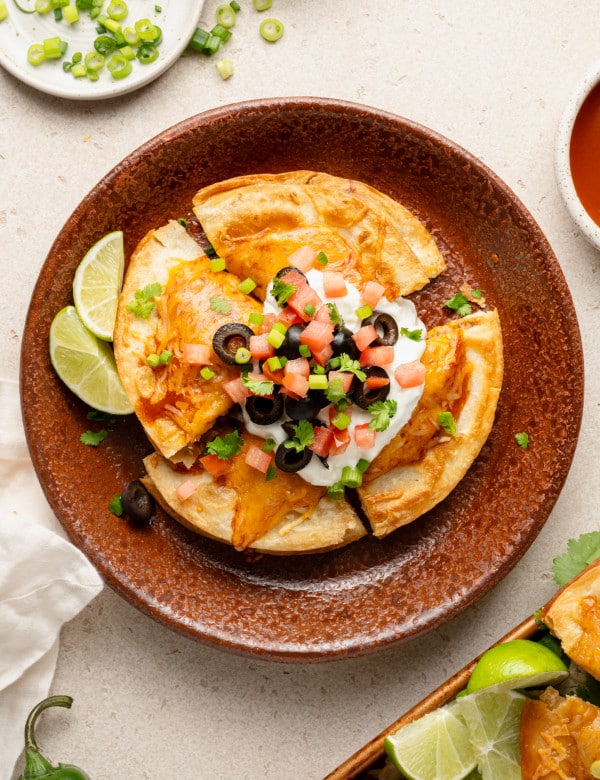
I feel like there are 2 camps: you either love Taco Bell’s Crunchwrap Supreme orrrrr you don’t. I fall under team LOVE it and it’s my go-to menu item. *And the chicken quesadilla of course*. When I am craving their quesadilla, I actually make my Sheet Pan Quesadillas and dunk them in the creamy jalapeno sauce (I have it listed in that blog post) and I swear it tastes just like Taco Bell’s! Anyways, these Homemade Crunchwraps have not only been a second trimester pregnancy craving, but pretty much a lifelong obsession, haha. Homemade really is SO much better, fresh, and I love being able to customize it at home. I sometimes add in pickled jalapenos to kick the spice level up a notch and I’ve added a layer of refried beans before too! Check out the variations section below for more ways to customize these delicious hand held pockets of heaven!
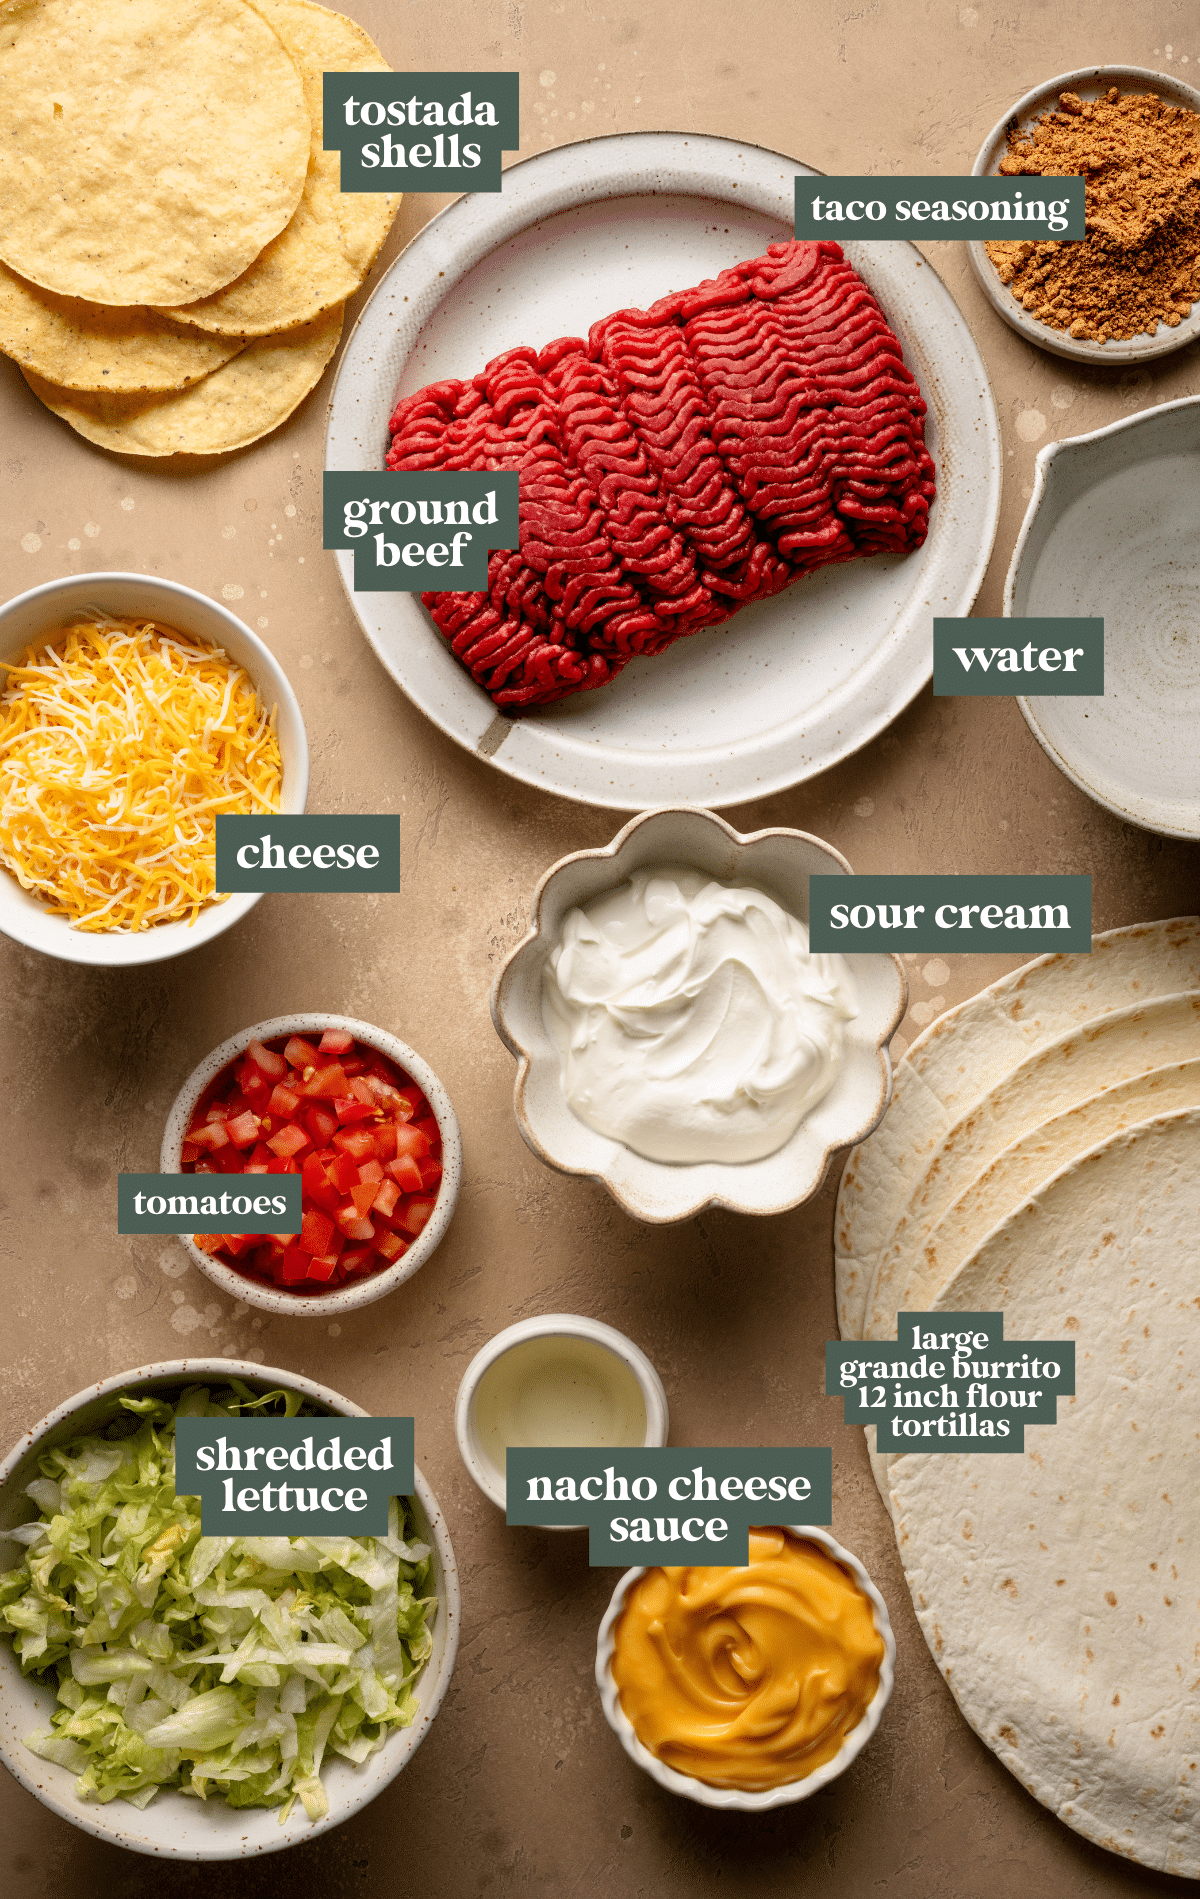
- Ground beef: ground beef is the traditional choice, but you can have fun with using other ground meats like ground turkey, ground chicken, ground pork, chorizo. Or use shredded chicken, shredded beef, or pulled pork.
- Tortillas: find the largest ones! I recommend using a 12-inch so when you fold, it covers all the fillings. The brand I typically buy is Guerrero.
- Tostada shells: adds that crunch we all love! You could even use crushed chips or Doritos for a fun twist.
- Taco seasoning: a store-bought packet works great, or use homemade if you have a favorite recipe.
- Nacho cheese sauce: necessary for the creamy, cheese goodness.
- Veggies: shredded lettuce and tomatoes. Or you can add guacamole, avocados, pickled jalapenos, grilled onions or bell peppers, etc.
Step by Step Directions
(For the full recipe, scroll down to the recipe card below)
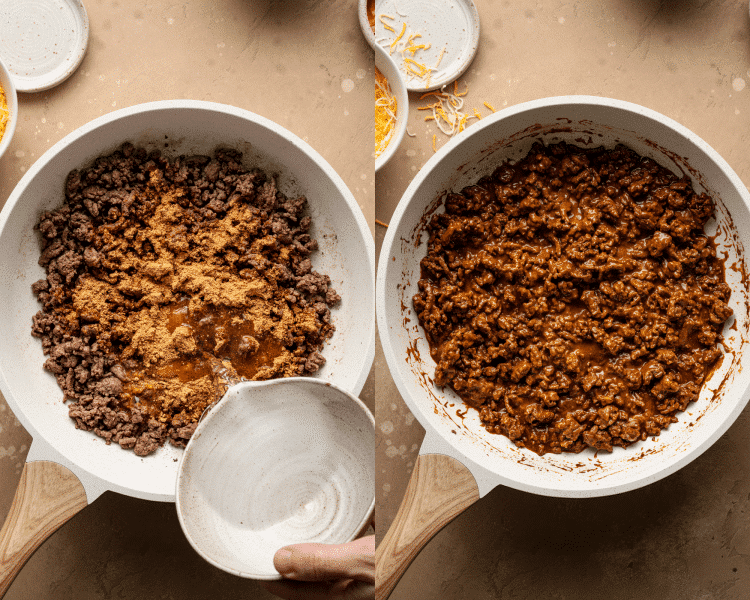
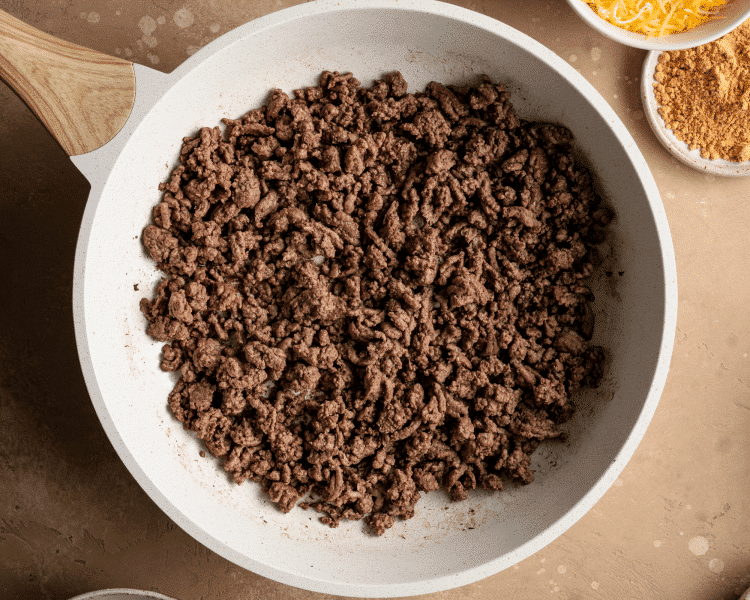
Cook the ground beef
Cook the beef, and drain the excess fat. Add the taco seasoning and water. Then the cheese. So far, so good! You haven’t even had to chop anything yet, woo!
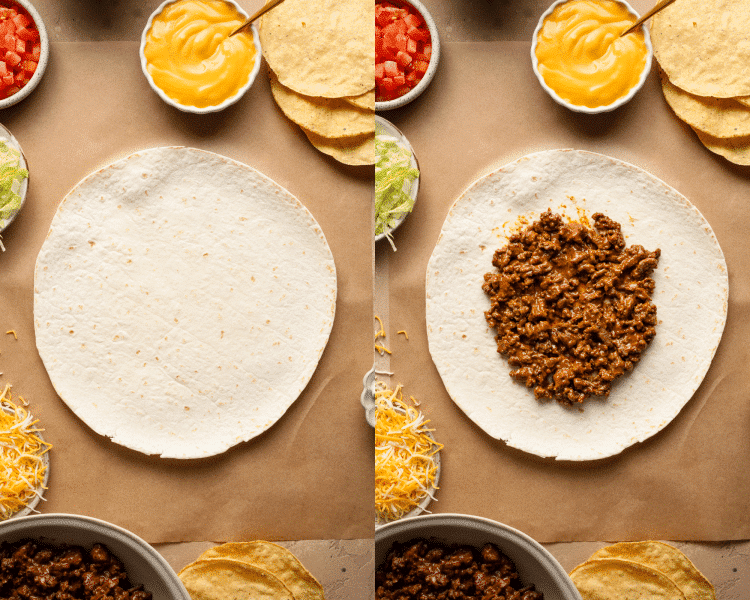
Assembly time
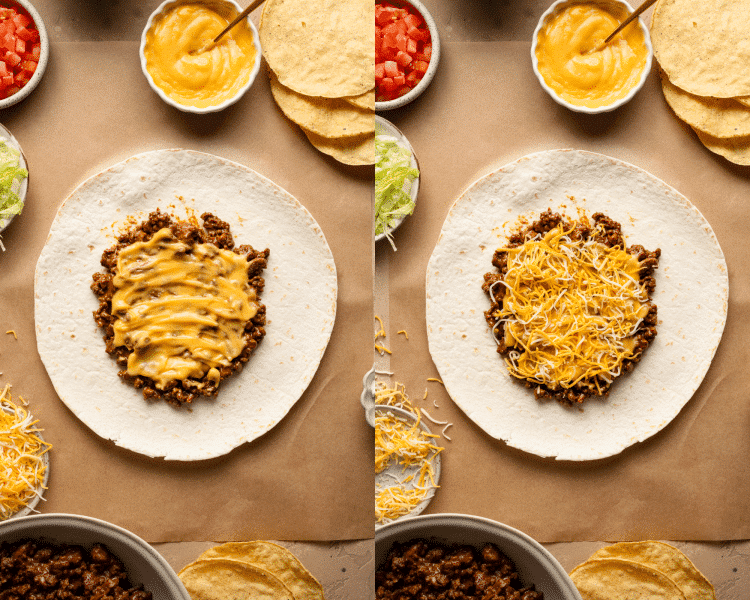
Snag the largest tortilla you can find, I recommend a 12-inch. Place the cheesy beef down first.
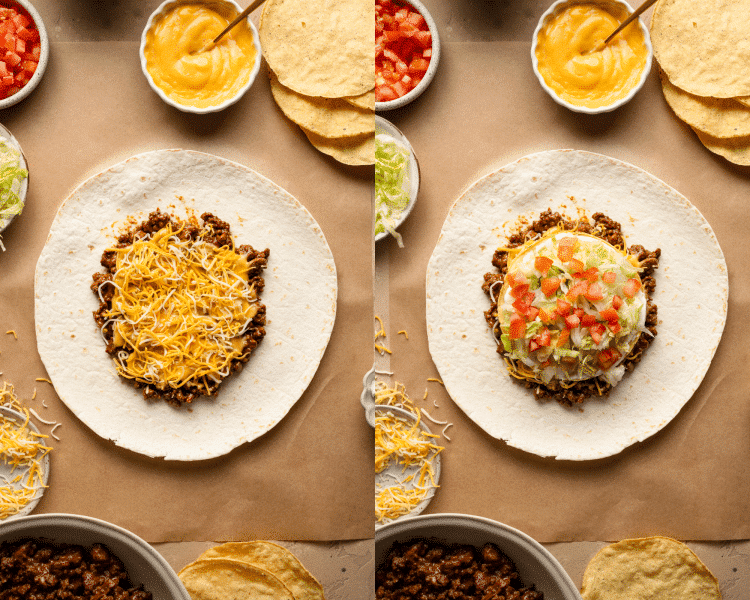
Layers!
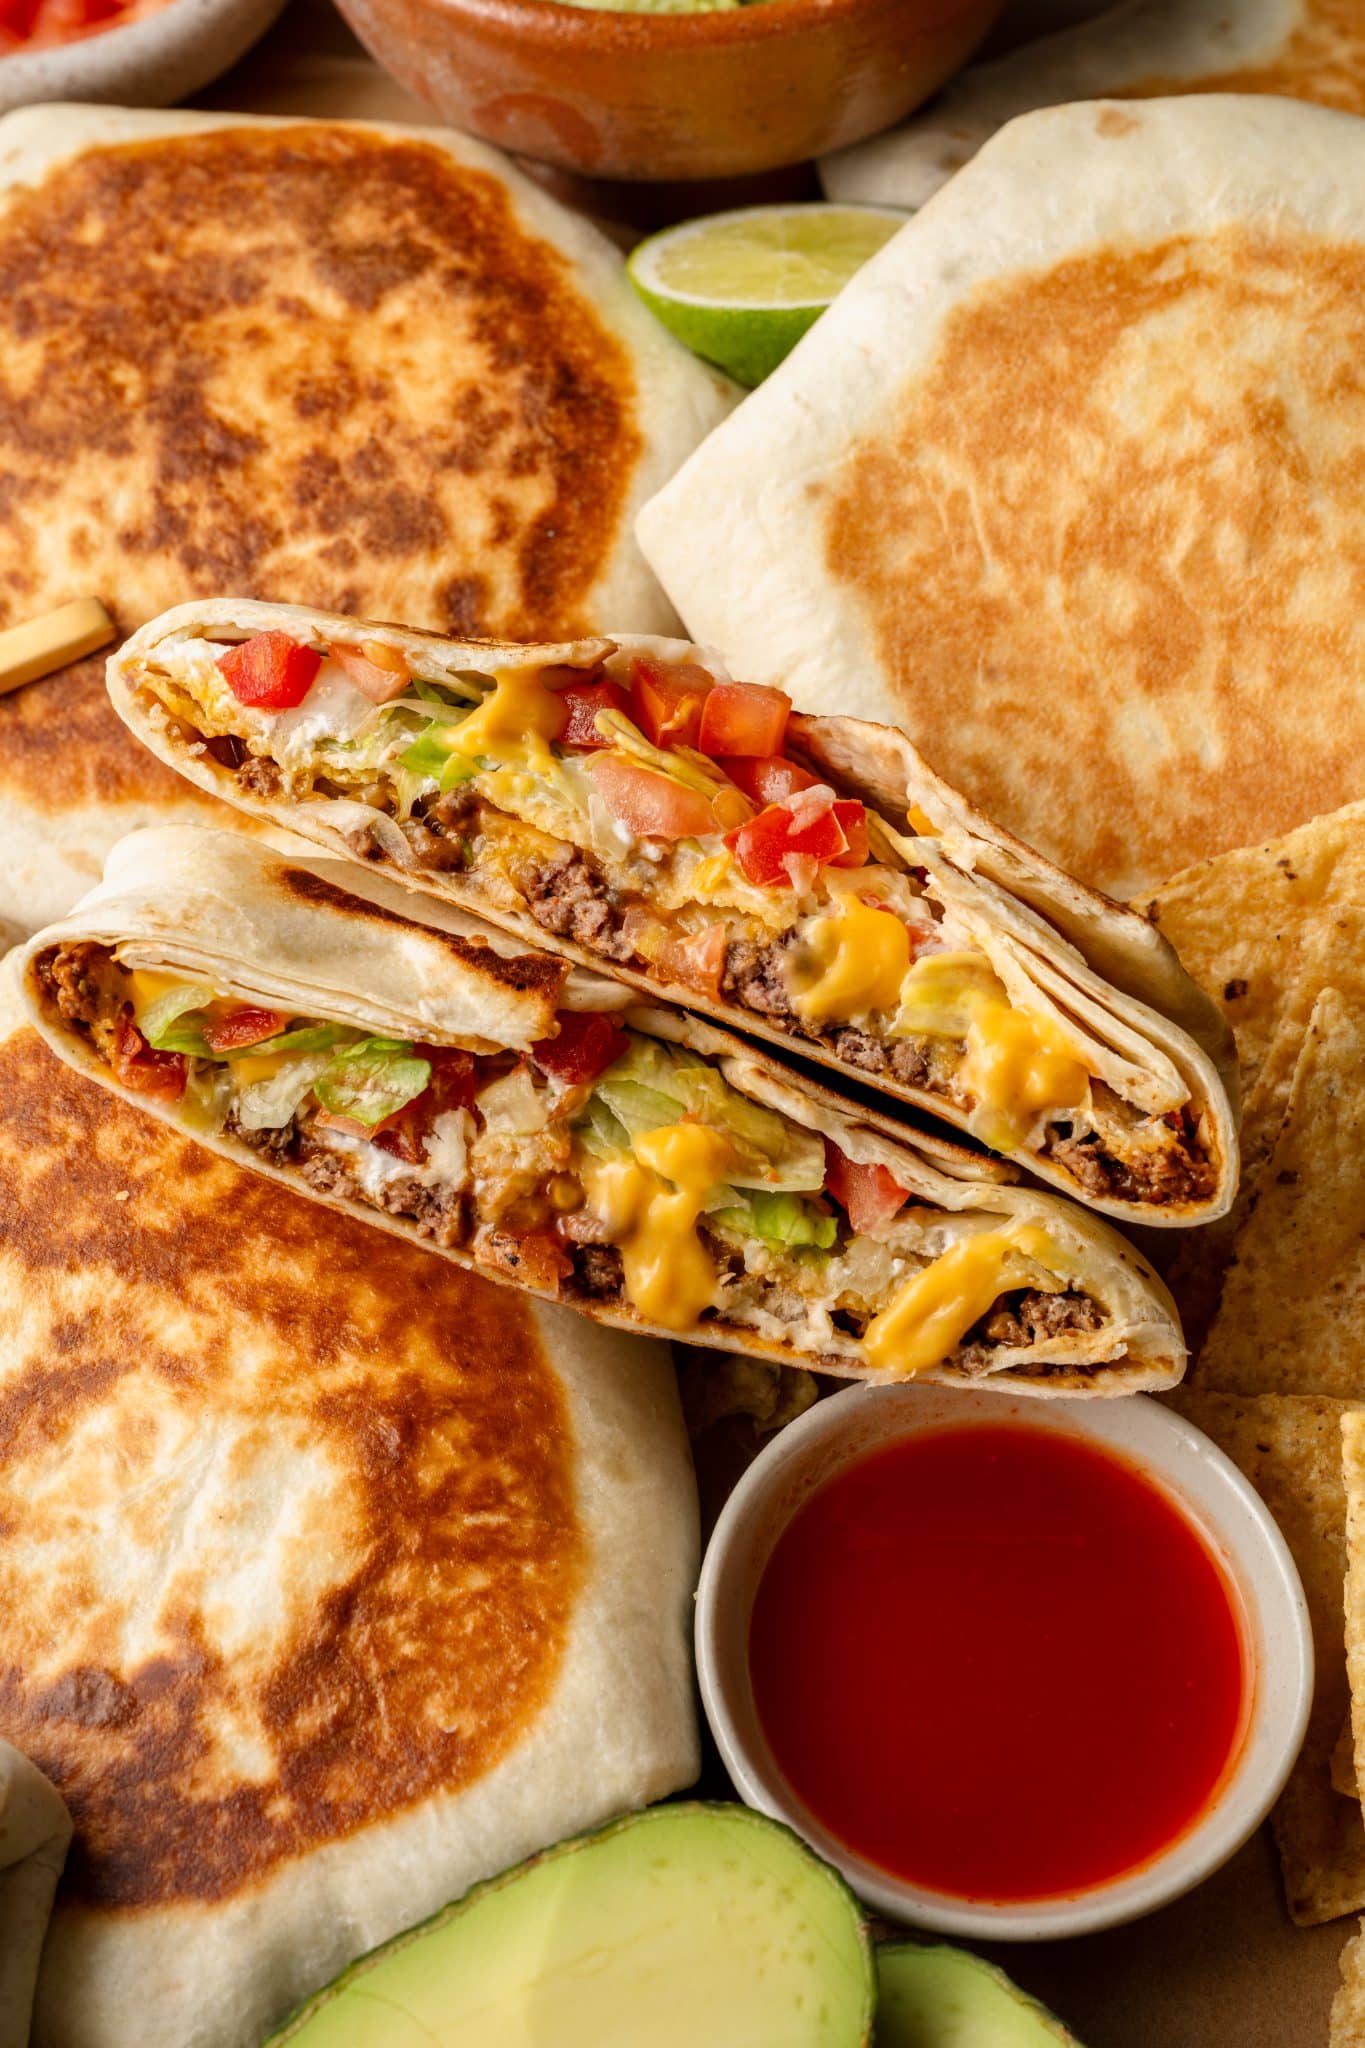
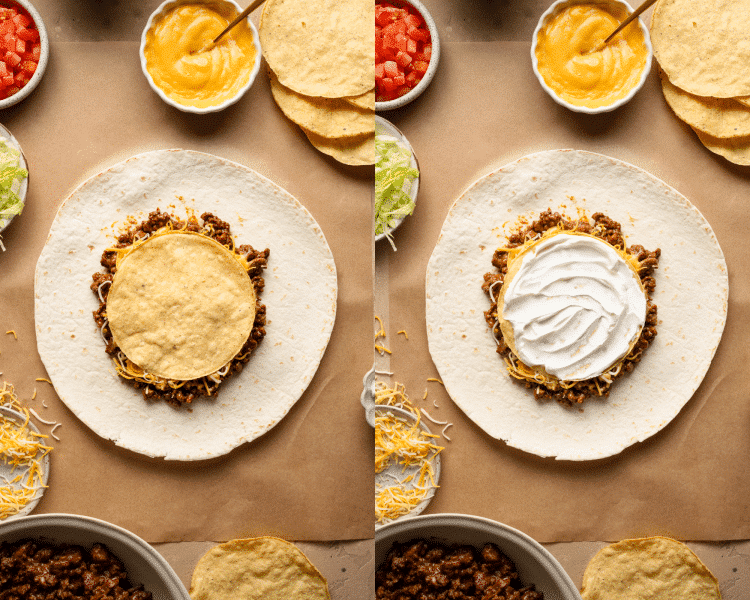
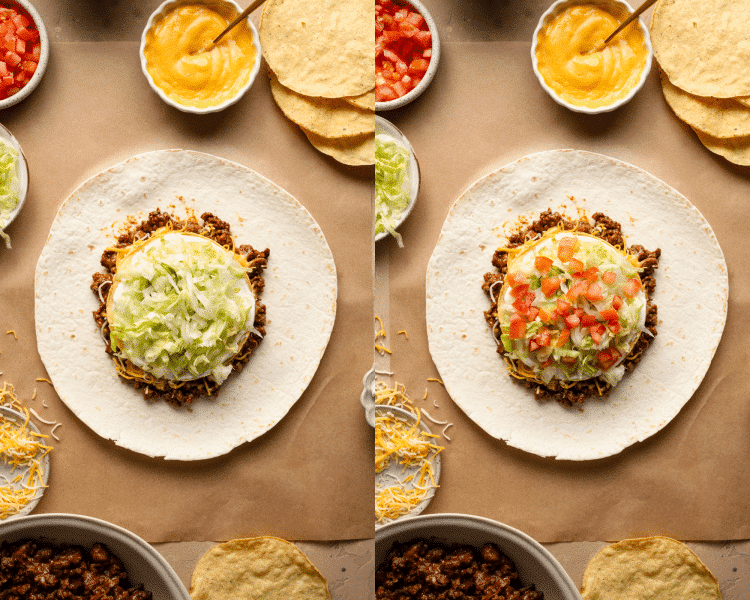
I like to layer the warm layers on first, the tostada, then the cold layers. Tortilla ➡️ beef ➡️ nacho cheese sauce ➡️ shredded cheese ➡️ tostada shell ➡️ sour cream ➡️ lettuce ➡️ tomatoes ➡️ done!

Fold
Fold to create pleats. The 12-inch tortilla will give you a perfectly sealed crunchwrap, but if you have a small gap like in the photo shown when using a 10-inch tortilla, see my tips section on how to fix this if you’d like!
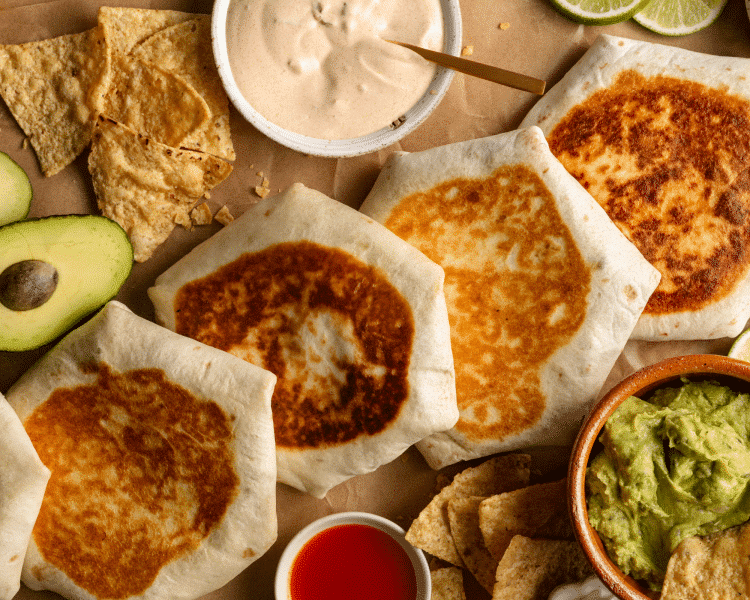
You’re so golden🎵🎶
Get those exteriors crispy in a pan either in a dry nonstick skillet or you can use a little oil or butter to help crisp them up. Gently press down on them while they are browning to get a nice golden exterior, but be careful not to burn. It should only take 1-2 minutes per side.
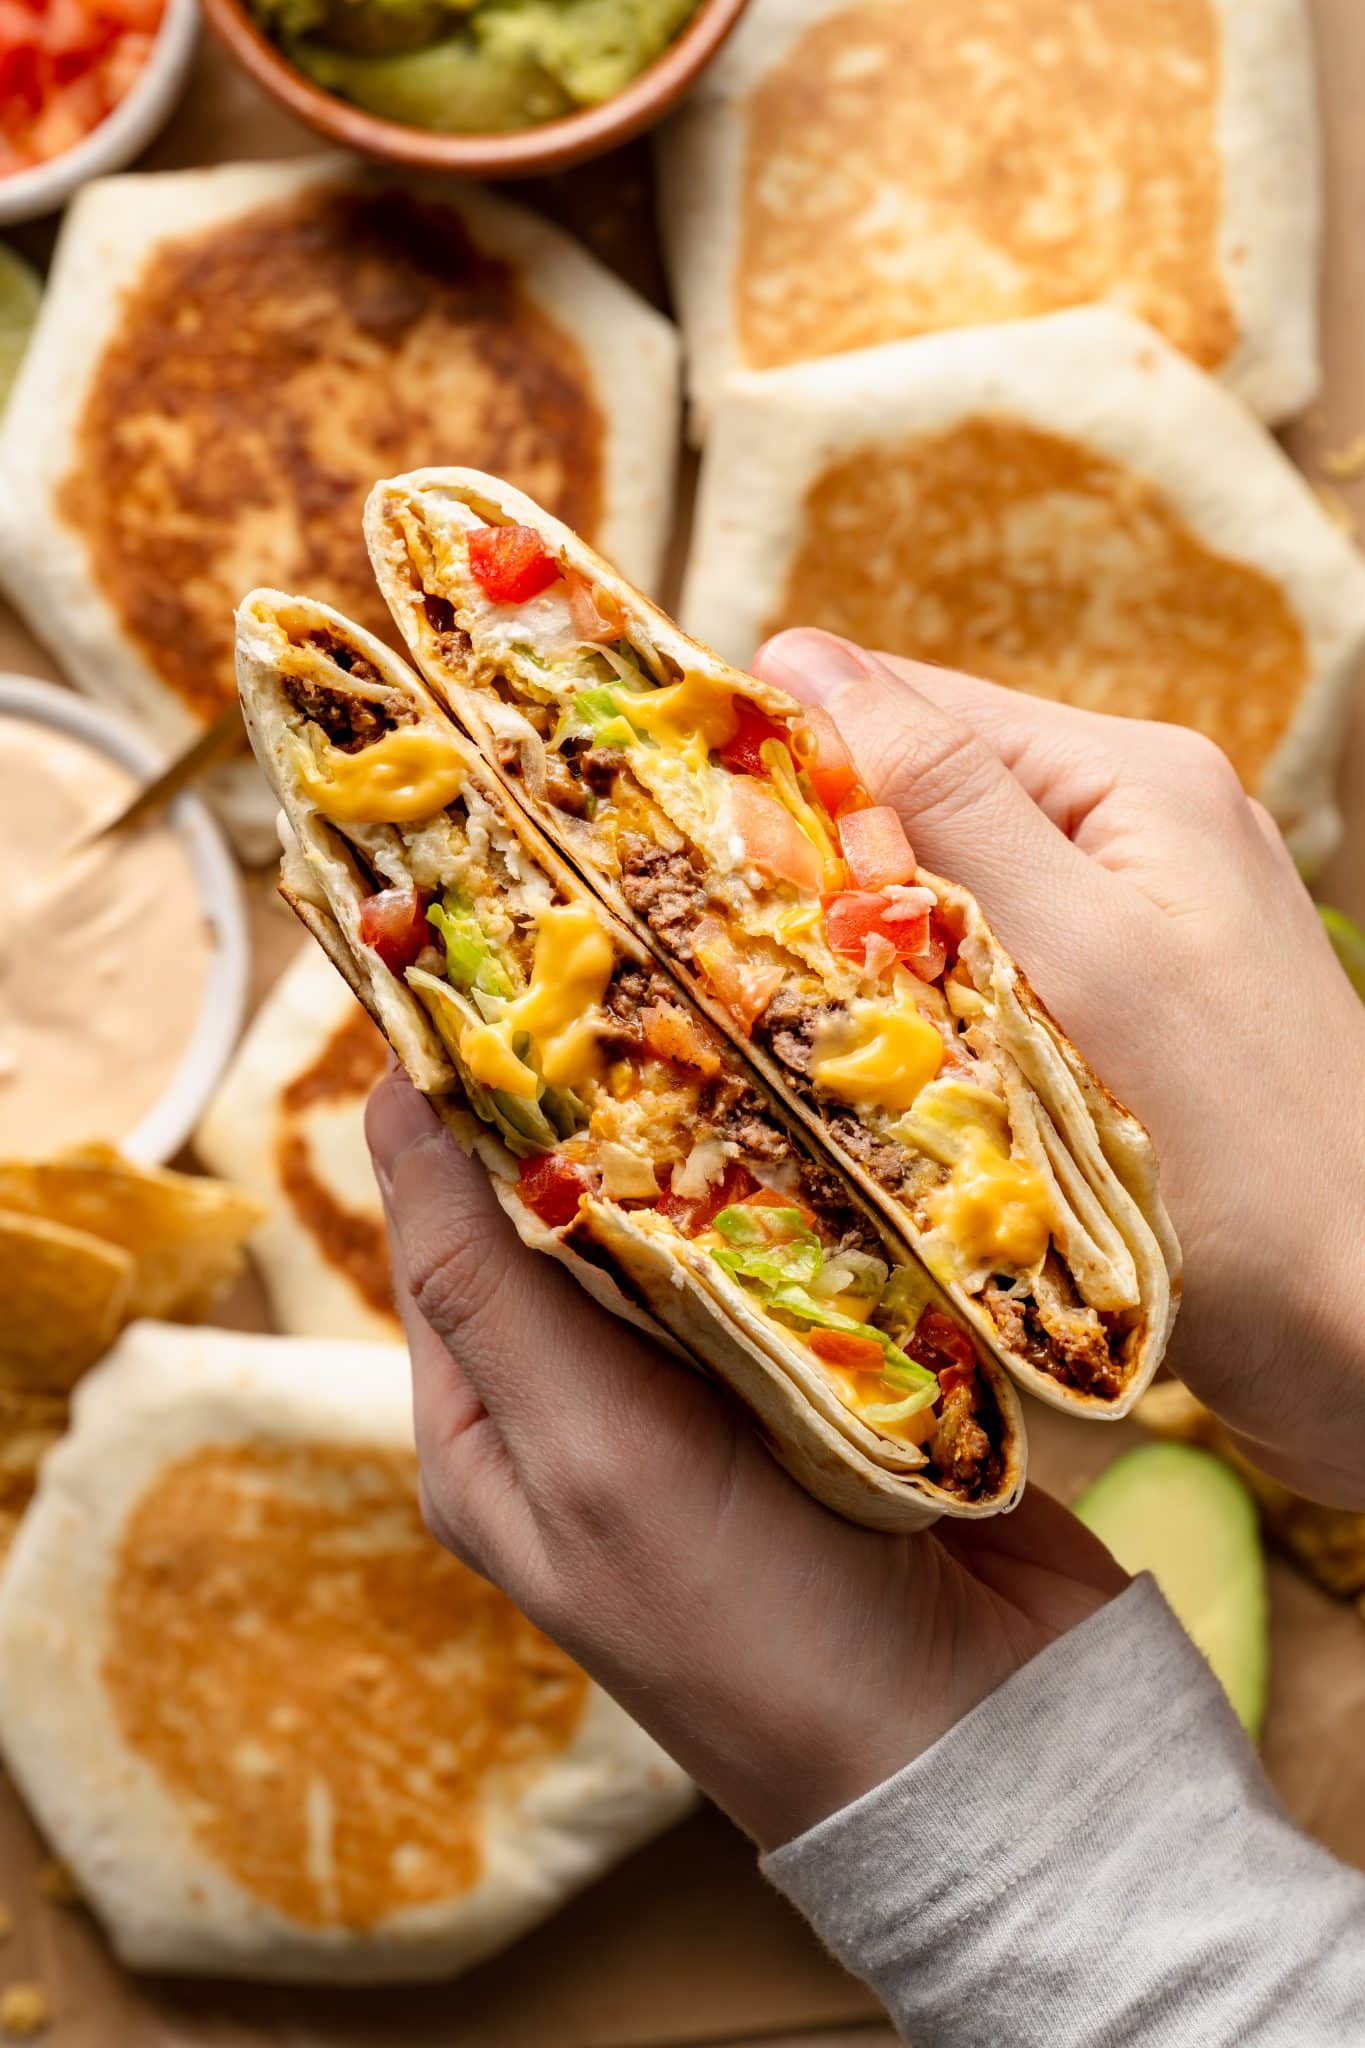
Devour!
The picture says it all. 🌮🔥
Expert Tips
- Smaller tortillas? No problem! If you only have 10-inch tortillas, and there is a small gap that doesn’t cover the fillings in the center when you make your folds, here is what you’ll do: cut one of the 10-inch flour tortillas into quarters. Place one of those quarters on top of the lettuce and tomatoes, and then continue on with your folds.
- Warm the tortillas first 🌯🔥 if they are cold or have been in the fridge, warm them on a dry skillet for a few seconds to make them more pliable. This way, when you make the folds it won’t tear.
- Fold it tightly for a secure crunch wrap 🔄 I like to use my hand to keep it secured as I fold it.
- Cook seam-side down 🔥 This helps seal the folds shut and prevents it from opening while flipping.
Variations / Substitutions
- Add pickled jalapenos or use a spicy nacho cheese for a spicy kick.
- Make a vegetarian version by replacing the ground beef with black beans, refried beans, or lentils.
- Add a drizzle of Taco Bell’s creamy jalapeño sauce for authenticity and vibes!
- 🥓 Bacon Lovers – Add crispy bacon bits for extra crunch.
Storage / Make ahead
- Guys, these are really best enjoyed fresh! But if you have leftovers (LOL), store them in the fridge for 1-2 days in an airtight container.
- Reheat: Warm in a skillet over medium heat for 3-4 minutes per side until crispy. I would avoid microwaving, because it makes the tortilla soggy.
- I wouldn’t assemble these ahead of time, because the ingredients lose their integrity. You can make and store all the ingredients separately, and then when you’re ready for a crunchwrap, assembly will be streamlined.
Before You Begin! If you make this, please leave a review and rating letting us know how you liked this recipe! This helps our business thrive & continue providing free recipes.
Homemade Crunchwrap Supremes
Ingredients
For the cheesy beef
- 1 lb. ground beef, 80/20 or 90/10
- 1, 1 oz. packet taco seasoning (~2 Tbsp. seasoning )
- 3/4 cup water
- 1/2 cup shredded Mexican cheese blend
For the crunchwrap
- 4, 12-inch flour tortillas* (I use Guerrero)
- 1/2 cup nacho cheese sauce, warmed
- 4 tostada shells (5-inch)
- 3/4 cup sour cream
- 2 1/2 cups shredded lettuce
- 1 roma tomato, diced
- 1 1/2 – 2 cups shredded Mexican cheese blend
- optional add-ins: guacamole, avocado, pickled jalapenos, refried beans.
Last step! If you make this, please leave a review and rating letting us know how you liked this recipe! This helps our business thrive & continue providing free recipes.
Instructions
- Cook the meat: In a skillet over medium heat, cook ground beef until browned. Drain the excess fat.1 lb. ground beef, 80/20 or 90/10

- Add taco seasoning: Stir in the taco seasoning mix and water. Bring to a boil, then reduce the heat and simmer for 5 minutes, stirring occasionally. Add the cheese, stir and remove from heat. Add beef mixture to a bowl and wipe the skillet clean.1, 1 oz. packet taco seasoning, 3/4 cup water, 1/2 cup shredded Mexican cheese blend
- Assemble the crunch wrap: Lay one large flour tortilla on a flat surface or cutting board. (If the tortillas are cold, I like to warm them on a dry skillet just for a few seconds to make more pliable). Add a layer of the seasoned beef in the center of the tortilla, leaving enough space around the border for folding).4, 12-inch flour tortillas*
- Spread a spoonful of the warm nacho cheese sauce on top & a sprinkle of shredded cheese.1/2 cup nacho cheese sauce, warmed, 1 1/2 – 2 cups shredded Mexican cheese blend
- Place a tostada shell over the cheese. Spread sour cream on top of the tostada.4 tostada shells (5-inch), 3/4 cup sour cream
- Sprinkle with lettuce & diced tomatoes2 1/2 cups shredded lettuce, 1 roma tomato, diced , optional add-ins: guacamole, avocado, pickled jalapenos, refried beans.
- *Fold to seal: Fold the edges of the tortilla toward the center, creating a circular wrap. I like to begin at the bottom edge of the tortilla or the side closest to me, and fold it up toward the center. Then, continue working clockwise, folding the next section over the previous fold using your hand to keep it secured. Keep folding in this pattern, making ~5-6 pleats until the wrap is completely sealed. (Flip the wrap over so it stays sealed. Repeat this process with the remaining tortillas and filling.
- Heat: (you can do this in a dry nonstick skillet too without oil, I usually do it this way) or add about 1 tsp. of oil to the skillet and heat. Place the crunch wrap seam-side down in the skillet. Cook for ~2 minutes on each side until golden brown and yummy! Repeat with remaining crunch wraps, adding more oil to the skillet as needed.
- Serve: transfer to a plate, and enjoy with hot sauce!
Notes
- Store any leftovers in the fridge for 1-2 days in an airtight container.
- Reheat: Warm in a skillet over medium heat for 3-4 minutes per side until crispy. I would avoid microwaving, because it makes the tortilla soggy.
- I wouldn’t assemble these ahead of time, because the ingredients lose their integrity. You can make and store all the ingredients separately, and then when you’re ready for a crunchwrap, assembly will be streamlined.
Nutrition Information
Nutritional information is provided as a courtesy and is automatically calculated. It should only be construed as an estimate rather than a guarantee. Ingredients can vary and Kroll’s Korner can’t make any guarantees to the accuracy of this information.
📸 Photography by Creating Kaitlin

Made these for dinner and they were so good…big hit with family! Made recipe as is and turned out perfect !!
Aw I am so glad! thanks for making! 🙂
10/5 stars. So good, SO EASY. We opted to skip the nacho cheese, sub salsa for the tomatoes, and use ground bison instead of ground beef. This recipe was a HIT! So easy to make substitutions. We weren’t able to wrap the whole tortilla around the tostada with all ingredients, so we cut little circles out of a large tortilla with a cup to fill the gap. Worked like a charm. So glad I finally tried this one. It’s a keeper
That all sounds so good Laura! thank you so much 🙂
So easy and delicious! We replaced the sour cream with refried black beans and added jalapeños and lime juice. This was the first crunchwrap my kids have ever had and they already asked to have them again tomorrow. This one is a keeper! Such an quick, easy dinner.
Hi Megan! The black beans and jalapenos sound so yummy in them! Always a success when they kid love it, thank you!!
Delicious!
Yay! thank you soo much 🙂