
Instant Pot Yogurt
Make your own creamy and delicious yogurt at home with this Instant Pot Yogurt recipe! You only need 2 ingredients and this easy step-by-step recipe yields rich, tangy yogurt perfect for breakfast, smoothies, or snacks. I am showing you how to make it either using my no boil/cold start method, or the boil method (which is also incredibly fool-proof and easy!)
Servings 8 cups
Calories 305kcal
Ingredients
Cold start (no boil method)
- 52 oz. whole milk , ultra-pasteurized and ultra-filtered, I always use Fairlife. You must use this milk for this method.
- 14 oz. sweetened condensed milk (canned), optional
- 2 Tbsp. plain full fat yogurt (with live active cultures) I use Fage 5%, be sure to use a newly opened container of yogurt for best results.
- 1 vanilla bean, (optional, split and cut in half with the beans scraped out)
Boil method
- 1/2 gallon pasteurized whole milk
- 2 Tbsp. plain full fat yogurt (with live active cultures) I use Fage 5%, be sure to use a newly opened container of yogurt for best results.
Instructions
Cold start (no boil method)
- Sweeten: If using the sweetened condensed milk: whisk 1 cup of the milk with the sweetened condensed milk in the instant pot insert and whisk until combined. Pour in the remaining milk and yogurt and whisk again until smooth.14 oz. sweetened condensed milk (canned)
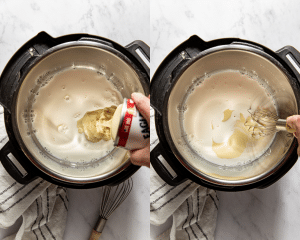
- Yogurt starter: If not using the sweetened condensed milk: whisk 1 cup of the milk with the yogurt an whisk well. Pour in the remaining milk and whisk well again.2 Tbsp. plain full fat yogurt (with live active cultures) I use Fage 5%, be sure to use a newly opened container of yogurt for best results. , 52 oz. whole milk
- Cover: Cover the Instant pot with a glass lid or a plate (you can use the instant pot lid too, doesn’t need to seal. I just usually use a glass lid so I can see the yogurt)
- Incubation: Press the yogurt button. The time should read 8:00. Be sure the pressure is set to normal, and not low. Note: during this incubation period the timer will count UP.
- Pro tip: you can incubate the yogurt longer for a thicker and tangier yogurt, up to 12 hours. Use the +/- button to adjust the time.
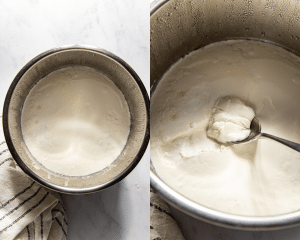
- Chill: This step is necessary so the yogurt can thicken further and set up. Once the incubation period is done (When it’s done, the instant pot will beep) remove the inner pot from the instant pot. DO NOT STIR. Allow to cool to room temperature for at least 30 minutes, then cover with plastic wrap and refrigerate for at least 4-6 hours or overnight. If you place in the fridge straight away, the rapid temperature change may thin out the yogurt.
- It may seem lumpy after it chills, but give it a good whisk to thin out. At this point you can add in vanilla bean or any flavorings you prefer, or just leave as is.1 vanilla bean
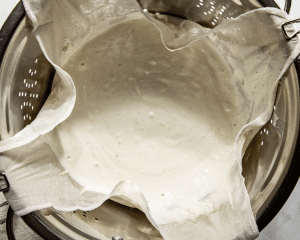
- Thicker yogurt: for more of a Greek yogurt style yogurt, strain the yogurt. The longer you strain, the thicker it will become. You can use a yogurt strainer if you have one. If not, I like to place a colander over a large bowl, place some paper towels in the colander and pour the yogurt on top of the paper towels. Strain for at least 1 hour in the fridge or up to overnight in the fridge. (The longer the thicker!)
- ENJOY!
Boil method (still, so easy!)
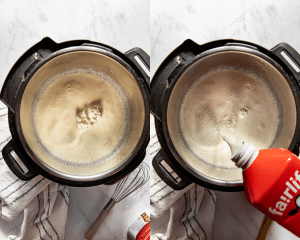
- Boil the milk in the instant pot: pour the milk in the instant pot insert and place in the instant pot housing. Lock the lid in place (the valve can be turned to sealing or venting), and press the yogurt button until “boil” or “high” appears on the screen. You may need to press the start button after this, depending on your model. This function will heat the milk to 180°-200°F to kill off any microorganisims. When it’s done, the instant pot will beep. I always like to make sure it’s reached the proper temp using a kitchen thermometer. If it is not 180°F, press the Cancel button to reset, then select sauté and heat until the milk temperature reaches 180°F1/2 gallon pasteurized whole milk
- Cool the milk: once it’s done, remove the insert from the instant pot and place in a large bowl of ice-cold water to cool the milk to 110°F-115°F. Stir the milk occasionally; this process should take 5-10 minutes. Carefully lift off the film of coagulated milk on the surface and discard it. (You can let it cool at room temperature without the ice water but this process takes much longer, about 1-2 hours).
- Yogurt starter: Place the 2 tbsp. Yogurt in a small bowl and ladle in about ½ cup of the milk. Whisk until smooth and then pour this into the rest of the milk.2 Tbsp. plain full fat yogurt (with live active cultures) I use Fage 5%, be sure to use a newly opened container of yogurt for best results.
- Incubation: place the insert back in the instant pot, cover the Instant pot with a glass lid or a plate (you can use the instant pot lid too, the steam vent can be open or closed. I just usually use a glass lid so I can see the yogurt) Press the yogurt button. Adjust the time to 8:00 or up to 12:00 hours. You can incubate the yogurt longer for a thicker and tangier yogurt. You can use the +/- button to adjust the incubation time. (For some models you may need to adjust the setting from “high” to “medium”).
- Chill: This step is necessary so the yogurt can thicken further and set up. Once the incubation period is done (When it’s done, the instant pot will beep) remove the inner pot from the instant pot. DO NOT STIR. Allow to cool to room temperature for at least 30 minutes, then cover with plastic wrap and refrigerate for at least 4-6 hours or overnight. If you place in the fridge straight away, the rapid temperature change may thin out the yogurt.
- It may seem lumpy after it chills, but give it a good whisk to thin out. At this point you can add in vanilla bean or any flavorings you prefer, or just leave as is.
- Thicker yogurt: for more of a Greek yogurt style yogurt, strain the yogurt (I alway do this). The longer you strain, the thicker it will become. You can use a yogurt strainer if you have one. If not, I like to place a colander over a large bowl, place some paper towels in the colander and pour the yogurt on top of the paper towels. Strain for at least 1 hour or up to overnight in the fridge. You can check it occassionall to see if it has reached a consistency you like.
- For both methods: store in sterile containers and enjoy within 10-14 days.
Video
Notes
- Note: Add in your favorite sweetener and mix-ins to boost the flavor! If you don't want to use sweetened condensed milk, that's fine. You don't NEED it to make yogurt. It only adds flavor. The only 2 ingredients necessary are the milk, and yogurt starter!
Nutrition
Serving: 1cup | Calories: 305kcal | Carbohydrates: 38g | Protein: 12g | Fat: 12g | Saturated Fat: 7g | Polyunsaturated Fat: 0.4g | Monounsaturated Fat: 3g | Cholesterol: 46mg | Sodium: 155mg | Potassium: 545mg | Sugar: 18g | Vitamin A: 519IU | Vitamin C: 1mg | Calcium: 436mg | Iron: 0.1mg